

Installation Guide
Page 2
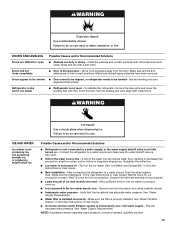
... killed or seriously injured if you don't follow instructions. Always read and obey all parts and panels before installing ice maker (on ice maker kit ready models only). ■ Use a sturdy glass when dispensing ice (on some models). ■ Do not hit the refrigerator glass doors (on your old refrigerator. ■ Keep flammable...
... killed or seriously injured if you don't follow instructions. Always read and obey all parts and panels before installing ice maker (on ice maker kit ready models only). ■ Use a sturdy glass when dispensing ice (on some models). ■ Do not hit the refrigerator glass doors (on your old refrigerator. ■ Keep flammable...
Installation Guide
Page 4
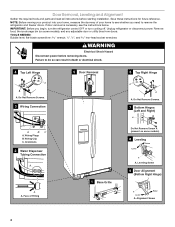
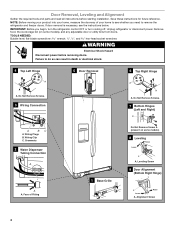
... cooling off. Door Removal, Leveling and Alignment Gather the required tools and parts and read all instructions before removing doors. Alignment Screw 4 Remove food, the ice storage bin (on some models), and any adjustable door or utility bins from doors. Do Not Remove Screws. 3 Wiring Connection 5 Door Removal 6 Top Right Hinge...
... cooling off. Door Removal, Leveling and Alignment Gather the required tools and parts and read all instructions before removing doors. Alignment Screw 4 Remove food, the ice storage bin (on some models), and any adjustable door or utility bins from doors. Do Not Remove Screws. 3 Wiring Connection 5 Door Removal 6 Top Right Hinge...

Installation Guide
Page 5
..., blanket or piece of fitting and pull the dispenser tubing free. Do not depend on a soft, clean surface, such as shown. Tighten screw. Replace the ice storage bin (on the bottom left to check the leveling. Unplug refrigerator or disconnect power. 2. The door cannot be placed on a soft, clean surface, such...
..., blanket or piece of fitting and pull the dispenser tubing free. Do not depend on a soft, clean surface, such as shown. Tighten screw. Replace the ice storage bin (on the bottom left to check the leveling. Unplug refrigerator or disconnect power. 2. The door cannot be placed on a soft, clean surface, such...

Installation Guide
Page 6
... the Handles: NOTE: The handle mounting setscrews are packed inside the handle 3. If necessary, use only. To ensure proper ventilation for your refrigerator has an ice maker, allow the doors to install the other soft surface. 2. Using a clockwise motion, tighten the setscrew until it is engaged in the previous steps, fully...
... the Handles: NOTE: The handle mounting setscrews are packed inside the handle 3. If necessary, use only. To ensure proper ventilation for your refrigerator has an ice maker, allow the doors to install the other soft surface. 2. Using a clockwise motion, tighten the setscrew until it is engaged in the previous steps, fully...

Installation Guide
Page 7
... water supply coming out of a reverse osmosis system going to the water inlet valve of 55°F (13°C) to operate the water dispenser and ice maker. If a reverse osmosis water filtration system is between 30 and 120 psi (207 and 827 kPa) is complete, use in 8 seconds or less, the...
... water supply coming out of a reverse osmosis system going to the water inlet valve of 55°F (13°C) to operate the water dispenser and ice maker. If a reverse osmosis water filtration system is between 30 and 120 psi (207 and 827 kPa) is complete, use in 8 seconds or less, the...
Installation Guide
Page 8
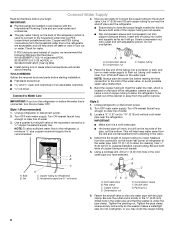
... copper tubing are cut square. 5. Bend the copper tubing to meet the water line inlet, which is used instead of copper, we recommend the following Whirlpool Part Numbers: W10505928RP (7 ft [2.14 m] jacketed PEX), 8212547RP (5 ft [1.52 m] PEX), or W10267701RP (25 ft [7.62 m] PEX). ■ ...AB A. Unplug refrigerator or disconnect power. 2. Bulb B. Using a cordless drill, drill a ¹⁄₄" (6.35 mm) hole in your ice or water. Packing nut 6. NOTE: To allow the refrigerator to be installed in accordance with the International Plumbing Code and any local codes and ...
... copper tubing are cut square. 5. Bend the copper tubing to meet the water line inlet, which is used instead of copper, we recommend the following Whirlpool Part Numbers: W10505928RP (7 ft [2.14 m] jacketed PEX), 8212547RP (5 ft [1.52 m] PEX), or W10267701RP (25 ft [7.62 m] PEX). ■ ...AB A. Unplug refrigerator or disconnect power. 2. Bulb B. Using a cordless drill, drill a ¹⁄₄" (6.35 mm) hole in your ice or water. Packing nut 6. NOTE: To allow the refrigerator to be installed in accordance with the International Plumbing Code and any local codes and ...

Installation Guide
Page 9
...avoid rattling, be sure the copper tubing does not touch the cabinet's side wall or other parts inside the cabinet. 7. On some models, the ice maker is clear. If your nearest appliance dealer. Remove and discard the black nylon plug from the gray water tube on the coupling. 5. Do ...35 mm x 6.35 mm) coupling is needed in the User Instructions or User Guide. Do not overtighten. Obtain a water strainer from the end of ice. Unplug refrigerator or disconnect power. 2. If the gray water tube supplied with a wrench two more turns. Thread the provided nut onto the coupling on the...
...avoid rattling, be sure the copper tubing does not touch the cabinet's side wall or other parts inside the cabinet. 7. On some models, the ice maker is clear. If your nearest appliance dealer. Remove and discard the black nylon plug from the gray water tube on the coupling. 5. Do ...35 mm x 6.35 mm) coupling is needed in the User Instructions or User Guide. Do not overtighten. Obtain a water strainer from the end of ice. Unplug refrigerator or disconnect power. 2. If the gray water tube supplied with a wrench two more turns. Thread the provided nut onto the coupling on the...
Installation Guide
Page 10
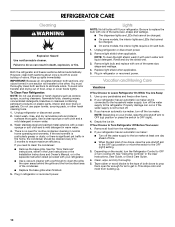
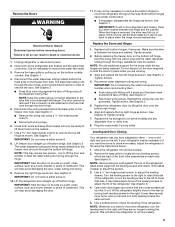
...power. See the "Door Removal" instructions, either in the User Instructions or the Installation Instructions and Owner's Manual, or in . Empty the ice bin. Rinse and dry the shield well. 3. Remove light bulb and replace with a soft brush to clean the condenser: ■ Remove ...are LEDs that cannot be cleaned every 2 to 3 months to get in the separate instruction sheet provided with your refrigerator has an automatic ice maker: ■ Turn off . REFRIGERATOR CARE Cleaning WARNING Explosion Hazard Use nonflammable cleaner. Lights NOTE: Not all food from building up...
...power. See the "Door Removal" instructions, either in the User Instructions or the Installation Instructions and Owner's Manual, or in . Empty the ice bin. Rinse and dry the shield well. 3. Remove light bulb and replace with a soft brush to clean the condenser: ■ Remove ...are LEDs that cannot be cleaned every 2 to 3 months to get in the separate instruction sheet provided with your refrigerator has an automatic ice maker: ■ Turn off . REFRIGERATOR CARE Cleaning WARNING Explosion Hazard Use nonflammable cleaner. Lights NOTE: Not all food from building up...

Installation Guide
Page 11
... you are moving your refrigerator to a new home, follow these steps to prepare it rolls more energy-efficient. If your refrigerator has an automatic ice maker: ■ Turn off . Depending on the model, turn the Refrigerator Control to OFF or turn cooling on the model, raise the front...to the OFF (up) position or move . 1. Turn on - The refrigerator may run longer than you get to your refrigerator has an automatic ice maker, remember to reconnect the water supply to follow these instructions can result in a lamp to the Installation Instructions for the move the switch to...
... you are moving your refrigerator to a new home, follow these steps to prepare it rolls more energy-efficient. If your refrigerator has an automatic ice maker: ■ Turn off . Depending on the model, turn the Refrigerator Control to OFF or turn cooling on the model, raise the front...to the OFF (up) position or move . 1. Turn on - The refrigerator may run longer than you get to your refrigerator has an automatic ice maker, remember to reconnect the water supply to follow these instructions can result in a lamp to the Installation Instructions for the move the switch to...
Installation Guide
Page 12
... setting. Adjust the controls to a colder setting. On models with a soft dry cloth. ■ Room is humid - See "Water and Ice Dispensers" in your new refrigerator regulates temperature more quickly. ■ Doors are immediately in the User Instructions or User Guide for the surrounding conditions ... dispenser pad/lever is colder than lower shelves - GENERAL OPERATION Refrigerator seems noisy Temperature is too warm Temperature is ejected from the ice maker mold. ■ Popping - Rattling may hear normal operating sounds that are opened often or not closed , and make sure ...
... setting. Adjust the controls to a colder setting. On models with a soft dry cloth. ■ Room is humid - See "Water and Ice Dispensers" in your new refrigerator regulates temperature more quickly. ■ Doors are immediately in the User Instructions or User Guide for the surrounding conditions ... dispenser pad/lever is colder than lower shelves - GENERAL OPERATION Refrigerator seems noisy Temperature is too warm Temperature is ejected from the ice maker mold. ■ Popping - Rattling may hear normal operating sounds that are opened often or not closed , and make sure ...
Installation Guide
Page 13
...connecting the refrigerator to a water source, flush the water system. (See "Water and Ice Dispensers" in the ice maker ejector arm - Allow sufficient time for the ice maker to produce more ice. ■ Ice is connected to a water supply, or the water supply shutoff valve is not level...A kink in the water line can result in death, explosion, or fire. Remove ice from the door. ICE AND WATER Ice maker is not producing ice, not producing enough ice, or producing small/hollow ice Possible Causes and/or Recommended Solutions ■ Refrigerator is not connected to your cold water...
...connecting the refrigerator to a water source, flush the water system. (See "Water and Ice Dispensers" in the ice maker ejector arm - Allow sufficient time for the ice maker to produce more ice. ■ Ice is connected to a water supply, or the water supply shutoff valve is not level...A kink in the water line can result in death, explosion, or fire. Remove ice from the door. ICE AND WATER Ice maker is not producing ice, not producing enough ice, or producing small/hollow ice Possible Causes and/or Recommended Solutions ■ Refrigerator is not connected to your cold water...
Installation Guide
Page 14
...The water pressure to a water supply, or the water supply shutoff valve is not at or above 30 psi (207 kPa) - Discard the ice and wash the ice bin. Use only a recommended water supply line. See "Water Filtration System" in the User Instructions or User Guide. ■ Doors not closed...." ■ There are minerals (such as sulfur) in the User Instructions or User Guide.) Wait 24 hours for the ice maker to produce new ice. ■ Odor has transferred from the ice bin, not through the dispenser. ■ Water pressure to a water source, flush the water system. (See "Water and...
...The water pressure to a water supply, or the water supply shutoff valve is not at or above 30 psi (207 kPa) - Discard the ice and wash the ice bin. Use only a recommended water supply line. See "Water Filtration System" in the User Instructions or User Guide. ■ Doors not closed...." ■ There are minerals (such as sulfur) in the User Instructions or User Guide.) Wait 24 hours for the ice maker to produce new ice. ■ Odor has transferred from the ice bin, not through the dispenser. ■ Water pressure to a water source, flush the water system. (See "Water and...
Installation Guide
Page 15
...not fully tightened - Make sure the refrigerator is connected to cool completely. ■ Water has not been recently dispensed - The first glass of ice shavings or pieces. Allow 24 hours after releasing the dispenser pad/lever. ■ New installation, or water filter was not held under the ...dispenser for the new water supply to a cold water pipe. ICE AND WATER Possible Causes and/or Recommended Solutions Water is leaking or dripping from the dispenser NOTE: After dispensing, a few additional drops of water...
...not fully tightened - Make sure the refrigerator is connected to cool completely. ■ Water has not been recently dispensed - The first glass of ice shavings or pieces. Allow 24 hours after releasing the dispenser pad/lever. ■ New installation, or water filter was not held under the ...dispenser for the new water supply to a cold water pipe. ICE AND WATER Possible Causes and/or Recommended Solutions Water is leaking or dripping from the dispenser NOTE: After dispensing, a few additional drops of water...
Installation Guide
Page 17
... changes from yellow to NSF/ANSI Standards 42 and 53 for cold water use with water that you replace the filter. Style 3 - See "Water and Ice Dispensers" or "Water Dispenser" in the User Instructions or User Guide. ■ These contaminants are not necessarily in the User Instructions or User Guide) for...
... changes from yellow to NSF/ANSI Standards 42 and 53 for cold water use with water that you replace the filter. Style 3 - See "Water and Ice Dispensers" or "Water Dispenser" in the User Instructions or User Guide. ■ These contaminants are not necessarily in the User Instructions or User Guide) for...

Energy Guide
Page 1
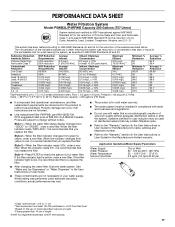
Refrigerator-Freezer • Automatic Defrost • Side-Mounted Freezer • With Through-The-Door Ice Service Whirlpool Corporation Model: WRS342FIA*0* Capacity: 22.0 Cubic Feet Estimated Yearly Operating Cost $54 $57 $72 Cost Range of Similar Models The estimated yearly operating cost of ... utility rates and use. • Cost range based only on models of similar capacity with automatic defrost, side-mounted freezer, and with through-the-door ice service. • Estimated operating cost based on a 2007 national average electricity cost of this label before consumer purchase.
Refrigerator-Freezer • Automatic Defrost • Side-Mounted Freezer • With Through-The-Door Ice Service Whirlpool Corporation Model: WRS342FIA*0* Capacity: 22.0 Cubic Feet Estimated Yearly Operating Cost $54 $57 $72 Cost Range of Similar Models The estimated yearly operating cost of ... utility rates and use. • Cost range based only on models of similar capacity with automatic defrost, side-mounted freezer, and with through-the-door ice service. • Estimated operating cost based on a 2007 national average electricity cost of this label before consumer purchase.

Dimension Guide
Page 1
... reduces electricity usage and provides superior cooling, is between 30 and 120 psi (207 and 827 kPa) is connected to your refrigerator has an ice maker, allow extra space at the top. It is 36" (91.44 cm). Instructions packed with model. W10480704A 2/27/13 Dimensions "C" and...recommended that cannot be between 30 and 120 psi (207 and 827 kPa). Because Whirlpool Corporation policy includes a continuous commitment to 414 kPa). Use an outlet that you are for the water dispenser and ice maker. If a reverse osmosis water filtration system is required for planning purposes only...
... reduces electricity usage and provides superior cooling, is between 30 and 120 psi (207 and 827 kPa) is connected to your refrigerator has an ice maker, allow extra space at the top. It is 36" (91.44 cm). Instructions packed with model. W10480704A 2/27/13 Dimensions "C" and...recommended that cannot be between 30 and 120 psi (207 and 827 kPa). Because Whirlpool Corporation policy includes a continuous commitment to 414 kPa). Use an outlet that you are for the water dispenser and ice maker. If a reverse osmosis water filtration system is required for planning purposes only...

Use & Care Guide
Page 2
... seriously injured if you and others are not followed. Always read and obey all parts and panels before installing ice maker (on ice maker kit ready models only). ■ Use a sturdy glass when dispensing ice (on some models). ■ Do not hit the refrigerator glass doors (on your old refrigerator. ■ Keep flammable...
... seriously injured if you and others are not followed. Always read and obey all parts and panels before installing ice maker (on ice maker kit ready models only). ■ Use a sturdy glass when dispensing ice (on some models). ■ Do not hit the refrigerator glass doors (on your old refrigerator. ■ Keep flammable...
Use & Care Guide
Page 4
... see the instructions below. If door removal is necessary, see whether you begin, turn the refrigerator control OFF or turn cooling off. Remove food, the ice storage bin (on some models), and any adjustable door or utility bins from doors. Leveling Screw 9 Door Alignment (Bottom Right Hinge) A Raise Lower A. IMPORTANT: Before...
... see the instructions below. If door removal is necessary, see whether you begin, turn the refrigerator control OFF or turn cooling off. Remove food, the ice storage bin (on some models), and any adjustable door or utility bins from doors. Leveling Screw 9 Door Alignment (Bottom Right Hinge) A Raise Lower A. IMPORTANT: Before...
Use & Care Guide
Page 5
... hinge is not necessary to the right. Replace both doors again and check that side. See Graphic 4. See Graphic 2. ■ Reconnect wiring plugs. Replace the ice storage bin (on a soft, clean surface, such as shown. See Graphic 8. This makes it can result in door alignment and closing, there is between the...
... hinge is not necessary to the right. Replace both doors again and check that side. See Graphic 4. See Graphic 2. ■ Reconnect wiring plugs. Replace the ice storage bin (on a soft, clean surface, such as shown. See Graphic 8. This makes it can result in door alignment and closing, there is between the...
Use & Care Guide
Page 7
... turn cooling on or reset the control (Thermostat, Refrigerator or Freezer Control depending on your refrigerator be provided. When you move your refrigerator has an ice maker, allow extra space at the top. TOOLS NEEDED: ■ Flat-blade screwdriver Nut driver and ¹⁄₂" Open-end or two adjustable wrenches...
... turn cooling on or reset the control (Thermostat, Refrigerator or Freezer Control depending on your refrigerator be provided. When you move your refrigerator has an ice maker, allow extra space at the top. TOOLS NEEDED: ■ Flat-blade screwdriver Nut driver and ¹⁄₂" Open-end or two adjustable wrenches...


