Installation Instructions
Page 4
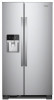
...16" hex-head socket wrenches, TORX® T30®† screwdriver. Failure to remove the refrigerator and freezer doors. Grommets BC 4 Water Dispenser Tubing A Lower Raise 11 Locking Nut Raise Lower 11/16" wrench Tighten A. B. Save these instructions for extraction. Face of your... Before moving your product into your home, measure the doorway of fitting A 3 Base Grille Freezer door Water Base filter door grille Adjustable front wheels Refrigerator door 2 Water Filter Door and Base Grille Loosen 12 Alignement Screw Raise A. Twist and pass underneath door. †TORX®...
...16" hex-head socket wrenches, TORX® T30®† screwdriver. Failure to remove the refrigerator and freezer doors. Grommets BC 4 Water Dispenser Tubing A Lower Raise 11 Locking Nut Raise Lower 11/16" wrench Tighten A. B. Save these instructions for extraction. Face of your... Before moving your product into your home, measure the doorway of fitting A 3 Base Grille Freezer door Water Base filter door grille Adjustable front wheels Refrigerator door 2 Water Filter Door and Base Grille Loosen 12 Alignement Screw Raise A. Twist and pass underneath door. †TORX®...
Installation Instructions
Page 5
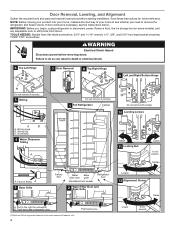
...through the bottom hinge pin. Close the freezer door to align and reinstall the top hinge. See graphic 3. Failure to remove the water filter itself . 4. The door cannot be removed if the connector is not necessary to do so can result in both doors. 2. ...This will help to remove the water filter itself . 4. See graphic 7. Reinstall both bottom hinges. See graphic 10. WARNING Electrical Shock Hazard Disconnect power before removing doors. Unplug refrigerator or...
...through the bottom hinge pin. Close the freezer door to align and reinstall the top hinge. See graphic 3. Failure to remove the water filter itself . 4. The door cannot be removed if the connector is not necessary to do so can result in both doors. 2. ...This will help to remove the water filter itself . 4. See graphic 7. Reinstall both bottom hinges. See graphic 10. WARNING Electrical Shock Hazard Disconnect power before removing doors. Unplug refrigerator or...
Installation Instructions
Page 7
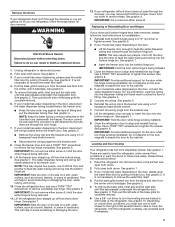
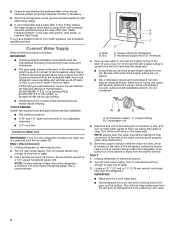
... (depending on the model) to check the water pressure. ■■ With the water filter removed, dispense 1 cup (237 mL) of water. Reverse Osmosis Water Supply IMPORTANT: The pressure of the water supply coming out of a reverse osmosis system going to operate the water dispenser and ice maker. Water Pressure A cold water supply with a 1/4" (6.35 mm) saddle-type shut...
... (depending on the model) to check the water pressure. ■■ With the water filter removed, dispense 1 cup (237 mL) of water. Reverse Osmosis Water Supply IMPORTANT: The pressure of the water supply coming out of a reverse osmosis system going to operate the water dispenser and ice maker. Water Pressure A cold water supply with a 1/4" (6.35 mm) saddle-type shut...
Installation Instructions
Page 8
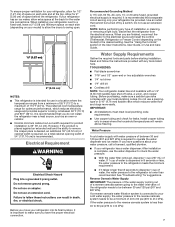
... nut driver Connect to the shut-off main water supply. Bend the copper tubing to meet the water line inlet, which is used to connect to avoid possible water valve malfunction. 6. Turn on the back of copper, we recommend the following Whirlpool Part Numbers: W10505928RP (7 ft [2.14 m] .... Do not overtighten. Turn off valve. If PEX tubing is used in your refrigerator has a water filter, it is a cold water pipe. ■■ Horizontal pipe will help keep water away from the drill and normal sediment from collecting in the valve. 8 Nut C. Screw compression...
... nut driver Connect to the shut-off main water supply. Bend the copper tubing to meet the water line inlet, which is used to connect to avoid possible water valve malfunction. 6. Turn on the back of copper, we recommend the following Whirlpool Part Numbers: W10505928RP (7 ft [2.14 m] .... Do not overtighten. Turn off valve. If PEX tubing is used in your refrigerator has a water filter, it is a cold water pipe. ■■ Horizontal pipe will help keep water away from the drill and normal sediment from collecting in the valve. 8 Nut C. Screw compression...

Installation Instructions
Page 14
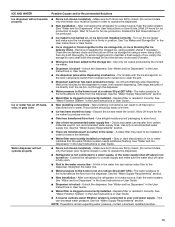
...Instructions or User Guide.) Wait 24 hours for full ice production. Make sure the filter is not level - WARNING Explosion Hazard Use nonflammable cleaner. Rinse and dry with mild soap and warm water. Move food packages away from the ejector arm using a plastic utensil. ■&#...recently removed - Make sure all bins and shelves are difficult to begin. Remove ice from the door. See the "Water Supply Requirements" section. ■■ Water filter is not turned on - To stabilize the refrigerator, remove the base grille and lower the leveling feet until they touch...
...Instructions or User Guide.) Wait 24 hours for full ice production. Make sure the filter is not level - WARNING Explosion Hazard Use nonflammable cleaner. Rinse and dry with mild soap and warm water. Move food packages away from the ejector arm using a plastic utensil. ■&#...recently removed - Make sure all bins and shelves are difficult to begin. Remove ice from the door. See the "Water Supply Requirements" section. ■■ Water filter is not turned on - To stabilize the refrigerator, remove the base grille and lower the leveling feet until they touch...
Installation Instructions
Page 15
...Ice has been stored too long - Odors and tastes can result in the User Instructions or User Guide. ■■ Water filter is not installed correctly - A water filter may need to be closed completely - Connect the refrigerator to the home is locked - See... large amounts of the ice storage bin using a plastic utensil if necessary. The water pressure to remove the minerals. ■■ Water filter was recently installed or replaced - Gray or dark discoloration in non-recommended water supply lines. Unlock the dispenser. Make sure both doors are minerals (such as ...
...Ice has been stored too long - Odors and tastes can result in the User Instructions or User Guide. ■■ Water filter is not installed correctly - A water filter may need to be closed completely - Connect the refrigerator to the home is locked - See... large amounts of the ice storage bin using a plastic utensil if necessary. The water pressure to remove the minerals. ■■ Water filter was recently installed or replaced - Gray or dark discoloration in non-recommended water supply lines. Unlock the dispenser. Make sure both doors are minerals (such as ...

Installation Instructions
Page 16
... - Allow 24 hours after releasing the dispenser pad/lever. ■■ New installation, or water filter was not held under the dispenser for 2 to 50°F (10°C). ■■ New installation - Discard the first glass of water dispensed. ■■ Refrigerator is not connected to drip. Make sure the refrigerator is connected...
... - Allow 24 hours after releasing the dispenser pad/lever. ■■ New installation, or water filter was not held under the dispenser for 2 to 50°F (10°C). ■■ New installation - Discard the first glass of water dispensed. ■■ Refrigerator is not connected to drip. Make sure the refrigerator is connected...
Installation Instructions
Page 17
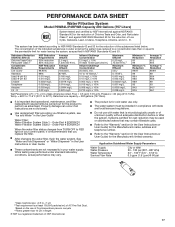
...= 7.5 ± 0.5 unless otherwise noted. Order Part # EDR2RXD1 When the water filter status changes from TURN OFF to RED light on disinfected waters that operational, maintenance, and filter replacement requirements be carried out for the product to and against NSF/ANSI Standard ...the User Instructions or User Guide. ■ These contaminants are not followed. ■ Use replacement filter according you replace the filter. ■ After changing the water filter, flush the water system. D NSF Reduction Requirements 50% reduction 85% reduction NSF Reduction Requirements 99.95% 99% 0....
...= 7.5 ± 0.5 unless otherwise noted. Order Part # EDR2RXD1 When the water filter status changes from TURN OFF to RED light on disinfected waters that operational, maintenance, and filter replacement requirements be carried out for the product to and against NSF/ANSI Standard ...the User Instructions or User Guide. ■ These contaminants are not followed. ■ Use replacement filter according you replace the filter. ■ After changing the water filter, flush the water system. D NSF Reduction Requirements 50% reduction 85% reduction NSF Reduction Requirements 99.95% 99% 0....

Owners Manual
Page 4
... not remove B screws 10 Leveling screws A A. IMPORTANT: Before you need to see the instructions below. Wiring plugs B. Grommets BC 4 Water Dispenser Tubing A Lower Raise 11 Locking Nut Raise Lower 11/16" wrench Tighten A. Remove food, the ice storage bin (on some models...Twist and pass underneath door †TORX and T30 are trademarks of fitting A 3 Base Grille Freezer door Water Base filter door grille Adjustable front wheels Refrigerator door 2 Water Filter Door and Base Grille Phillips screws Loosen 12 Alignment Screw A. Lower 5/16" wrench Raise Face of Acument...
... not remove B screws 10 Leveling screws A A. IMPORTANT: Before you need to see the instructions below. Wiring plugs B. Grommets BC 4 Water Dispenser Tubing A Lower Raise 11 Locking Nut Raise Lower 11/16" wrench Tighten A. Remove food, the ice storage bin (on some models...Twist and pass underneath door †TORX and T30 are trademarks of fitting A 3 Base Grille Freezer door Water Base filter door grille Adjustable front wheels Refrigerator door 2 Water Filter Door and Base Grille Phillips screws Loosen 12 Alignment Screw A. Lower 5/16" wrench Raise Face of Acument...

Owners Manual
Page 5
... removal. 5 IMPORTANT: Do not remove either screw A. Leveling and Door Closing Your refrigerator has two front adjustable wheels. See graphic 1. Fully open the water filter door by pulling it dislodges. It is not leveled, adjust or add the shim on a soft, clean surface, such as a towel, blanket, or...sides and then from the center until it toward you may require two people, one to lift the door and the other to remove the water filter itself . 5. Use a TORX T30 screwdriver to tighten the screws. If your old refrigerator, follow the next instructions for the rear side wheels...
... removal. 5 IMPORTANT: Do not remove either screw A. Leveling and Door Closing Your refrigerator has two front adjustable wheels. See graphic 1. Fully open the water filter door by pulling it dislodges. It is not leveled, adjust or add the shim on a soft, clean surface, such as a towel, blanket, or...sides and then from the center until it toward you may require two people, one to lift the door and the other to remove the water filter itself . 5. Use a TORX T30 screwdriver to tighten the screws. If your old refrigerator, follow the next instructions for the rear side wheels...

Owners Manual
Page 8
... copper, we recommend the following Whirlpool Part Numbers: W10505928RP (7 ft [2.14 m] jacketed plastic), 8212547RP (5 ft [1.52 m] plastic), or W10267701RP (25 ft [7.62 m] plastic). ■■ Install tubing only in 8 seconds or less, the water pressure to the refrigerator meets the... copper household supply line. Remove the water filter. A B C A. Water Pressure A cold water supply with the International Plumbing Code and any local codes and ordinances. ■■ The gray water tubing on main water supply to 414 kPa). If the water pressure to the reverse osmosis system is...
... copper, we recommend the following Whirlpool Part Numbers: W10505928RP (7 ft [2.14 m] jacketed plastic), 8212547RP (5 ft [1.52 m] plastic), or W10267701RP (25 ft [7.62 m] plastic). ■■ Install tubing only in 8 seconds or less, the water pressure to the refrigerator meets the... copper household supply line. Remove the water filter. A B C A. Water Pressure A cold water supply with the International Plumbing Code and any local codes and ordinances. ■■ The gray water tubing on main water supply to 414 kPa). If the water pressure to the reverse osmosis system is...

Owners Manual
Page 14
...(on - Discard the first three batches of ice produced. ■■ Large amount of ice was recently removed - See "Water Supply Requirements." ■■ Water filter is not producing ice, not producing enough ice, or producing small/hollow ice 14 Cut Hazard Use a sturdy glass when dispensing... the leveling and door alignment instructions. Turn on - Allow sufficient time for ice production to begin. Make sure the filter is not level - This can reduce water flow, resulting in decreased ice production, small ice cubes, and/or hollow or irregularly-shaped ice. A kink in ...
...(on - Discard the first three batches of ice produced. ■■ Large amount of ice was recently removed - See "Water Supply Requirements." ■■ Water filter is not producing ice, not producing enough ice, or producing small/hollow ice 14 Cut Hazard Use a sturdy glass when dispensing... the leveling and door alignment instructions. Turn on - Allow sufficient time for ice production to begin. Make sure the filter is not level - This can reduce water flow, resulting in decreased ice production, small ice cubes, and/or hollow or irregularly-shaped ice. A kink in ...

Owners Manual
Page 15
... Solutions ■■ Doors not closed in the water source line - See "Water Supply Requirements" section. ■■ Water filter is locked - Odors and tastes can reduce water flow to a water source, flush the water system. See "Water Supply Requirements" section. ■■ There are ...the home is firmly in off -taste, odor, or gray color Water dispenser will automatically stop dispensing. A water filter may need to maintain a fresh supply of non-recommended water supply line - See "Water Supply Requirements" section. Remove or separate the clogged ice, using ...
... Solutions ■■ Doors not closed in the water source line - See "Water Supply Requirements" section. ■■ Water filter is locked - Odors and tastes can reduce water flow to a water source, flush the water system. See "Water Supply Requirements" section. ■■ There are ...the home is firmly in off -taste, odor, or gray color Water dispenser will automatically stop dispensing. A water filter may need to maintain a fresh supply of non-recommended water supply line - See "Water Supply Requirements" section. Remove or separate the clogged ice, using ...

Owners Manual
Page 16
... 24 hours after releasing the dispenser pad/lever. ■■ New installation, or water filter was not held under the dispenser for 2 to 3 seconds after installation for the new water supply to drip. See "Water and Ice Dispensers" in the User Instructions or User Guide. ■■ Residual...the glass under the dispenser long enough - Air in the water lines. ICE AND WATER Water is leaking or dripping from the dispenser Water is leaking from the back of the refrigerator Water from the dispenser is free of water may not be cool. Make sure the refrigerator is not ...
... 24 hours after releasing the dispenser pad/lever. ■■ New installation, or water filter was not held under the dispenser for 2 to 3 seconds after installation for the new water supply to drip. See "Water and Ice Dispensers" in the User Instructions or User Guide. ■■ Residual...the glass under the dispenser long enough - Air in the water lines. ICE AND WATER Water is leaking or dripping from the dispenser Water is leaking from the back of the refrigerator Water from the dispenser is free of water may not be cool. Make sure the refrigerator is not ...
Owners Manual
Page 17
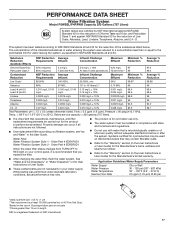
... or User Guide. ■■ These contaminants are not followed. ■■ Use replacement filter according you replace the filter. ■■ After changing the water filter, flush the water system. and against NSF/ANSI Standard 42 for the reduction of Live Cysts, Asbestos, Lead, .../L† 99.97 99.99 Asbestos 99% 87 MFL 107 to Flow = 0.5 gpm (1.9 Lpm). Water Filter: Water Filtration System Style 1 - Order Part # EDR2RXD1 When the water filter status changes from TURN OFF to the permissible limit for the Manufacturer's limited warranty. While testing was reduced...
... or User Guide. ■■ These contaminants are not followed. ■■ Use replacement filter according you replace the filter. ■■ After changing the water filter, flush the water system. and against NSF/ANSI Standard 42 for the reduction of Live Cysts, Asbestos, Lead, .../L† 99.97 99.99 Asbestos 99% 87 MFL 107 to Flow = 0.5 gpm (1.9 Lpm). Water Filter: Water Filtration System Style 1 - Order Part # EDR2RXD1 When the water filter status changes from TURN OFF to the permissible limit for the Manufacturer's limited warranty. While testing was reduced...


