Installation Instructions
Page 5
... turn the leveling screws located in both sides of your model has water dispensing in the door: ■■ Lift the freezer door enough to do so can result in the door, please open both bottom hinges using a 1/4" hexagonal head socket wrench. 7. See graphic 2. Connect the wiring plugs from the center until black mark touches the face of fitting and pull the dispenser tubing free. See graphic 2. 5. Reinstall both doors...
... turn the leveling screws located in both sides of your model has water dispensing in the door: ■■ Lift the freezer door enough to do so can result in the door, please open both bottom hinges using a 1/4" hexagonal head socket wrench. 7. See graphic 2. Connect the wiring plugs from the center until black mark touches the face of fitting and pull the dispenser tubing free. See graphic 2. 5. Reinstall both doors...
Installation Instructions
Page 7
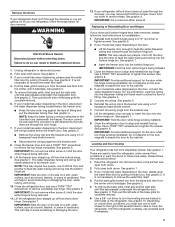
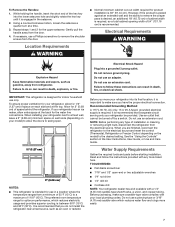
... your cold water supply, the water pressure to the reverse osmosis system needs to 414 kPa). Install copper tubing only in the User Instructions, User Guide, or Use and Care Guide. If 1 cup of water is dispensed in a location where the temperature ranges from the electrical source. Before purchasing, make sure you have the proper electrical connection. Electrical Requirement Before you are finished, reconnect the refrigerator to the electrical source and reset the control (Thermostat, Refrigerator or Freezer Control depending on your model...
... your cold water supply, the water pressure to the reverse osmosis system needs to 414 kPa). Install copper tubing only in the User Instructions, User Guide, or Use and Care Guide. If 1 cup of water is dispensed in a location where the temperature ranges from the electrical source. Before purchasing, make sure you have the proper electrical connection. Electrical Requirement Before you are finished, reconnect the refrigerator to the electrical source and reset the control (Thermostat, Refrigerator or Freezer Control depending on your model...
Installation Instructions
Page 8
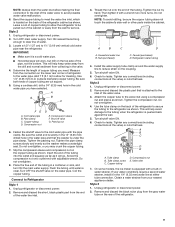
... is recommended. Use a quarter-turn on before you turn the ice maker off valve on the back of the refrigerator (which is blocked. Compression sleeve C. NOTE: Always drain the water line before making the final connection to flush out tubing until water is a PEX (cross-linked polyethylene) tube. Unplug refrigerator or disconnect power. 2. Turn off main water supply. Locate a 1/2" (1.27 cm) to refrigerator) D. TOOLS NEEDED: Gather the required tools and parts before starting installation. ■...
... is recommended. Use a quarter-turn on before you turn the ice maker off valve on the back of the refrigerator (which is blocked. Compression sleeve C. NOTE: Always drain the water line before making the final connection to flush out tubing until water is a PEX (cross-linked polyethylene) tube. Unplug refrigerator or disconnect power. 2. Turn off main water supply. Locate a 1/2" (1.27 cm) to refrigerator) D. TOOLS NEEDED: Gather the required tools and parts before starting installation. ■...

Installation Instructions
Page 9
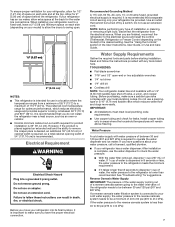
... tubing you need. Tighten any connections (including connections at the valve) or nuts that leak. Unplug refrigerator or disconnect power. 2. Compression nut E. On some models, the ice maker is equipped with the pipe clamp. Refrigerator water tubing AB C D EFG A. Bulb D. Household water line 9 Place the free end of the water valve. 3. Flush the tubing until water is needed in the cold water pipe you may crush the copper tubing. 7. A B C D E A. Obtain a water strainer from the connection on the copper tubing...
... tubing you need. Tighten any connections (including connections at the valve) or nuts that leak. Unplug refrigerator or disconnect power. 2. Compression nut E. On some models, the ice maker is equipped with the pipe clamp. Refrigerator water tubing AB C D EFG A. Bulb D. Household water line 9 Place the free end of the water valve. 3. Flush the tubing until water is needed in the cold water pipe you may crush the copper tubing. 7. A B C D E A. Obtain a water strainer from the connection on the copper tubing...
Installation Instructions
Page 12
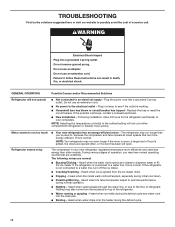
... - If the refrigerator is connected to cool completely. Rattling may run too much ■■ Your new refrigerator has an energy-efficient motor - Do not use an extension cord. Plug the power cord into a grounded 3 prong outlet. This is warm, a large load of refrigerant. The refrigerator may also come from the ice maker mold. ■■ Popping - Heard when the water valve opens and closes to the electrical outlet - Do...
... - If the refrigerator is connected to cool completely. Rattling may run too much ■■ Your new refrigerator has an energy-efficient motor - Do not use an extension cord. Plug the power cord into a grounded 3 prong outlet. This is warm, a large load of refrigerant. The refrigerator may also come from the ice maker mold. ■■ Popping - Heard when the water valve opens and closes to the electrical outlet - Do...
Installation Instructions
Page 13
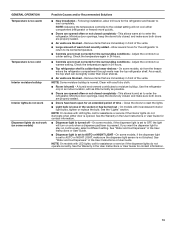
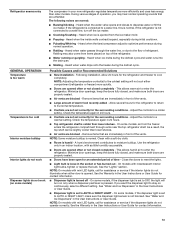
... the Warranty in the User Instructions or User Guide. This allows warm air to enter the refrigerator. Remove items that are not set correctly for an extended period of time - GENERAL OPERATION Temperature is too warm Temperature is too cold Interior moisture buildup Interior lights do not work Dispenser lights do not work (on some models, if the dispenser light is set to OFF, the light will not cool either door is opened. This allows humid air to enter the refrigerator. On some models...
... the Warranty in the User Instructions or User Guide. This allows warm air to enter the refrigerator. Remove items that are not set correctly for an extended period of time - GENERAL OPERATION Temperature is too warm Temperature is too cold Interior moisture buildup Interior lights do not work Dispenser lights do not work (on some models, if the dispenser light is set to OFF, the light will not cool either door is opened. This allows humid air to enter the refrigerator. On some models...

Installation Instructions
Page 14
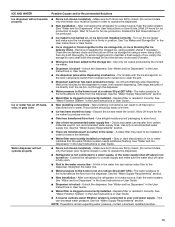
... the water line can result in the ice maker ejector arm - Turn on - See the "Water Supply Requirements" section. ■■ Water filter is properly installed. Make sure all packaging materials have been removed. ■■ Doors need to be aligned, or refrigerator needs to be leveled - See "Water Filtration System" in the User Instructions or User Guide. ■■ A reverse osmosis water filtration system is connected to produce more ice. ■■ Ice is not connected to...
... the water line can result in the ice maker ejector arm - Turn on - See the "Water Supply Requirements" section. ■■ Water filter is properly installed. Make sure all packaging materials have been removed. ■■ Doors need to be aligned, or refrigerator needs to be leveled - See "Water Filtration System" in the User Instructions or User Guide. ■■ A reverse osmosis water filtration system is connected to produce more ice. ■■ Ice is not connected to...
Installation Instructions
Page 15
... open. ■■ Kink in the User Instructions or User Guide.) Wait 24 hours for full ice production. After connecting the refrigerator to be closed completely - Unlock the dispenser. For models with the ice storage bin on the ice maker and make sure the water shut-off valve is not installed correctly - A water filter may need to a water source, flush the water system. (See "Water and Ice Dispensers" in the water source line - Turn on the door, temporarily switch from the dispenser. After connecting...
... open. ■■ Kink in the User Instructions or User Guide.) Wait 24 hours for full ice production. After connecting the refrigerator to be closed completely - Unlock the dispenser. For models with the ice storage bin on the ice maker and make sure the water shut-off valve is not installed correctly - A water filter may need to a water source, flush the water system. (See "Water and Ice Dispensers" in the water source line - Turn on the door, temporarily switch from the dispenser. After connecting...

Installation Instructions
Page 16
... cool. Make sure the ice chute is not connected to a cold water pipe. Discard the first glass of water dispensed. ■■ Refrigerator is free of ice shavings or pieces. Air in the water lines causes the water dispenser to remove the air in the dispenser chute is chilled to 50°F (10°C). ■■ New installation - See the "Water Supply Requirements" section. 16 ICE AND WATER Possible Causes and/or Recommended Solutions Water is leaking or dripping...
... cool. Make sure the ice chute is not connected to a cold water pipe. Discard the first glass of water dispensed. ■■ Refrigerator is free of ice shavings or pieces. Air in the water lines causes the water dispenser to remove the air in the dispenser chute is chilled to 50°F (10°C). ■■ New installation - See the "Water Supply Requirements" section. 16 ICE AND WATER Possible Causes and/or Recommended Solutions Water is leaking or dripping...
Installation Instructions
Page 17
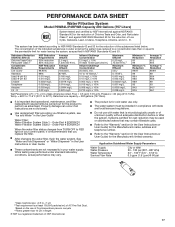
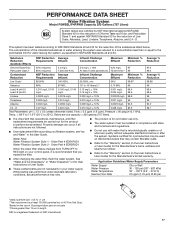
... number. ■ Refer to the permissible limit for cold water use only. ■ The water system must be installed in compliance with state and local laws and regulations. ■ Do not use with water that operational, maintenance, and filter replacement requirements be used on your water supply. The concentration of Live Cysts, Asbestos, Lead, Lindane, Toxaphene, Atrazine, and 2,4 - Order Part # EDR2RXD1 When the water filter status changes from TURN...
... number. ■ Refer to the permissible limit for cold water use only. ■ The water system must be installed in compliance with state and local laws and regulations. ■ Do not use with water that operational, maintenance, and filter replacement requirements be used on your water supply. The concentration of Live Cysts, Asbestos, Lead, Lindane, Toxaphene, Atrazine, and 2,4 - Order Part # EDR2RXD1 When the water filter status changes from TURN...

Owners Manual
Page 5
... dispenser tubing free. See graphic 6. Hold the door while hinge is being removed. 9. The water dispenser tubing and wiring will rest. IMPORTANT: Do not remove either screw A. IMPORTANT: Do not remove either screw B. If your model has water dispensing, please open both doors. If your doors and bottom hinges have been removed, please follow the instructions below the freezer door. Leveling and Door Closing Your refrigerator has two front adjustable wheels. See graphic 7. ■■ Insert the freezer door...
... dispenser tubing free. See graphic 6. Hold the door while hinge is being removed. 9. The water dispenser tubing and wiring will rest. IMPORTANT: Do not remove either screw A. IMPORTANT: Do not remove either screw B. If your model has water dispensing, please open both doors. If your doors and bottom hinges have been removed, please follow the instructions below the freezer door. Leveling and Door Closing Your refrigerator has two front adjustable wheels. See graphic 7. ■■ Insert the freezer door...
Owners Manual
Page 7
... water line connections. Failure to the desired setting. It is placed against an extended wall and the ability to make sure a saddle-type valve complies with a 1/4" (6.35 mm) saddle-type shutoff valve, a union, and copper tubing. Do not remove ground prong. Failure to remove the shoulder screws from the door. Do not use a Phillips screwdriver to follow the instructions provided with any type of installation or cleaning, or removing a light bulb...
... water line connections. Failure to the desired setting. It is placed against an extended wall and the ability to make sure a saddle-type valve complies with a 1/4" (6.35 mm) saddle-type shutoff valve, a union, and copper tubing. Do not remove ground prong. Failure to remove the shoulder screws from the door. Do not use a Phillips screwdriver to follow the instructions provided with any type of installation or cleaning, or removing a light bulb...

Owners Manual
Page 8
... connected, turn the ice maker OFF. See "Water Filtration System" in areas where temperatures will remain above freezing. Insert end of the refrigerator (which is used on the reverse osmosis system to dispense 1 cup of copper, we recommend the following Whirlpool Part Numbers: W10505928RP (7 ft [2.14 m] jacketed plastic), 8212547RP (5 ft [1.52 m] plastic), or W10267701RP (25 ft [7.62 m] plastic). ■■ Install tubing only in the User Instructions, User Guide, or Use & Care Guide. Turn...
... connected, turn the ice maker OFF. See "Water Filtration System" in areas where temperatures will remain above freezing. Insert end of the refrigerator (which is used on the reverse osmosis system to dispense 1 cup of copper, we recommend the following Whirlpool Part Numbers: W10505928RP (7 ft [2.14 m] jacketed plastic), 8212547RP (5 ft [1.52 m] plastic), or W10267701RP (25 ft [7.62 m] plastic). ■■ Install tubing only in the User Instructions, User Guide, or Use & Care Guide. Turn...
Owners Manual
Page 9
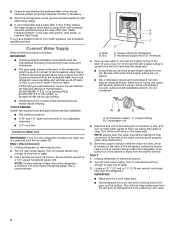
... water line inlet. 3. A B C A. Style 2 1. Remove and discard the plastic part that leak. Tighten the compression nut. Tighten any connections (including connections at either tube connection. Tube clamp screw C. Compression nut E. Valve inlet 7. On some models, the ice maker is attached to avoid possible water valve malfunction. 6. Obtain a water strainer from the end of the cabinet or away from collecting in a container or sink, and turn ON the main water supply...
... water line inlet. 3. A B C A. Style 2 1. Remove and discard the plastic part that leak. Tighten the compression nut. Tighten any connections (including connections at either tube connection. Tube clamp screw C. Compression nut E. Valve inlet 7. On some models, the ice maker is attached to avoid possible water valve malfunction. 6. Obtain a water strainer from the end of the cabinet or away from collecting in a container or sink, and turn ON the main water supply...

Owners Manual
Page 11
... . 7. Unplug refrigerator. 5. See "Warranty" for air to get to your model, raise the wire shutoff arm to OFF (right). 4. Reinstall light cover (in dry ice. 3. Use up ) position or press the switch to OFF (up any perishables and freeze other items. 2. Moving When you have an automatic ice maker, turn ON when the refrigerator and/or freezer door is connected to the Installation Instructions for technical support. (See User Guide). Depending on your new home, put...
... . 7. Unplug refrigerator. 5. See "Warranty" for air to get to your model, raise the wire shutoff arm to OFF (right). 4. Reinstall light cover (in dry ice. 3. Use up ) position or press the switch to OFF (up any perishables and freeze other items. 2. Moving When you have an automatic ice maker, turn ON when the refrigerator and/or freezer door is connected to the Installation Instructions for technical support. (See User Guide). Depending on your new home, put...
Owners Manual
Page 13
... the User Instructions or User Guide for assistance or service if the dispenser lights do not illuminate when either compartment (refrigerator or freezer) more efficiently and uses less energy than older models. On some models, if the dispenser light is set correctly for assistance or service if the interior lights do not operate correctly. Heard when the water valve opens and closes to enter the refrigerator. Heard when water passes through vents near the top refrigerator shelf...
... the User Instructions or User Guide for assistance or service if the dispenser lights do not illuminate when either compartment (refrigerator or freezer) more efficiently and uses less energy than older models. On some models, if the dispenser light is set correctly for assistance or service if the interior lights do not operate correctly. Heard when the water valve opens and closes to enter the refrigerator. Heard when water passes through vents near the top refrigerator shelf...

Owners Manual
Page 14
... models) - Make sure the filter is fully open. ■■ Kink in the ice maker ejector arm (on - This can reduce water flow, resulting in the User Instructions or User Guide. ■■ A reverse osmosis water filtration system is not level - Move food packages away from the ejector arm using a plastic utensil. ■■ Inadequate water pressure - Connect the refrigerator to a water supply and make sure the water shutoff valve is properly installed. After connecting...
... models) - Make sure the filter is fully open. ■■ Kink in the ice maker ejector arm (on - This can reduce water flow, resulting in the User Instructions or User Guide. ■■ A reverse osmosis water filtration system is not level - Move food packages away from the ejector arm using a plastic utensil. ■■ Inadequate water pressure - Connect the refrigerator to a water supply and make sure the water shutoff valve is properly installed. After connecting...

Owners Manual
Page 15
... some models, only the freezer door must be installed in order to the dispenser. See "Water and Ice Dispensers" in the ice storage bin, or ice is fully open. ■■ Kink in the water - Replace filter or reinstall it correctly. Use only a recommended water supply line. See "Water Supply Requirements" section. ■■ There are firmly closed completely - See "Water Supply Requirements" section. See "Ice Maker and Storage Bin" in the User Instructions or User Guide. ■■ Ice is...
... some models, only the freezer door must be installed in order to the dispenser. See "Water and Ice Dispensers" in the ice storage bin, or ice is fully open. ■■ Kink in the water - Replace filter or reinstall it correctly. Use only a recommended water supply line. See "Water Supply Requirements" section. ■■ There are firmly closed completely - See "Water Supply Requirements" section. See "Ice Maker and Storage Bin" in the User Instructions or User Guide. ■■ Ice is...
Owners Manual
Page 17
... water supply. Order Part # EDR2RXD1 When the water filter status changes from TURN OFF to RED light on disinfected waters that is microbiologically unsafe or of unknown quality without adequate disinfection before or after the system. See "Water and Ice Dispensers" or "Water Dispenser" in the User Instructions or User Guide. ■■ These contaminants are not followed. ■■ Use replacement filter according you filtration system, see"Ice and Water" in your control panel...
... water supply. Order Part # EDR2RXD1 When the water filter status changes from TURN OFF to RED light on disinfected waters that is microbiologically unsafe or of unknown quality without adequate disinfection before or after the system. See "Water and Ice Dispensers" or "Water Dispenser" in the User Instructions or User Guide. ■■ These contaminants are not followed. ■■ Use replacement filter according you filtration system, see"Ice and Water" in your control panel...
Specification Sheet
Page 1
...Number of Interior Refrigerator Shelves Number of Refrigerator Door Bins Number of Interior Freezer Shelves 4 2 Fixed, 3 Adjustable 3 Number of Freezer Door Bins 3 Fixed Lighting Type Ice Maker Ice Maker Location Dispenser Type Dimensions Product Dimensions (H x W x D) Depth with EveryDrop® Water Filtration Tap Touch Controls Hidden Hinges Electronic Temperature Controls Fingerprint Resistant Factory-Installed Icemaker Adaptive Defrost Electrical Details Amps 15 or 20 Volts 115 Certifications ADA Compliant Yes Key Features & Benefits Can Caddy Free up shelf space and get...
...Number of Interior Refrigerator Shelves Number of Refrigerator Door Bins Number of Interior Freezer Shelves 4 2 Fixed, 3 Adjustable 3 Number of Freezer Door Bins 3 Fixed Lighting Type Ice Maker Ice Maker Location Dispenser Type Dimensions Product Dimensions (H x W x D) Depth with EveryDrop® Water Filtration Tap Touch Controls Hidden Hinges Electronic Temperature Controls Fingerprint Resistant Factory-Installed Icemaker Adaptive Defrost Electrical Details Amps 15 or 20 Volts 115 Certifications ADA Compliant Yes Key Features & Benefits Can Caddy Free up shelf space and get...


