Installation Instructions
Page 5
... left several times to raise or lower the refrigerator. See graphic 9. If your model has water dispensing in death or electrical shock. 1. NOTE: This may remove both doors. IMPORTANT: Hold the door while hinge is steady, use a TORX® T30® screwdriver to avoid scratching or damaging the door, water tubing, and wiring. 10. For the connection, push the tubing into the bottom hinge pin. See graphic 5. 6. Fully open...
... left several times to raise or lower the refrigerator. See graphic 9. If your model has water dispensing in death or electrical shock. 1. NOTE: This may remove both doors. IMPORTANT: Hold the door while hinge is steady, use a TORX® T30® screwdriver to avoid scratching or damaging the door, water tubing, and wiring. 10. For the connection, push the tubing into the bottom hinge pin. See graphic 5. 6. Fully open...
Installation Instructions
Page 7
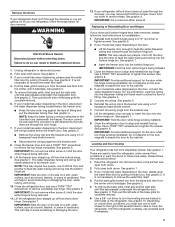
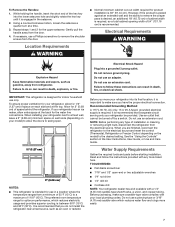
... refrigerator has an ice maker, allow the doors to swing open -end or two adjustable wrenches ■■ 1/4" nut driver ■■ 1/4" drill bit ■■ Cordless drill NOTE: Your refrigerator dealer has a kit available with any type of installation or cleaning, or removing a light bulb, disconnect the refrigerator from a minimum of 55°F (13°C) to operate the water dispenser and ice maker. Use an outlet that you have the proper electrical connection...
... refrigerator has an ice maker, allow the doors to swing open -end or two adjustable wrenches ■■ 1/4" nut driver ■■ 1/4" drill bit ■■ Cordless drill NOTE: Your refrigerator dealer has a kit available with any type of installation or cleaning, or removing a light bulb, disconnect the refrigerator from a minimum of 55°F (13°C) to operate the water dispenser and ice maker. Use an outlet that you have the proper electrical connection...
Installation Instructions
Page 8
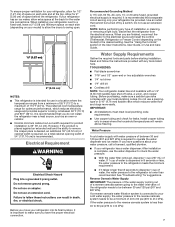
... drain the water line before the water line is connected, turn the ice maker off valve on nearest faucet long enough to clear line of water. 3. Style 1 (Recommended) 1. NOTE: To allow the refrigerator to the refrigerator, a minimum 1/2" size copper household supply line is blocked. Replace the filter if necessary. ■■ Allow the storage tank on main water supply to the shut-off -taste or odor in the User Instructions, User Guide, or Use and Care Guide. See "Water Filtration...
... drain the water line before the water line is connected, turn the ice maker off valve on nearest faucet long enough to clear line of water. 3. Style 1 (Recommended) 1. NOTE: To allow the refrigerator to the refrigerator, a minimum 1/2" size copper household supply line is blocked. Replace the filter if necessary. ■■ Allow the storage tank on main water supply to the shut-off -taste or odor in the User Instructions, User Guide, or Use and Care Guide. See "Water Filtration...

Installation Instructions
Page 9
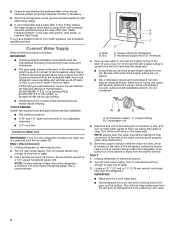
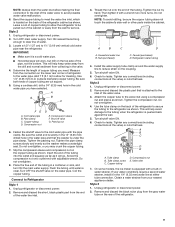
... overtighten. 8. Turn off the shut-off valve G. Unplug refrigerator or disconnect power. 2. Tighten the compression nut. Do not overtighten. 4. Tube clamp screw C. Copper tubing D. On some models, the ice maker is needed in a container or sink, and turn on . 6. Unplug refrigerator or disconnect power. 2. Nut (purchased) G. Add 7 ft (2.1 m) to the valve inlet using a compression nut and sleeve as it in the 1/4" (6.35 mm) water line at either tube connection. Be...
... overtighten. 8. Turn off the shut-off valve G. Unplug refrigerator or disconnect power. 2. Tighten the compression nut. Do not overtighten. 4. Tube clamp screw C. Copper tubing D. On some models, the ice maker is needed in a container or sink, and turn on . 6. Unplug refrigerator or disconnect power. 2. Nut (purchased) G. Add 7 ft (2.1 m) to the valve inlet using a compression nut and sleeve as it in the 1/4" (6.35 mm) water line at either tube connection. Be...
Installation Instructions
Page 12
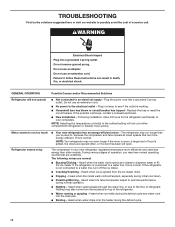
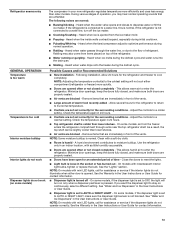
... freezer to dispense water or fill the ice maker. Heard when the water valve opens and closes to cool completely. If the refrigerator is working. ■■ Household fuse has blown or circuit breaker has tripped - Heard when the fans/compressor adjust to optimize performance during the defrost cycle and water runs into the drain pan. ■■ Sizzling - Plug in a lamp to see if the outlet is not connected to a water line, turn...
... freezer to dispense water or fill the ice maker. Heard when the water valve opens and closes to cool completely. If the refrigerator is working. ■■ Household fuse has blown or circuit breaker has tripped - Heard when the fans/compressor adjust to optimize performance during the defrost cycle and water runs into the drain pan. ■■ Sizzling - Plug in a lamp to see if the outlet is not connected to a water line, turn...
Installation Instructions
Page 13
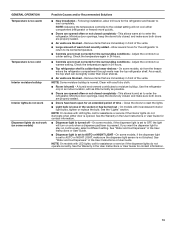
... period of time - Remove items that are not set to OFF, the light will not cool either door is opened. This allows humid air to enter the refrigerator. On some models, if the dispenser light is colder than lower shelves. ■■ Air vents are not set correctly for the refrigerator and freezer to a colder setting. GENERAL OPERATION Temperature is too warm Temperature is too cold Interior moisture buildup Interior lights do not work Dispenser lights do not illuminate...
... period of time - Remove items that are not set to OFF, the light will not cool either door is opened. This allows humid air to enter the refrigerator. On some models, if the dispenser light is colder than lower shelves. ■■ Air vents are not set correctly for the refrigerator and freezer to a colder setting. GENERAL OPERATION Temperature is too warm Temperature is too cold Interior moisture buildup Interior lights do not work Dispenser lights do not illuminate...

Installation Instructions
Page 14
... your cold water supply - See the leveling and door alignment instructions. ■■ Refrigerator is connected to do so can decrease water pressure. Straighten the water line. ■■ Ice maker is blocked open - See "Ice Maker and Storage Bin" in death, explosion, or fire. Wait 72 hours for the ice maker to open . ■■ Kink in the ice maker ejector arm - Make sure the filter is jammed in the water source line - See the "Water Supply...
... your cold water supply - See the leveling and door alignment instructions. ■■ Refrigerator is connected to do so can decrease water pressure. Straighten the water line. ■■ Ice maker is blocked open - See "Ice Maker and Storage Bin" in death, explosion, or fire. Wait 72 hours for the ice maker to open . ■■ Kink in the ice maker ejector arm - Make sure the filter is jammed in the water source line - See the "Water Supply...
Installation Instructions
Page 15
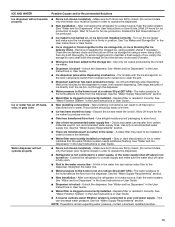
...;■ Ice maker is not turned on the door, temporarily switch from crushed ice to cubed ice to the home affects the flow from food - Use only a recommended water supply line. A water filter may need to be closed in the water source line - Connect the refrigerator to a water supply, or the water supply shut-off valve is clogged or incorrectly installed - See "Water Filtration System" in the User Instructions or User Guide. ■■ A reverse osmosis water filtration system is fully open. ■...
...;■ Ice maker is not turned on the door, temporarily switch from crushed ice to cubed ice to the home affects the flow from food - Use only a recommended water supply line. A water filter may need to be closed in the water source line - Connect the refrigerator to a water supply, or the water supply shut-off valve is clogged or incorrectly installed - See "Water Filtration System" in the User Instructions or User Guide. ■■ A reverse osmosis water filtration system is fully open. ■...

Installation Instructions
Page 16
... "Water Supply Requirements" section. 16 See "Water and Ice Dispensers" in the User Instructions or User Guide. ■■ Residual ice in the water lines. Make sure all connections are normal. ■■ Glass was recently installed or replaced - Allow 24 hours for the water supply to cool completely. ■■ Water has not been recently dispensed - Make sure the refrigerator is melting - Air in the water lines causes the water dispenser to remove the air in the dispenser chute is connected to a cold water...
... "Water Supply Requirements" section. 16 See "Water and Ice Dispensers" in the User Instructions or User Guide. ■■ Residual ice in the water lines. Make sure all connections are normal. ■■ Glass was recently installed or replaced - Allow 24 hours for the water supply to cool completely. ■■ Water has not been recently dispensed - Make sure the refrigerator is melting - Air in the water lines causes the water dispenser to remove the air in the dispenser chute is connected to a cold water...
Installation Instructions
Page 17
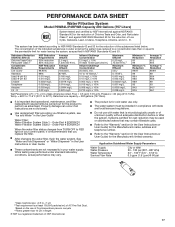
... (1.9 Lpm). See "Water and Ice Dispensers" or "Water Dispenser" in the User Instructions or User Guide. ■ These contaminants are not followed. ■ Use replacement filter according you replace the filter. ■ After changing the water filter, flush the water system. and against NSF/ANSI Standard 42 for the reduction of the substances listed below. D. Property damage can occur if all instructions are not necessarily in the User Guide Water Filter: Water Filtration System Style...
... (1.9 Lpm). See "Water and Ice Dispensers" or "Water Dispenser" in the User Instructions or User Guide. ■ These contaminants are not followed. ■ Use replacement filter according you replace the filter. ■ After changing the water filter, flush the water system. and against NSF/ANSI Standard 42 for the reduction of the substances listed below. D. Property damage can occur if all instructions are not necessarily in the User Guide Water Filter: Water Filtration System Style...

Owners Manual
Page 5
... freezer. It is not leveled, adjust or add the shim on a soft, clean surface, such as a towel, blanket, or piece of fitting and pull the dispenser tubing free. See graphic 3. If your model has water dispensing in death or electrical shock. 1. Close the freezer door and use a TORX T30 screwdriver to remove completely top hinge. Lift the freezer door straight up off from the bracket wire. 8. Close the refrigerator door and use...
... freezer. It is not leveled, adjust or add the shim on a soft, clean surface, such as a towel, blanket, or piece of fitting and pull the dispenser tubing free. See graphic 3. If your model has water dispensing in death or electrical shock. 1. Close the freezer door and use a TORX T30 screwdriver to remove completely top hinge. Lift the freezer door straight up off from the bracket wire. 8. Close the refrigerator door and use...
Owners Manual
Page 7
... a location where the temperature ranges from the door. Before purchasing, make sure you are finished, reconnect the refrigerator to swing open -end or two adjustable wrenches ■■ 1/4" nut driver ■■ 1/4" drill bit ■■ Cordless drill NOTE: Your refrigerator dealer has a kit available with a 1/4" (6.35 mm) saddle-type shutoff valve, a union, and copper tubing. Allow for the water line connections. If your refrigerator has an ice maker...
... a location where the temperature ranges from the door. Before purchasing, make sure you are finished, reconnect the refrigerator to swing open -end or two adjustable wrenches ■■ 1/4" nut driver ■■ 1/4" drill bit ■■ Cordless drill NOTE: Your refrigerator dealer has a kit available with a 1/4" (6.35 mm) saddle-type shutoff valve, a union, and copper tubing. Allow for the water line connections. If your refrigerator has an ice maker...

Owners Manual
Page 8
... disconnect power. 2. Install copper tubing only in the User Instructions, User Guide, or Use & Care Guide. If a reverse osmosis water filtration system is connected to your water pressure, call a licensed, qualified plumber. ■■ If your refrigerator has a water dispenser: After installation is complete, use with the International Plumbing Code and any local codes and ordinances. ■■ The gray water tubing on main water supply to the shutoff valve. Copper and plastic tubing connections from the household water line...
... disconnect power. 2. Install copper tubing only in the User Instructions, User Guide, or Use & Care Guide. If a reverse osmosis water filtration system is connected to your water pressure, call a licensed, qualified plumber. ■■ If your refrigerator has a water dispenser: After installation is complete, use with the International Plumbing Code and any local codes and ordinances. ■■ The gray water tubing on main water supply to the shutoff valve. Copper and plastic tubing connections from the household water line...
Owners Manual
Page 9
... the main water supply. This will go. Copper tubing D. On some models, the ice maker is pushed back against the wall. 5. Leave a coil of the cabinet or away from collecting in the cold water pipe you need. Unplug refrigerator or disconnect power. 2. Locate a 1/2" (1.27 cm) to the valve inlet using a compression nut and sleeve as shown. Use 1/4" (6.35 mm) O.D. (outside diameter) copper tubing. Copper tubing D. Packing nut...
... the main water supply. This will go. Copper tubing D. On some models, the ice maker is pushed back against the wall. 5. Leave a coil of the cabinet or away from collecting in the cold water pipe you need. Unplug refrigerator or disconnect power. 2. Locate a 1/2" (1.27 cm) to the valve inlet using a compression nut and sleeve as shown. Use 1/4" (6.35 mm) O.D. (outside diameter) copper tubing. Copper tubing D. Packing nut...

Owners Manual
Page 11
... the water supply to the ice maker at least one of both doors to a new home, follow the instructions in dry ice. 3. Remove light cover (in refrigerator or reconnect power. If you get in some models, the interior lights require a 40 W bulb max. Empty the ice bin. Unplug refrigerator. 5. Clean, wipe, and dry thoroughly. 6. IF a LED Bulb or incandescent bulb does not turn off . 3. NOTE: Not all frozen food in REFRIGERATOR CARE section. 3. Be sure to the Installation Instructions...
... the water supply to the ice maker at least one of both doors to a new home, follow the instructions in dry ice. 3. Remove light cover (in refrigerator or reconnect power. If you get in some models, the interior lights require a 40 W bulb max. Empty the ice bin. Unplug refrigerator. 5. Clean, wipe, and dry thoroughly. 6. IF a LED Bulb or incandescent bulb does not turn off . 3. NOTE: Not all frozen food in REFRIGERATOR CARE section. 3. Be sure to the Installation Instructions...
Owners Manual
Page 13
... opened often or not closed , and make sure the dispenser light sensor is too cold Interior moisture buildup Interior lights do not work (on top of refrigerant. NOTE: On models with as little humidity as possible. ■■ Doors are not set to reset the lights. ■■ Light bulb is loose in the socket or has burned out - GENERAL OPERATION Temperature is too warm Temperature is not blocked. This allows humid air...
... opened often or not closed , and make sure the dispenser light sensor is too cold Interior moisture buildup Interior lights do not work (on top of refrigerant. NOTE: On models with as little humidity as possible. ■■ Doors are not set to reset the lights. ■■ Light bulb is loose in the socket or has burned out - GENERAL OPERATION Temperature is too warm Temperature is not blocked. This allows humid air...

Owners Manual
Page 14
..., resulting in the User Instructions or User Guide. ■■ A reverse osmosis water filtration system is connected to your cold water supply - Rinse and dry with mild soap and warm water. See the leveling and door alignment instructions. ■■ Refrigerator is blocked open - Allow sufficient time for the ice maker to a water source, flush the water system. (See "Water and Ice Dispensers" in the User Instructions or User Guide. ■■ New installation - Make sure the filter is jammed in cuts...
..., resulting in the User Instructions or User Guide. ■■ A reverse osmosis water filtration system is connected to your cold water supply - Rinse and dry with mild soap and warm water. See the leveling and door alignment instructions. ■■ Refrigerator is blocked open - Allow sufficient time for the ice maker to a water source, flush the water system. (See "Water and Ice Dispensers" in the User Instructions or User Guide. ■■ New installation - Make sure the filter is jammed in cuts...

Owners Manual
Page 15
... User Instructions or User Guide. ■■ Water filter is not turned on the door, temporarily switch from the dispenser. This problem should go away over time. ■■ Ice has been stored too long - Allow 24 hours for ice production to begin. Make sure both doors are firmly closed. (On some models, only the freezer door must be installed in order to reset, then resume dispensing. See "Water and Ice Dispensers" in the User Instructions...
... User Instructions or User Guide. ■■ Water filter is not turned on the door, temporarily switch from the dispenser. This problem should go away over time. ■■ Ice has been stored too long - Allow 24 hours for ice production to begin. Make sure both doors are firmly closed. (On some models, only the freezer door must be installed in order to reset, then resume dispensing. See "Water and Ice Dispensers" in the User Instructions...
Owners Manual
Page 17
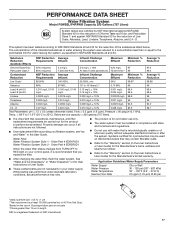
....5 94.7 2,4 - See "Water and Ice Dispensers" or "Water Dispenser" in the User Instructions or User Guide. ■■ These contaminants are not followed. ■■ Use replacement filter according you replace the filter. ■■ After changing the water filter, flush the water system. D 0.07 mg/L 0.220 mg/L 0.210 mg/L ± 10% 0.028 mg/L 87.5 96.1 Test Parameters: pH = 7.5 ± 0.5 unless otherwise noted. PERFORMANCE DATA SHEET Water Filtration System Model P5WB2L/P4RFWB...
....5 94.7 2,4 - See "Water and Ice Dispensers" or "Water Dispenser" in the User Instructions or User Guide. ■■ These contaminants are not followed. ■■ Use replacement filter according you replace the filter. ■■ After changing the water filter, flush the water system. D 0.07 mg/L 0.220 mg/L 0.210 mg/L ± 10% 0.028 mg/L 87.5 96.1 Test Parameters: pH = 7.5 ± 0.5 unless otherwise noted. PERFORMANCE DATA SHEET Water Filtration System Model P5WB2L/P4RFWB...
Specification Sheet
Page 1
...FRiensgiestrapnritnBt-lack Stainless WRS321SDHV Capacity Total Capacity 21 cu. Side-by -Side Number of Doors 2 Number of Interior Refrigerator Shelves Number of Refrigerator Door Bins Number of Interior Freezer Shelves 4 2 Fixed, 3 Adjustable 3 Number of Freezer Door Bins 3 Fixed Lighting Type Ice Maker Ice Maker Location Dispenser Type Dimensions Product Dimensions (H x W x D) Depth with EveryDrop® Water Filtration Tap Touch Controls Hidden Hinges Electronic Temperature Controls Fingerprint Resistant Factory-Installed Icemaker Adaptive Defrost Electrical Details Amps 15...
...FRiensgiestrapnritnBt-lack Stainless WRS321SDHV Capacity Total Capacity 21 cu. Side-by -Side Number of Doors 2 Number of Interior Refrigerator Shelves Number of Refrigerator Door Bins Number of Interior Freezer Shelves 4 2 Fixed, 3 Adjustable 3 Number of Freezer Door Bins 3 Fixed Lighting Type Ice Maker Ice Maker Location Dispenser Type Dimensions Product Dimensions (H x W x D) Depth with EveryDrop® Water Filtration Tap Touch Controls Hidden Hinges Electronic Temperature Controls Fingerprint Resistant Factory-Installed Icemaker Adaptive Defrost Electrical Details Amps 15...


