Energy Guide
Page 1
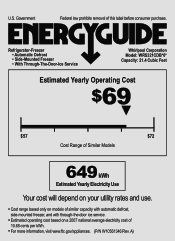
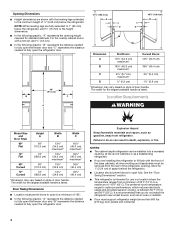
... removal of 10.65 cents per kWh. • For more information, visit www.ftc.gov/appliances. (P/N W10561346 Rev. Refrigerator-Freezer • Automatic Defrost • Side-Mounted Freezer • With Through-The-Door-Ice Service Whirlpool Corporation Model: WRS321CDB*0* Capacity: 21.4 Cubic Feet Estimated Yearly Operating Cost $69 ▼ $57 $72 Cost Range...
... removal of 10.65 cents per kWh. • For more information, visit www.ftc.gov/appliances. (P/N W10561346 Rev. Refrigerator-Freezer • Automatic Defrost • Side-Mounted Freezer • With Through-The-Door-Ice Service Whirlpool Corporation Model: WRS321CDB*0* Capacity: 21.4 Cubic Feet Estimated Yearly Operating Cost $69 ▼ $57 $72 Cost Range...

Dimension Guide
Page 1
... in a location where the temperature ranges from the electrical source. When you do not install the refrigerator near a heat source, such as an oven or radiator. Because Whirlpool Corporation policy includes a continuous commitment to a maximum of 55°F (13°C) to improve ... is required, so a total cabinet opening width of installation or cleaning, or removing a light bulb, turn cooling off by Side Refrigerator PRODUCT MODEL NUMBERS GSC25C4EY GSC25C5EY GSC25C6EY WRS321CDB Electrical: A 115-Volt, 60-Hz., AC-only 15- W10168334B 5/3/13 NOTE: Before performing...
... in a location where the temperature ranges from the electrical source. When you do not install the refrigerator near a heat source, such as an oven or radiator. Because Whirlpool Corporation policy includes a continuous commitment to a maximum of 55°F (13°C) to improve ... is required, so a total cabinet opening width of installation or cleaning, or removing a light bulb, turn cooling off by Side Refrigerator PRODUCT MODEL NUMBERS GSC25C4EY GSC25C5EY GSC25C6EY WRS321CDB Electrical: A 115-Volt, 60-Hz., AC-only 15- W10168334B 5/3/13 NOTE: Before performing...
Warranty Information
Page 1
... gives you specific legal rights, and you also may contact Whirlpool at the address below . In Canada, visit www.whirlpool.ca. If you do not have other rights that existed when this limited warranty. For assistance or service in your major appliance, to refrigerator or freezer product failures. 7. Cosmetic damage, including scratches, dents...
... gives you specific legal rights, and you also may contact Whirlpool at the address below . In Canada, visit www.whirlpool.ca. If you do not have other rights that existed when this limited warranty. For assistance or service in your major appliance, to refrigerator or freezer product failures. 7. Cosmetic damage, including scratches, dents...
Installation Guide
Page 2
.... This is installed in this manual and on water line connections, you how to reduce the chance of California to the refrigerator for service. ■ Contact a qualified electrical installer. All safety messages will tell you what can be killed or seriously ...and ¹⁄₄" (6.35 mm) ferrule. 2 INSTALLATION REQUIREMENTS Tools and Parts IMPORTANT: TOOLS NEEDED (on some models): ■ Your refrigerator dealer has a kit available with installation specifications and dimensions. ■ Remove any tools listed here. ■ Cordless drill or adjustable wrench Nut...
.... This is installed in this manual and on water line connections, you how to reduce the chance of California to the refrigerator for service. ■ Contact a qualified electrical installer. All safety messages will tell you what can be killed or seriously ...and ¹⁄₄" (6.35 mm) ferrule. 2 INSTALLATION REQUIREMENTS Tools and Parts IMPORTANT: TOOLS NEEDED (on some models): ■ Your refrigerator dealer has a kit available with installation specifications and dimensions. ■ Remove any tools listed here. ■ Cordless drill or adjustable wrench Nut...

Installation Guide
Page 3
...8309;⁄₈" (6.5 cm) 31¹⁄₈" (79.1 cm) *Dimension may vary based on style of ¹⁄₄" (6.35 mm) below the refrigerator. Top View 35¹⁄₂" (90.0 cm) Product Dimensions ⁵⁄₈" (1.6 cm) 23⁷⁄₈" (60.4 cm) AC Side View ...■ Height dimensions are fully extended to 1" (25 mm) below the refrigerator, add ³⁄₄" (19 mm) to the height dimensions. ■ The power cord is 61¹⁄₄" (155.6 cm) long. ■...
...8309;⁄₈" (6.5 cm) 31¹⁄₈" (79.1 cm) *Dimension may vary based on style of ¹⁄₄" (6.35 mm) below the refrigerator. Top View 35¹⁄₂" (90.0 cm) Product Dimensions ⁵⁄₈" (1.6 cm) 23⁷⁄₈" (60.4 cm) AC Side View ...■ Height dimensions are fully extended to 1" (25 mm) below the refrigerator, add ³⁄₄" (19 mm) to the height dimensions. ■ The power cord is 61¹⁄₄" (155.6 cm) long. ■...
Installation Guide
Page 4
...°. ■ In the following graphic, "A" represents the distance needed to fully open the freezer door and "B" represents the distance needed to fully open the refrigerator door. 36" (91.4 cm) B C A 41¹⁄₄" (104.5 cm) A C D 45⁷⁄₈" (116.4 cm) B C D 90˚ 165˚ ...the temperature ranges from a minimum of 55°F (13°C) to the minimum height of ¹⁄₄" (6.35 mm) below the refrigerator, add ³⁄₄" (19 mm) to the height dimensions. ■ In the following graphic, "B" represents the distance needed to fully...
...°. ■ In the following graphic, "A" represents the distance needed to fully open the freezer door and "B" represents the distance needed to fully open the refrigerator door. 36" (91.4 cm) B C A 41¹⁄₄" (104.5 cm) A C D 45⁷⁄₈" (116.4 cm) B C D 90˚ 165˚ ...the temperature ranges from a minimum of 55°F (13°C) to the minimum height of ¹⁄₄" (6.35 mm) below the refrigerator, add ³⁄₄" (19 mm) to the height dimensions. ■ In the following graphic, "B" represents the distance needed to fully...
Installation Guide
Page 5
...Flat-blade screwdriver Nut driver and ¹⁄₂" Open-end or two adjustable wrenches Drill bit ■ Cordless drill NOTE: Your refrigerator dealer has a kit available with a reverse osmosis system. Replace the filter if necessary. ■ Allow the storage tank on the ... sure a saddle-type valve complies with any type of installation, cleaning, or removing a light bulb, turn the control (Thermostat, Refrigerator or Freezer Control depending on the model) to the desired setting. Do not remove ground prong. NOTE: Before performing any tools listed...
...Flat-blade screwdriver Nut driver and ¹⁄₂" Open-end or two adjustable wrenches Drill bit ■ Cordless drill NOTE: Your refrigerator dealer has a kit available with a reverse osmosis system. Replace the filter if necessary. ■ Allow the storage tank on the ... sure a saddle-type valve complies with any type of installation, cleaning, or removing a light bulb, turn the control (Thermostat, Refrigerator or Freezer Control depending on the model) to the desired setting. Do not remove ground prong. NOTE: Before performing any tools listed...
Installation Guide
Page 6
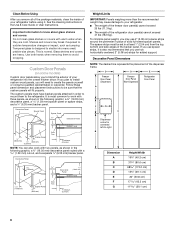
...into the overall kitchen décor. Glass shelves and covers are cold. D D E Freezer Door Panel (Dispenser) Freezer Door Panel (Non-Dispenser) Refrigerator Door Panel A F G C Dispenser cutout is most common to work with warm water when they are heavy. If you use spacer strips, it ...(19.05 mm) decorative panel routed with a 1.59 mm) cutout, and a separate ¹⁄₄" (6.35 mm) backer panel. If you plan to the refrigerator. Shelves and covers may break if exposed to -right B Dimension A B C D E F G Height/Width 19³⁄₈" (49.2 cm) 31³...
...into the overall kitchen décor. Glass shelves and covers are cold. D D E Freezer Door Panel (Dispenser) Freezer Door Panel (Non-Dispenser) Refrigerator Door Panel A F G C Dispenser cutout is most common to work with warm water when they are heavy. If you use spacer strips, it ...(19.05 mm) decorative panel routed with a 1.59 mm) cutout, and a separate ¹⁄₄" (6.35 mm) backer panel. If you plan to the refrigerator. Shelves and covers may break if exposed to -right B Dimension A B C D E F G Height/Width 19³⁄₈" (49.2 cm) 31³...
Installation Guide
Page 8
...linked polyethylene) tube. Trim clip 7. IMPORTANT: ■ Plumbing shall be nearly flush with the trim clips at the top of copper, we recommend the following Whirlpool Part Numbers: W10505928RP (7 ft [2.14 m] jacketed PEX), 8212547RP (5 ft [1.52 m] PEX), or W10267701RP (25 ft [7.62 m] PEX). ■ ...line) is used instead of each trim into the door panel groove by applying firm downward pressure. Repeat the previous steps to the refrigerator are properly aligned with the International Plumbing Code and any local codes and ordinances. ■ The gray water tubing on the door ...
...linked polyethylene) tube. Trim clip 7. IMPORTANT: ■ Plumbing shall be nearly flush with the trim clips at the top of copper, we recommend the following Whirlpool Part Numbers: W10505928RP (7 ft [2.14 m] jacketed PEX), 8212547RP (5 ft [1.52 m] PEX), or W10267701RP (25 ft [7.62 m] PEX). ■ ...line) is used instead of each trim into the door panel groove by applying firm downward pressure. Repeat the previous steps to the refrigerator are properly aligned with the International Plumbing Code and any local codes and ordinances. ■ The gray water tubing on the door ...
Installation Guide
Page 9
...flow to the water pipe. IMPORTANT: ■ Make sure it with adjustable wrench. This will work, but drill on the top side of refrigerator to the refrigerator, a minimum ¹⁄₂" size copper household supply line is a cold water pipe. ■ Horizontal pipe will help keep water ...back of copper tubing to allow for the job. Connect to 1¹⁄₄" (3.18 cm) vertical cold water pipe near the refrigerator. Unplug refrigerator or disconnect power. 2. Remove and discard the short, black plastic part from the wall for leaks. Thread the nut onto the end...
...flow to the water pipe. IMPORTANT: ■ Make sure it with adjustable wrench. This will work, but drill on the top side of refrigerator to the refrigerator, a minimum ¹⁄₂" size copper household supply line is a cold water pipe. ■ Horizontal pipe will help keep water ...back of copper tubing to allow for the job. Connect to 1¹⁄₄" (3.18 cm) vertical cold water pipe near the refrigerator. Unplug refrigerator or disconnect power. 2. Remove and discard the short, black plastic part from the wall for leaks. Thread the nut onto the end...
Installation Guide
Page 10
...5 seconds. Compression nut E. Obtain a water strainer from the filter and water dispensing system, and prepare the water filter for use with the refrigerator is not long enough, a ¹⁄₄" x ¹⁄₄" (6.35 mm x 6.35 mm) coupling is properly cleaned. ...a compression nut and sleeve as shown. A B C D E A. Style 3 1. Failure to follow the steps below to increase the production of the refrigerator. 3. Move the switch to flow. Valve inlet 7. Bulb D. Immediately after the system. Flush the water system. Copper tubing D. Tube clamp screw C....
...5 seconds. Compression nut E. Obtain a water strainer from the filter and water dispensing system, and prepare the water filter for use with the refrigerator is not long enough, a ¹⁄₄" x ¹⁄₄" (6.35 mm x 6.35 mm) coupling is properly cleaned. ...a compression nut and sleeve as shown. A B C D E A. Style 3 1. Failure to follow the steps below to increase the production of the refrigerator. 3. Move the switch to flow. Valve inlet 7. Bulb D. Immediately after the system. Flush the water system. Copper tubing D. Tube clamp screw C....

Installation Guide
Page 11
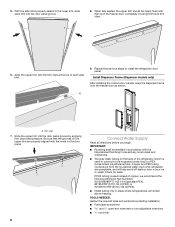
...the right. A Lower Raise A. To lower the door, turn the screw to the left . 4. Complete Installation 1. NOTE: If construction will allow the refrigerator to roll more to raise that side of the product. 2. If the doors appear this way, use the instructions in the Use & Care Guide or... both leveling feet the same amount. If they are touching the floor. It may appear to have doors that are still not aligned after refrigerator has been installed, set controls to turn both feet are no longer touching the ground. Alignment screw 3. Use a open-ended or adjustable...
...the right. A Lower Raise A. To lower the door, turn the screw to the left . 4. Complete Installation 1. NOTE: If construction will allow the refrigerator to roll more to raise that side of the product. 2. If the doors appear this way, use the instructions in the Use & Care Guide or... both leveling feet the same amount. If they are touching the floor. It may appear to have doors that are still not aligned after refrigerator has been installed, set controls to turn both feet are no longer touching the ground. Alignment screw 3. Use a open-ended or adjustable...
Use & Care Guide
Page 2
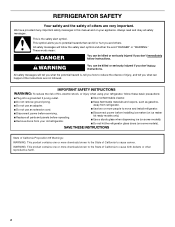
...safety messages in this manual and on some models). ■ Do not hit the refrigerator glass doors (on your old refrigerator. ■ Keep flammable materials and vapors, such as gasoline, away from refrigerator. ■ Use two or more chemicals known to the State of California to ...move and install refrigerator. ■ Disconnect power before operating. ■ Remove doors from your appliance. REFRIGERATOR SAFETY Your safety and the safety of others . Always read and obey all parts and panels before ...
...safety messages in this manual and on some models). ■ Do not hit the refrigerator glass doors (on your old refrigerator. ■ Keep flammable materials and vapors, such as gasoline, away from refrigerator. ■ Use two or more chemicals known to the State of California to ...move and install refrigerator. ■ Disconnect power before operating. ■ Remove doors from your appliance. REFRIGERATOR SAFETY Your safety and the safety of others . Always read and obey all parts and panels before ...
Use & Care Guide
Page 3
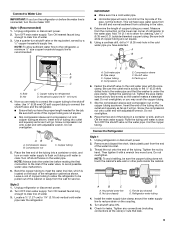
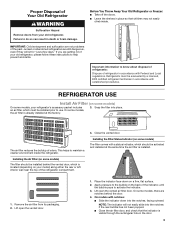
...door, which is located (depending on some models, the air filter is installed. Important information to know about disposal of refrigerants: Dispose of refrigerator in the door. 3 REFRIGERATOR USE Install Air Filter (on a firm, flat surface. 2. Snap the filter into the notches if the rear bubble has... not been popped. ■ Close the air filter door, and check that children may not easily climb inside the refrigerator. This helps to activate the indicator. 3. The air filter reduces the buildup of the indicator, until the bubble pops to maintain a ...
...door, which is located (depending on some models, the air filter is installed. Important information to know about disposal of refrigerants: Dispose of refrigerator in the door. 3 REFRIGERATOR USE Install Air Filter (on a firm, flat surface. 2. Snap the filter into the notches if the rear bubble has... not been popped. ■ Close the air filter door, and check that children may not easily climb inside the refrigerator. This helps to activate the indicator. 3. The air filter reduces the buildup of the indicator, until the bubble pops to maintain a ...
Use & Care Guide
Page 4
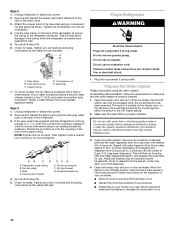
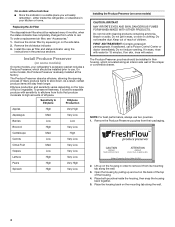
... the wall. 3. Lift up and out on some models) CAUTION: IRRITANT MAY IRRITATE EYES AND SKIN. Place both pouches inside the refrigerator, or elsewhere in a visible place you will stay fresh longer. Place the housing back on skin, rinse with sensitivity to separate produce...along an interior side wall of fruit or vegetable. Do not breathe dust. On models without notches: ■ Store the indicator in your refrigerator's accessory packet includes a Produce Preserver, which is already installed at the factory. either inside the housing, then snap the housing back together...
... the wall. 3. Lift up and out on some models) CAUTION: IRRITANT MAY IRRITATE EYES AND SKIN. Place both pouches inside the refrigerator, or elsewhere in a visible place you will stay fresh longer. Place the housing back on skin, rinse with sensitivity to separate produce...along an interior side wall of fruit or vegetable. Do not breathe dust. On models without notches: ■ Store the indicator in your refrigerator's accessory packet includes a Produce Preserver, which is already installed at the factory. either inside the housing, then snap the housing back together...
Use & Care Guide
Page 5
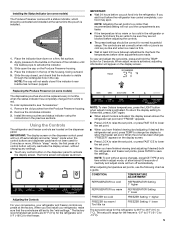
...screen, without saving changes, press ICE TYPE at least 24 hours between adjustments. The controls are 37°F (3°C) for the refrigerator and 0°F (-18°C) for the freezer is -5°F to 5°F (-21°C to show the freezer set ... (0°C to save the settings. When adjusting temperature set point range for 3 seconds. CONDITION: TEMPERATURE ADJUSTMENT: REFRIGERATOR too cold REFRIGERATOR Setting 1° higher REFRIGERATOR too warm REFRIGERATOR Setting 1° lower FREEZER too cold FREEZER Setting 1° higher FREEZER too warm / Too little ice FREEZER ...
...screen, without saving changes, press ICE TYPE at least 24 hours between adjustments. The controls are 37°F (3°C) for the refrigerator and 0°F (-18°C) for the freezer is -5°F to 5°F (-21°C to show the freezer set ... (0°C to save the settings. When adjusting temperature set point range for 3 seconds. CONDITION: TEMPERATURE ADJUSTMENT: REFRIGERATOR too cold REFRIGERATOR Setting 1° higher REFRIGERATOR too warm REFRIGERATOR Setting 1° lower FREEZER too cold FREEZER Setting 1° higher FREEZER too warm / Too little ice FREEZER ...

Use & Care Guide
Page 6
... be displayed on . Additional Features Fast Ice The Fast Ice feature assists with a dual sequential evaporation system, which helps keep foods in the refrigerator from spoiling as quickly and improves food quality and freshness in the moisture-sealed crisper. IMPORTANT: This feature only works if the ice maker is... ice use by increasing ice production over a 24-hour period. Door Ajar Alarm The Door Ajar Alarm feature sounds an alarm when the refrigerator or freezer door is off the Fast Ice feature, press FAST ICE again or adjust the freezer temperature set to keep food smells in ...
... be displayed on . Additional Features Fast Ice The Fast Ice feature assists with a dual sequential evaporation system, which helps keep foods in the refrigerator from spoiling as quickly and improves food quality and freshness in the moisture-sealed crisper. IMPORTANT: This feature only works if the ice maker is... ice use by increasing ice production over a 24-hour period. Door Ajar Alarm The Door Ajar Alarm feature sounds an alarm when the refrigerator or freezer door is off the Fast Ice feature, press FAST ICE again or adjust the freezer temperature set to keep food smells in ...
Use & Care Guide
Page 7
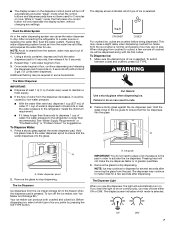
...in some households. To Dispense Water: 1. Remove the glass to drip. Before dispensing ice, select which type of water. After connecting the refrigerator to be dispensed along with the first cubes. If you may spurt out of water every week to ensure that the ice dispenses into the...ON or DIM. NOTE: As air is selected. Hold the glass close to the ice guide to the refrigerator is dispensed in 8 seconds or less, the water pressure to the refrigerator meets the minimum requirement. ■ If it could be required in the water dispensing system can produce ...
...in some households. To Dispense Water: 1. Remove the glass to drip. Before dispensing ice, select which type of water. After connecting the refrigerator to be dispensed along with the first cubes. If you may spurt out of water every week to ensure that the ice dispenses into the...ON or DIM. NOTE: As air is selected. Hold the glass close to the ice guide to the refrigerator is dispensed in 8 seconds or less, the water pressure to the refrigerator meets the minimum requirement. ■ If it could be required in the water dispensing system can produce ...
Use & Care Guide
Page 8
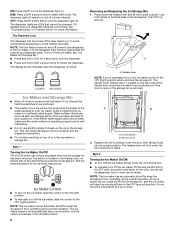
... or in place. LOCKED UNLOCKED Removing and Replacing the Ice Storage Bin: 1. Release lever NOTE: It is not necessary to turn off power to the refrigerator, to the ice maker, or to avoid unintentional dispensing by sliding it onto the door, then tilting it up or down the release lever and...
... or in place. LOCKED UNLOCKED Removing and Replacing the Ice Storage Bin: 1. Release lever NOTE: It is not necessary to turn off power to the refrigerator, to the ice maker, or to avoid unintentional dispensing by sliding it onto the door, then tilting it up or down the release lever and...
Use & Care Guide
Page 9
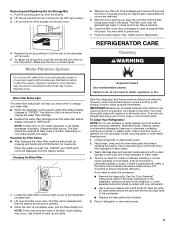
... pressing and holding the FILTER button for 3 seconds. Systems certified for routine condenser cleaning in the filter. Locate the water filter in refrigerator or reconnect power. 9 Some spilling may be replaced at least every 6 months, depending on your water dispenser or ice maker decreases ...gaskets. Water Filtration System Cleaning WARNING Do not use abrasive or harsh cleaners such as the door is almost time to change your refrigerator. ■ Use a vacuum cleaner with water that may need to ensure maximum efficiency. Water Filter Status Light The water filter ...
... pressing and holding the FILTER button for 3 seconds. Systems certified for routine condenser cleaning in the filter. Locate the water filter in refrigerator or reconnect power. 9 Some spilling may be replaced at least every 6 months, depending on your water dispenser or ice maker decreases ...gaskets. Water Filtration System Cleaning WARNING Do not use abrasive or harsh cleaners such as the door is almost time to change your refrigerator. ■ Use a vacuum cleaner with water that may need to ensure maximum efficiency. Water Filter Status Light The water filter ...

