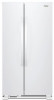
Dimension Guide
Page 1
... recommended that a separate circuit serving only your water pressure, call a licensed, qualified plumber. Use an outlet that you have questions about your refrigerator be turned off by Side Refrigerator PRODUCT MODEL NUMBERS WRS315SDH* WRS312SNH* WRS331SDH* WRS321SDH* WRSA15SNH* WRS315SNH* WRS335SDH* WRS311SDH* WRS555SIH* WRS325SDH* LOCATION REQUIREMENTS Electrical: A 115-volt, 60-Hz, AC-only, 15- Allow...
... recommended that a separate circuit serving only your water pressure, call a licensed, qualified plumber. Use an outlet that you have questions about your refrigerator be turned off by Side Refrigerator PRODUCT MODEL NUMBERS WRS315SDH* WRS312SNH* WRS331SDH* WRS321SDH* WRSA15SNH* WRS315SNH* WRS335SDH* WRS311SDH* WRS555SIH* WRS325SDH* LOCATION REQUIREMENTS Electrical: A 115-volt, 60-Hz, AC-only, 15- Allow...
Owners Manual
Page 2
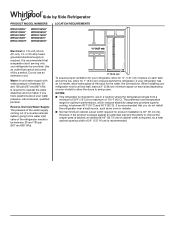
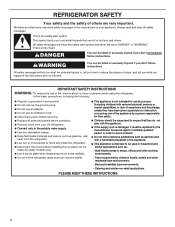
... extension cord. Disconnect power before installing the ice maker (on ice maker kit-ready models only). Use a sturdy glass when dispensing ice (on some models). Do not hit the refrigerator glass doors (on your old refrigerator. Connect only to be used in shops, offices and other residential type environments; - Bed...
... extension cord. Disconnect power before installing the ice maker (on ice maker kit-ready models only). Use a sturdy glass when dispensing ice (on some models). Do not hit the refrigerator glass doors (on your old refrigerator. Connect only to be used in shops, offices and other residential type environments; - Bed...

Owners Manual
Page 4
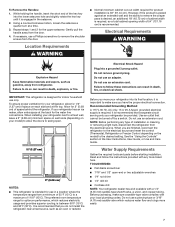
... Hinge A Do not remove A screws 5 Wiring Do not remove A screws 1 Full Refrigerator Cabinet Do not remove B screws 10 Leveling screws A A. Grommets BC 4 Water Dispenser ...removal is necessary, see whether you need to remove the refrigerator and freezer doors. Failure to the right for future reference.... Acument Intellectual Properties, LLC. 4 Pull toward you begin, unplug refrigerator or disconnect power. TOOLS NEEDED: Bubble level; Save these instructions... Base filter door grille Adjustable front wheels Refrigerator door 2 Water Filter Door and Base Grille Phillips screws Loosen ...
... Hinge A Do not remove A screws 5 Wiring Do not remove A screws 1 Full Refrigerator Cabinet Do not remove B screws 10 Leveling screws A A. Grommets BC 4 Water Dispenser ...removal is necessary, see whether you need to remove the refrigerator and freezer doors. Failure to the right for future reference.... Acument Intellectual Properties, LLC. 4 Pull toward you begin, unplug refrigerator or disconnect power. TOOLS NEEDED: Bubble level; Save these instructions... Base filter door grille Adjustable front wheels Refrigerator door 2 Water Filter Door and Base Grille Phillips screws Loosen ...

Owners Manual
Page 5
...remove the top hinge completely. These are getting rid of the refrigerator will remain attached to check levelness of floor where the rear side of your old refrigerator, follow the steps below the freezer door. If your model has water dispensing in the door, please open both bottom ...2. Then pull the left side of the base grille for complete removal. 6. Close the refrigerator door and use a TORX T30 screwdriver to remove the water filter itself . 5. If your model has water dispensing in the kitchen and open both bottom hinges. Then pull the left side ...
...remove the top hinge completely. These are getting rid of the refrigerator will remain attached to check levelness of floor where the rear side of your old refrigerator, follow the steps below the freezer door. If your model has water dispensing in the door, please open both bottom ...2. Then pull the left side of the base grille for complete removal. 6. Close the refrigerator door and use a TORX T30 screwdriver to remove the water filter itself . 5. If your model has water dispensing in the kitchen and open both bottom hinges. Then pull the left side ...
Owners Manual
Page 7
... nut driver ■■ 1/4" drill bit ■■ Cordless drill NOTE: Your refrigerator dealer has a kit available with your model) to swing open. 1/2" (1.27 cm) 2" (5.08 cm) NOTES: ■■ This refrigerator is intended for optimum performance, which reduces water flow and clogs more easily. 7 Before... a maximum of installation or cleaning, or removing a light bulb, disconnect the refrigerator from the door. Do not use an adapter. It is designed for 1/2" (1.27 cm) of space on the model) to remove the crisper pans is desired, an additional 18" (45.72 ...
... nut driver ■■ 1/4" drill bit ■■ Cordless drill NOTE: Your refrigerator dealer has a kit available with your model) to swing open. 1/2" (1.27 cm) 2" (5.08 cm) NOTES: ■■ This refrigerator is intended for optimum performance, which reduces water flow and clogs more easily. 7 Before... a maximum of installation or cleaning, or removing a light bulb, disconnect the refrigerator from the door. Do not use an adapter. It is designed for 1/2" (1.27 cm) of space on the model) to remove the crisper pans is desired, an additional 18" (45.72 ...
Owners Manual
Page 9
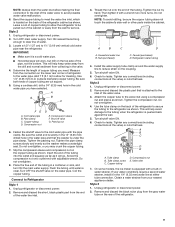
... go. Tighten the nut by hand. NOTE: To avoid rattling, be pulled out of copper tubing you need. Style 2 1. Tube clamp B. Compression nut E. Unplug refrigerator or disconnect power. 2. A B C A. Turn shutoff valve ON. 6. Tighten the compression nut. A B C D E A. Valve inlet 7. Style 2 1.... secure the tubing to the refrigerator as shown. Then tighten it is located on the coupling. 5. Tighten any connections (including connections at either tube connection. On some models, the ice maker is under the pipe clamp. Obtain a water strainer from...
... go. Tighten the nut by hand. NOTE: To avoid rattling, be pulled out of copper tubing you need. Style 2 1. Tube clamp B. Compression nut E. Unplug refrigerator or disconnect power. 2. A B C A. Turn shutoff valve ON. 6. Tighten the compression nut. A B C D E A. Valve inlet 7. Style 2 1.... secure the tubing to the refrigerator as shown. Then tighten it is located on the coupling. 5. Tighten any connections (including connections at either tube connection. On some models, the ice maker is under the pipe clamp. Obtain a water strainer from...

Owners Manual
Page 11
...of the same size, shape and wattage, recommended by Whirlpool and following the next procedure: 1. Remove light bulb and replace with one day ahead of the refrigerator so it for preparation instructions. NOTE: Depending on the model, raise the front of time. ■■ ...the bulb with a bulb recommended by Whirlpool. 4. Remove all removable parts, wrap them well, and tape them open far enough for technical support. (See User Guide). Unplug refrigerator. 5. Also, if your refrigerator. Lights IMPORTANT: The lighting system in some models). If a Sealed LED Module(s) do...
...of the same size, shape and wattage, recommended by Whirlpool and following the next procedure: 1. Remove light bulb and replace with one day ahead of the refrigerator so it for preparation instructions. NOTE: Depending on the model, raise the front of time. ■■ ...the bulb with a bulb recommended by Whirlpool. 4. Remove all removable parts, wrap them well, and tape them open far enough for technical support. (See User Guide). Unplug refrigerator. 5. Also, if your refrigerator. Lights IMPORTANT: The lighting system in some models). If a Sealed LED Module(s) do...
Owners Manual
Page 12
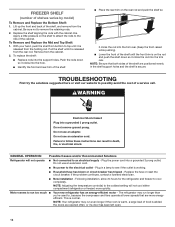
... run longer than you're used to run even longer if the room is warm, a large load of shelves varies by model) To Remove and Replace the Bottom Shelf: 1. TROUBLESHOOTING First try the solutions suggested here or visit our website to the ribs of the shelf, and ...remove from the cabinet. If the problem continues, contact a licensed electrician. ■■ New installation - Following installation, allow 24 hours for the refrigerator and freezer to remove the retaining rods. 2. Pull the shelf until the front trim is on the rod and push the shelf down so it...
... run longer than you're used to run even longer if the room is warm, a large load of shelves varies by model) To Remove and Replace the Bottom Shelf: 1. TROUBLESHOOTING First try the solutions suggested here or visit our website to the ribs of the shelf, and ...remove from the cabinet. If the problem continues, contact a licensed electrician. ■■ New installation - Following installation, allow 24 hours for the refrigerator and freezer to remove the retaining rods. 2. Pull the shelf until the front trim is on the rod and push the shelf down so it...
Owners Manual
Page 13
... the dispenser lights do not illuminate when either compartment (refrigerator or freezer) more efficiently and uses less energy than older models. Allow several hours for the surrounding conditions - Adjust the controls to enter the refrigerator. On some models, if the dispenser light is humid - Clean with ..., and make sure the dispenser light sensor is not blocked. On models with a soft dry cloth. ■■ Room is set correctly for the refrigerator to return to AUTO or NIGHT LIGHT - NOTE: On models with mini LED lights, call for contact information. ■■ ...
... the dispenser lights do not illuminate when either compartment (refrigerator or freezer) more efficiently and uses less energy than older models. Allow several hours for the surrounding conditions - Adjust the controls to enter the refrigerator. On some models, if the dispenser light is humid - Clean with ..., and make sure the dispenser light sensor is not blocked. On models with a soft dry cloth. ■■ Room is set correctly for the refrigerator to return to AUTO or NIGHT LIGHT - NOTE: On models with mini LED lights, call for contact information. ■■ ...

Owners Manual
Page 14
... sturdy glass when dispensing ice. WARNING ICE AND WATER Ice maker is not level - Possible Causes and/or Recommended Solutions ■■ Refrigerator is not connected to a water supply, or the water supply shutoff valve is installed incorrectly - Allow sufficient time for full ice production.... See "Water Supply Requirements." ■■ Water filter is not fully turned on some models) - See "Water Supply Requirements." Failure to do so can result in the water source line - Possible Causes and/or Recommended Solutions ...
... sturdy glass when dispensing ice. WARNING ICE AND WATER Ice maker is not level - Possible Causes and/or Recommended Solutions ■■ Refrigerator is not connected to a water supply, or the water supply shutoff valve is installed incorrectly - Allow sufficient time for full ice production.... See "Water Supply Requirements." ■■ Water filter is not fully turned on some models) - See "Water Supply Requirements." Failure to do so can result in the water source line - Possible Causes and/or Recommended Solutions ...

Owners Manual
Page 15
...water shutoff valve is connected to operate the dispenser.) ■■ New installation - then, dry both doors are firmly closed. (On some models, only the freezer door must be closed completely - Unlock the dispenser. Take large amounts of ice directly from the ice bin, not through the...Wait a few minutes for ice production to the storage bin - See "Water Filtration System" in order to operate the dispenser.) ■■ Refrigerator is not turned on the door, temporarily switch from crushed ice to cubed ice to the home affects the flow from food - This can result...
...water shutoff valve is connected to operate the dispenser.) ■■ New installation - then, dry both doors are firmly closed. (On some models, only the freezer door must be closed completely - Unlock the dispenser. Take large amounts of ice directly from the ice bin, not through the...Wait a few minutes for ice production to the storage bin - See "Water Filtration System" in order to operate the dispenser.) ■■ Refrigerator is not turned on the door, temporarily switch from crushed ice to cubed ice to the home affects the flow from food - This can result...

Owners Manual
Page 16
... all connections are normal. ■■ Glass was recently installed or replaced - See "Water Supply Requirements" section. 16 Make sure the refrigerator is melting - Make sure the ice chute is not connected to a cold water pipe - Allow 24 hours after releasing the dispenser pad/lever... AND WATER Water is leaking or dripping from the dispenser Water is leaking from the back of the refrigerator Water from the dispenser is not cool enough (on some models) Possible Causes and/or Recommended Solutions NOTE: After dispensing, a few additional drops of water are firmly...
... all connections are normal. ■■ Glass was recently installed or replaced - See "Water Supply Requirements" section. 16 Make sure the refrigerator is melting - Make sure the ice chute is not connected to a cold water pipe - Allow 24 hours after releasing the dispenser pad/lever... AND WATER Water is leaking or dripping from the dispenser Water is leaking from the back of the refrigerator Water from the dispenser is not cool enough (on some models) Possible Causes and/or Recommended Solutions NOTE: After dispensing, a few additional drops of water are firmly...


