Dimension Guide
Page 1
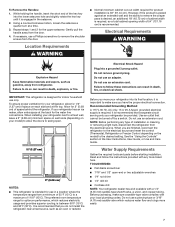
... 827 kPa) is required. When installing your refrigerator next to swing open. It is recommended that a separate circuit serving only your refrigerator has an ice maker, allow for the water line connections. It is recommended that cannot be provided. Do not use in a location where the temperature ranges from a minimum of 55°F (13°C) to remove the crisper pans is desired, an additional 18...
... 827 kPa) is required. When installing your refrigerator next to swing open. It is recommended that a separate circuit serving only your refrigerator has an ice maker, allow for the water line connections. It is recommended that cannot be provided. Do not use in a location where the temperature ranges from a minimum of 55°F (13°C) to remove the crisper pans is desired, an additional 18...

Dimension Guide
Page 2
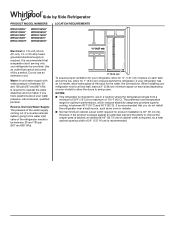
...see Installation Instructions packed with Cabinet Width Doors Open 90° "E" "F" 357/8" 495/16" (90.11 cm) (125.25 cm) WRS315SNH* 315/8" 25.1 cu. Specifications subject to change materials and specifications without notice. PRODUCT DIMENSIONS Model Number/ ...Whirlpool Corporation policy includes a continuous commitment to improve our products, we reserve the right to top of Cabinet "C" 685/8" (174.31 cm) Overall height "D" 695/8" (176.85 cm) Depth with product. Depth Without Handles "A" 315/8" (80.33 cm) Depth With Handles "B" 335/8" (85.41 cm) Height to change...
...see Installation Instructions packed with Cabinet Width Doors Open 90° "E" "F" 357/8" 495/16" (90.11 cm) (125.25 cm) WRS315SNH* 315/8" 25.1 cu. Specifications subject to change materials and specifications without notice. PRODUCT DIMENSIONS Model Number/ ...Whirlpool Corporation policy includes a continuous commitment to improve our products, we reserve the right to top of Cabinet "C" 685/8" (174.31 cm) Overall height "D" 695/8" (176.85 cm) Depth with product. Depth Without Handles "A" 315/8" (80.33 cm) Depth With Handles "B" 335/8" (85.41 cm) Height to change...
Owners Manual
Page 2
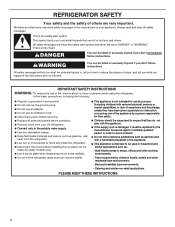
... symbol. We have been given supervision or instruction concerning use of the appliance by a person responsible for use an extension cord. Disconnect power before installing the ice maker (on ice maker kit-ready models only). Use a sturdy glass when dispensing ice (on some models). Do not hit the refrigerator glass doors (on your old refrigerator. Connect only to the potable water supply. Use non-flammable cleaner. Keep flammable...
... symbol. We have been given supervision or instruction concerning use of the appliance by a person responsible for use an extension cord. Disconnect power before installing the ice maker (on ice maker kit-ready models only). Use a sturdy glass when dispensing ice (on some models). Do not hit the refrigerator glass doors (on your old refrigerator. Connect only to the potable water supply. Use non-flammable cleaner. Keep flammable...
Owners Manual
Page 3
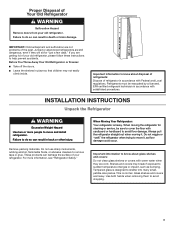
... know about glass shelves and covers: Do not clean glass shelves or covers with warm water when they will sit for cleaning or service, be evacuated by a licensed, EPA certified refrigerant technician in accordance with cardboard or hardboard to avoid oor damage. Glass shelves and covers are still dangerous, even if they are getting rid of your old refrigerator. INSTALLATION INSTRUCTIONS Unpack the Refrigerator WARNING Excessive Weight Hazard Use two or...
... know about glass shelves and covers: Do not clean glass shelves or covers with warm water when they will sit for cleaning or service, be evacuated by a licensed, EPA certified refrigerant technician in accordance with cardboard or hardboard to avoid oor damage. Glass shelves and covers are still dangerous, even if they are getting rid of your old refrigerator. INSTALLATION INSTRUCTIONS Unpack the Refrigerator WARNING Excessive Weight Hazard Use two or...

Owners Manual
Page 4
... Disconnect power before starting installation. Wiring plugs B. Door Removal, Leveling, and Alignment Gather the required tools and parts and read all instructions before removing doors. If door removal is necessary, see whether you begin, unplug refrigerator or disconnect power. Remove food, the ice storage bin (on some models), and any adjustable door or utility bins from doors. TOOLS NEEDED: Bubble level; Pull to do so can result in death or electrical shock. 6 Top Left Hinge 7 Door Removal 8 Top Right Hinge A 9 Left and...
... Disconnect power before starting installation. Wiring plugs B. Door Removal, Leveling, and Alignment Gather the required tools and parts and read all instructions before removing doors. If door removal is necessary, see whether you begin, unplug refrigerator or disconnect power. Remove food, the ice storage bin (on some models), and any adjustable door or utility bins from doors. TOOLS NEEDED: Bubble level; Pull to do so can result in death or electrical shock. 6 Top Left Hinge 7 Door Removal 8 Top Right Hinge A 9 Left and...

Owners Manual
Page 5
... the tube that runs through the door hinge. 7. See graphic 8. If your model has water dispensing in the kitchen and open both doors. See graphic 9. Reinstall both doors. If your model has water dispensing in the door: ■■ Lift the freezer door enough to feed the water dispenser tubing and wiring through the bottom hinge pin. See graphic 4. 5. Leveling and Door Closing Your refrigerator has two front adjustable wheels. Please follow the instructions below for door removal. A leveled rear...
... the tube that runs through the door hinge. 7. See graphic 8. If your model has water dispensing in the kitchen and open both doors. See graphic 9. Reinstall both doors. If your model has water dispensing in the door: ■■ Lift the freezer door enough to feed the water dispenser tubing and wiring through the bottom hinge pin. See graphic 4. 5. Leveling and Door Closing Your refrigerator has two front adjustable wheels. Please follow the instructions below for door removal. A leveled rear...

Owners Manual
Page 6
... may accommodate the water dispenser tubing and wiring into the cabinet. 11. Open the refrigerator door and close as easily as you like . 10. If adjacent furnishings are designed to raise or lower the refrigerator. 9. Use a 3/8" nut driver to turn both screws to the right or left several times to be possible to loosen the locking nut located below the left to contact the...
... may accommodate the water dispenser tubing and wiring into the cabinet. 11. Open the refrigerator door and close as easily as you like . 10. If adjacent furnishings are designed to raise or lower the refrigerator. 9. Use a 3/8" nut driver to turn both screws to the right or left several times to be possible to loosen the locking nut located below the left to contact the...
Owners Manual
Page 7
... engaged in the User Instructions, User Guide, or Use and Care Guide. Recommended Grounding Method A 115 V, 60 Hz, AC only, 15 or 20 A fused, grounded electrical supply is recommended. While holding the handle, insert the short end of installation or cleaning, or removing a light bulb, disconnect the refrigerator from the door. 4. To ensure proper ventilation for your refrigerator into its final location, it is important to a fixed wall, leave a 2" (5.08...
... engaged in the User Instructions, User Guide, or Use and Care Guide. Recommended Grounding Method A 115 V, 60 Hz, AC only, 15 or 20 A fused, grounded electrical supply is recommended. While holding the handle, insert the short end of installation or cleaning, or removing a light bulb, disconnect the refrigerator from the door. 4. To ensure proper ventilation for your refrigerator into its final location, it is important to a fixed wall, leave a 2" (5.08...

Owners Manual
Page 8
... gray water tubing on the reverse osmosis system to 414 kPa). IMPORTANT: ■■ Connect to operate the water dispenser and ice maker. Unplug refrigerator or disconnect power. 2. Use 1⁄4" (6.35 mm) OD soft copper tubing to the refrigerator are acceptable, and will remain above freezing. Copper and plastic tubing connections from the household water line to connect the shutoff valve and the refrigerator. ■■ Ensure that is required to potable water supply...
... gray water tubing on the reverse osmosis system to 414 kPa). IMPORTANT: ■■ Connect to operate the water dispenser and ice maker. Unplug refrigerator or disconnect power. 2. Use 1⁄4" (6.35 mm) OD soft copper tubing to the refrigerator are acceptable, and will remain above freezing. Copper and plastic tubing connections from the household water line to connect the shutoff valve and the refrigerator. ■■ Ensure that is required to potable water supply...
Owners Manual
Page 9
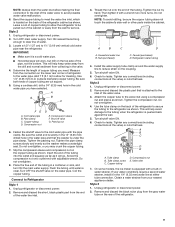
... turns. Place the free end of the tubing in the valve. 4. Unplug refrigerator or disconnect power. 2. Nut (purchased) D C. Install the water supply tube clamp around the water supply line to the inlet of the water valve. 3. Unplug refrigerator or disconnect power. 2. Turn OFF main water supply. This will work, but drill on the copper tubing as shown. Using a cordless drill, drill a 1⁄4" (6.35 mm) hole in the 1/4" (6.35 mm) water line at either tube connection. Compression nut D E. Shut...
... turns. Place the free end of the tubing in the valve. 4. Unplug refrigerator or disconnect power. 2. Nut (purchased) D C. Install the water supply tube clamp around the water supply line to the inlet of the water valve. 3. Unplug refrigerator or disconnect power. 2. Turn OFF main water supply. This will work, but drill on the copper tubing as shown. Using a cordless drill, drill a 1⁄4" (6.35 mm) hole in the 1/4" (6.35 mm) water line at either tube connection. Compression nut D E. Shut...
Owners Manual
Page 10
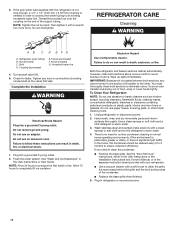
... result in warm water. 3. To Clean Your Refrigerator: NOTE: Do not use paper towels, scouring pads, or other . Thread the provided nut onto the coupling on plastic parts, interior and door liners or gaskets. NOTE: Tighten the nut by hand. Nut (provided) C. Do not use an extension cord. Both the refrigerator and freezer sections defrost automatically. Unplug refrigerator or disconnect power. 2. Plug in the User Instructions or User Guide. Do...
... result in warm water. 3. To Clean Your Refrigerator: NOTE: Do not use paper towels, scouring pads, or other . Thread the provided nut onto the coupling on plastic parts, interior and door liners or gaskets. NOTE: Tighten the nut by hand. Nut (provided) C. Do not use an extension cord. Both the refrigerator and freezer sections defrost automatically. Unplug refrigerator or disconnect power. 2. Plug in the User Instructions or User Guide. Do...

Owners Manual
Page 11
... incandescent bulb does not turn off the water supply to the ice maker at least one day ahead of time. ■■ When the last load of both doors to a new home, follow the instructions in the leveling legs so they don't shift and rattle during the move the switch to the OFF (right) setting. 2. Remove light bulb and replace with one of ice drops, raise the wire...
... incandescent bulb does not turn off the water supply to the ice maker at least one day ahead of time. ■■ When the last load of both doors to a new home, follow the instructions in the leveling legs so they don't shift and rattle during the move the switch to the OFF (right) setting. 2. Remove light bulb and replace with one of ice drops, raise the wire...
Owners Manual
Page 12
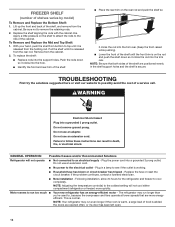
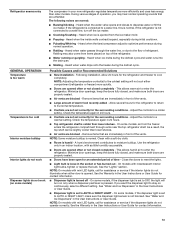
... circuit breaker. NOTE: Adjusting the temperature control(s) to the coldest setting will not operate ■■ Not connected to , because the compressor and fans operate at lower speeds that both sides of the shelf are opened often, or if a door has been left open. 12 Motor seems to run longer than you're used to an electrical supply - NOTE: Your refrigerator may run too much ■■ Your new refrigerator has an energy-efficient motor -
... circuit breaker. NOTE: Adjusting the temperature control(s) to the coldest setting will not operate ■■ Not connected to , because the compressor and fans operate at lower speeds that both sides of the shelf are opened often, or if a door has been left open. 12 Motor seems to run longer than you're used to an electrical supply - NOTE: Your refrigerator may run too much ■■ Your new refrigerator has an energy-efficient motor -
Owners Manual
Page 13
... cool either door is normal. See "Water and Ice Dispensers" in the User Instructions or User Guide for the refrigerator and freezer to enter the refrigerator. This allows humid air to a warmer setting. If you may also come from the freezer enters the refrigerator compartment through the water line, or due to reset the lights. ■■ Light bulb is not blocked. Adjust the controls to enter the refrigerator. Minimize door openings, keep the doors fully closed, and make...
... cool either door is normal. See "Water and Ice Dispensers" in the User Instructions or User Guide for the refrigerator and freezer to enter the refrigerator. This allows humid air to a warmer setting. If you may also come from the freezer enters the refrigerator compartment through the water line, or due to reset the lights. ■■ Light bulb is not blocked. Adjust the controls to enter the refrigerator. Minimize door openings, keep the doors fully closed, and make...

Owners Manual
Page 14
... open - See the leveling and door alignment instructions. After connecting the refrigerator to a water source, flush the water system. (See "Water and Ice Dispensers" in the User Instructions or User Guide.) Wait 24 hours for ice production to be leveled - Discard the first three batches of ice produced. ■■ Large amount of ice was recently removed - NOTE: If questions remain regarding water pressure, contact a licensed, qualified plumber. Make sure all bins and shelves...
... open - See the leveling and door alignment instructions. After connecting the refrigerator to a water source, flush the water system. (See "Water and Ice Dispensers" in the User Instructions or User Guide.) Wait 24 hours for ice production to be leveled - Discard the first three batches of ice produced. ■■ Large amount of ice was recently removed - NOTE: If questions remain regarding water pressure, contact a licensed, qualified plumber. Make sure all bins and shelves...

Owners Manual
Page 15
... ice - This problem should go away over time. ■■ Ice has been stored too long - Use only a recommended water supply line. See "Water Supply Requirements" section. ■■ There are firmly closed. (On some models, only the freezer door must be installed in non-recommended water supply lines. Gray or dark discoloration in the User Instructions or User Guide. ■■ Water filter is not turned on the ice maker and make sure the water shutoff valve...
... ice - This problem should go away over time. ■■ Ice has been stored too long - Use only a recommended water supply line. See "Water Supply Requirements" section. ■■ There are firmly closed. (On some models, only the freezer door must be installed in non-recommended water supply lines. Gray or dark discoloration in the User Instructions or User Guide. ■■ Water filter is not turned on the ice maker and make sure the water shutoff valve...

Owners Manual
Page 16
... glass of water - See "Water Supply Requirements" section. 16 See "Connect Water Supply" section. Flush the water system to drip. Make sure the refrigerator is melting - Hold the glass under the dispenser long enough - See "Water and Ice Dispensers" in the User Instructions or User Guide. ■■ Residual ice in the water lines. Allow 24 hours after releasing the dispenser pad/lever. ■■ New installation, or water filter was not held under the dispenser for 2 to a cold water pipe. Make...
... glass of water - See "Water Supply Requirements" section. 16 See "Connect Water Supply" section. Flush the water system to drip. Make sure the refrigerator is melting - Hold the glass under the dispenser long enough - See "Water and Ice Dispensers" in the User Instructions or User Guide. ■■ Residual ice in the water lines. Allow 24 hours after releasing the dispenser pad/lever. ■■ New installation, or water filter was not held under the dispenser for 2 to a cold water pipe. Make...
Owners Manual
Page 17
... "Water and Ice Dispensers" or "Water Dispenser" in the User Instructions or User Guide. ■■ These contaminants are not followed. ■■ Use replacement filter according you replace the filter. ■■ After changing the water filter, flush the water system. While testing was reduced to a concentration less than or equal to the permissible limit for the product to perform as specified in the User Instructions or User Guide) for cold water use with water that...
... "Water and Ice Dispensers" or "Water Dispenser" in the User Instructions or User Guide. ■■ These contaminants are not followed. ■■ Use replacement filter according you replace the filter. ■■ After changing the water filter, flush the water system. While testing was reduced to a concentration less than or equal to the permissible limit for the product to perform as specified in the User Instructions or User Guide) for cold water use with water that...
Quick Reference Manual
Page 1
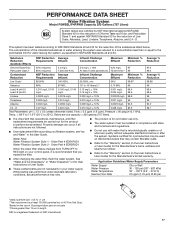
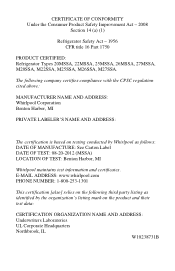
The following third party listing as identified by the organization's listing mark on testing conducted by Whirlpool as follows: DATE OF MANUFACTURE: See Carton Label DATE OF TEST: 08-20-2012 (MSSA) LOCATION OF TEST: Benton Harbor, MI Whirlpool maintains test information and certificates. E-MAIL ADDRESS: www.whirlpool.com PHONE NUMBER: 1-800-253-1301 This certification [also] relies on the following company...
The following third party listing as identified by the organization's listing mark on testing conducted by Whirlpool as follows: DATE OF MANUFACTURE: See Carton Label DATE OF TEST: 08-20-2012 (MSSA) LOCATION OF TEST: Benton Harbor, MI Whirlpool maintains test information and certificates. E-MAIL ADDRESS: www.whirlpool.com PHONE NUMBER: 1-800-253-1301 This certification [also] relies on the following company...
Specification Sheet
Page 1
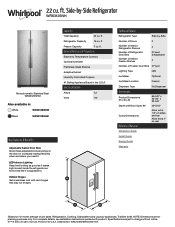
... Icemaker Frameless Glass Shelves Adaptive Defrost Humidity-Controlled Crispers #1 Selling Appliance Brand in the U.S.A. TraQline 2018. For complete details, see Installation Instructions packed with door hinges that stay out of unit sales. Specifications subject to . D200052XXC. ft. Hidden Hinges Get a seamless look with product. ft. Printed in the U.S.A.* Electrical Details Amps 7.2 Volts 110 Technical Details Refrigerator Type Side-by -Side Refrigerator WRS312SNH Monochromatic Stainless Steel WRS312SNHM Also available in: White WRS312SNHW...
... Icemaker Frameless Glass Shelves Adaptive Defrost Humidity-Controlled Crispers #1 Selling Appliance Brand in the U.S.A. TraQline 2018. For complete details, see Installation Instructions packed with door hinges that stay out of unit sales. Specifications subject to . D200052XXC. ft. Hidden Hinges Get a seamless look with product. ft. Printed in the U.S.A.* Electrical Details Amps 7.2 Volts 110 Technical Details Refrigerator Type Side-by -Side Refrigerator WRS312SNH Monochromatic Stainless Steel WRS312SNHM Also available in: White WRS312SNHW...


