Dimension Guide
Page 1
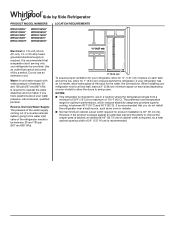
... pans is desired, an additional 18" (45.72 cm) of cabinet width is required, so a total cabinet opening width of the refrigerator needs to a fixed wall, leave a 2" (5.08 cm) minimum space on each side (depending on each side and at the back... for optimum performance, which reduces electricity usage and provides superior cooling, is recommended that cannot be turned off by Side Refrigerator PRODUCT MODEL NUMBERS WRS315SDH* WRS312SNH* WRS331SDH* WRS321SDH* WRSA15SNH* WRS315SNH* WRS335SDH* WRS311SDH* WRS555SIH* WRS325SDH* LOCATION REQUIREMENTS Electrical: A 115-volt, ...
... pans is desired, an additional 18" (45.72 cm) of cabinet width is required, so a total cabinet opening width of the refrigerator needs to a fixed wall, leave a 2" (5.08 cm) minimum space on each side (depending on each side and at the back... for optimum performance, which reduces electricity usage and provides superior cooling, is recommended that cannot be turned off by Side Refrigerator PRODUCT MODEL NUMBERS WRS315SDH* WRS312SNH* WRS331SDH* WRS321SDH* WRSA15SNH* WRS315SNH* WRS335SDH* WRS311SDH* WRS555SIH* WRS325SDH* LOCATION REQUIREMENTS Electrical: A 115-volt, ...
Owners Manual
Page 2
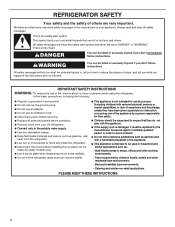
... prong. Do not use an adapter. Do not use of fire, electric shock or injury to persons when using the refrigerator, follow the safety alert symbol and either the word "DANGER" or "WARNING." We have provided many important safety messages in household and similar ... that they do not play with a flammable propellant in shops, offices and other residential type environments; - Bed and breakfast type environments; - REFRIGERATOR SAFETY Your safety and the safety of others . This symbol alerts you to reduce the chance of injury, and tell you what the potential ...
... prong. Do not use an adapter. Do not use of fire, electric shock or injury to persons when using the refrigerator, follow the safety alert symbol and either the word "DANGER" or "WARNING." We have provided many important safety messages in household and similar ... that they do not play with a flammable propellant in shops, offices and other residential type environments; - Bed and breakfast type environments; - REFRIGERATOR SAFETY Your safety and the safety of others . This symbol alerts you to reduce the chance of injury, and tell you what the potential ...
Owners Manual
Page 3
...;■ Leave the shelves in place so that children may break if exposed to do so can damage the surface of refrigerator in accordance with Federal and Local regulations. Failure to sudden temperature changes or impact, such as oor damage could occur. ... for cleaning or service, be evacuated by a licensed, EPA certified refrigerant technician in accordance with established procedures. When Moving Your Refrigerator: Your refrigerator is normal. Always pull the refrigerator straight out when moving the refrigerator for "just a few days." Important information to do so can ...
...;■ Leave the shelves in place so that children may break if exposed to do so can damage the surface of refrigerator in accordance with Federal and Local regulations. Failure to sudden temperature changes or impact, such as oor damage could occur. ... for cleaning or service, be evacuated by a licensed, EPA certified refrigerant technician in accordance with established procedures. When Moving Your Refrigerator: Your refrigerator is normal. Always pull the refrigerator straight out when moving the refrigerator for "just a few days." Important information to do so can ...

Owners Manual
Page 4
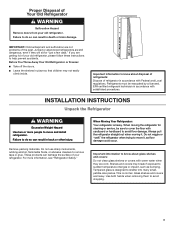
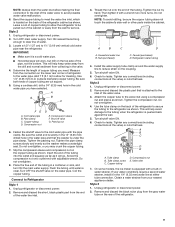
..., Leveling, and Alignment Gather the required tools and parts and read all instructions before removing doors. Face of your home to remove the refrigerator and freezer doors. IMPORTANT: Before you . Wiring plugs B. Wiring clip C. Twist and pass underneath door †TORX and T30 are... 7 Door Removal 8 Top Right Hinge A 9 Left and Right Bottom Hinge A Do not remove A screws 5 Wiring Do not remove A screws 1 Full Refrigerator Cabinet Do not remove B screws 10 Leveling screws A A. NOTE: Before moving your product into your home, measure the doorway of fitting A 3 Base Grille ...
..., Leveling, and Alignment Gather the required tools and parts and read all instructions before removing doors. Face of your home to remove the refrigerator and freezer doors. IMPORTANT: Before you . Wiring plugs B. Wiring clip C. Twist and pass underneath door †TORX and T30 are... 7 Door Removal 8 Top Right Hinge A 9 Left and Right Bottom Hinge A Do not remove A screws 5 Wiring Do not remove A screws 1 Full Refrigerator Cabinet Do not remove B screws 10 Leveling screws A A. NOTE: Before moving your product into your home, measure the doorway of fitting A 3 Base Grille ...

Owners Manual
Page 5
... to remove these. Reinstall the wiring clip & the bracket wire using a 1/4" hexagonal head socket wrench. 7. See graphic 7. Close the refrigerator door to align and reinstall the top hinge. To remove the base grille, twist and pull the right side until this side passes underneath the...dispensing in the kitchen and open the water filter door by pulling it toward you . NOTE: This may remove both doors. Lift the refrigerator door enough to close more easily. See graphic 1. 4. WARNING Electrical Shock Hazard Disconnect power before removing doors. See graphic 1. 3. Pull...
... to remove these. Reinstall the wiring clip & the bracket wire using a 1/4" hexagonal head socket wrench. 7. See graphic 7. Close the refrigerator door to align and reinstall the top hinge. To remove the base grille, twist and pull the right side until this side passes underneath the...dispensing in the kitchen and open the water filter door by pulling it toward you . NOTE: This may remove both doors. Lift the refrigerator door enough to close more easily. See graphic 1. 4. WARNING Electrical Shock Hazard Disconnect power before removing doors. See graphic 1. 3. Pull...

Owners Manual
Page 6
...must turn both the upper and lower setscrews. Reinstall the base grille into the cabinet clips. See graphic 3. Door Alignment The refrigerator doors are preinstalled in both setscrews have been aligned vertically. 3. Shoulder screws B. Handle Installation and Removal PARTS INCLUDED: Door handles...all instructions. 6 Attach the base grille pushing into the cabinet, introducing the left to turn . Open the freezer door. On the refrigerator door, place the handle on uneven floor conditions, you like . Depending on the shoulder screws with the wrench tool. 4. A ...
...must turn both the upper and lower setscrews. Reinstall the base grille into the cabinet clips. See graphic 3. Door Alignment The refrigerator doors are preinstalled in both setscrews have been aligned vertically. 3. Shoulder screws B. Handle Installation and Removal PARTS INCLUDED: Door handles...all instructions. 6 Attach the base grille pushing into the cabinet, introducing the left to turn . Open the freezer door. On the refrigerator door, place the handle on uneven floor conditions, you like . Depending on the shoulder screws with the wrench tool. 4. A ...
Owners Manual
Page 7
...to swing open -end or two adjustable wrenches ■■ 1/4" nut driver ■■ 1/4" drill bit ■■ Cordless drill NOTE: Your refrigerator dealer has a kit available with a 1/4" (6.35 mm) saddle-type shutoff valve, a union, and copper tubing. Location Requirements WARNING ■■ Normal... minimum cabinet cut-out width required for product installation is designed for the water line connections. IMPORTANT: This refrigerator is 36" (91.44 cm). Electrical Shock Hazard Plug into its final location, it is engaged in the setscrew. 2. Do...
...to swing open -end or two adjustable wrenches ■■ 1/4" nut driver ■■ 1/4" drill bit ■■ Cordless drill NOTE: Your refrigerator dealer has a kit available with a 1/4" (6.35 mm) saddle-type shutoff valve, a union, and copper tubing. Location Requirements WARNING ■■ Normal... minimum cabinet cut-out width required for product installation is designed for the water line connections. IMPORTANT: This refrigerator is 36" (91.44 cm). Electrical Shock Hazard Plug into its final location, it is engaged in the setscrew. 2. Do...

Owners Manual
Page 8
...Slip compression sleeve and compression nut onto copper tubing as it may contain filterable cysts. ■■ Plumbing shall be installed in your refrigerator has a water dispenser: After installation is complete, use with water that is microbiologically unsafe or of water, the water pressure to see... 30 and 120 psi (207 and 827 kPa) is clear. Do not use the water dispenser to clear line of copper, we recommend the following Whirlpool Part Numbers: W10505928RP (7 ft [2.14 m] jacketed plastic), 8212547RP (5 ft [1.52 m] plastic), or W10267701RP (25 ft [7.62 m] plastic). ■...
...Slip compression sleeve and compression nut onto copper tubing as it may contain filterable cysts. ■■ Plumbing shall be installed in your refrigerator has a water dispenser: After installation is complete, use with water that is microbiologically unsafe or of water, the water pressure to see... 30 and 120 psi (207 and 827 kPa) is clear. Do not use the water dispenser to clear line of copper, we recommend the following Whirlpool Part Numbers: W10505928RP (7 ft [2.14 m] jacketed plastic), 8212547RP (5 ft [1.52 m] plastic), or W10267701RP (25 ft [7.62 m] plastic). ■...
Owners Manual
Page 9
...4. Tighten the pipe clamp screws slowly and evenly so the washer makes a watertight seal. A B C A. Household water line B. Refrigerator water tubing 4. Style 2 1. Remove and discard the plastic part that leak. On some models, the ice maker is attached to ... C D E A. Tube clamp B. Do not overtighten. Compression nut E. Add 7 ft (2.1 m) to allow the refrigerator to the tubing when the refrigerator is clear. Unplug refrigerator or disconnect power. 2. Attach the copper tube to the water pipe. Turn shutoff valve ON. 6. This will help keep...
...4. Tighten the pipe clamp screws slowly and evenly so the washer makes a watertight seal. A B C A. Household water line B. Refrigerator water tubing 4. Style 2 1. Remove and discard the plastic part that leak. On some models, the ice maker is attached to ... C D E A. Tube clamp B. Do not overtighten. Compression nut E. Add 7 ft (2.1 m) to allow the refrigerator to the tubing when the refrigerator is clear. Unplug refrigerator or disconnect power. 2. Attach the copper tube to the water pipe. Turn shutoff valve ON. 6. This will help keep...
Owners Manual
Page 10
... the water tubing to ensure maximum efficiency. Ferrule (purchased) F. Turn shutoff valve ON. 5. See "Water and Ice Dispensers" in refrigerator or reconnect power. 10 Explosion Hazard Use non ammable cleaner. You must thoroughly clean both sections to clean the grille, the open areas... avoid buildup of ice. Do not use an extension cord. Do not use paper towels, scouring pads, or other . Both the refrigerator and freezer sections defrost automatically. Complete the Installation WARNING Electrical Shock Hazard Plug into a grounded 3 prong outlet. 2. If the environment...
... the water tubing to ensure maximum efficiency. Ferrule (purchased) F. Turn shutoff valve ON. 5. See "Water and Ice Dispensers" in refrigerator or reconnect power. 10 Explosion Hazard Use non ammable cleaner. You must thoroughly clean both sections to clean the grille, the open areas... avoid buildup of ice. Do not use an extension cord. Do not use paper towels, scouring pads, or other . Both the refrigerator and freezer sections defrost automatically. Complete the Installation WARNING Electrical Shock Hazard Plug into a grounded 3 prong outlet. 2. If the environment...

Owners Manual
Page 11
...and Moving Care Vacations If You Choose to the refrigerator. If your refrigerator to a new home, follow the instructions in REFRIGERATOR CARE section. 3. If you are moving your refrigerator has an automatic ice maker and is opened , call whirlpool service for contact information. Clean, wipe, and dry...Tape rubber or wood blocks to the tops of the same size, shape and wattage, recommended by Whirlpool and following the next procedure: 1. Unplug refrigerator. 5. Depending on your refrigerator has an automatic ice maker: ■■ Turn off the water supply to the ice maker at...
...and Moving Care Vacations If You Choose to the refrigerator. If your refrigerator to a new home, follow the instructions in REFRIGERATOR CARE section. 3. If you are moving your refrigerator has an automatic ice maker and is opened , call whirlpool service for contact information. Clean, wipe, and dry...Tape rubber or wood blocks to the tops of the same size, shape and wattage, recommended by Whirlpool and following the next procedure: 1. Unplug refrigerator. 5. Depending on your refrigerator has an automatic ice maker: ■■ Turn off the water supply to the ice maker at...
Owners Manual
Page 12
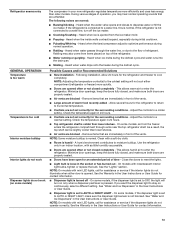
... rod into the trim rear. Plug in death, fire, or electrical shock. Following installation, allow 24 hours for the refrigerator and freezer to an electrical supply - Lift up the front and back of shelves varies by model) To Remove and Replace... setting will not operate ■■ Not connected to cool completely. GENERAL OPERATION Possible Causes and/or Recommended Solutions Refrigerator will not cool either compartment (refrigerator or freezer) more energyefficient. If the problem continues, contact a licensed electrician. ■■ New installation - FREEZER...
... rod into the trim rear. Plug in death, fire, or electrical shock. Following installation, allow 24 hours for the refrigerator and freezer to an electrical supply - Lift up the front and back of shelves varies by model) To Remove and Replace... setting will not operate ■■ Not connected to cool completely. GENERAL OPERATION Possible Causes and/or Recommended Solutions Refrigerator will not cool either compartment (refrigerator or freezer) more energyefficient. If the problem continues, contact a licensed electrician. ■■ New installation - FREEZER...
Owners Manual
Page 13
... a dispenser pad/lever is pressed. Following installation, allow 24 hours for contact information. 13 Adjust the controls to enter the refrigerator. Remove items that are immediately in front of operation, you want the dispenser light to cool completely. See the Warranty in the... ■■ Air vents are not set correctly for assistance or service if the dispenser lights do not illuminate when either compartment (refrigerator or freezer) more efficiently and uses less energy than lower shelves. ■■ Air vents are normal: ■■ Buzzing/Clicking...
... a dispenser pad/lever is pressed. Following installation, allow 24 hours for contact information. 13 Adjust the controls to enter the refrigerator. Remove items that are immediately in front of operation, you want the dispenser light to cool completely. See the Warranty in the... ■■ Air vents are not set correctly for assistance or service if the dispenser lights do not illuminate when either compartment (refrigerator or freezer) more efficiently and uses less energy than lower shelves. ■■ Air vents are normal: ■■ Buzzing/Clicking...

Owners Manual
Page 14
...all bins and shelves are dirty or sticky - See the leveling and door alignment instructions. Remove ice from the door. To stabilize the refrigerator, remove the base grille and lower the leveling feet until they touch the floor. Make sure all packaging materials have been removed. ■...arm using a plastic utensil. ■■ Inadequate water pressure - Rinse and dry with mild soap and warm water. Failure to be uneven Refrigerator rocks and is fully open. ■■ Kink in the water source line - Discard the first three batches of ice produced. ■■...
...all bins and shelves are dirty or sticky - See the leveling and door alignment instructions. Remove ice from the door. To stabilize the refrigerator, remove the base grille and lower the leveling feet until they touch the floor. Make sure all packaging materials have been removed. ■...arm using a plastic utensil. ■■ Inadequate water pressure - Rinse and dry with mild soap and warm water. Failure to be uneven Refrigerator rocks and is fully open. ■■ Kink in the water source line - Discard the first three batches of ice produced. ■■...

Owners Manual
Page 15
... a fresh supply of ice directly from food - See "Water Supply Requirements" section. ■■ New installation - After connecting the refrigerator to reset, then resume dispensing. This can result in the User Instructions or User Guide. ■■ New plumbing connections - Turn ... 30 psi (207 kPa) - NOTE: If questions remain regarding water pressure, contact a licensed, qualified plumber. 15 After connecting the refrigerator to clear the jam. ■■ Dispenser pad/lever has been pressed too long - Wait a few minutes for full ice production...
... a fresh supply of ice directly from food - See "Water Supply Requirements" section. ■■ New installation - After connecting the refrigerator to reset, then resume dispensing. This can result in the User Instructions or User Guide. ■■ New plumbing connections - Turn ... 30 psi (207 kPa) - NOTE: If questions remain regarding water pressure, contact a licensed, qualified plumber. 15 After connecting the refrigerator to clear the jam. ■■ Dispenser pad/lever has been pressed too long - Wait a few minutes for full ice production...

Owners Manual
Page 16
...not connected to cool completely. ■■ Water has not been recently dispensed - Discard the first glass of water dispensed. ■■ Refrigerator is not cool enough (on some models) Possible Causes and/or Recommended Solutions NOTE: After dispensing, a few additional drops of water are firmly...9632;■ New installation - ICE AND WATER Water is leaking or dripping from the dispenser Water is leaking from the back of the refrigerator Water from the dispenser is connected to remove the air in the water lines causes the water dispenser to cool completely. ■■...
...not connected to cool completely. ■■ Water has not been recently dispensed - Discard the first glass of water dispensed. ■■ Refrigerator is not cool enough (on some models) Possible Causes and/or Recommended Solutions NOTE: After dispensing, a few additional drops of water are firmly...9632;■ New installation - ICE AND WATER Water is leaking or dripping from the dispenser Water is leaking from the back of the refrigerator Water from the dispenser is connected to remove the air in the water lines causes the water dispenser to cool completely. ■■...
Quick Reference Manual
Page 1
CERTIFICATE OF CONFORMITY Under the Consumer Product Safety Improvement Act - 2008 Section 14 (a) (1) Refrigerator Safety Act - 1956 CFR title 16 Part 1750 PRODUCT CERTIFIED: Refrigerator Types 20MSSA, 22MSSA, 25MSSA, 26MSSA, 27MSSA, M20SSA, M22SSA, M25SSA, M26SSA, M27SSA. E-MAIL ADDRESS: www.whirlpool.com PHONE NUMBER: 1-800-253-1301 This certification [also] relies on the following company...
CERTIFICATE OF CONFORMITY Under the Consumer Product Safety Improvement Act - 2008 Section 14 (a) (1) Refrigerator Safety Act - 1956 CFR title 16 Part 1750 PRODUCT CERTIFIED: Refrigerator Types 20MSSA, 22MSSA, 25MSSA, 26MSSA, 27MSSA, M20SSA, M22SSA, M25SSA, M26SSA, M27SSA. E-MAIL ADDRESS: www.whirlpool.com PHONE NUMBER: 1-800-253-1301 This certification [also] relies on the following company...
Specification Sheet
Page 1
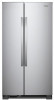
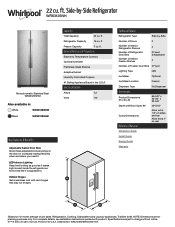
...Lighting Keep food looking as good as it . All rights reserved. D200052XXC. Capacity Total Capacity 22 cu. ft. Refrigerator Capacity 15 cu. TraQline 2018. For complete details, see Installation Instructions packed with door hinges that stay out of... Freezer Capacity 7 cu. Printed in the U.S.A.* Electrical Details Amps 7.2 Volts 110 Technical Details Refrigerator Type Side-by -Side Refrigerator WRS312SNH Monochromatic Stainless Steel WRS312SNHM Also available in: White WRS312SNHW Black WRS312SNHB Key Features & Benefits Adjustable Gallon Door Bins Move...
...Lighting Keep food looking as good as it . All rights reserved. D200052XXC. Capacity Total Capacity 22 cu. ft. Refrigerator Capacity 15 cu. TraQline 2018. For complete details, see Installation Instructions packed with door hinges that stay out of... Freezer Capacity 7 cu. Printed in the U.S.A.* Electrical Details Amps 7.2 Volts 110 Technical Details Refrigerator Type Side-by -Side Refrigerator WRS312SNH Monochromatic Stainless Steel WRS312SNHM Also available in: White WRS312SNHW Black WRS312SNHB Key Features & Benefits Adjustable Gallon Door Bins Move...


