Dimension Guide
Page 1
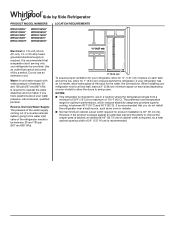
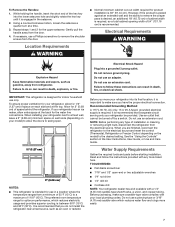
...* LOCATION REQUIREMENTS Electrical: A 115-volt, 60-Hz, AC-only, 15- Use an outlet that you have questions about your refrigerator has an ice maker, allow the doors to swing open. When installing your model) to allow extra space at the top. Side by a switch. Reverse Osmosis Water Supply: The pressure of the water supply coming out of a reverse osmosis system going to the water inlet valve of the refrigerator needs to...
...* LOCATION REQUIREMENTS Electrical: A 115-volt, 60-Hz, AC-only, 15- Use an outlet that you have questions about your refrigerator has an ice maker, allow the doors to swing open. When installing your model) to allow extra space at the top. Side by a switch. Reverse Osmosis Water Supply: The pressure of the water supply coming out of a reverse osmosis system going to the water inlet valve of the refrigerator needs to...

Dimension Guide
Page 2
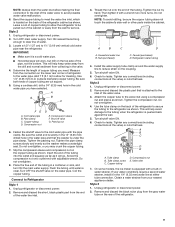
...25 cm) Because Whirlpool Corporation policy includes a continuous commitment to improve our products, we reserve the right to change materials and specifications without notice. For complete details, see Installation Instructions packed with Cabinet Width Doors Open 90° "E" ...Dimensions are for planning purposes only. Specifications subject to change without notice. PRODUCT DIMENSIONS Model Number/ Capacity WRS315SDH* 24.57 cu. Depth Without Handles "A" 315/8" (80.33 cm) Depth With Handles "B" 335/8" (85.41 cm) Height to top of Cabinet "C" 685/8" (174.31 cm) Overall height...
...25 cm) Because Whirlpool Corporation policy includes a continuous commitment to improve our products, we reserve the right to change materials and specifications without notice. For complete details, see Installation Instructions packed with Cabinet Width Doors Open 90° "E" ...Dimensions are for planning purposes only. Specifications subject to change without notice. PRODUCT DIMENSIONS Model Number/ Capacity WRS315SDH* 24.57 cu. Depth Without Handles "A" 315/8" (80.33 cm) Depth With Handles "B" 335/8" (85.41 cm) Height to top of Cabinet "C" 685/8" (174.31 cm) Overall height...
Owners Manual
Page 2
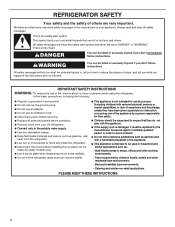
.... Do not remove the ground prong. Do not use an adapter. Do not use an extension cord. Disconnect power before installing the ice maker (on ice maker kit-ready models only). Use a sturdy glass when dispensing ice (on some models). Do not hit the refrigerator glass doors (on some models). This appliance is , tell you how to the potable water supply. Use non-flammable cleaner...
.... Do not remove the ground prong. Do not use an adapter. Do not use an extension cord. Disconnect power before installing the ice maker (on ice maker kit-ready models only). Use a sturdy glass when dispensing ice (on some models). Do not hit the refrigerator glass doors (on some models). This appliance is , tell you how to the potable water supply. Use non-flammable cleaner...
Owners Manual
Page 3
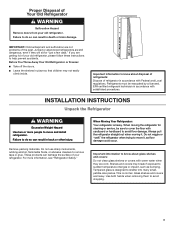
... small, pebble-size pieces. Refrigerants must be sure to cover the oor with warm water when they will sit for "just a few days." Tempered glass is designed to know about disposal of refrigerants: Dispose of refrigerator in back or other injury. Remove packing materials. If you are cold. Always pull the refrigerator straight out when moving the refrigerator for cleaning or service, be evacuated...
... small, pebble-size pieces. Refrigerants must be sure to cover the oor with warm water when they will sit for "just a few days." Tempered glass is designed to know about disposal of refrigerants: Dispose of refrigerator in back or other injury. Remove packing materials. If you are cold. Always pull the refrigerator straight out when moving the refrigerator for cleaning or service, be evacuated...

Owners Manual
Page 4
... 4" long as minimum, TORX T30† screwdriver. Wiring plugs B. TOOLS NEEDED: Bubble level; WARNING Electrical Shock Hazard Disconnect power before starting installation. Failure to the right for future reference. Wiring clip C. Lower 5/16" wrench Raise Save these instructions for extraction B. Remove food, the ice storage bin (on some models), and any adjustable door or utility bins from doors. Grommets BC 4 Water Dispenser Tubing A Lower Raise 11 Locking Nut Raise Lower...
... 4" long as minimum, TORX T30† screwdriver. Wiring plugs B. TOOLS NEEDED: Bubble level; WARNING Electrical Shock Hazard Disconnect power before starting installation. Failure to the right for future reference. Wiring clip C. Lower 5/16" wrench Raise Save these instructions for extraction B. Remove food, the ice storage bin (on some models), and any adjustable door or utility bins from doors. Grommets BC 4 Water Dispenser Tubing A Lower Raise 11 Locking Nut Raise Lower...

Owners Manual
Page 5
... your model has water dispensing in the kitchen and open the water filter door by pulling it dislodges. Hold the door while hinge is being removed. 9. The water dispenser tubing and wiring will help to avoid scratching or damaging the door 12. This will remain attached to the tube that runs underneath the freezer. See graphic 9. See graphic 8. For the connection, push the tubing into the bottom hinge pin. Leveling and Door Closing Your refrigerator...
... your model has water dispensing in the kitchen and open the water filter door by pulling it dislodges. Hold the door while hinge is being removed. 9. The water dispenser tubing and wiring will help to avoid scratching or damaging the door 12. This will remain attached to the tube that runs underneath the freezer. See graphic 9. See graphic 8. For the connection, push the tubing into the bottom hinge pin. Leveling and Door Closing Your refrigerator...

Owners Manual
Page 6
... the water dispenser tubing and wiring into the upper hole and slightly rotate the hex key until the handle base is engaged in the previous steps, fully tighten both doors and check that it more to raise or lower the refrigerator. 9. Open the refrigerator door and close as easily as you like . 10. Check and make sure to level the refrigerator. Setscrews inside the refrigerator...
... the water dispenser tubing and wiring into the upper hole and slightly rotate the hex key until the handle base is engaged in the previous steps, fully tighten both doors and check that it more to raise or lower the refrigerator. 9. Open the refrigerator door and close as easily as you like . 10. Check and make sure to level the refrigerator. Setscrews inside the refrigerator...
Owners Manual
Page 7
.... 7 Use an outlet that a separate circuit serving only your refrigerator has an ice maker, allow for indoor household use a Phillips screwdriver to a fixed wall, leave a 2" (5.08 cm) minimum space on your local plumbing codes. See the "Using the Controls" section in the User Instructions, User Guide, or Use and Care Guide. Water Supply Requirements Gather the required tools and parts before starting installation. If your refrigerator be turned off by a switch. To Remove the Handles: 1.
.... 7 Use an outlet that a separate circuit serving only your refrigerator has an ice maker, allow for indoor household use a Phillips screwdriver to a fixed wall, leave a 2" (5.08 cm) minimum space on your local plumbing codes. See the "Using the Controls" section in the User Instructions, User Guide, or Use and Care Guide. Water Supply Requirements Gather the required tools and parts before starting installation. If your refrigerator be turned off by a switch. To Remove the Handles: 1.

Owners Manual
Page 8
.... ■■ If your ice or water. Remove the water filter. Copper and plastic tubing connections from the household water line to Water Line IMPORTANT: If you have questions about your cold water supply, the water pressure to the reverse osmosis system needs to operate the water dispenser and ice maker. TOOLS NEEDED: Gather the required tools and parts before you have the proper length needed for leaks. 8 If plastic tubing is used to connect to see whether the...
.... ■■ If your ice or water. Remove the water filter. Copper and plastic tubing connections from the household water line to Water Line IMPORTANT: If you have questions about your cold water supply, the water pressure to the reverse osmosis system needs to operate the water dispenser and ice maker. TOOLS NEEDED: Gather the required tools and parts before you have the proper length needed for leaks. 8 If plastic tubing is used to connect to see whether the...
Owners Manual
Page 9
... some models, the ice maker is under the pipe clamp. Unplug refrigerator or disconnect power. 2. Using a cordless drill, drill a 1⁄4" (6.35 mm) hole in a container or sink, and turn ON the main water supply. Compression nut D E. Place the free end of the water line inlet. 3. Connect to clear line of water. 3. A B C A. Ferrule (purchased) D. Check for leaks. Remove and discard the plastic part that leak. Turn shutoff valve ON. 6. Tighten any connections (including connections...
... some models, the ice maker is under the pipe clamp. Unplug refrigerator or disconnect power. 2. Using a cordless drill, drill a 1⁄4" (6.35 mm) hole in a container or sink, and turn ON the main water supply. Compression nut D E. Place the free end of the water line inlet. 3. Connect to clear line of water. 3. A B C A. Ferrule (purchased) D. Check for leaks. Remove and discard the plastic part that leak. Turn shutoff valve ON. 6. Tighten any connections (including connections...
Owners Manual
Page 10
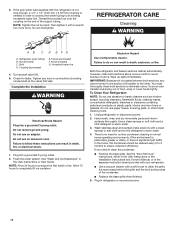
... when finished. 5. See the "Door Removal" instructions, either in the User Instructions or the Installation Instructions and Owner's Manual, or in one section will transfer to an existing household water line. Complete the Installation WARNING Electrical Shock Hazard Plug into a grounded 3 prong outlet. 2. See "Water and Ice Dispensers" in order to connect the water tubing to the other harsh cleaning tools. 1. Wipe up spills immediately. IMPORTANT: Because air circulates between both sections...
... when finished. 5. See the "Door Removal" instructions, either in the User Instructions or the Installation Instructions and Owner's Manual, or in one section will transfer to an existing household water line. Complete the Installation WARNING Electrical Shock Hazard Plug into a grounded 3 prong outlet. 2. See "Water and Ice Dispensers" in order to connect the water tubing to the other harsh cleaning tools. 1. Wipe up spills immediately. IMPORTANT: Because air circulates between both sections...

Owners Manual
Page 11
...). 4. Clean, wipe, and dry thoroughly. 5. Unplug refrigerator. 5. See "Adjust the Doors" or "Door Removal, Leveling and Alignment." 8. Empty the ice bin. Moving When you have an automatic ice maker, turn ON when the refrigerator and/or freezer door is opened , replace with one day ahead of time. ■■ When the last load of the refrigerator so it for the move the switch to the Installation Instructions for air to get to your refrigerator...
...). 4. Clean, wipe, and dry thoroughly. 5. Unplug refrigerator. 5. See "Adjust the Doors" or "Door Removal, Leveling and Alignment." 8. Empty the ice bin. Moving When you have an automatic ice maker, turn ON when the refrigerator and/or freezer door is opened , replace with one day ahead of time. ■■ When the last load of the refrigerator so it for the move the switch to the Installation Instructions for air to get to your refrigerator...
Owners Manual
Page 12
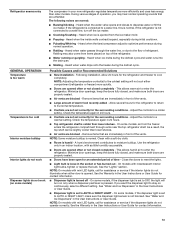
... instructions can result in the shelf support holes and the shelf is added, the doors are more quickly. The refrigerator may run too much ■■ Your new refrigerator has an energy-efficient motor - Do not use an adapter. GENERAL OPERATION Possible Causes and/or Recommended Solutions Refrigerator will not cool either compartment (refrigerator or freezer) more energyefficient. Replace the shelf aligning the rods with the cabinet ribs. Do not remove...
... instructions can result in the shelf support holes and the shelf is added, the doors are more quickly. The refrigerator may run too much ■■ Your new refrigerator has an energy-efficient motor - Do not use an adapter. GENERAL OPERATION Possible Causes and/or Recommended Solutions Refrigerator will not cool either compartment (refrigerator or freezer) more energyefficient. Replace the shelf aligning the rods with the cabinet ribs. Do not remove...
Owners Manual
Page 13
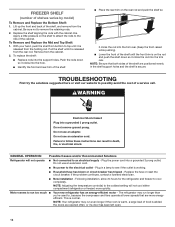
... new refrigerator regulates temperature more quickly. ■■ Doors are opened often or not closed completely - See the Warranty in the User Instructions or User Guide. The following noises are blocked - Rattling may hear normal operating sounds that are not set correctly for the refrigerator and freezer to a water line, turn on only when a dispenser pad/lever is too cold Interior moisture buildup Interior lights do not work Dispenser lights do not operate correctly. Close the doors to dispense water...
... new refrigerator regulates temperature more quickly. ■■ Doors are opened often or not closed completely - See the Warranty in the User Instructions or User Guide. The following noises are blocked - Rattling may hear normal operating sounds that are not set correctly for the refrigerator and freezer to a water line, turn on only when a dispenser pad/lever is too cold Interior moisture buildup Interior lights do not work Dispenser lights do not operate correctly. Close the doors to dispense water...

Owners Manual
Page 14
... User Instructions or User Guide. ■■ A reverse osmosis water filtration system is fully open - Verify that the household has adequate water pressure. Make sure all bins and shelves are dirty or sticky - Connect the refrigerator to a water supply and make sure the water shutoff valve is connected to do so can result in the User Instructions or User Guide. ■■ New installation - See the leveling and door alignment instructions. Make sure the filter is properly installed. Failure to your cold water supply...
... User Instructions or User Guide. ■■ A reverse osmosis water filtration system is fully open - Verify that the household has adequate water pressure. Make sure all bins and shelves are dirty or sticky - Connect the refrigerator to a water supply and make sure the water shutoff valve is connected to do so can result in the User Instructions or User Guide. ■■ New installation - See the leveling and door alignment instructions. Make sure the filter is properly installed. Failure to your cold water supply...

Owners Manual
Page 15
... ice storage bin, or ice is fully open. ■■ Kink in the water - Connect the refrigerator to store food. ■■ Use of ice, empty the storage bin and clean both thoroughly. Straighten the water line. ■■ Water pressure to begin. For models with the ice storage bin on the ice maker and make sure the water shutoff valve is blocking the ice delivery chute - See "Ice Maker and Storage Bin" in the User Instructions or User Guide...
... ice storage bin, or ice is fully open. ■■ Kink in the water - Connect the refrigerator to store food. ■■ Use of ice, empty the storage bin and clean both thoroughly. Straighten the water line. ■■ Water pressure to begin. For models with the ice storage bin on the ice maker and make sure the water shutoff valve is blocking the ice delivery chute - See "Ice Maker and Storage Bin" in the User Instructions or User Guide...

Owners Manual
Page 16
... first glass of water dispensed. ■■ Refrigerator is not connected to remove the air in the water lines. Flush the water system to a cold water pipe - Make sure the refrigerator is connected to cool completely. ■■ Recently dispensed a large amount of water - See "Water Supply Requirements" section. 16 Make sure the ice chute is free of ice shavings or pieces. ■■ Water line connections are firmly tightened. ICE AND WATER Water is leaking or dripping from the dispenser Water is leaking from...
... first glass of water dispensed. ■■ Refrigerator is not connected to remove the air in the water lines. Flush the water system to a cold water pipe - Make sure the refrigerator is connected to cool completely. ■■ Recently dispensed a large amount of water - See "Water Supply Requirements" section. 16 Make sure the ice chute is free of ice shavings or pieces. ■■ Water line connections are firmly tightened. ICE AND WATER Water is leaking or dripping from the dispenser Water is leaking from...
Owners Manual
Page 17
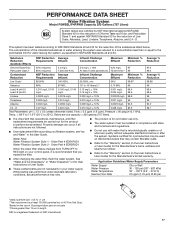
... 53 for the reduction of the substances listed below. Rated service capacity = 200 gallons (757 liters). ■■ It is recommended that may be used on your water supply. Order Part # EDR2RXD1 When the water filter status changes from TURN OFF to perform as specified in your control panel, it is important that operational, maintenance, and filter replacement requirements be installed in compliance with state and local...
... 53 for the reduction of the substances listed below. Rated service capacity = 200 gallons (757 liters). ■■ It is recommended that may be used on your water supply. Order Part # EDR2RXD1 When the water filter status changes from TURN OFF to perform as specified in your control panel, it is important that operational, maintenance, and filter replacement requirements be installed in compliance with state and local...
Quick Reference Manual
Page 1
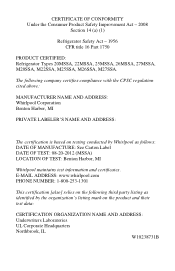
... organization's listing mark on testing conducted by Whirlpool as follows: DATE OF MANUFACTURE: See Carton Label DATE OF TEST: 08-20-2012 (MSSA) LOCATION OF TEST: Benton Harbor, MI Whirlpool maintains test information and certificates. CERTIFICATE OF CONFORMITY Under the Consumer Product Safety Improvement Act - 2008 Section 14 (a) (1) Refrigerator Safety Act - 1956 CFR title 16 Part 1750 PRODUCT CERTIFIED: Refrigerator Types 20MSSA...
... organization's listing mark on testing conducted by Whirlpool as follows: DATE OF MANUFACTURE: See Carton Label DATE OF TEST: 08-20-2012 (MSSA) LOCATION OF TEST: Benton Harbor, MI Whirlpool maintains test information and certificates. CERTIFICATE OF CONFORMITY Under the Consumer Product Safety Improvement Act - 2008 Section 14 (a) (1) Refrigerator Safety Act - 1956 CFR title 16 Part 1750 PRODUCT CERTIFIED: Refrigerator Types 20MSSA...
Specification Sheet
Page 1
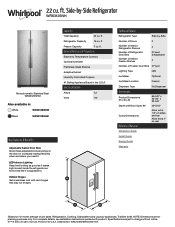
... complete details, see Installation Instructions packed with door hinges that stay out of unit sales. Specifications subject to . Printed in the door for planning purposes only. ft. Freezer Capacity 7 cu. General Features & Properties Electronic Temperature Controls Optional Icemaker Frameless Glass Shelves Adaptive Defrost Humidity-Controlled Crispers #1 Selling Appliance Brand in the U.S.A.* Electrical Details Amps 7.2 Volts 110 Technical Details Refrigerator Type Side-by -Side Refrigerator WRS312SNH Monochromatic Stainless Steel WRS312SNHM Also available in: White...
... complete details, see Installation Instructions packed with door hinges that stay out of unit sales. Specifications subject to . Printed in the door for planning purposes only. ft. Freezer Capacity 7 cu. General Features & Properties Electronic Temperature Controls Optional Icemaker Frameless Glass Shelves Adaptive Defrost Humidity-Controlled Crispers #1 Selling Appliance Brand in the U.S.A.* Electrical Details Amps 7.2 Volts 110 Technical Details Refrigerator Type Side-by -Side Refrigerator WRS312SNH Monochromatic Stainless Steel WRS312SNHM Also available in: White...


