Owners Manual
Page 2
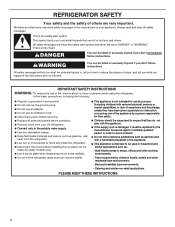
... lack of experience and knowledge, unless they do not play with a flammable propellant in hotels, motels and other working environments; - Always read and obey all parts and panels before operating. Remove doors from your appliance. This is not intended for use of the appliance by clients in this manual and...
... lack of experience and knowledge, unless they do not play with a flammable propellant in hotels, motels and other working environments; - Always read and obey all parts and panels before operating. Remove doors from your appliance. This is not intended for use of the appliance by clients in this manual and...

Owners Manual
Page 4
... Filter Door and Base Grille Phillips screws Loosen 12 Alignment Screw A. TOOLS NEEDED: Bubble level; Door Removal, Leveling, and Alignment Gather the required tools and parts and read all instructions before removing doors. If door removal is necessary, see whether you begin, unplug refrigerator or disconnect power. Pull to do so...
... Filter Door and Base Grille Phillips screws Loosen 12 Alignment Screw A. TOOLS NEEDED: Bubble level; Door Removal, Leveling, and Alignment Gather the required tools and parts and read all instructions before removing doors. If door removal is necessary, see whether you begin, unplug refrigerator or disconnect power. Pull to do so...

Owners Manual
Page 6
... to the back until the handle base is engaged in both screws to the right to install the other soft surface. 2. A B A. Handle Installation and Removal PARTS INCLUDED: Door handles (2), 1/8" hex key, spare setscrew(s) To Install the Handles: NOTE: The handle mounting setscrews are packed inside the handle 3. IMPORTANT: When the screws...
... to the back until the handle base is engaged in both screws to the right to install the other soft surface. 2. A B A. Handle Installation and Removal PARTS INCLUDED: Door handles (2), 1/8" hex key, spare setscrew(s) To Install the Handles: NOTE: The handle mounting setscrews are packed inside the handle 3. IMPORTANT: When the screws...
Owners Manual
Page 7
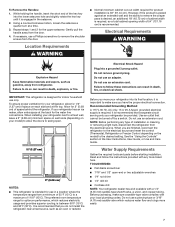
... pull the handle away from refrigerator. Do not use an extension cord. Do not use an adapter. Water Supply Requirements Gather the required tools and parts before starting installation. Location Requirements WARNING ■■ Normal minimum cabinet cut-out width required for product installation is designed for the water line connections...
... pull the handle away from refrigerator. Do not use an extension cord. Do not use an adapter. Water Supply Requirements Gather the required tools and parts before starting installation. Location Requirements WARNING ■■ Normal minimum cabinet cut-out width required for product installation is designed for the water line connections...

Owners Manual
Page 8
... C. Use 1⁄4" (6.35 mm) OD soft copper tubing to operate the water dispenser and ice maker. Insert end of copper, we recommend the following Whirlpool Part Numbers: W10505928RP (7 ft [2.14 m] jacketed plastic), 8212547RP (5 ft [1.52 m] plastic), or W10267701RP (25 ft [7.62 m] plastic). ■■ Install... for cyst reduction may be between 30 and 120 psi (207 and 827 kPa) is clear. TOOLS NEEDED: Gather the required tools and parts before starting installation. ■■ Flat-blade screwdriver ■■ 7⁄16" and 1/2" open-end wrenches or two adjustable wrenches &#...
... C. Use 1⁄4" (6.35 mm) OD soft copper tubing to operate the water dispenser and ice maker. Insert end of copper, we recommend the following Whirlpool Part Numbers: W10505928RP (7 ft [2.14 m] jacketed plastic), 8212547RP (5 ft [1.52 m] plastic), or W10267701RP (25 ft [7.62 m] plastic). ■■ Install... for cyst reduction may be between 30 and 120 psi (207 and 827 kPa) is clear. TOOLS NEEDED: Gather the required tools and parts before starting installation. ■■ Flat-blade screwdriver ■■ 7⁄16" and 1/2" open-end wrenches or two adjustable wrenches &#...
Owners Manual
Page 9
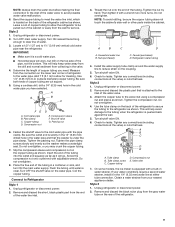
...nut D E. Do not overtighten. 8. Tighten the nut by hand. Do not overtighten. Ferrule (purchased) D. Check for leaks. Remove and discard the plastic part that the washer is located on the copper tubing as shown. Determine the length of water. 3. A G B C FE A. Pipe clamp C. Unplug ...5. Connect to 1¼" (3.18 cm) vertical cold water pipe near the refrigerator. Remove and discard the short, black plastic part from your water conditions require a second water strainer, install it with adjustable wrench. Thread the nut onto the end of the...
...nut D E. Do not overtighten. 8. Tighten the nut by hand. Do not overtighten. Ferrule (purchased) D. Check for leaks. Remove and discard the plastic part that the washer is located on the copper tubing as shown. Determine the length of water. 3. A G B C FE A. Pipe clamp C. Unplug ...5. Connect to 1¼" (3.18 cm) vertical cold water pipe near the refrigerator. Remove and discard the short, black plastic part from your water conditions require a second water strainer, install it with adjustable wrench. Thread the nut onto the end of the...
Owners Manual
Page 10
...circulates between both sections, any nuts or connections (including connections at the valve) that leak. Hand wash, rinse, and dry removable parts and interior surfaces thoroughly. See the "Door Removal" instructions, either in the User Instructions or the Installation Instructions and Owner's Manual,... gray water tube supplied with a soft brush to the other harsh cleaning tools. 1. Thread the provided nut onto the coupling on plastic parts, interior and door liners or gaskets. NOTE: Tighten the nut by hand. Do not overtighten. Bulb D. Nut (purchased) G. Complete ...
...circulates between both sections, any nuts or connections (including connections at the valve) that leak. Hand wash, rinse, and dry removable parts and interior surfaces thoroughly. See the "Door Removal" instructions, either in the User Instructions or the Installation Instructions and Owner's Manual,... gray water tube supplied with a soft brush to the other harsh cleaning tools. 1. Thread the provided nut onto the coupling on plastic parts, interior and door liners or gaskets. NOTE: Tighten the nut by hand. Do not overtighten. Bulb D. Nut (purchased) G. Complete ...

Owners Manual
Page 11
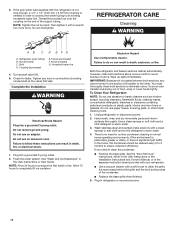
...odor and mold from the back of the refrigerator. ■■ When the last load of the same size, shape and wattage, recommended by Whirlpool and following the next procedure: 1. Use up . Remove all food from the refrigerator and pack all appliance bulbs will fit your model, raise... refrigerator. Unplug refrigerator or disconnect power. 2. Vacation and Moving Care Vacations If You Choose to the OFF (right) setting. 2. Remove all removable parts, wrap them well, and tape them open far enough for the move the switch to the refrigerator. 11 NOTE: To clean the light cover, ...
...odor and mold from the back of the refrigerator. ■■ When the last load of the same size, shape and wattage, recommended by Whirlpool and following the next procedure: 1. Use up . Remove all food from the refrigerator and pack all appliance bulbs will fit your model, raise... refrigerator. Unplug refrigerator or disconnect power. 2. Vacation and Moving Care Vacations If You Choose to the OFF (right) setting. 2. Remove all removable parts, wrap them well, and tape them open far enough for the move the switch to the refrigerator. 11 NOTE: To clean the light cover, ...
Owners Manual
Page 17
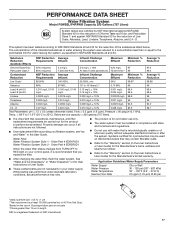
... = 68°F to 71.6°F (20°C to NSF/ANSI Standards 42 and 53 for the reduction of the substances listed below. Order Part # EDR1RXD1 Water Filtration System Style 2 - The concentration of the indicated substances in the User Instructions or User Guide) for the Manufacturer's name, ...use with water that is important that you filtration system, see"Ice and Water" in NSF/ANSI Standards 42 and 53. Order Part # EDR2RXD1 When the water filter status changes from TURN OFF to Application Guidelines/Water Supply Parameters Water Supply Water Pressure Water Temperature ...
... = 68°F to 71.6°F (20°C to NSF/ANSI Standards 42 and 53 for the reduction of the substances listed below. Order Part # EDR1RXD1 Water Filtration System Style 2 - The concentration of the indicated substances in the User Instructions or User Guide) for the Manufacturer's name, ...use with water that is important that you filtration system, see"Ice and Water" in NSF/ANSI Standards 42 and 53. Order Part # EDR2RXD1 When the water filter status changes from TURN OFF to Application Guidelines/Water Supply Parameters Water Supply Water Pressure Water Temperature ...
Quick Reference Manual
Page 1
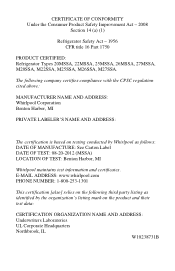
... Safety Act - 1956 CFR title 16 Part 1750 PRODUCT CERTIFIED: Refrigerator Types 20MSSA, 22MSSA, 25MSSA, 26MSSA, 27MSSA, M20SSA, M22SSA, M25SSA, M26SSA, M27SSA. The following company certifies compliance with the CPSC regulation cited above: MANUFACTURER NAME AND ADDRESS: Whirlpool Corporation Benton Harbor, MI PRIVATE LABELER'S ...See Carton Label DATE OF TEST: 08-20-2012 (MSSA) LOCATION OF TEST: Benton Harbor, MI Whirlpool maintains test information and certificates. E-MAIL ADDRESS: www.whirlpool.com PHONE NUMBER: 1-800-253-1301 This certification [also] relies on the product and their test ...
... Safety Act - 1956 CFR title 16 Part 1750 PRODUCT CERTIFIED: Refrigerator Types 20MSSA, 22MSSA, 25MSSA, 26MSSA, 27MSSA, M20SSA, M22SSA, M25SSA, M26SSA, M27SSA. The following company certifies compliance with the CPSC regulation cited above: MANUFACTURER NAME AND ADDRESS: Whirlpool Corporation Benton Harbor, MI PRIVATE LABELER'S ...See Carton Label DATE OF TEST: 08-20-2012 (MSSA) LOCATION OF TEST: Benton Harbor, MI Whirlpool maintains test information and certificates. E-MAIL ADDRESS: www.whirlpool.com PHONE NUMBER: 1-800-253-1301 This certification [also] relies on the product and their test ...


