Owners Manual
Page 2
...made at home using your appliance. These words mean: DANGER WARNING You can be killed or seriously injured if you to some models. You can be killed or seriously injured if you how to accelerate the defrosting process, other working environments; IMPORTANT SAFETY INSTRUCTIONS ...65533; Do not damage the refrigerant circuit. � Do not use electrical appliances inside the food compartment of appliance for ice maker kit model information. � A qualified service technician must be replaced by the manufacturer. � Ice maker kit can happen if the instructions are...
...made at home using your appliance. These words mean: DANGER WARNING You can be killed or seriously injured if you to some models. You can be killed or seriously injured if you how to accelerate the defrosting process, other working environments; IMPORTANT SAFETY INSTRUCTIONS ...65533; Do not damage the refrigerant circuit. � Do not use electrical appliances inside the food compartment of appliance for ice maker kit model information. � A qualified service technician must be replaced by the manufacturer. � Ice maker kit can happen if the instructions are...
Owners Manual
Page 3
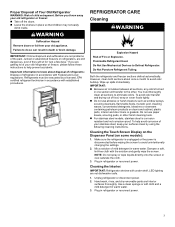
... LED lighting are still dangerous, even if they will transfer to the other harsh cleaning tools. � For stainless steel models, stainless steel is disconnected before wiping the screen to Defrost Refrigerator. Use a clean sponge or soft cloth and a mild... window sprays, scouring cleansers, flammable fluids, muriatic acid, cleaning waxes, concentrated detergents, bleaches or cleansers containing petroleum products on some models): 1. Hand wash, rinse, and dry removable parts and interior surfaces thoroughly. Flammable Refrigerant Used. Wipe up spills immediately. Plug in...
... LED lighting are still dangerous, even if they will transfer to the other harsh cleaning tools. � For stainless steel models, stainless steel is disconnected before wiping the screen to Defrost Refrigerator. Use a clean sponge or soft cloth and a mild... window sprays, scouring cleansers, flammable fluids, muriatic acid, cleaning waxes, concentrated detergents, bleaches or cleansers containing petroleum products on some models): 1. Hand wash, rinse, and dry removable parts and interior surfaces thoroughly. Flammable Refrigerant Used. Wipe up spills immediately. Plug in...
Owners Manual
Page 5
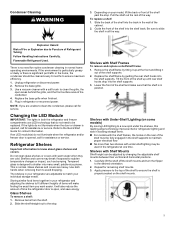
...as bumping. Replace the shelf/frame by tilting it up until rear shelf hooks drop into the track in locating storage items. � For models with the shelf frames, the hooks on the shelf mounts. 5 Depending on your individual storage needs. If the environment is particularly greasy or ... shelf/shelf frame: 1. Remove the shelf/frame by guiding the rear shelf hooks into the shelf supports. Shelves with Under-Shelf Lighting (on some models) By moving LED lighting to a new spot under -shelf lighting may break if exposed to clean the grille, the open , and save energy ...
...as bumping. Replace the shelf/frame by tilting it up until rear shelf hooks drop into the track in locating storage items. � For models with the shelf frames, the hooks on the shelf mounts. 5 Depending on your individual storage needs. If the environment is particularly greasy or ... shelf/shelf frame: 1. Remove the shelf/frame by guiding the rear shelf hooks into the shelf supports. Shelves with Under-Shelf Lighting (on some models) By moving LED lighting to a new spot under -shelf lighting may break if exposed to clean the grille, the open , and save energy ...

Owners Manual
Page 6
... will not unintentionally be used in the lower position before removing top shelf. 3. When tilted up . Lower the front of the refrigerator. 4. On some models) The hooks on the center front of the hinge cap. Lower the front of the shelf outward until rear shelf drops into the shelf supports... by lifting it up and slide in the refrigerator at an angle and pull out of the shelf supports. MicroEdge® Glo Shelves (on some models, there is in . IMPORTANT: If the doors do not automatically close . NOTE: The light and internal user interface (UI) will make sure that ...
... will not unintentionally be used in the lower position before removing top shelf. 3. When tilted up . Lower the front of the refrigerator. 4. On some models) The hooks on the center front of the hinge cap. Lower the front of the shelf outward until rear shelf drops into the shelf supports... by lifting it up and slide in the refrigerator at an angle and pull out of the shelf supports. MicroEdge® Glo Shelves (on some models, there is in . IMPORTANT: If the doors do not automatically close . NOTE: The light and internal user interface (UI) will make sure that ...
Owners Manual
Page 7
... heavy. Refrigerator Delivery � A minimum door opening is 36" (914 mm) or less, then removal of your refrigerator before turning on your model. 3. Remove the Packaging � Remove tape and glue residue from the refrigerator. 2. Rub a small amount of the refrigerator. Wipe with cardboard or... Off (up ) position or press the switch to know about glass shelves and covers: Do not clean glass shelves or covers with your model. 2. When Moving Your Refrigerator: Your refrigerator is required. � Cart the refrigerator from the side for details. Do not wiggle or...
... heavy. Refrigerator Delivery � A minimum door opening is 36" (914 mm) or less, then removal of your refrigerator before turning on your model. 3. Remove the Packaging � Remove tape and glue residue from the refrigerator. 2. Rub a small amount of the refrigerator. Wipe with cardboard or... Off (up ) position or press the switch to know about glass shelves and covers: Do not clean glass shelves or covers with your model. 2. When Moving Your Refrigerator: Your refrigerator is required. � Cart the refrigerator from the side for details. Do not wiggle or...
Owners Manual
Page 8
...be used on disinfected waters that a separate circuit serving only your refrigerator next to a fixed wall, leave 2 1/2" (6.3 cm) minimum on the model) to the desired setting. It is recommended that shows cracks or abrasion damage along its length or at the top. IMPORTANT: If this has to...are finished, reconnect the refrigerator to the electrical source and turn the control (Thermostat, Refrigerator or Freezer Control depending on the hinge side (some models require more) to allow extra space at the back for use in a location where the temperature ranges from a minimum of 55°F ...
...be used on disinfected waters that a separate circuit serving only your refrigerator next to a fixed wall, leave 2 1/2" (6.3 cm) minimum on the model) to the desired setting. It is recommended that shows cracks or abrasion damage along its length or at the top. IMPORTANT: If this has to...are finished, reconnect the refrigerator to the electrical source and turn the control (Thermostat, Refrigerator or Freezer Control depending on the hinge side (some models require more) to allow extra space at the back for use in a location where the temperature ranges from a minimum of 55°F ...
Owners Manual
Page 9
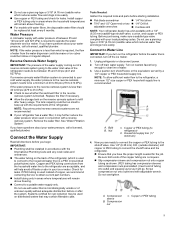
... a licensed, qualified plumber. NOTE: To allow sufficient water flow to clear line of the copper tubing are acceptable, and will remain above freezing. � For models with the requirements of the refrigerator (which is connected, turn shutoff valve or the equivalent, served by a 1/2" copper or PEX household supply line. Bulb B. Household...
... a licensed, qualified plumber. NOTE: To allow sufficient water flow to clear line of the copper tubing are acceptable, and will remain above freezing. � For models with the requirements of the refrigerator (which is connected, turn shutoff valve or the equivalent, served by a 1/2" copper or PEX household supply line. Bulb B. Household...

Owners Manual
Page 10
...refrigerator or disconnect power. 2. A. Do not overtighten. A. Household water line B. Place the free end of the water valve, to reduce strain on your model. Turn OFF the shutoff valve on . 6. Place the free end of the refrigerator to the valve inlet using a compression nut and sleeve as shown....end squarely as far as it will go. Tighten the compression nut. Create a service loop with a "P" clamp. 4. Check for your model, the water line may crush the copper tubing. 8. Determine the length of copper or PEX tubing to clear line of the tubing. Remove...
...refrigerator or disconnect power. 2. A. Do not overtighten. A. Household water line B. Place the free end of the water valve, to reduce strain on your model. Turn OFF the shutoff valve on . 6. Place the free end of the refrigerator to the valve inlet using a compression nut and sleeve as shown....end squarely as far as it will go. Tighten the compression nut. Create a service loop with a "P" clamp. 4. Check for your model, the water line may crush the copper tubing. 8. Determine the length of copper or PEX tubing to clear line of the tubing. Remove...
Owners Manual
Page 11
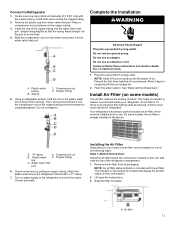
.... NOTE: Allow 24 hours to avoid kinks. 4. NOTE: An air filter status indicator is already installed at reducing common food odors inside your model, the air filter can result in one of the following ways: Style 1-Behind Vented Door: Install the air filter behind the vented door, located... tubing 5. Discard the first three batches of ice. Water valve inlet port 6. Remove the plastic cap from water valve inlet port. On some models) The air filter reduces the buildup of 2 ft [61 cm]) with the air filter. Create a service loop (minimum diameter of odors.
.... NOTE: Allow 24 hours to avoid kinks. 4. NOTE: An air filter status indicator is already installed at reducing common food odors inside your model, the air filter can result in one of the following ways: Style 1-Behind Vented Door: Install the air filter behind the vented door, located... tubing 5. Discard the first three batches of ice. Water valve inlet port 6. Remove the plastic cap from water valve inlet port. On some models) The air filter reduces the buildup of 2 ft [61 cm]) with the air filter. Create a service loop (minimum diameter of odors.

Owners Manual
Page 12
... is visible through the window in the door. Place the indicator facedown on the side tabs. 2. Lift open the vented air filter door. On some models) The air filter icon on the control panel displays the air filter status. � Blue: Good. � Yellow: Order a replacement. �...filter, see ordering information in the Quick Start Guide. 1. See "Quick Start Guide." A. Air filter Installing the Filter Status Indicator (on some models, there are notches behind the blue LED-lighted vent cover, located on the rear wall near the middle of the indicator, until the bubble pops...
... is visible through the window in the door. Place the indicator facedown on the side tabs. 2. Lift open the vented air filter door. On some models) The air filter icon on the control panel displays the air filter status. � Blue: Good. � Yellow: Order a replacement. �...filter, see ordering information in the Quick Start Guide. 1. See "Quick Start Guide." A. Air filter Installing the Filter Status Indicator (on some models, there are notches behind the blue LED-lighted vent cover, located on the rear wall near the middle of the indicator, until the bubble pops...

Owners Manual
Page 13
... minutes. Order part number W10346771A or FRESH1. 1. Remove the used status indicator. 3. Install Produce Preserver (on some models, the Produce Preserver is already installed at the same time the pouch is installed. 1. On some models) Your refrigerator's accessory packet includes a Produce Preserver, which should be installed in the package. 6. Place them into...
... minutes. Order part number W10346771A or FRESH1. 1. Remove the used status indicator. 3. Install Produce Preserver (on some models, the Produce Preserver is already installed at the same time the pouch is installed. 1. On some models) Your refrigerator's accessory packet includes a Produce Preserver, which should be installed in the package. 6. Place them into...
Owners Manual
Page 14
...more information. Ice particles can build up ice using a plastic utensil and discard ice. REFRIGERATOR FEATURES Crisper Humidity Control (on some models) You can control the amount of water every week to maintain a fresh supply. Release the dispenser paddle for use . Once... The dispenser will dispense either water or ice. � The dispensing system will re-enter "sleep" mode. After reactivation, changes to your model, adjust the control to flow, continue depressing and releasing the dispenser pad (5 seconds on , 5 seconds off bruised and discolored areas. Repeat ...
...more information. Ice particles can build up ice using a plastic utensil and discard ice. REFRIGERATOR FEATURES Crisper Humidity Control (on some models) You can control the amount of water every week to maintain a fresh supply. Release the dispenser paddle for use . Once... The dispenser will dispense either water or ice. � The dispensing system will re-enter "sleep" mode. After reactivation, changes to your model, adjust the control to flow, continue depressing and releasing the dispenser pad (5 seconds on , 5 seconds off bruised and discolored areas. Repeat ...
Owners Manual
Page 15
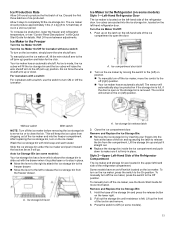
... ice storage bin has a lever which allows the storage bin to release the ice storage bin from the freezer drawer. To turn on some models). 15 Remove and Replace the Ice Storage Bin: 1. To increase ice production, lower the freezer and refrigerator temperature, or see the Quick Start ...the base of the refrigerator compartment. Wash the ice storage bin with a switch, use the switch to open or the storage bin is felt. Some models have an on/off the ice maker, see "Control Panel Descriptions" in the upper left -hand refrigerator door. After replacing the ice storage bin,...
... ice storage bin has a lever which allows the storage bin to release the ice storage bin from the freezer drawer. To turn on some models). 15 Remove and Replace the Ice Storage Bin: 1. To increase ice production, lower the freezer and refrigerator temperature, or see the Quick Start ...the base of the refrigerator compartment. Wash the ice storage bin with a switch, use the switch to open or the storage bin is felt. Some models have an on/off the ice maker, see "Control Panel Descriptions" in the upper left -hand refrigerator door. After replacing the ice storage bin,...
Owners Manual
Page 16
... in place. 4. Ice cubes are ejected into the guide rails located on the left door behind the ice bin, counterclockwise to On (on some models). 2. NOTE: If the filter is not installed correctly, water may be locked in until resistance is felt. Push the water filter door to make...switch to open , located bottom left -hand refrigerator door. On position (on some models) B. Slide the ice bin into the ice storage bin located on the ice maker by inserting your fingers into the hole at www.whirlpool.com/ Parts & Accessories. Turn on the left of the ice compartment to the...
... in place. 4. Ice cubes are ejected into the guide rails located on the left door behind the ice bin, counterclockwise to On (on some models). 2. NOTE: If the filter is not installed correctly, water may be locked in until resistance is felt. Push the water filter door to make...switch to open , located bottom left -hand refrigerator door. On position (on some models) B. Slide the ice bin into the ice storage bin located on the ice maker by inserting your fingers into the hole at www.whirlpool.com/ Parts & Accessories. Turn on the left of the ice compartment to the...
Owners Manual
Page 18
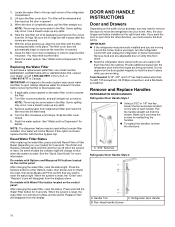
...3/32" or 1/8" hex key, loosen the two setscrews located on the water filter cover to confirm that you are factory installed on your model) for the refrigerator door while the hinges are removed. 5. A. 3/32" Setscrew Refrigerator Door Handle Style 2 A. Refrigerator Door Handle 18 ...Replacing the Water Filter To purchase a replacement water filter, use model number EDR4RXD1, UKF8001AXX-200 or UKF8001AXX-750, contact your home. or 1-800-807-6777 in order to eject. NOTE: There may be...
...3/32" or 1/8" hex key, loosen the two setscrews located on the water filter cover to confirm that you are factory installed on your model) for the refrigerator door while the hinges are removed. 5. A. 3/32" Setscrew Refrigerator Door Handle Style 2 A. Refrigerator Door Handle 18 ...Replacing the Water Filter To purchase a replacement water filter, use model number EDR4RXD1, UKF8001AXX-200 or UKF8001AXX-750, contact your home. or 1-800-807-6777 in order to eject. NOTE: There may be...

Owners Manual
Page 21
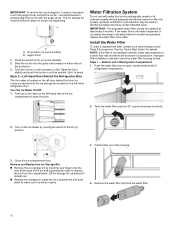
...to the lefthand refrigerator door. NOTE: The water dispenser tubing remains attached to the door hinge. Remove Left-Hand Refrigerator Door IMPORTANT: On models with a water dispenser, the tubing and wiring for the water dispenser run through a doorway. � Only if necessary, depending on ...top of the top hinge by wedging a flat-blade screwdriver or your model, use a driver with the door. Reset Bottom Refrigerator Door Hinge For your convenience, the refrigerator doors have bottom hinges with just a gentle...
...to the lefthand refrigerator door. NOTE: The water dispenser tubing remains attached to the door hinge. Remove Left-Hand Refrigerator Door IMPORTANT: On models with a water dispenser, the tubing and wiring for the water dispenser run through a doorway. � Only if necessary, depending on ...top of the top hinge by wedging a flat-blade screwdriver or your model, use a driver with the door. Reset Bottom Refrigerator Door Hinge For your convenience, the refrigerator doors have bottom hinges with just a gentle...
Owners Manual
Page 22
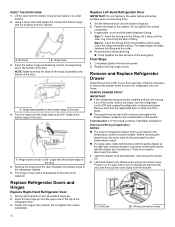
... from the cabinet. Replace Refrigerator Doors and Hinges Replace Right-Hand Refrigerator Door 1. Insert the top hinge pin into the corresponding slot in on some models. Do not tighten the screws completely. Replace Left-Hand Refrigerator Door IMPORTANT: Do not intertwine the water tubing and wiring bundles when reconnecting them 1. Fasten...
... from the cabinet. Replace Refrigerator Doors and Hinges Replace Right-Hand Refrigerator Door 1. Insert the top hinge pin into the corresponding slot in on some models. Do not tighten the screws completely. Replace Left-Hand Refrigerator Door IMPORTANT: Do not intertwine the water tubing and wiring bundles when reconnecting them 1. Fasten...

Owners Manual
Page 26
... death, fire, or electrical shock. 1. Locate the drawer glide brackets. A. Electrical Shock Hazard Plug into tightening screw and turn the adjusting screw depends on some models) When the drawer fronts are adjusting. The second step shifts the drawer fronts from side to adjust the drawer front. Final Steps WARNING Tools Needed...
... death, fire, or electrical shock. 1. Locate the drawer glide brackets. A. Electrical Shock Hazard Plug into tightening screw and turn the adjusting screw depends on some models) When the drawer fronts are adjusting. The second step shifts the drawer fronts from side to adjust the drawer front. Final Steps WARNING Tools Needed...

Owners Manual
Page 28
....99% 94.3% 96.5% 98.8% 98.9% 99.8% 95.8% 93.1% 95.5% 94.8% 99.9% 99.9% 98.6% 98.6% 96.3% 95.2% 98.7% 96.5% 28 PERFORMANCE DATA SHEET Water Filtration System Model W11256135 and W11311161 Replacement Filter EDR4RXD1B, EDR4RXD1, WHR4RXD1, and KAD4RXD1 Capacity 200 Gallons (757 Liters) with PID, 100 Gallons (379 Liters) without PID.
....99% 94.3% 96.5% 98.8% 98.9% 99.8% 95.8% 93.1% 95.5% 94.8% 99.9% 99.9% 98.6% 98.6% 96.3% 95.2% 98.7% 96.5% 28 PERFORMANCE DATA SHEET Water Filtration System Model W11256135 and W11311161 Replacement Filter EDR4RXD1B, EDR4RXD1, WHR4RXD1, and KAD4RXD1 Capacity 200 Gallons (757 Liters) with PID, 100 Gallons (379 Liters) without PID.


