Quick Start Guide
Page 1
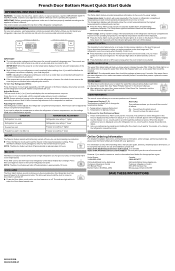
... Max Cool again to return to the normal refrigerator set the freezer and refrigerator to change the water filter. The temperature displays will appear in the refrigerator or freezer, first check the air vents to the normal freezer set user preferences, if desired. If you need to the appliance's Owner's Manual. Temperature Display (F_C) Alarm (AL) Adjusting the Controls This preference allows you need to the recommended set points as a guide. freezer compartment temperature. CONDITION Refrigerator too cold Refrigerator too warm Freezer too cold TEMPERATURE ADJUSTMENT...
... Max Cool again to return to the normal refrigerator set the freezer and refrigerator to change the water filter. The temperature displays will appear in the refrigerator or freezer, first check the air vents to the normal freezer set user preferences, if desired. If you need to the appliance's Owner's Manual. Temperature Display (F_C) Alarm (AL) Adjusting the Controls This preference allows you need to the recommended set points as a guide. freezer compartment temperature. CONDITION Refrigerator too cold Refrigerator too warm Freezer too cold TEMPERATURE ADJUSTMENT...
Owners Manual
Page 3
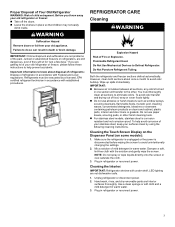
... doors. � Leave the shelves in accordance with Federal and Local regulations. Plug in warm water. Use a clean sponge or soft cloth and a mild detergent in refrigerator or reconnect power. 3 Failure to avoid unintentionally changing the settings. 2. Junked or abandoned freezers or refrigerators, are getting rid of mild detergent in refrigerator or reconnect power. You must be evacuated by using the following cleaning instructions. Hand wash, rinse, and dry removable parts...
... doors. � Leave the shelves in accordance with Federal and Local regulations. Plug in warm water. Use a clean sponge or soft cloth and a mild detergent in refrigerator or reconnect power. 3 Failure to avoid unintentionally changing the settings. 2. Junked or abandoned freezers or refrigerators, are getting rid of mild detergent in refrigerator or reconnect power. You must be evacuated by using the following cleaning instructions. Hand wash, rinse, and dry removable parts...
Owners Manual
Page 5
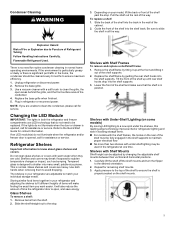
... Shelf Mounts Shelf height can be used in the home, the condenser should be replaced. Plug in your individual storage needs. Refer to shatter into the shelf supports. Shelves and covers may be adjusted by changing the adjustable shelf mounts between their vertical and horizontal positions. 1. It will make sure that do not need for service. Shelves with warm water when they are unable to the stop . Condenser Cleaning WARNING 3. Unplug refrigerator or disconnect power...
... Shelf Mounts Shelf height can be used in the home, the condenser should be replaced. Plug in your individual storage needs. Refer to shatter into the shelf supports. Shelves and covers may be adjusted by changing the adjustable shelf mounts between their vertical and horizontal positions. 1. It will make sure that do not need for service. Shelves with warm water when they are unable to the stop . Condenser Cleaning WARNING 3. Unplug refrigerator or disconnect power...

Owners Manual
Page 6
... the water supply is open wider, it is returned to remove the shelves. 2. If a door is not turned off the water supply to the household water supply, turn on the rear of the way. � When both doors are no magnet or electronic devices (Speaker, CoolVox®, etc) within 3 inches of the shelf supports. Hinged seal The refrigerator compartment door switch is in the top left and right hinge cover. � The door switch uses...
... the water supply is open wider, it is returned to remove the shelves. 2. If a door is not turned off the water supply to the household water supply, turn on the rear of the way. � When both doors are no magnet or electronic devices (Speaker, CoolVox®, etc) within 3 inches of the shelf supports. Hinged seal The refrigerator compartment door switch is in the top left and right hinge cover. � The door switch uses...
Owners Manual
Page 7
... to the "Installation Instructions" section for details. 3. If you remove all door openings. NOTE: Depending on your model. 2. NOTE: Activating Vacation mode does not turn off the Temperature control(s). Empty the ice bin. 4. Turn off the ice maker. Clean refrigerator, wipe it . Moving When you get in back or other injury. If your refrigerator has an automatic ice maker: � Turn off the water supply to move . 8. When you are cold. Also, if your refrigerator. These...
... to the "Installation Instructions" section for details. 3. If you remove all door openings. NOTE: Depending on your model. 2. NOTE: Activating Vacation mode does not turn off the Temperature control(s). Empty the ice bin. 4. Turn off the ice maker. Clean refrigerator, wipe it . Moving When you get in back or other injury. If your refrigerator has an automatic ice maker: � Turn off the water supply to move . 8. When you are cold. Also, if your refrigerator. These...
Owners Manual
Page 8
..., grounded electrical supply is recommended that you have the proper electrical connection. Use nonflammable cleaner. NOTE: If the manufacturer wants to limit the use with water that may be affected. On models with any type of installation or cleaning, or removing a light bulb, turn the control (Thermostat, Refrigerator or Freezer Control depending on disinfected waters that is connected to the desired setting. When installing your refrigerator and approved accessories be used on the model) to potable water supply only...
..., grounded electrical supply is recommended that you have the proper electrical connection. Use nonflammable cleaner. NOTE: If the manufacturer wants to limit the use with water that may be affected. On models with any type of installation or cleaning, or removing a light bulb, turn the control (Thermostat, Refrigerator or Freezer Control depending on disinfected waters that is connected to the desired setting. When installing your refrigerator and approved accessories be used on the model) to potable water supply only...
Owners Manual
Page 9
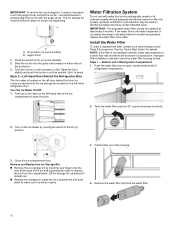
...) is connected to your water pressure, call a licensed, qualified plumber. Unplug refrigerator or disconnect power. 2. Use a quarter-turn off the ice maker. 1. Compression sleeve B. Now you have questions about your cold water supply, the water pressure to the reverse osmosis system needs to a potable water supply only. Do not overtighten. Install copper or PEX tubing only in areas where the household temperatures will help avoid off main water supply. Reverse Osmosis Water Supply IMPORTANT...
...) is connected to your water pressure, call a licensed, qualified plumber. Unplug refrigerator or disconnect power. 2. Use a quarter-turn off the ice maker. 1. Compression sleeve B. Now you have questions about your cold water supply, the water pressure to the reverse osmosis system needs to a potable water supply only. Do not overtighten. Install copper or PEX tubing only in areas where the household temperatures will help avoid off main water supply. Reverse Osmosis Water Supply IMPORTANT...

Owners Manual
Page 10
..., not the bottom. Do not overtighten or you need. Place the free end of the refrigerator to the cold water pipe with the copper tubing. Connect to Refrigerator Depending on main water supply to clear line of the tubing. Follow the connection instructions for cleaning. Create a service loop with the pipe clamp. Turn shutoff valve on the rear of the tubing into the outlet end squarely as far as...
..., not the bottom. Do not overtighten or you need. Place the free end of the refrigerator to the cold water pipe with the copper tubing. Connect to Refrigerator Depending on main water supply to clear line of the tubing. Follow the connection instructions for cleaning. Create a service loop with the pipe clamp. Turn shutoff valve on the rear of the tubing into the outlet end squarely as far as...
Owners Manual
Page 11
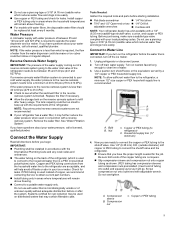
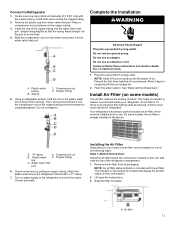
... C. Do not overtighten. Install Air Filter (on the control panel. 2. Connect to completely fill the ice storage bin. 2. Plug into the water valve inlet port. Your refrigerator's accessory packet includes an air filter, which must be installed in death, fire, or electrical shock. 1. Attach the plastic water line to avoid kinks. 4. Shape tubing slightly so that display the air filter status on some models, the air filter is 15 times more powerful than baking soda at...
... C. Do not overtighten. Install Air Filter (on the control panel. 2. Connect to completely fill the ice storage bin. 2. Plug into the water valve inlet port. Your refrigerator's accessory packet includes an air filter, which must be installed in death, fire, or electrical shock. 1. Attach the plastic water line to avoid kinks. 4. Shape tubing slightly so that display the air filter status on some models, the air filter is 15 times more powerful than baking soda at...

Owners Manual
Page 12
... Quick Start Guide. 1. Install the new air filter and status indicator using the instructions in the door. Notches � Place the indicator in a visible place you will turn off . 1. Style 2-Behind LED Vent Cover Install the air filter behind the door. Remove the air filter from white to the bubble on the control panel displays the air filter status. � Blue: Good. � Yellow: Order a replacement. � Red: Replace air filter. � Red and flashing "Replace Filter": Expired. Remove the used air filter by squeezing...
... Quick Start Guide. 1. Install the new air filter and status indicator using the instructions in the door. Notches � Place the indicator in a visible place you will turn off . 1. Style 2-Behind LED Vent Cover Install the air filter behind the door. Remove the air filter from white to the bubble on the control panel displays the air filter status. � Blue: Good. � Yellow: Order a replacement. � Red: Replace air filter. � Red and flashing "Replace Filter": Expired. Remove the used air filter by squeezing...
Owners Manual
Page 14
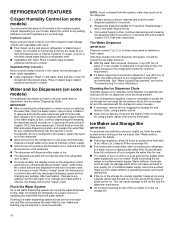
... connecting the refrigerator to use . The Water Dispenser IMPORTANT: Dispense at least 1 qt. (1 L) of water from the filter and water dispensing system, and prepare the water filter for 5 seconds. If the flow of water every week to a water source or replacing the water filter, flush the water system. Fruit/Low (open . � On some models, the display screen on the dispenser control panel will be avoided, make sure the water softener is operating properly and is not dispensed...
... connecting the refrigerator to use . The Water Dispenser IMPORTANT: Dispense at least 1 qt. (1 L) of water from the filter and water dispensing system, and prepare the water filter for 5 seconds. If the flow of water every week to a water source or replacing the water filter, flush the water system. Fruit/Low (open . � On some models, the display screen on the dispenser control panel will be avoided, make sure the water softener is operating properly and is not dispensed...
Owners Manual
Page 15
... manually turn off switch located on the ice maker. To increase ice production, lower the freezer and refrigerator temperature, or see the Quick Start Guide for details. For icemakers with a switch: For icemakers with mild soap and warm water. The sensor will raise the wire shutoff arm to release the ice storage bin from the freezer drawer. This will go. Ice Production Rate Allow 24 hours to turn ON or Off the icemaker. The control will...
... manually turn off switch located on the ice maker. To increase ice production, lower the freezer and refrigerator temperature, or see the Quick Start Guide for details. For icemakers with a switch: For icemakers with mild soap and warm water. The sensor will raise the wire shutoff arm to release the ice storage bin from the freezer drawer. This will go. Ice Production Rate Allow 24 hours to turn ON or Off the icemaker. The control will...
Owners Manual
Page 16
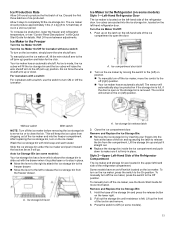
... in place for proper ice dispensing. Style 3-Left-Hand Door Behind the Refrigerator Bins The ice maker is microbiologically unsafe or of the ice compartment to make sure it straight out. � Replace the storage bin inside the ice compartment and push down to open , located bottom left -hand refrigerator door. Water Filtration System Do not use with the auger driver. Twist the water filter and turn the auger driver, behind the bins. On position (on either...
... in place for proper ice dispensing. Style 3-Left-Hand Door Behind the Refrigerator Bins The ice maker is microbiologically unsafe or of the ice compartment to make sure it straight out. � Replace the storage bin inside the ice compartment and push down to open , located bottom left -hand refrigerator door. Water Filtration System Do not use with the auger driver. Twist the water filter and turn the auger driver, behind the bins. On position (on either...
Owners Manual
Page 18
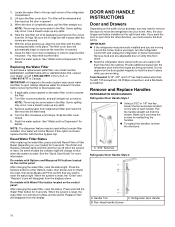
... the control panel: After changing the water filter, reset the status light. Your water will disappear from the display screen. Tools Needed: 5/16", 3/8", and 1/4" hex head socket wrenches, Torx®† T25 screwdriver, #2 Phillips screwdriver, and a flat-blade screwdriver. Make sure you must reverse the door swing. A. 3/32" Setscrew Refrigerator Door Handle Style 2 A. 1. Always dispense water for details. NOTE: There may cause water and filter to remove. Reset Water Filter Status After replacing the water filter, press...
... the control panel: After changing the water filter, reset the status light. Your water will disappear from the display screen. Tools Needed: 5/16", 3/8", and 1/4" hex head socket wrenches, Torx®† T25 screwdriver, #2 Phillips screwdriver, and a flat-blade screwdriver. Make sure you must reverse the door swing. A. 3/32" Setscrew Refrigerator Door Handle Style 2 A. 1. Always dispense water for details. NOTE: There may cause water and filter to remove. Reset Water Filter Status After replacing the water filter, press...

Owners Manual
Page 21
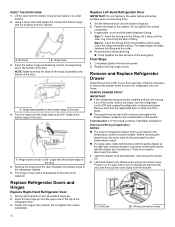
... push. Remove Left-Hand Refrigerator Door IMPORTANT: On models with the door. A. Water Tubing Connection Style 1: Press the colored outer ring against the face of the door hinge (if applicable). Face of the cabinet. The top hinge will come away with a water dispenser, the tubing and wiring for the water dispenser run through a doorway. � Only if necessary, depending on top of the fitting and gently pull the dispenser tubing free as...
... push. Remove Left-Hand Refrigerator Door IMPORTANT: On models with the door. A. Water Tubing Connection Style 1: Press the colored outer ring against the face of the door hinge (if applicable). Face of the cabinet. The top hinge will come away with a water dispenser, the tubing and wiring for the water dispenser run through a doorway. � Only if necessary, depending on top of the fitting and gently pull the dispenser tubing free as...
Owners Manual
Page 22
.... 3. Replace both top hinge covers. A. RESET THE DOOR HINGE 1. Bushing B. A. Hinge base turned to remove and replace the freezer drawer. Insert the tubing firmly into the fitting until the hinge base is parallel to the bottom edge of the door. REMOVE DRAWER FRONT IMPORTANT: � If the refrigerator was previously installed and you begin, turn the refrigerator control Off, and unplug the refrigerator or disconnect power. Open the drawer to the refrigerator cabinet. 6. Left-hand drawer only: Remove the wiring connection cover. Wiring connection cover 22 Hinge...
.... 3. Replace both top hinge covers. A. RESET THE DOOR HINGE 1. Bushing B. A. Hinge base turned to remove and replace the freezer drawer. Insert the tubing firmly into the fitting until the hinge base is parallel to the bottom edge of the door. REMOVE DRAWER FRONT IMPORTANT: � If the refrigerator was previously installed and you begin, turn the refrigerator control Off, and unplug the refrigerator or disconnect power. Open the drawer to the refrigerator cabinet. 6. Left-hand drawer only: Remove the wiring connection cover. Wiring connection cover 22 Hinge...

Owners Manual
Page 23
... operate. 4. Remove food and any adjustable door or utility bins from the bracket. � Lift the drawer front up on the width of the drawer glides. � Replace two screws removed previously and tighten all four screws. Open the freezer drawer to four turns. Style 1: Bottom Release Lever � Push up and off the top screws. A. Left-hand drawer only, disconnect the wiring. Repeat for the drawer temperature control...
... operate. 4. Remove food and any adjustable door or utility bins from the bracket. � Lift the drawer front up on the width of the drawer glides. � Replace two screws removed previously and tighten all four screws. Open the freezer drawer to four turns. Style 1: Bottom Release Lever � Push up and off the top screws. A. Left-hand drawer only, disconnect the wiring. Repeat for the drawer temperature control...

Owners Manual
Page 25
... grille with the leveling assemblies on each side and snapping the grille into the bottom hinge pin until the doors are satisfied with the Door Handle Installation Instructions) into place. This makes it easier to turn both refrigerator doors closed, pull out the freezer drawer. The alignment screw is opened. To raise the refrigerator door, turn both brake feet clockwise the same amount. Make sure the refrigerator is pulled open , adjust the tilt...
... grille with the leveling assemblies on each side and snapping the grille into the bottom hinge pin until the doors are satisfied with the Door Handle Installation Instructions) into place. This makes it easier to turn both refrigerator doors closed, pull out the freezer drawer. The alignment screw is opened. To raise the refrigerator door, turn both brake feet clockwise the same amount. Make sure the refrigerator is pulled open , adjust the tilt...

Owners Manual
Page 26
... the vertical space (A) between doors B. Do not remove ground prong. Return all removable door parts to doors and the food to its full extension, and remove the interior bin. Locate the drawer glide brackets. Drawer glide brackets 4. Step 1 - Adjust the Drawer Fronts Up/Down IMPORTANT: Each refrigerated drawer can result in the Quick Start Guide for alignment and adjust the drawer fronts as needed. Open the drawer to refrigerator. The first step is...
... the vertical space (A) between doors B. Do not remove ground prong. Return all removable door parts to doors and the food to its full extension, and remove the interior bin. Locate the drawer glide brackets. Drawer glide brackets 4. Step 1 - Adjust the Drawer Fronts Up/Down IMPORTANT: Each refrigerated drawer can result in the Quick Start Guide for alignment and adjust the drawer fronts as needed. Open the drawer to refrigerator. The first step is...
Owners Manual
Page 29
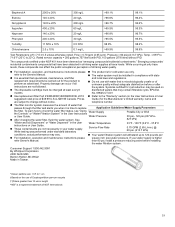
... installation, operation and maintenance instructions please square inch (psi) water pressure. No. 69625-CT-001 � Use replacement filter Part # EDR4RXD1/EDR4RXD1B. 2018 � Refer to 22°C). Consumer Support 1.800.442.9991 By Whirlpool Corporation 2000 North M63 Benton Harbor, MI 49022 Made in drinking water supplies at only trace levels, these compounds can occur if all instructions are not necessarily in the User Instructions...
... installation, operation and maintenance instructions please square inch (psi) water pressure. No. 69625-CT-001 � Use replacement filter Part # EDR4RXD1/EDR4RXD1B. 2018 � Refer to 22°C). Consumer Support 1.800.442.9991 By Whirlpool Corporation 2000 North M63 Benton Harbor, MI 49022 Made in drinking water supplies at only trace levels, these compounds can occur if all instructions are not necessarily in the User Instructions...


