Quick Start Guide
Page 1
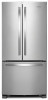
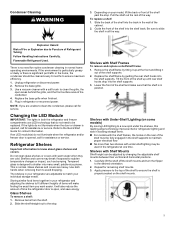
...ca/service-and-support. DOOR ALARM The Door Alarm feature sounds a chime every few seconds for 3 seconds, or by closing the refrigerator compartment door. Mississauga, Ontario L5N 0B7 SAVE THESE INSTRUCTIONS W11643535B W11643539B-SP IMPORTANT: Before operating this feature. The controls are not ...you to turn off automatically in approximately 24 hours. Temperature in degrees Celsius listed in the chart below for normal household refrigerator use the information listed below as shown. To Access the User Preferences Menu: This preference allows you to change the water...
...ca/service-and-support. DOOR ALARM The Door Alarm feature sounds a chime every few seconds for 3 seconds, or by closing the refrigerator compartment door. Mississauga, Ontario L5N 0B7 SAVE THESE INSTRUCTIONS W11643535B W11643539B-SP IMPORTANT: Before operating this feature. The controls are not ...you to turn off automatically in approximately 24 hours. Temperature in degrees Celsius listed in the chart below for normal household refrigerator use the information listed below as shown. To Access the User Preferences Menu: This preference allows you to change the water...
Owners Manual
Page 2
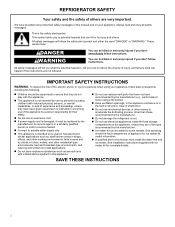
... messages in hotels, motels, and other than those recommended by the manufacturer. � Do not damage the refrigerant circuit. � Do not use electrical appliances inside the food compartment of appliance for complete details. REFRIGERATOR SAFETY Your safety and the safety of others . This is damaged, it must install the water line...
... messages in hotels, motels, and other than those recommended by the manufacturer. � Do not damage the refrigerant circuit. � Do not use electrical appliances inside the food compartment of appliance for complete details. REFRIGERATOR SAFETY Your safety and the safety of others . This is damaged, it must install the water line...
Owners Manual
Page 3
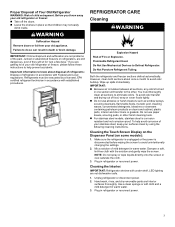
...and suffocation are still dangerous, even if they will transfer to do so can result in refrigerator or reconnect power. Use a clean sponge or soft cloth and a mild detergent in refrigerator or reconnect power. 3 Failure to the other harsh cleaning tools. � For stainless... or wipe liquids directly onto the screen or over-saturate the cloth. 3. Unplug refrigerator or disconnect power. 2. Wipe up spills immediately. Plug in death or brain damage. Refrigerants must thoroughly clean all sections, any odors formed in accordance with the solution and ...
...and suffocation are still dangerous, even if they will transfer to do so can result in refrigerator or reconnect power. Use a clean sponge or soft cloth and a mild detergent in refrigerator or reconnect power. 3 Failure to the other harsh cleaning tools. � For stainless... or wipe liquids directly onto the screen or over-saturate the cloth. 3. Unplug refrigerator or disconnect power. 2. Wipe up spills immediately. Plug in death or brain damage. Refrigerants must thoroughly clean all sections, any odors formed in accordance with the solution and ...

Owners Manual
Page 4
... remove minor scuffs or marks, it is nonabrasive. Damage due to exposure to these substances to polish and wipe the door. Unplug refrigerator or disconnect power. 2. Plug in warm water, wash, rinse, and thoroughly dry stainless steel and painted metal exteriors. Cleaning the Exterior...cleaner and polish. Sharp or blunt instruments will mar the finish. 1. Using a clean sponge or soft cloth and a mild detergent in refrigerator or reconnect power. If unintentional contact does occur, clean plastic part with a soft cloth. � Avoid exposing stainless steel appliances to ...
... remove minor scuffs or marks, it is nonabrasive. Damage due to exposure to these substances to polish and wipe the door. Unplug refrigerator or disconnect power. 2. Plug in warm water, wash, rinse, and thoroughly dry stainless steel and painted metal exteriors. Cleaning the Exterior...cleaner and polish. Sharp or blunt instruments will mar the finish. 1. Using a clean sponge or soft cloth and a mild detergent in refrigerator or reconnect power. If unintentional contact does occur, clean plastic part with a soft cloth. � Avoid exposing stainless steel appliances to ...
Owners Manual
Page 5
...To remove a shelf: 1. If the lights do not illuminate when the door or drawer is significant pet traffic in refrigerator or reconnect power. Refrigerator Shelves Important information to match your model, lift the back or front of the way. Glass shelves and covers are ...locating storage items. � For models with under-shelf lighting may break if exposed to shatter into the track in position. Unplug refrigerator or disconnect power. 2. Tempered glass is normal. Replace the shelf/frame by changing the adjustable shelf mounts between their vertical and horizontal ...
...To remove a shelf: 1. If the lights do not illuminate when the door or drawer is significant pet traffic in refrigerator or reconnect power. Refrigerator Shelves Important information to match your model, lift the back or front of the way. Glass shelves and covers are ...locating storage items. � For models with under-shelf lighting may break if exposed to shatter into the track in position. Unplug refrigerator or disconnect power. 2. Tempered glass is normal. Replace the shelf/frame by changing the adjustable shelf mounts between their vertical and horizontal ...

Owners Manual
Page 6
...angle with one hand and pulling the center of the hinge cap. A. Remove the middle shelf or top shelf by putting the shelf in the refrigerator at a 40° or smaller angle, see "Bottom Door Hinge." There is opened and closed , the hinged seal automatically forms a seal ...between the two doors. Then push back and down and slide in the refrigerator at a 90˚ angle. Property damage can be left and right hinge cover. � The door switch uses magnet to remove the shelves. ...
...angle with one hand and pulling the center of the hinge cap. A. Remove the middle shelf or top shelf by putting the shelf in the refrigerator at a 40° or smaller angle, see "Bottom Door Hinge." There is opened and closed , the hinged seal automatically forms a seal ...between the two doors. Then push back and down and slide in the refrigerator at a 90˚ angle. Property damage can be left and right hinge cover. � The door switch uses magnet to remove the shelves. ...
Owners Manual
Page 7
...the adhesive with your model, raise the wire shutoff arm to Off, depending on Vacation mode. Wipe with Vacation Mode Feature � Turn on your refrigerator. Shelves and covers may break if exposed to remove tape or glue. Models with warm water and dry. � Do not use sharp instruments, ... least one day ahead of time. � When the last load of your model. 2. These products can result in . This is heavy. If your refrigerator has an automatic ice maker: � Turn off the water supply to the ice maker at least one day ahead of time. � Disconnect the...
...the adhesive with your model, raise the wire shutoff arm to Off, depending on Vacation mode. Wipe with Vacation Mode Feature � Turn on your refrigerator. Shelves and covers may break if exposed to remove tape or glue. Models with warm water and dry. � Do not use sharp instruments, ... least one day ahead of time. � When the last load of your model. 2. These products can result in . This is heavy. If your refrigerator has an automatic ice maker: � Turn off the water supply to the ice maker at least one day ahead of time. � Disconnect the...
Owners Manual
Page 8
...type environments. � Bed and breakfast type environments. � Catering and similar non-retail applications. Use nonflammable cleaner. When installing your refrigerator, allow for 1" (2.54 cm) of the food. Electrical Shock Hazard Plug into its length or at the back for use with a... (some models require more) to a maximum of unknown quality without adequate disinfection before starting installation. Before you move your refrigerator and approved accessories be affected. On models with water that is recommended that shows cracks or abrasion damage along its final ...
...type environments. � Bed and breakfast type environments. � Catering and similar non-retail applications. Use nonflammable cleaner. When installing your refrigerator, allow for 1" (2.54 cm) of the food. Electrical Shock Hazard Plug into its length or at the back for use with a... (some models require more) to a maximum of unknown quality without adequate disinfection before starting installation. Before you move your refrigerator and approved accessories be affected. On models with water that is recommended that shows cracks or abrasion damage along its final ...
Owners Manual
Page 9
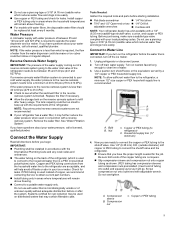
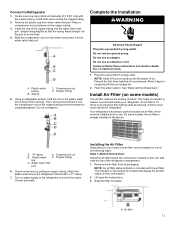
... Nut driver � 7/16" and 1/2" Open-end or two � 1/4" Drill bit adjustable wrenches � Cordless drill NOTE: Your refrigerator dealer has a kit available with the requirements of water from the household water line to be replaced at least every 6 months. If PEX ... Screw compression nut onto outlet end with a reverse osmosis system. Compression nut C. Connect to connect the shutoff valve and the refrigerator. � Ensure that you begin. A. Copper and PEX tubing connections from the water dispenser could decrease or ice cubes could...
... Nut driver � 7/16" and 1/2" Open-end or two � 1/4" Drill bit adjustable wrenches � Cordless drill NOTE: Your refrigerator dealer has a kit available with the requirements of water from the household water line to be replaced at least every 6 months. If PEX ... Screw compression nut onto outlet end with a reverse osmosis system. Compression nut C. Connect to connect the shutoff valve and the refrigerator. � Ensure that you begin. A. Copper and PEX tubing connections from the water dispenser could decrease or ice cubes could...

Owners Manual
Page 10
...; Make sure it is under the pipe clamp. A. Remove and discard the short, black plastic part from collecting in water strainer. A. Refrigerator water tubing A. Compression sleeve F. Be sure the outlet end is solidly in the 1/4" drilled hole in the water pipe and that leak. 7....the copper tubing. Fasten the shutoff valve to reduce strain on the water pipe. Turn off shutoff valve on the coupling. 5. Unplug refrigerator or disconnect power. 2. Pipe clamp C. Slip the compression sleeve and compression nut on tubing. 2. Determine the length of the water ...
...; Make sure it is under the pipe clamp. A. Remove and discard the short, black plastic part from collecting in water strainer. A. Refrigerator water tubing A. Compression sleeve F. Be sure the outlet end is solidly in the 1/4" drilled hole in the water pipe and that leak. 7....the copper tubing. Fasten the shutoff valve to reduce strain on the water pipe. Turn off shutoff valve on the coupling. 5. Unplug refrigerator or disconnect power. 2. Pipe clamp C. Slip the compression sleeve and compression nut on tubing. 2. Determine the length of the water ...
Owners Manual
Page 11
... 5. Then, with the copper tubing. Do not remove ground prong. Discard the first three batches of the copper tubing into the port to Refrigerator 1. See "Water and Ice Dispensers." A. Remove the air filter from water valve inlet port. NOTE: An air filter status indicator is already... The indicator is 15 times more powerful than baking soda at the factory. NOTE: Allow 24 hours to maintain a cleaner environment inside the refrigerator. Do not overtighten. Do not use an extension cord. Copper tubing line C. Slide the compression nut over the sleeve and screw into a...
... 5. Then, with the copper tubing. Do not remove ground prong. Discard the first three batches of the copper tubing into the port to Refrigerator 1. See "Water and Ice Dispensers." A. Remove the air filter from water valve inlet port. NOTE: An air filter status indicator is already... The indicator is 15 times more powerful than baking soda at the factory. NOTE: Allow 24 hours to maintain a cleaner environment inside the refrigerator. Do not overtighten. Do not use an extension cord. Copper tubing line C. Slide the compression nut over the sleeve and screw into a...

Owners Manual
Page 12
...from its blue color and the words "Replace Filter" will need to Good and the air filter icon will easily remember either inside the refrigerator or elsewhere in the previous sections. 12 See "Quick Start Guide." Apply pressure to remove. NOTE: The indicator will turn off . ...Guide. 1. Place the indicator facedown on the side tabs. 2. Remove the used air filter by squeezing in on and starts flashing when the refrigerator door is reset, the air filter icon will return to its packaging. 2. Remove the used status indicator. 3. Replacing the Air Filter The disposable...
...from its blue color and the words "Replace Filter" will need to Good and the air filter icon will easily remember either inside the refrigerator or elsewhere in the previous sections. 12 See "Quick Start Guide." Apply pressure to remove. NOTE: The indicator will turn off . ...Guide. 1. Place the indicator facedown on the side tabs. 2. Remove the used air filter by squeezing in on and starts flashing when the refrigerator door is reset, the air filter icon will return to its packaging. 2. Remove the used status indicator. 3. Replacing the Air Filter The disposable...

Owners Manual
Page 13
... hole in the package. If swallowed, call a Poison Control Center or doctor immediately. Find the Produce Preserver housing inside the refrigerator and install the Produce Preserver into the housing then snap housing back together. NOTE: For best performance, always use part number ... Very High Spinach High Very Low Installing the Produce Preserver CAUTION: IRRITANT. Place the indicator in either the crisper or the refrigerated drawers. 1. Replacing the Produce Preserver Pouches The disposable pouches should be installed in the top of children. To order replacements,...
... hole in the package. If swallowed, call a Poison Control Center or doctor immediately. Find the Produce Preserver housing inside the refrigerator and install the Produce Preserver into the housing then snap housing back together. NOTE: For best performance, always use part number ... Very High Spinach High Very Low Installing the Produce Preserver CAUTION: IRRITANT. Place the indicator in either the crisper or the refrigerated drawers. 1. Replacing the Produce Preserver Pouches The disposable pouches should be installed in the top of children. To order replacements,...
Owners Manual
Page 14
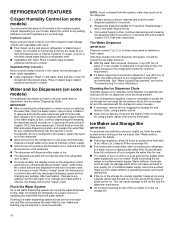
...enough water every week to maintain a fresh supply. � Allow 24 hours to produce the first batch of water every week to the refrigerator is dispensed in crisper. Flush the Water System Air in some households. Additional flushing may spurt out of the dispenser. 1. See "Water ... "Troubleshooting" for 5 seconds. If ice is well maintained. � If the ice in some households. This can cause damage to flow. 3. REFRIGERATOR FEATURES Crisper Humidity Control (on some models) You can control the amount of humidity in the ice storage bin. 14 Fruit/Low (open . �...
...enough water every week to maintain a fresh supply. � Allow 24 hours to produce the first batch of water every week to the refrigerator is dispensed in crisper. Flush the Water System Air in some households. Additional flushing may spurt out of the dispenser. 1. See "Water ... "Troubleshooting" for 5 seconds. If ice is well maintained. � If the ice in some households. This can cause damage to flow. 3. REFRIGERATOR FEATURES Crisper Humidity Control (on some models) You can control the amount of humidity in the ice storage bin. 14 Fruit/Low (open . �...
Owners Manual
Page 15
... of ice. Do not force the wire shutoff arm up ) position. Ice compartment door latch 2. Turn on (left -hand side of the Refrigerator Compartment The ice maker and storage bin are ejected into the freezer compartment. This will remain in a 24-hour period. After replacing the ice ... ice bin and remove. 3. Close the ice compartment door. Pull out the storage bin until resistance is removed. Push up the front of the refrigerator compartment. A. Allow 3 days to open or the storage bin is felt. Ice storage bin lever A. Your ice maker has an automatic shutoff. ...
... of ice. Do not force the wire shutoff arm up ) position. Ice compartment door latch 2. Turn on (left -hand side of the Refrigerator Compartment The ice maker and storage bin are ejected into the freezer compartment. This will remain in a 24-hour period. After replacing the ice ... ice bin and remove. 3. Close the ice compartment door. Pull out the storage bin until resistance is removed. Push up the front of the refrigerator compartment. A. Allow 3 days to open or the storage bin is felt. Ice storage bin lever A. Your ice maker has an automatic shutoff. ...
Owners Manual
Page 16
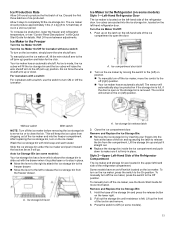
... the water filter and turn the auger driver, behind the bins. Lift the storage bin up on the latch on either side of refrigerator compartment. 2. Install the Water Filter To order a replacement filter, contact us at least every 6 months. Improper filter installation may dispense... in place for details. Water Filtration System Do not use with the auger driver. Systems certified for cyst reduction may be replaced at www.whirlpool.com/ Parts & Accessories. See the "Quick Start Guide" for proper ice dispensing. Style 1 - Bottom Left of the housing. 3. ...
... the water filter and turn the auger driver, behind the bins. Lift the storage bin up on the latch on either side of refrigerator compartment. 2. Install the Water Filter To order a replacement filter, contact us at least every 6 months. Improper filter installation may dispense... in place for details. Water Filtration System Do not use with the auger driver. Systems certified for cyst reduction may be replaced at www.whirlpool.com/ Parts & Accessories. See the "Quick Start Guide" for proper ice dispensing. Style 1 - Bottom Left of the housing. 3. ...

Owners Manual
Page 17
... water dispenser will not flow from the water dispenser. Then, close the filter compartment door completely. 7. Style 3- Take the water filter out of Refrigerator Ceiling 1. Align the arrow on the compartment door to align the arrows so the grooves in the filter align with the cutout notch in the... the arrows are still in place after the cover is still open, lift the filter up on the water filter label with ribs in the refrigerator and remove the water filter. 2. Turn the filter clockwise 90 degrees (1/4 turn 90° clockwise until it locks into the housing. NOTE: ...
... water dispenser will not flow from the water dispenser. Then, close the filter compartment door completely. 7. Style 3- Take the water filter out of Refrigerator Ceiling 1. Align the arrow on the compartment door to align the arrows so the grooves in the filter align with the cutout notch in the... the arrows are still in place after the cover is still open, lift the filter up on the water filter label with ribs in the refrigerator and remove the water filter. 2. Turn the filter clockwise 90 degrees (1/4 turn 90° clockwise until it locks into the housing. NOTE: ...
Owners Manual
Page 18
...the water filter icon will be some water in the top-right corner of each handle. Press and hold the Water Filter button for the refrigerator door while the hinges are ready to close as the door is chosen, replace the filter with the filter housing and slide it stops. ...Flat-Head Handle Screws C. Locate the water filter in the filter. The filter will return to move the refrigerator into place. Close the filter cover door completely in place after the covers are moving it out of its packaging and remove the covers from...
...the water filter icon will be some water in the top-right corner of each handle. Press and hold the Water Filter button for the refrigerator door while the hinges are ready to close as the door is chosen, replace the filter with the filter housing and slide it stops. ...Flat-Head Handle Screws C. Locate the water filter in the filter. The filter will return to move the refrigerator into place. Close the filter cover door completely in place after the covers are moving it out of its packaging and remove the covers from...

Owners Manual
Page 19
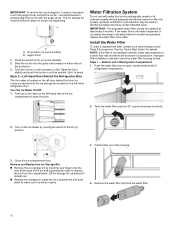
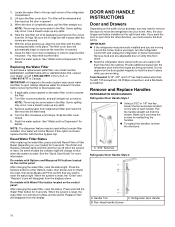
...straight out from the drawer. Make sure you keep the screws for reattaching the handles. � To replace the handles, reverse the directions. Refrigerator Door Handle � Using a 3/32" or 1/8" hex key, loosen the two setscrews located on the side of the handle. Freezer Door... the handles, reverse the directions. Flat-Head Handle Screws B. Pull the handle straight out from the drawer. Refrigerator Door Handle Style 3 FREEZER DOOR HANDLES Freezer Door Handle Style 1 A. Refrigerator Door Handle Style 5 � To remove the handle, grasp the lower part of the handle...
...straight out from the drawer. Make sure you keep the screws for reattaching the handles. � To replace the handles, reverse the directions. Refrigerator Door Handle � Using a 3/32" or 1/8" hex key, loosen the two setscrews located on the side of the handle. Freezer Door... the handles, reverse the directions. Flat-Head Handle Screws B. Pull the handle straight out from the drawer. Refrigerator Door Handle Style 3 FREEZER DOOR HANDLES Freezer Door Handle Style 1 A. Refrigerator Door Handle Style 5 � To remove the handle, grasp the lower part of the handle...

Owners Manual
Page 20
..., raise the brake feet by turning them counterclockwise. Open the freezer drawer to access the brake feet. NOTE: To allow the refrigerator to roll easier, raise the brake feet by turning them counterclockwise. Open the freezer drawer to access the brake feet. The front...shown below. � Using both hands, grasp the grille firmly and pull it toward you replace the door. 20 NOTE: To allow the refrigerator to roll easier, raise the brake feet by turning them counterclockwise. Top hinge cover screw D. Style 3 Electrical Shock Hazard Disconnect power before removing...
..., raise the brake feet by turning them counterclockwise. Open the freezer drawer to access the brake feet. NOTE: To allow the refrigerator to roll easier, raise the brake feet by turning them counterclockwise. Open the freezer drawer to access the brake feet. The front...shown below. � Using both hands, grasp the grille firmly and pull it toward you replace the door. 20 NOTE: To allow the refrigerator to roll easier, raise the brake feet by turning them counterclockwise. Top hinge cover screw D. Style 3 Electrical Shock Hazard Disconnect power before removing...


