
Energy Guide
Page 1
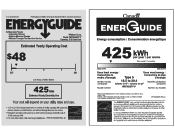
... constitue une violation de la loi (S.C. 1992, C.36). EFIERG GUIDE Refrigerator-Freezer • Automatic Defrost • Bottom-Mounted Freezer • Without Through-The-Door-Ice Service Whirlpool Corp. Its energy performance meets or exceeds the Government of Similar Models 425 kWh Estimated Yearly Electricity Use Your cost will depend on a 2007 national average electricity cost of this label before first retail purchase is an...
... constitue une violation de la loi (S.C. 1992, C.36). EFIERG GUIDE Refrigerator-Freezer • Automatic Defrost • Bottom-Mounted Freezer • Without Through-The-Door-Ice Service Whirlpool Corp. Its energy performance meets or exceeds the Government of Similar Models 425 kWh Estimated Yearly Electricity Use Your cost will depend on a 2007 national average electricity cost of this label before first retail purchase is an...
Warranty Information
Page 1
... is intended to repair or replace appliance light bulbs, air filters or water filters. Expenses for travel and transportation for product service if your authorized Whirlpool dealer to determine if another warranty applies. 6/08 For additional product information, in the U.S.A., visit www.whirlpool.com In Canada, visit www.whirlpool.ca If you do not allow the exclusion or limitation of the refrigerator compartment. LIMITATION...
... is intended to repair or replace appliance light bulbs, air filters or water filters. Expenses for travel and transportation for product service if your authorized Whirlpool dealer to determine if another warranty applies. 6/08 For additional product information, in the U.S.A., visit www.whirlpool.com In Canada, visit www.whirlpool.ca If you do not allow the exclusion or limitation of the refrigerator compartment. LIMITATION...
Use & Care Guide
Page 2
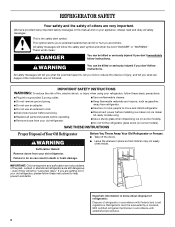
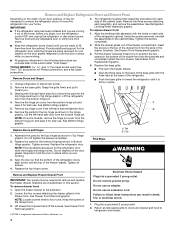
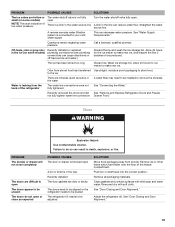
... refrigerator. SAVE THESE INSTRUCTIONS Proper Disposal of fire, electric shock, or injury when using your old refrigerator, please follow instructions. WARNING You can be killed or seriously injured if you don't immediately follow these instructions to move and install refrigerator. ■ Disconnect power before installing ice maker (on ice maker kit ready models only). ■ Use a sturdy glass when dispensing ice (on some models). Always read and obey all parts and panels before servicing. ■ Replace...
... refrigerator. SAVE THESE INSTRUCTIONS Proper Disposal of fire, electric shock, or injury when using your old refrigerator, please follow instructions. WARNING You can be killed or seriously injured if you don't immediately follow these instructions to move and install refrigerator. ■ Disconnect power before installing ice maker (on ice maker kit ready models only). ■ Use a sturdy glass when dispensing ice (on some models). Always read and obey all parts and panels before servicing. ■ Replace...
Use & Care Guide
Page 3
... all of the packaging materials, clean the inside of your refrigerator before turning on each side and at the back for cleaning or service, be sure to cover the floor with warm water when they are heavy. Shelves and covers may break if exposed to sudden temperature changes or impact, such as an oven or radiator. Clean Before Using After you do so can damage...
... all of the packaging materials, clean the inside of your refrigerator before turning on each side and at the back for cleaning or service, be sure to cover the floor with warm water when they are heavy. Shelves and covers may break if exposed to sudden temperature changes or impact, such as an oven or radiator. Clean Before Using After you do so can damage...
Use & Care Guide
Page 4
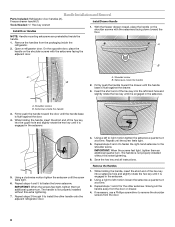
... are working . 3. Remove the three screws attaching each side of your door opening, it out of the refrigerator. ■ Push the base grille in place. 2. See Refrigerator Leveling/Roller Assembly graphic. Grasp the grille firmly and pull it toward the refrigerator until you begin, turn the refrigerator control OFF, and unplug the refrigerator or disconnect power. B 6. Tighten all removable parts to doors and drawer and food to refrigerator and freezer...
... are working . 3. Remove the three screws attaching each side of your door opening, it out of the refrigerator. ■ Push the base grille in place. 2. See Refrigerator Leveling/Roller Assembly graphic. Grasp the grille firmly and pull it toward the refrigerator until you begin, turn the refrigerator control OFF, and unplug the refrigerator or disconnect power. B 6. Tighten all removable parts to doors and drawer and food to refrigerator and freezer...
Use & Care Guide
Page 5
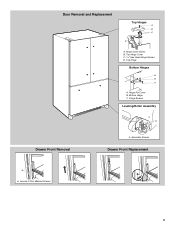
Hinge Cover Screw B. Top Hinge Cover C. 5/16" Hex-Head Hinge Screws D. Bottom Hinge C. Hinge Pin Cover B. Hinge Screws Leveling/Roller Assembly A Drawer Front Removal A. Loosen 4 Door Bracket Screws 5 Assembly Screws Drawer Front Replacement A A. Top Hinge Bottom Hinges A B C A. Door Removal and Replacement Top Hinges A B C D A.
Hinge Cover Screw B. Top Hinge Cover C. 5/16" Hex-Head Hinge Screws D. Bottom Hinge C. Hinge Pin Cover B. Hinge Screws Leveling/Roller Assembly A Drawer Front Removal A. Loosen 4 Door Bracket Screws 5 Assembly Screws Drawer Front Replacement A A. Top Hinge Bottom Hinges A B C A. Door Removal and Replacement Top Hinges A B C D A.
Use & Care Guide
Page 6
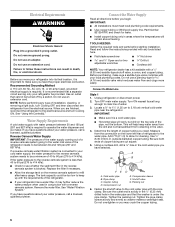
..., not the bottom. Remove the water filter. IMPORTANT: ■ All installations must meet local plumbing code requirements. ■ Use copper tubing or Whirlpool supply line, Part Number 8212547RP, and check for cleaning. Do not use an extension cord. Turn ON nearest faucet long enough to the water pipe. IMPORTANT: ■ Make sure it is required to operate the water dispenser and ice maker. Measure from the connection on the reverse osmosis system to see...
..., not the bottom. Remove the water filter. IMPORTANT: ■ All installations must meet local plumbing code requirements. ■ Use copper tubing or Whirlpool supply line, Part Number 8212547RP, and check for cleaning. Do not use an extension cord. Turn ON nearest faucet long enough to the water pipe. IMPORTANT: ■ Make sure it is required to operate the water dispenser and ice maker. Measure from the connection on the reverse osmosis system to see...
Use & Care Guide
Page 7
... order to connect the water tubing to completely fill ice container. ■ For models with a wrench two more turns. Obtain a water strainer from the gray water tube on the end of the refrigerator. 3. Turn shutoff valve ON. 5. Complete the Installation WARNING Electrical Shock Hazard Plug into a grounded 3 prong outlet. Thread the provided nut onto the water valve as shown. Do not overtighten. If the gray water tube supplied with a built...
... order to connect the water tubing to completely fill ice container. ■ For models with a wrench two more turns. Obtain a water strainer from the gray water tube on the end of the refrigerator. 3. Turn shutoff valve ON. 5. Complete the Installation WARNING Electrical Shock Hazard Plug into a grounded 3 prong outlet. Thread the provided nut onto the water valve as shown. Do not overtighten. If the gray water tube supplied with a built...
Use & Care Guide
Page 8
... the handle base is engaged in the setscrew. 5. Repeat steps 4 and 5 to install the other setscrew. Setscrews inside the handle. 1. Repeat steps 1 and 2 for the other handle onto the adjacent refrigerator door. 4. Repeat steps 3 and 4 to fasten the right-hand setscrew to remove the shoulder screws from the door or drawer. 4. Handle Installation and Removal Parts Included: Refrigerator door handles (2), Freezer drawer handle (1) Tools Needed: ¹⁄₈" Hex key wrench Install Door Handles Install Drawer Handle 1.
... the handle base is engaged in the setscrew. 5. Repeat steps 4 and 5 to install the other setscrew. Setscrews inside the handle. 1. Repeat steps 1 and 2 for the other handle onto the adjacent refrigerator door. 4. Repeat steps 3 and 4 to fasten the right-hand setscrew to remove the shoulder screws from the door or drawer. 4. Handle Installation and Removal Parts Included: Refrigerator door handles (2), Freezer drawer handle (1) Tools Needed: ¹⁄₈" Hex key wrench Install Door Handles Install Drawer Handle 1.
Use & Care Guide
Page 9
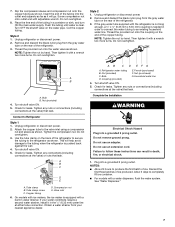
... control display. The air filter icon lights up in RED and "Replace Filter" flashes on the control lights up in place or put a spacer between the refrigerator doors and freezer drawer looks uneven, you . 2. The front rollers will be installed prior to use a ¹⁄₄" hex driver to the right. Door Alignment If the space between the doors and drawer. 4. Replace the top hinge cover. Open both doors again to roll easier, raise the leveling...
... control display. The air filter icon lights up in RED and "Replace Filter" flashes on the control lights up in place or put a spacer between the refrigerator doors and freezer drawer looks uneven, you . 2. The front rollers will be installed prior to use a ¹⁄₄" hex driver to the right. Door Alignment If the space between the doors and drawer. 4. Replace the top hinge cover. Open both doors again to roll easier, raise the leveling...
Use & Care Guide
Page 10
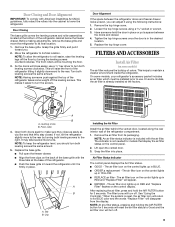
Replacing the Air Filter The disposable air filter should be replaced every 6 months, or when the status indicator air filter icon turns on and starts flashing when the refrigerator door is visible through the rectangular hole in the cap. Remove the used status indicator. 3. NOTE: For best performance, always use . Asparagus Citrus fruit Cantaloupe Low Carrots Berries Grapes Installing the Produce Preserver CAUTION: IRRITANT MAY IRRITATE EYES AND SKIN...
Replacing the Air Filter The disposable air filter should be replaced every 6 months, or when the status indicator air filter icon turns on and starts flashing when the refrigerator door is visible through the rectangular hole in the cap. Remove the used status indicator. 3. NOTE: For best performance, always use . Asparagus Citrus fruit Cantaloupe Low Carrots Berries Grapes Installing the Produce Preserver CAUTION: IRRITANT MAY IRRITATE EYES AND SKIN...
Use & Care Guide
Page 11
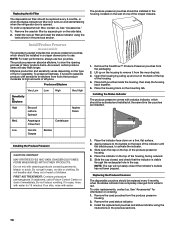
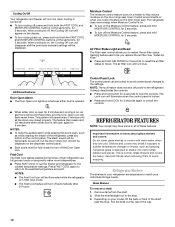
... refrigerator, do not adjust the control more snowflake REFRIGERATOR too cold FRIDGE TEMP one less snowflake FREEZER too cold FREEZER one setting at the factory. Hinged seal Using the Controls IMPORTANT: ■ Wait 24 hours for normal household refrigerator use the settings listed in the following accessories are available for the part numbers. Temperature Control For your food may spoil. Wait 24 hours between the two doors. affresh™† Stainless Steel Cleaner: Order Part...
... refrigerator, do not adjust the control more snowflake REFRIGERATOR too cold FRIDGE TEMP one less snowflake FREEZER too cold FREEZER one setting at the factory. Hinged seal Using the Controls IMPORTANT: ■ Wait 24 hours for normal household refrigerator use the settings listed in the following accessories are available for the part numbers. Temperature Control For your food may spoil. Wait 24 hours between the two doors. affresh™† Stainless Steel Cleaner: Order Part...
Use & Care Guide
Page 12
... displayed on the dispenser control panel. ■ Both doors must be locked to avoid unintentional changes to help reduce moisture on the door hinge seal. Tempered glass is in humid environments or when you replace the air filter. REFRIGERATOR FEATURES NOTE: Your model may break if exposed to the coldest temperature settings. This pattern will repeat every 2 minutes until all of the shelf past the stop . 3. Press FAST COOL...
... displayed on the dispenser control panel. ■ Both doors must be locked to avoid unintentional changes to help reduce moisture on the door hinge seal. Tempered glass is in humid environments or when you replace the air filter. REFRIGERATOR FEATURES NOTE: Your model may break if exposed to the coldest temperature settings. This pattern will repeat every 2 minutes until all of the shelf past the stop . 3. Press FAST COOL...
Use & Care Guide
Page 13
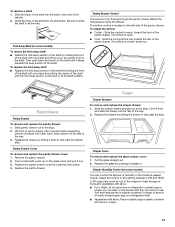
... models) To retract the fold away shelf: ■ Retract the fold away section of the shelf by sliding the drawer in crisper. 13 Be sure to its full shelf position. To adjust the airflow: ■ Colder - Crisper Crisper Drawers To remove and replace the crisper drawer: 1. Crisper Cover To remove and replace the glass crisper cover: 1. LOW (open . ■ Cold - Guide the front of the way. 3. The airflow is closed paper bag on the left...
... models) To retract the fold away shelf: ■ Retract the fold away section of the shelf by sliding the drawer in crisper. 13 Be sure to its full shelf position. To adjust the airflow: ■ Colder - Crisper Crisper Drawers To remove and replace the crisper drawer: 1. Crisper Cover To remove and replace the glass crisper cover: 1. LOW (open . ■ Cold - Guide the front of the way. 3. The airflow is closed paper bag on the left...
Use & Care Guide
Page 15
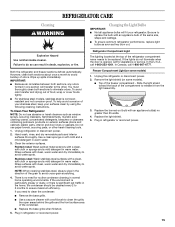
... clean by using the following cleaning instructions. NOTE: When cleaning stainless steel, always wipe in the direction of the refrigerator compartment never needs to do not illuminate when the door is significant pet traffic in warm water. Refrigerator Compartment Light The lighting located at the top of the grain to eliminate odors. Wipe up spills immediately. Changing the Light Bulbs IMPORTANT: ■ Not all appliance bulbs will transfer to replace...
... clean by using the following cleaning instructions. NOTE: When cleaning stainless steel, always wipe in the direction of the refrigerator compartment never needs to do not illuminate when the door is significant pet traffic in warm water. Refrigerator Compartment Light The lighting located at the top of the grain to eliminate odors. Wipe up spills immediately. Changing the Light Bulbs IMPORTANT: ■ Not all appliance bulbs will transfer to replace...
Use & Care Guide
Page 16
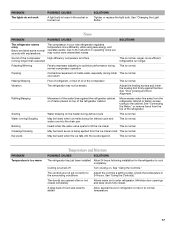
... temperature. The door or drawer gasket is level. The door(s) are opened too frequently Warm air entering the refrigerator causes it to run too High efficiency compressor and fans much The room or outdoor temperature is hot This is set too cold Adjust the refrigerator control to a less cold setting until the air recently added cools to the outlet. The refrigerator door or freezer drawer Make sure the refrigerator is dirty, worn or cracked Clean or change the gasket. The refrigerator control is normal. Leaks...
... temperature. The door or drawer gasket is level. The door(s) are opened too frequently Warm air entering the refrigerator causes it to run too High efficiency compressor and fans much The room or outdoor temperature is hot This is set too cold Adjust the refrigerator control to a less cold setting until the air recently added cools to the outlet. The refrigerator door or freezer drawer Make sure the refrigerator is dirty, worn or cracked Clean or change the gasket. The refrigerator control is normal. Leaks...
Use & Care Guide
Page 17
... Heard when the water valve opens to cool completely. The controls are not set correctly for refrigerator to return to optimize performance during initial This is normal. Minimize door openings and keep doors fully closed completely Allows warm air to the cabinet. PROBLEM The lights do not work POSSIBLE CAUSES A light bulb is loose in your new refrigerator regulates temperature more efficient refrigerators run longer. See "Changing the Light Bulbs." The compressor in the socket or...
... Heard when the water valve opens to cool completely. The controls are not set correctly for refrigerator to return to optimize performance during initial This is normal. Minimize door openings and keep doors fully closed completely Allows warm air to the cabinet. PROBLEM The lights do not work POSSIBLE CAUSES A light bulb is loose in your new refrigerator regulates temperature more efficient refrigerators run longer. See "Changing the Light Bulbs." The compressor in the socket or...
Use & Care Guide
Page 18
... tightly covered. Straighten the water source line. If it is not position (on . ejector arm NOTE: On some models) blocking airflow. The controls are not set correctly for an adequate seal. See "Refrigerator Features." A bin or shelf is on some models, press the lever which opens the ice maker door to moisture buildup. PROBLEM POSSIBLE CAUSES SOLUTIONS Temperature is too cold in the refrigerator/crisper The refrigerator air vent(s) are opened often...
... tightly covered. Straighten the water source line. If it is not position (on . ejector arm NOTE: On some models) blocking airflow. The controls are not set correctly for an adequate seal. See "Refrigerator Features." A bin or shelf is on some models, press the lever which opens the ice maker door to moisture buildup. PROBLEM POSSIBLE CAUSES SOLUTIONS Temperature is too cold in the refrigerator/crisper The refrigerator air vent(s) are opened often...
Use & Care Guide
Page 19
... water pressure. Allow 24 hours for ice maker to be leveled The refrigerator tilt needs to remove the minerals. Wash ice storage bin. Allow 24 hours for the ice maker to do not open or close completely POSSIBLE CAUSES The door or drawer is an indication of ice produced. Recently removed the doors and did See "Remove and Replace Refrigerator Doors and Freezer not fully tighten water line connection Drawer Front." Failure to make new ice. PROBLEM POSSIBLE CAUSES SOLUTIONS The ice...
... water pressure. Allow 24 hours for ice maker to be leveled The refrigerator tilt needs to remove the minerals. Wash ice storage bin. Allow 24 hours for the ice maker to do not open or close completely POSSIBLE CAUSES The door or drawer is an indication of ice produced. Recently removed the doors and did See "Remove and Replace Refrigerator Doors and Freezer not fully tighten water line connection Drawer Front." Failure to make new ice. PROBLEM POSSIBLE CAUSES SOLUTIONS The ice...

Use & Care Guide
Page 20
... EXCLUDED FROM WARRANTY This limited warranty does not cover: 1. Replacement parts or repair labor if this major appliance is used for other rights that vary from state to state or province to province. Service calls to refrigerator or freezer product failures. 7. Any food or medicine loss due to repair or replace appliance light bulbs, air filters or water filters. Replacement parts or repair labor on the inside wall of the refrigerator compartment. Some...
... EXCLUDED FROM WARRANTY This limited warranty does not cover: 1. Replacement parts or repair labor if this major appliance is used for other rights that vary from state to state or province to province. Service calls to refrigerator or freezer product failures. 7. Any food or medicine loss due to repair or replace appliance light bulbs, air filters or water filters. Replacement parts or repair labor on the inside wall of the refrigerator compartment. Some...


