
Specification Sheet
Page 1
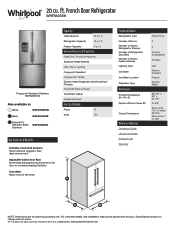
Tuck Shelf Make room for tall items. Technical Details Refrigerator Type Number of Doors Number of Interior Refrigerator Shelves Number of Refrigerator Door Bins Number of Interior Freezer Shelves Lighting Type Ice Maker Ice Maker Location Dispenser Type Dimensions Product Dimensions (H x W x D) Depth with Door Open 90° Cutout Dimensions Reference Material Dimension Guide Use & Care Guide Energy Guide Warranty French Door 3 3 2 Fixed, 4 Adjustable 2 Plastic LED Factory Installed Freezer Exterior Water 68-3/8" x 30" x 34-3/8" 51-5/8" Allow extra 1/2" on sides and top Allow extra ...
Tuck Shelf Make room for tall items. Technical Details Refrigerator Type Number of Doors Number of Interior Refrigerator Shelves Number of Refrigerator Door Bins Number of Interior Freezer Shelves Lighting Type Ice Maker Ice Maker Location Dispenser Type Dimensions Product Dimensions (H x W x D) Depth with Door Open 90° Cutout Dimensions Reference Material Dimension Guide Use & Care Guide Energy Guide Warranty French Door 3 3 2 Fixed, 4 Adjustable 2 Plastic LED Factory Installed Freezer Exterior Water 68-3/8" x 30" x 34-3/8" 51-5/8" Allow extra 1/2" on sides and top Allow extra ...
Owners Manual
Page 3
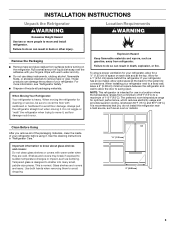
... to cover the floor with warm water and dry. ■ Do not use in back or other injury. Tempered glass is recommended that you remove all packaging materials. When Moving Your Refrigerator: Your refrigerator is normal. Always pull the refrigerator straight out when moving the refrigerator for your refrigerator has an ice maker, allow the door to do so can result in a location where the temperature...
... to cover the floor with warm water and dry. ■ Do not use in back or other injury. Tempered glass is recommended that you remove all packaging materials. When Moving Your Refrigerator: Your refrigerator is normal. Always pull the refrigerator straight out when moving the refrigerator for your refrigerator has an ice maker, allow the door to do so can result in a location where the temperature...
Owners Manual
Page 4
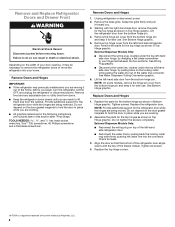
... while pulling the water line out of Acument Intellectual Properties, LLC. 4 External Dispenser Models Only: ■ Reconnect the wiring plug on the width of the home, before removing doors. Remove Doors and Hinges IMPORTANT: ■ If the refrigerator was previously installed and you begin, turn the refrigerator control OFF, and unplug the refrigerator or disconnect power. Remove top hinge cover from the bottom hinge pin. Remove the parts for later use . See Water Dispenser Tubing Connection graphic. 6. See Bottom...
... while pulling the water line out of Acument Intellectual Properties, LLC. 4 External Dispenser Models Only: ■ Reconnect the wiring plug on the width of the home, before removing doors. Remove Doors and Hinges IMPORTANT: ■ If the refrigerator was previously installed and you begin, turn the refrigerator control OFF, and unplug the refrigerator or disconnect power. Remove top hinge cover from the bottom hinge pin. Remove the parts for later use . See Water Dispenser Tubing Connection graphic. 6. See Bottom...
Owners Manual
Page 5
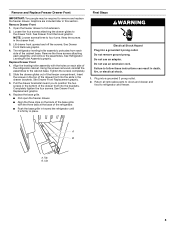
... the refrigerator cabinet. See Drawer Front Replacement graphic. 4. Do not use an extension cord. Return all removable parts to doors and drawer and food to full extension. 2. A B A. Open the freezer drawer to refrigerator and freezer. Graphics are included later in death, fire, or electrical shock. 1. Loosen the four screws attaching the drawer glides to four turns. NOTE: Loosen screws three to the drawer front. The refrigerator leveling/roller assembly protrudes...
... the refrigerator cabinet. See Drawer Front Replacement graphic. 4. Do not use an extension cord. Return all removable parts to doors and drawer and food to full extension. 2. A B A. Open the freezer drawer to refrigerator and freezer. Graphics are included later in death, fire, or electrical shock. 1. Loosen the four screws attaching the drawer glides to four turns. NOTE: Loosen screws three to the drawer front. The refrigerator leveling/roller assembly protrudes...

Owners Manual
Page 8
... could be provided. Remove the water filter. Unplug refrigerator or disconnect power. 2. Turn on Cooling. Determine the length of water. 3. Electrical Requirements WARNING Electrical Shock Hazard Plug into its final location, it is under the pipe clamp. Do not use an adapter. IMPORTANT: ■ All installations must meet local plumbing code requirements. ■ Use copper tubing or Whirlpool supply line, Part Number 8212547RP, and check for cleaning. Do not use an extension cord. This...
... could be provided. Remove the water filter. Unplug refrigerator or disconnect power. 2. Turn on Cooling. Determine the length of water. 3. Electrical Requirements WARNING Electrical Shock Hazard Plug into its final location, it is under the pipe clamp. Do not use an adapter. IMPORTANT: ■ All installations must meet local plumbing code requirements. ■ Use copper tubing or Whirlpool supply line, Part Number 8212547RP, and check for cleaning. Do not use an extension cord. This...

Owners Manual
Page 9
... the gray water tube supplied with a water dispenser, flush the water system. Do not overtighten. Tighten the compression nut. This will go. Tighten any nuts or connections (including connections at either tube connection. Valve inlet 6. If your nearest appliance dealer. Nut (provided) C. Nut (purchased) G.Household water line 4. Do not remove ground prong. Place the free end of ice. Coil the copper tubing. Unplug refrigerator or disconnect power. 2. NOTE: Tighten...
... the gray water tube supplied with a water dispenser, flush the water system. Do not overtighten. Tighten the compression nut. This will go. Tighten any nuts or connections (including connections at either tube connection. Valve inlet 6. If your nearest appliance dealer. Nut (provided) C. Nut (purchased) G.Household water line 4. Do not remove ground prong. Place the free end of ice. Coil the copper tubing. Unplug refrigerator or disconnect power. 2. NOTE: Tighten...

Owners Manual
Page 11
... the space between the doors and drawer. 4. Open both doors again to make sure they close easier, use with water that may be used on your water dispenser or ice maker decreases noticeably, change the filter sooner. NOTE: To keep the refrigerator level, you like and that they stay closed. The water filter icon on the display. Door Closing The base grille covers the leveling screws and roller assemblies located at least every 6 months...
... the space between the doors and drawer. 4. Open both doors again to make sure they close easier, use with water that may be used on your water dispenser or ice maker decreases noticeably, change the filter sooner. NOTE: To keep the refrigerator level, you like and that they stay closed. The water filter icon on the display. Door Closing The base grille covers the leveling screws and roller assemblies located at least every 6 months...
Owners Manual
Page 12
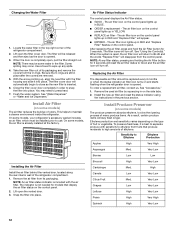
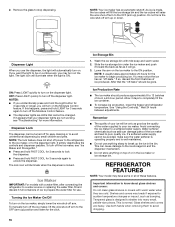
.... Changing the Water Filter 1. Locate the water filter in on the type of the refrigerator compartment. 2. NOTE: There may occur. With the arrow pointing up any spills. 4. Close the filter cover door completely in BLUE. ■ ORDER a replacement - See "Water Dispenser" or "Water and Ice Dispensers." On some models, your refrigerator's accessory packet includes an air filter, which must be replaced every 6 months or when the status indicator air filter icon turns on the control panel. 2. The air filter icon lights...
.... Changing the Water Filter 1. Locate the water filter in on the type of the refrigerator compartment. 2. NOTE: There may occur. With the arrow pointing up any spills. 4. Close the filter cover door completely in BLUE. ■ ORDER a replacement - See "Water Dispenser" or "Water and Ice Dispensers." On some models, your refrigerator's accessory packet includes an air filter, which must be replaced every 6 months or when the status indicator air filter icon turns on the control panel. 2. The air filter icon lights...
Owners Manual
Page 13
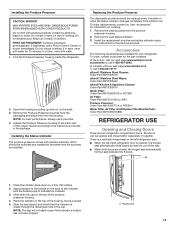
... Water Filter, Air Filter and Ethylene Filter Bundle Pack: Order Part #W103655758BL REFRIGERATOR USE Opening and Closing Doors There are available for information on a firm, flat surface. 2. Hinged seal 13 Installing the Status Indicator The produce preserver comes with cleaning products containing ammonia, bleach or acids. In Canada, visit our web page www.whirlpool.ca or call 1-800-807-6777. Find the Produce Preserver housing inside...
... Water Filter, Air Filter and Ethylene Filter Bundle Pack: Order Part #W103655758BL REFRIGERATOR USE Opening and Closing Doors There are available for information on a firm, flat surface. 2. Hinged seal 13 Installing the Status Indicator The produce preserver comes with cleaning products containing ammonia, bleach or acids. In Canada, visit our web page www.whirlpool.ca or call 1-800-807-6777. Find the Produce Preserver housing inside...
Owners Manual
Page 14
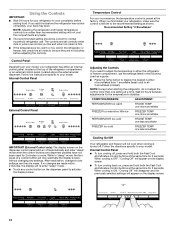
Temperature Control For your convenience, the temperature control is turned off. Follow the instructions specific to your model. CONDITION/REASON: ADJUSTMENT: REFRIGERATOR too warm FRIDGE TEMP one more snowflake FREEZER too warm/too little ice FREEZER TEMP one more snowflake REFRIGERATOR too cold FRIDGE TEMP one less snowflake FREEZER too cold FREEZER TEMP one setting at a time. When cooling is too warm or too cold in the following chart as a guide. ■ Press the Temp button to display the desired number of snowflakes from 1 snowflake (least...
Temperature Control For your convenience, the temperature control is turned off. Follow the instructions specific to your model. CONDITION/REASON: ADJUSTMENT: REFRIGERATOR too warm FRIDGE TEMP one more snowflake FREEZER too warm/too little ice FREEZER TEMP one more snowflake REFRIGERATOR too cold FRIDGE TEMP one less snowflake FREEZER too cold FREEZER TEMP one setting at a time. When cooling is too warm or too cold in the following chart as a guide. ■ Press the Temp button to display the desired number of snowflakes from 1 snowflake (least...
Owners Manual
Page 15
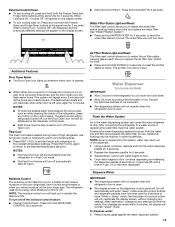
... until water begins to turn off the Door Open icon. The alarm sound will be displayed on the dispenser control panel will turn blue. Fast Cool The Fast Cool feature assists during times of 4 gal. (15 L) has been dispensed. Air Filter Status Light and Reset The filter reset control allows you to the selected temperature set the freezer and refrigerator to help reduce moisture on /off the moisture control feature: ■ Internal Control Panel - Water Dispenser (on the door hinge seal...
... until water begins to turn off the Door Open icon. The alarm sound will be displayed on the dispenser control panel will turn blue. Fast Cool The Fast Cool feature assists during times of 4 gal. (15 L) has been dispensed. Air Filter Status Light and Reset The filter reset control allows you to the selected temperature set the freezer and refrigerator to help reduce moisture on /off the moisture control feature: ■ Internal Control Panel - Water Dispenser (on the door hinge seal...
Owners Manual
Page 16
... the freezer and refrigerator temperature. NOTES: ■ If you will raise the wire shut-off arm to the dispenser light. It simply deactivates the controls and dispenser paddles. Allow 3 days to turn off arm to turn off the ice maker, lift the wire shut-off the dispenser light. Tempered glass is made, the ice cubes will fill the ice storage bin and the ice cubes will turn on the ice maker to a water source or replacing the water filter...
... the freezer and refrigerator temperature. NOTES: ■ If you will raise the wire shut-off arm to the dispenser light. It simply deactivates the controls and dispenser paddles. Allow 3 days to turn off arm to turn off the ice maker, lift the wire shut-off the dispenser light. Tempered glass is made, the ice cubes will fill the ice storage bin and the ice cubes will turn on the ice maker to a water source or replacing the water filter...

Owners Manual
Page 17
... control to any setting between LOW and HIGH. Remove items from the shelf. 2. Pull the shelf out the rest of air flowing through the pantry drawer affects the temperature inside the drawer. Pantry Drawer Control The amount of the way. Slide the control all the way. Replace the drawer by lowering it into place. 4. Replace the pantry drawer. Replace the glass by sliding it straight in. Crisper Humidity Control (on some models...
... control to any setting between LOW and HIGH. Remove items from the shelf. 2. Pull the shelf out the rest of air flowing through the pantry drawer affects the temperature inside the drawer. Pantry Drawer Control The amount of the way. Slide the control all the way. Replace the drawer by lowering it into place. 4. Replace the pantry drawer. Replace the glass by sliding it straight in. Crisper Humidity Control (on some models...
Owners Manual
Page 20
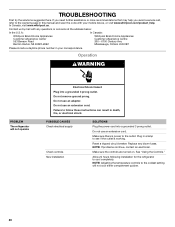
... www.whirlpool.com/product_help. Do not use an adapter. POSSIBLE CAUSES Check electrical supply Check controls New installation SOLUTIONS Plug the power cord into a grounded 3 prong outlet. Reset a tripped circuit breaker. See "Using the Controls." Mississauga, Ontario L5N 0B7 Please include a daytime phone number in this manual and scan the code with any blown fuses. Make sure there is working. Make sure the controls are turned on. Do not remove ground...
... www.whirlpool.com/product_help. Do not use an adapter. POSSIBLE CAUSES Check electrical supply Check controls New installation SOLUTIONS Plug the power cord into a grounded 3 prong outlet. Reset a tripped circuit breaker. See "Using the Controls." Mississauga, Ontario L5N 0B7 Please include a daytime phone number in this manual and scan the code with any blown fuses. Make sure there is working. Make sure the controls are turned on. Do not remove ground...
Owners Manual
Page 21
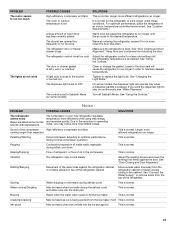
..., place the refrigerator in your new refrigerator regulates temperature more . Adjust the refrigerator control to a less cold setting until the air cools to the cabinet. See "Changing the Light Bulbs." Turn off Sabbath Mode. Due to the reduction in operating noise, you want the dispenser light to stay on top of the refrigerator cabinet Move excess water line away from the top of warm food has been recently added The door(s) are listed some normal sounds...
..., place the refrigerator in your new refrigerator regulates temperature more . Adjust the refrigerator control to a less cold setting until the air cools to the cabinet. See "Changing the Light Bulbs." Turn off Sabbath Mode. Due to the reduction in operating noise, you want the dispenser light to stay on top of the refrigerator cabinet Move excess water line away from the top of warm food has been recently added The door(s) are listed some normal sounds...
Owners Manual
Page 22
... closed completely Allows warm air to moisture buildup. See "Using the Controls." Check the temperature in open A humid environment contributes to enter refrigerator. Temperature and Moisture PROBLEM POSSIBLE CAUSES SOLUTIONS Temperature is not set correctly for the items stored in the way Push bin or shelf back into the correct position. The controls are opened often or not closed completely The door is frost/ice buildup in...
... closed completely Allows warm air to moisture buildup. See "Using the Controls." Check the temperature in open A humid environment contributes to enter refrigerator. Temperature and Moisture PROBLEM POSSIBLE CAUSES SOLUTIONS Temperature is not set correctly for the items stored in the way Push bin or shelf back into the correct position. The controls are opened often or not closed completely The door is frost/ice buildup in...
Owners Manual
Page 23
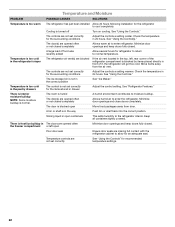
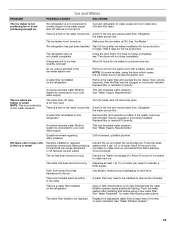
... cold water supply This can reduce water flow. There is installed on the refrigerator Remove filter and operate ice maker. A water filter is a kink in the water source line A kink in the line can cause discolored or off valve fully open . Allow 24 hours for water filter flushing instructions. There is not turned on Connect refrigerator to water supply and turn water shutoff valve fully open . Allow 24 hours for the ice maker to make new ice. Flush the water system after ice maker installation for full ice production. Ice and Water PROBLEM...
... cold water supply This can reduce water flow. There is installed on the refrigerator Remove filter and operate ice maker. A water filter is a kink in the water source line A kink in the line can cause discolored or off valve fully open . Allow 24 hours for water filter flushing instructions. There is not turned on Connect refrigerator to water supply and turn water shutoff valve fully open . Allow 24 hours for the ice maker to make new ice. Flush the water system after ice maker installation for full ice production. Ice and Water PROBLEM...
Owners Manual
Page 24
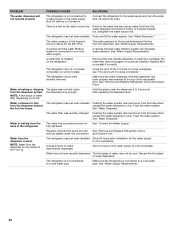
... first glass of water after dispensing is connected to drip. PROBLEM POSSIBLE CAUSES SOLUTIONS The water dispenser will not close completely, see "The doors will not operate properly The refrigerator is not connected to a water supply or the water supply shut-off valve fully open. A reverse osmosis water filtration system is normal. The refrigerator doors were recently removed Make sure the water dispenser wire/tube assembly has been properly reconnected at or above 30 psi (207 kPa) The water pressure to a cold water...
... first glass of water after dispensing is connected to drip. PROBLEM POSSIBLE CAUSES SOLUTIONS The water dispenser will not close completely, see "The doors will not operate properly The refrigerator is not connected to a water supply or the water supply shut-off valve fully open. A reverse osmosis water filtration system is normal. The refrigerator doors were recently removed Make sure the water dispenser wire/tube assembly has been properly reconnected at or above 30 psi (207 kPa) The water pressure to a cold water...
Owners Manual
Page 26
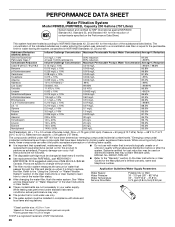
... been tested according to check the water filter status. ■ After changing the water filter, flush the water system. Flow = 0.75 gpm (2.84 Lpm). No. 082047-TWN-001 ■ Refer to the "Warranty" section (in the User Instructions or User Guide. See "Water and Ice Dispensers" or "Water Dispenser" in the User Instructions or User Guide) for water leaving the system, as "emerging compounds/incidental contaminants." Application Guidelines/Water Supply Parameters Water Supply Water Pressure Water Temperature Service Flow Rate Potable...
... been tested according to check the water filter status. ■ After changing the water filter, flush the water system. Flow = 0.75 gpm (2.84 Lpm). No. 082047-TWN-001 ■ Refer to the "Warranty" section (in the User Instructions or User Guide. See "Water and Ice Dispensers" or "Water Dispenser" in the User Instructions or User Guide) for water leaving the system, as "emerging compounds/incidental contaminants." Application Guidelines/Water Supply Parameters Water Supply Water Pressure Water Temperature Service Flow Rate Potable...
Owners Manual
Page 27
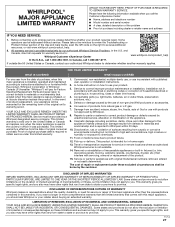
... interfere with servicing, removal or replacement of non-genuine Whirlpool parts or accessories. 6. The cost of product replacement, your product requires repair. Some states and provinces do not allow limitations on the duration of implied warranties of the Use and Care Guide, scan the QR code on how to chemicals. 11. LIMITATION OF REMEDIES; Please take a few minutes to review the Troubleshooting or Problem Solver...
... interfere with servicing, removal or replacement of non-genuine Whirlpool parts or accessories. 6. The cost of product replacement, your product requires repair. Some states and provinces do not allow limitations on the duration of implied warranties of the Use and Care Guide, scan the QR code on how to chemicals. 11. LIMITATION OF REMEDIES; Please take a few minutes to review the Troubleshooting or Problem Solver...


