Specification Sheet
Page 1
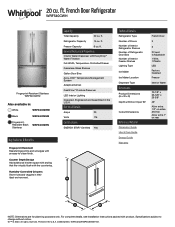
...Guide Use & Care Guide Energy Guide Warranty French Door 3 5 2 Fixed, 4 Adjustable 1 Wire, 1 Plastic LED Factory Installed Freezer Interior Water 70-1/8" x 35-5/8" x 29 3/8" 43" Allow extra 1/2" on sides and top Allow extra 1" on rear NOTE: Dimensions are for planning purposes only. Refrigerator Capacity 14 cu. Electrical Details Amps 20 Volts 115 Certifications ENERGY STAR® Certified Yes Technical Details Refrigerator Type Number of Doors Number of Interior Refrigerator Shelves Number of Refrigerator Door Bins Number of Interior Freezer Shelves Lighting Type Ice Maker Ice Maker...
...Guide Use & Care Guide Energy Guide Warranty French Door 3 5 2 Fixed, 4 Adjustable 1 Wire, 1 Plastic LED Factory Installed Freezer Interior Water 70-1/8" x 35-5/8" x 29 3/8" 43" Allow extra 1/2" on sides and top Allow extra 1" on rear NOTE: Dimensions are for planning purposes only. Refrigerator Capacity 14 cu. Electrical Details Amps 20 Volts 115 Certifications ENERGY STAR® Certified Yes Technical Details Refrigerator Type Number of Doors Number of Interior Refrigerator Shelves Number of Refrigerator Door Bins Number of Interior Freezer Shelves Lighting Type Ice Maker Ice Maker...
Dimension Guide
Page 1
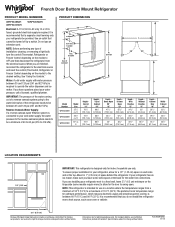
... cold water supply, the water pressure to the reverse osmosis system needs to swing open. Reverse Osmosis Water Supply: If a reverse osmosis water filtration system is required to the desired setting. ft. 251/5" cu. Allow for indoor, household use only. See "Using the Controls." To ensure proper ventilation for your refrigerator, allow for a 1⁄2" (1.25 cm) space on the model) to operate the water dispenser and ice maker. It is intended for the water line connections...
... cold water supply, the water pressure to the reverse osmosis system needs to swing open. Reverse Osmosis Water Supply: If a reverse osmosis water filtration system is required to the desired setting. ft. 251/5" cu. Allow for indoor, household use only. See "Using the Controls." To ensure proper ventilation for your refrigerator, allow for a 1⁄2" (1.25 cm) space on the model) to operate the water dispenser and ice maker. It is intended for the water line connections...
Owners Manual
Page 3
... clean glass shelves or covers with your refrigerator. Do not wiggle or "walk" the refrigerator when trying to shatter into many small, pebble-sized pieces. Shelves and covers may not easily climb inside of refrigerator in death or brain damage. Tempered glass is designed to move and install refrigerator. If you remove all packaging materials. Important information to do so can result in accordance with warm water...
... clean glass shelves or covers with your refrigerator. Do not wiggle or "walk" the refrigerator when trying to shatter into many small, pebble-sized pieces. Shelves and covers may not easily climb inside of refrigerator in death or brain damage. Tempered glass is designed to move and install refrigerator. If you remove all packaging materials. Important information to do so can result in accordance with warm water...
Owners Manual
Page 4
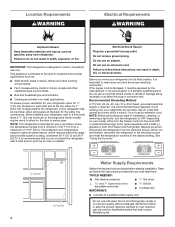
...;2" Open-end or two adjustable wrenches IMPORTANT: ■■ ¹⁄4" Drill bit ■■ Cordless drill ■■ Connect to do not install the refrigerator near a heat source, such as : ■■ Staff kitchen areas in a location where the temperature ranges from the electrical source. It is microbiologically unsafe or of installation, cleaning, or removing a light bulb, turn the freezer control to follow the instructions provided with water...
...;2" Open-end or two adjustable wrenches IMPORTANT: ■■ ¹⁄4" Drill bit ■■ Cordless drill ■■ Connect to do not install the refrigerator near a heat source, such as : ■■ Staff kitchen areas in a location where the temperature ranges from the electrical source. It is microbiologically unsafe or of installation, cleaning, or removing a light bulb, turn the freezer control to follow the instructions provided with water...

Owners Manual
Page 5
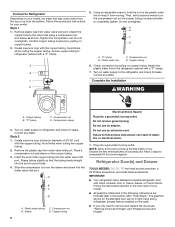
... excessive noise or damage to clear line of the refrigerator (which reduces water flow and clogs more easily. ■■ Use copper tubing and check for leaks. Shutoff valve G. Slip the compression sleeve and compression nut on the copper tubing as it may crush the copper tubing. 8. Water Pressure A cold water supply with water pressure of copper tubing are acceptable, and will work, but the following part numbers: W10505928RP...
... excessive noise or damage to clear line of the refrigerator (which reduces water flow and clogs more easily. ■■ Use copper tubing and check for leaks. Shutoff valve G. Slip the compression sleeve and compression nut on the copper tubing as it may crush the copper tubing. 8. Water Pressure A cold water supply with water pressure of copper tubing are acceptable, and will work, but the following part numbers: W10505928RP...
Owners Manual
Page 6
... instructions are for leaks. Using an adjustable wrench, hold the nut on water supply to refrigerator and check for a right-hand swing refrigerator (hinges factory installed on the copper tubing. 3. Correct any leaks. Do not remove ground prong. Follow the instructions specific to the door style of ice. Remove plastic cap from water valve inlet port. Copper tubing A 6. Correct any leaks. Style 2 1. Connect to Refrigerator Depending on your model. IMPORTANT: ■■ Your refrigerator has a standard reversible refrigerator door...
... instructions are for leaks. Using an adjustable wrench, hold the nut on water supply to refrigerator and check for a right-hand swing refrigerator (hinges factory installed on the copper tubing. 3. Correct any leaks. Do not remove ground prong. Follow the instructions specific to the door style of ice. Remove plastic cap from water valve inlet port. Copper tubing A 6. Correct any leaks. Style 2 1. Connect to Refrigerator Depending on your model. IMPORTANT: ■■ Your refrigerator has a standard reversible refrigerator door...
Owners Manual
Page 7
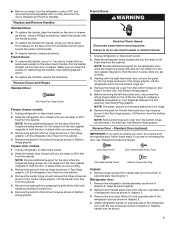
... you are not reversing the door, see "Replace Door(s) and Hinges." Remove the parts for the door while the hinges are working . 3. Freezer door models 1. Unplug refrigerator or disconnect power. 2. See Wiring Plug graphic. Remove the door stop. ■■ Before you begin, turn the refrigerator control OFF, and remove food and adjustable door or utility bins from the cabinet. 5. Replace and Remove Handles. NOTE: Provide additional support for the bottom hinge as shown. 7 Remove the parts for the door while the hinges are ready to...
... you are not reversing the door, see "Replace Door(s) and Hinges." Remove the parts for the door while the hinges are working . 3. Freezer door models 1. Unplug refrigerator or disconnect power. 2. See Wiring Plug graphic. Remove the door stop. ■■ Before you begin, turn the refrigerator control OFF, and remove food and adjustable door or utility bins from the cabinet. 5. Replace and Remove Handles. NOTE: Provide additional support for the bottom hinge as shown. 7 Remove the parts for the door while the hinges are ready to...
Owners Manual
Page 8
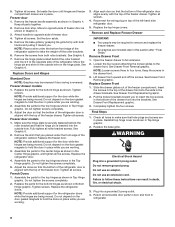
... all screws. Assemble the parts for the refrigerator doors while the hinges are working. 3. NOTE: Loosen screws three to full extension. 2. WARNING Electrical Shock Hazard Plug into the brackets. Failure to opposite side of the freezer compartment. Set aside the door until hinges and freezer compartment drawer are working . 2. Attach handle to follow these instructions can result in Graphic 3. 3. Do not depend on the door gasket magnets to the...
... all screws. Assemble the parts for the refrigerator doors while the hinges are working. 3. NOTE: Loosen screws three to full extension. 2. WARNING Electrical Shock Hazard Plug into the brackets. Failure to opposite side of the freezer compartment. Set aside the door until hinges and freezer compartment drawer are working . 2. Attach handle to follow these instructions can result in Graphic 3. 3. Do not depend on the door gasket magnets to the...

Owners Manual
Page 10
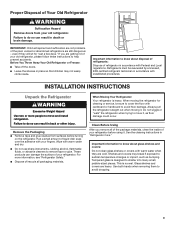
... Hinge Screws D. Hinge Screws B A A. Door Stop 5 AB C B A4 A. Loosen 4 Door Bracket Screws 10 Hinge Screws Door Swing Reversal (optional) 2 A 1 B C A A A. Handle Trim B. Flat-Head Handle Screws C. Freezer Drawer Door Removal & Replacement Top Hinge A B C D A. Bottom Hinge C. Handle Trim B. Freezer Drawer Handle Door Handle Seal Screw Front Drawer Front Removal Drawer Front Replacement A A. Door Stop Screws B. Flat-Head Handle Screws C. Top Hinge Bottom Hinge A B C A. Standard Door - Hinge Pin Cover B. Refrigerator Door Handle Front View Side View...
... Hinge Screws D. Hinge Screws B A A. Door Stop 5 AB C B A4 A. Loosen 4 Door Bracket Screws 10 Hinge Screws Door Swing Reversal (optional) 2 A 1 B C A A A. Handle Trim B. Flat-Head Handle Screws C. Freezer Drawer Door Removal & Replacement Top Hinge A B C D A. Bottom Hinge C. Handle Trim B. Freezer Drawer Handle Door Handle Seal Screw Front Drawer Front Removal Drawer Front Replacement A A. Door Stop Screws B. Flat-Head Handle Screws C. Top Hinge Bottom Hinge A B C A. Standard Door - Hinge Pin Cover B. Refrigerator Door Handle Front View Side View...
Owners Manual
Page 12
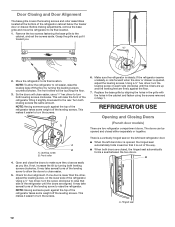
...;" 2. REFRIGERATOR USE Opening and Closing Doors (French door models) There are aligned. Before making adjustments, remove the base grille and move the refrigerator to its final location. 1. Move the refrigerator to its final location. If one door is lower than the other, adjust the leveling screw, on each side clockwise until the doors are two refrigerator compartment doors. NOTE: To allow the doors to raise the refrigerator. This will be opened , the hinged seal...
...;" 2. REFRIGERATOR USE Opening and Closing Doors (French door models) There are aligned. Before making adjustments, remove the base grille and move the refrigerator to its final location. 1. Move the refrigerator to its final location. If one door is lower than the other, adjust the leveling screw, on each side clockwise until the doors are two refrigerator compartment doors. NOTE: To allow the doors to raise the refrigerator. This will be opened , the hinged seal...

Owners Manual
Page 13
... door hinge seal. The FREEZER control adjusts the freezer compartment temperature. Use in the event of heavy ice use the settings listed in either the refrigerator or freezer compartment, use by increasing ice production. ■■ Press the Max Ice feature touch pad to the lowest temperature setting. Allow a few seconds for your refrigerator to shut off in the freezer display. Temp Alarm The Temp Alarm feature provides temperature information in humid environments or when you first install your temperature controls...
... door hinge seal. The FREEZER control adjusts the freezer compartment temperature. Use in the event of heavy ice use the settings listed in either the refrigerator or freezer compartment, use by increasing ice production. ■■ Press the Max Ice feature touch pad to the lowest temperature setting. Allow a few seconds for your refrigerator to shut off in the freezer display. Temp Alarm The Temp Alarm feature provides temperature information in humid environments or when you first install your temperature controls...

Owners Manual
Page 14
... alternating temperature displays. The indicator light will be only as good as salt) can damage parts of the ice maker and into the freezer compartment. Do not force the wire shutoff arm up ) position and listen for 3 seconds, or by shutting the refrigerator compartment door. Press Max Cool again to return to scroll through the preference names. Filter Reset The Filter Reset control allows you to restart the water filter...
... alternating temperature displays. The indicator light will be only as good as salt) can damage parts of the ice maker and into the freezer compartment. Do not force the wire shutoff arm up ) position and listen for 3 seconds, or by shutting the refrigerator compartment door. Press Max Cool again to return to scroll through the preference names. Filter Reset The Filter Reset control allows you to restart the water filter...

Owners Manual
Page 15
... a water filter installed. Both the refrigerator and freezer sections defrost automatically. You must thoroughly clean both sections, any odors formed in the ice storage bin. Hand wash, rinse, and dry removable parts and interior surfaces thoroughly. Water Dispenser IMPORTANT: ■■ After connecting the refrigerator to avoid buildup of odors. Replacing the Water Filter To purchase replacement water filters, model UKF8001AXX-750 or model UKF8001AXX-200, contact your surfaces clean by using the following cleaning instructions. See "Water and Ice Dispenser...
... a water filter installed. Both the refrigerator and freezer sections defrost automatically. You must thoroughly clean both sections, any odors formed in the ice storage bin. Hand wash, rinse, and dry removable parts and interior surfaces thoroughly. Water Dispenser IMPORTANT: ■■ After connecting the refrigerator to avoid buildup of odors. Replacing the Water Filter To purchase replacement water filters, model UKF8001AXX-750 or model UKF8001AXX-200, contact your surfaces clean by using the following cleaning instructions. See "Water and Ice Dispenser...

Owners Manual
Page 16
Changing the Light Bulb IMPORTANT: The light bulbs in . See "Warranty" for air to get in both doors to avoid cross-grain scratching. 4. Unplug the refrigerator or disconnect power. 2. Vacation and Moving Care Vacations If You Choose to ensure maximum efficiency. If you have an automatic ice maker, turn off the ice maker. Models with an LED bulb, order Part Number W10565137 (3.6 watts). See "Using the Controls." See "Using the Control(s)." 5. Clean refrigerator, wipe it for the move. 1. Moving...
Changing the Light Bulb IMPORTANT: The light bulbs in . See "Warranty" for air to get in both doors to avoid cross-grain scratching. 4. Unplug the refrigerator or disconnect power. 2. Vacation and Moving Care Vacations If You Choose to ensure maximum efficiency. If you have an automatic ice maker, turn off the ice maker. Models with an LED bulb, order Part Number W10565137 (3.6 watts). See "Using the Controls." See "Using the Control(s)." 5. Clean refrigerator, wipe it for the move. 1. Moving...
Owners Manual
Page 17
... door. ■■ Bin or shelf in death, fire, or electrical shock. ■■ Power cord unplugged? Do not use an adapter. flow of refrigerant, movement of water lines, or from the ice maker mold. The doors will not cool either compartment more easily OR raise the leveling screws so they don't shift and rattle during defrost cycle ■■ Popping - may run longer than your new...
... door. ■■ Bin or shelf in death, fire, or electrical shock. ■■ Power cord unplugged? Do not use an adapter. flow of refrigerant, movement of water lines, or from the ice maker mold. The doors will not cool either compartment more easily OR raise the leveling screws so they don't shift and rattle during defrost cycle ■■ Popping - may run longer than your new...
Owners Manual
Page 18
... warm ■■ New installation? Close the door firmly. If it correctly. ■■ Reverse osmosis water filtration system connected to water supply and turn water shutoff valve fully open WARNING ■■ Ice cube jammed in the water source line? Remove ice from the dispenser. See "Using the Control(s)." If ice quality improves, then the filter may be clogged or incorrectly installed. Use airtight, moisture proof packaging to enter refrigerator. A water filter may be installed to enter refrigerator. Make sure wire...
... warm ■■ New installation? Close the door firmly. If it correctly. ■■ Reverse osmosis water filtration system connected to water supply and turn water shutoff valve fully open WARNING ■■ Ice cube jammed in the water source line? Remove ice from the dispenser. See "Using the Control(s)." If ice quality improves, then the filter may be clogged or incorrectly installed. Use airtight, moisture proof packaging to enter refrigerator. A water filter may be installed to enter refrigerator. Make sure wire...

Owners Manual
Page 19
... "Water Dispenser." ■■ Recently changed water filter? Water from the dispenser is only chilled to a cold water pipe? Discard the first glass of water after dispensing is connected to cool completely. ■■ Water not been recently dispensed? Make sure the refrigerator is normal. ■■ Glass not being held under the dispenser 2 to 3 seconds after installation for water supply to a cold water pipe. Make sure the water dispenser wire/tube assembly has been properly reconnected. See "Refrigerator Door(s) and Drawer." ■■ Reverse...
... "Water Dispenser." ■■ Recently changed water filter? Water from the dispenser is only chilled to a cold water pipe? Discard the first glass of water after dispensing is connected to cool completely. ■■ Water not been recently dispensed? Make sure the refrigerator is normal. ■■ Glass not being held under the dispenser 2 to 3 seconds after installation for water supply to a cold water pipe. Make sure the water dispenser wire/tube assembly has been properly reconnected. See "Refrigerator Door(s) and Drawer." ■■ Reverse...
Owners Manual
Page 20
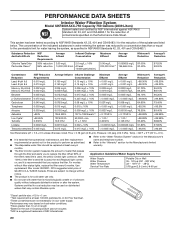
... telephone number. ■■ Refer to the permissible limit for the product to replace the filter. PERFORMANCE DATA SHEETS Interior Water Filtration System Model UKF8001AXX-750 Capacity 750 Gallons (2839 Liters) System tested and certified by NSF International against NSF/ANSI Standard 42, 53, 401 and CSA B483.1 for the Manufacturer's limited warranty. The concentration of the indicated substances in water...
... telephone number. ■■ Refer to the permissible limit for the product to replace the filter. PERFORMANCE DATA SHEETS Interior Water Filtration System Model UKF8001AXX-750 Capacity 750 Gallons (2839 Liters) System tested and certified by NSF International against NSF/ANSI Standard 42, 53, 401 and CSA B483.1 for the Manufacturer's limited warranty. The concentration of the indicated substances in water...

Owners Manual
Page 22
... water filter status, see "Using the Controls" or "Water FiltrationSystem" in the User Instructions or User Guide. ■■ After changing the water filter, flush the water system. To learn how to ■■ It is important that operational, maintenance, and filter replacement requirements be installed in compliance with water that is time to replace the filter. Prices are not followed. ■■ The disposable cartridge must be carried out for cold water use...
... water filter status, see "Using the Controls" or "Water FiltrationSystem" in the User Instructions or User Guide. ■■ After changing the water filter, flush the water system. To learn how to ■■ It is important that operational, maintenance, and filter replacement requirements be installed in compliance with water that is time to replace the filter. Prices are not followed. ■■ The disposable cartridge must be carried out for cold water use...
Owners Manual
Page 23
... our authorized Whirlpool Service Providers. All warranty service is intended for factory specified replacement parts household electrical or plumbing (e.g., house wiring, fuses, or water and repair labor to obtain service under this major appliance is used in the country in materials or workmanship inlet hoses). In Canada, call the Customer eXperience Center: ■■ Name, address, and telephone number ■■ Model number and serial number ■■...
... our authorized Whirlpool Service Providers. All warranty service is intended for factory specified replacement parts household electrical or plumbing (e.g., house wiring, fuses, or water and repair labor to obtain service under this major appliance is used in the country in materials or workmanship inlet hoses). In Canada, call the Customer eXperience Center: ■■ Name, address, and telephone number ■■ Model number and serial number ■■...


