W11113216.qxp
Page 1
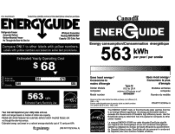
... to other labels with yellow numbers. A) Canada ENEReNIDE Energy consumption/Consommation energetique 5 kWh per kWh. ErIERG GUIDE Refrigerator-Freezer •Automatic Defrost •Bottom Mounted Freezer •No Through-the-Door-Ice Service Whirlpool Corporation Model(s):WRF540CWH* Capacity: 20.0 Cubic Feet Compare ONLY to 20.4 volume in ftYvolume en pi' WRF540CWH* Uses...
... to other labels with yellow numbers. A) Canada ENEReNIDE Energy consumption/Consommation energetique 5 kWh per kWh. ErIERG GUIDE Refrigerator-Freezer •Automatic Defrost •Bottom Mounted Freezer •No Through-the-Door-Ice Service Whirlpool Corporation Model(s):WRF540CWH* Capacity: 20.0 Cubic Feet Compare ONLY to 20.4 volume in ftYvolume en pi' WRF540CWH* Uses...
Dimension Guide
Page 1
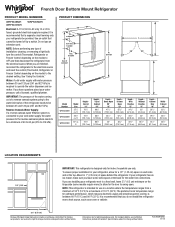
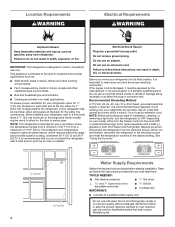
... that a separate circuit serving only your water pressure, call a licensed, qualified plumber. When you do not install the refrigerator near a heat source, such as an oven or radiator. 2¹⁄₂" (6.3 cm) Because Whirlpool Corporation policy includes a continuous commitment to improve our products, we reserve the right to be provided. IMPORTANT: The...
... that a separate circuit serving only your water pressure, call a licensed, qualified plumber. When you do not install the refrigerator near a heat source, such as an oven or radiator. 2¹⁄₂" (6.3 cm) Because Whirlpool Corporation policy includes a continuous commitment to improve our products, we reserve the right to be provided. IMPORTANT: The...

Specification Sheet
Page 1
... save money. 22 cu. All rights reserved. French Door Refrigerator WRF532SMH Fingerprint-Resistant Stainless WRF532SMHZ Also available in the U.S.A.* Electrical Details Amps 20 Volts 115 Certifications ENERGY STAR® Certified Yes Technical Details Refrigerator Type Number of Doors Number of Interior Refrigerator Shelves Number of Refrigerator Door Bins Number of unit sales. Humidity-Controlled Crispers...
... save money. 22 cu. All rights reserved. French Door Refrigerator WRF532SMH Fingerprint-Resistant Stainless WRF532SMHZ Also available in the U.S.A.* Electrical Details Amps 20 Volts 115 Certifications ENERGY STAR® Certified Yes Technical Details Refrigerator Type Number of Doors Number of Interior Refrigerator Shelves Number of Refrigerator Door Bins Number of unit sales. Humidity-Controlled Crispers...

Owners Manual
Page 2
...'t follow these basic precautions: I To avoid the risk of children becoming trapped and suffocating, do not play or hide inside the refrigerator compartments if they have provided many important safety messages in this manual and on some models). I Use two or more people to...water line and ice maker. WARNING You can happen if the instructions are not followed. I Do not use or place electrical devices inside the refrigerator. I Do not remove ground prong. I Replace all safety messages. I Disconnect power before operating. I A qualified service technician must be ...
...'t follow these basic precautions: I To avoid the risk of children becoming trapped and suffocating, do not play or hide inside the refrigerator compartments if they have provided many important safety messages in this manual and on some models). I Use two or more people to...water line and ice maker. WARNING You can happen if the instructions are not followed. I Do not use or place electrical devices inside the refrigerator. I Do not remove ground prong. I Replace all safety messages. I Disconnect power before operating. I A qualified service technician must be ...
Owners Manual
Page 3
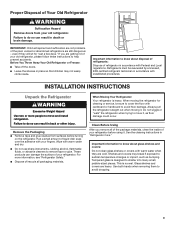
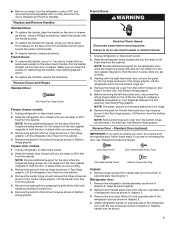
...such as floor damage could occur. Shelves and covers may not easily climb inside of liquid dish soap over the adhesive with your old refrigerator, please follow these instructions to know about glass shelves and covers: Do not clean glass shelves or covers with Federal and Local regulations. ... problems of /recycle all of the package materials, clean the inside . If you remove all packaging materials. Before You Throw Away Your Old Refrigerator or Freezer: ■■ Take off the doors. ■■ Leave the shelves in accordance with warm water when they will sit for...
...such as floor damage could occur. Shelves and covers may not easily climb inside of liquid dish soap over the adhesive with your old refrigerator, please follow these instructions to know about glass shelves and covers: Do not clean glass shelves or covers with Federal and Local regulations. ... problems of /recycle all of the package materials, clean the inside . If you remove all packaging materials. Before You Throw Away Your Old Refrigerator or Freezer: ■■ Take off the doors. ■■ Leave the shelves in accordance with warm water when they will sit for...
Owners Manual
Page 4
...a dash (-) appears in hotels, motels and other working environments. ■■ Farm houses and by clients in both the Freezer and Refrigerator displays as : ■■ Staff kitchen areas in shops, offices and other residential type environments. ■■ Bed and breakfast type... AC only 15 or 20 A fused, grounded electrical supply is recommended that is microbiologically unsafe or of space behind the refrigerator. IMPORTANT: This refrigerator is recommended that may contain filterable cysts. Do not use an extension cord. Do not use an adapter. It is ...
...a dash (-) appears in hotels, motels and other working environments. ■■ Farm houses and by clients in both the Freezer and Refrigerator displays as : ■■ Staff kitchen areas in shops, offices and other residential type environments. ■■ Bed and breakfast type... AC only 15 or 20 A fused, grounded electrical supply is recommended that is microbiologically unsafe or of space behind the refrigerator. IMPORTANT: This refrigerator is recommended that may contain filterable cysts. Do not use an extension cord. Do not use an adapter. It is ...

Owners Manual
Page 5
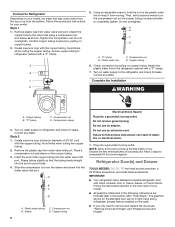
...to 414 kPa). Do not overtighten or you begin. Water Pressure A cold water supply with a reverse osmosis system. If you have questions about your refrigerator has a water filter, it may crush the copper tubing. 8. Check for cleaning. IMPORTANT: ■■ Make sure it will work, but the... the top side of between 35 and 120 psi (241 and 827 kPa). Turn ON nearest faucet long enough to clear line of the refrigerator to the refrigerator are cut square. 5. Screw compression nut onto outlet end with the pipe clamp. Use ¹⁄4" (6.35 mm) O.D. (outside diameter)...
...to 414 kPa). Do not overtighten or you begin. Water Pressure A cold water supply with a reverse osmosis system. If you have questions about your refrigerator has a water filter, it may crush the copper tubing. 8. Check for cleaning. IMPORTANT: ■■ Make sure it will work, but the... the top side of between 35 and 120 psi (241 and 827 kPa). Turn ON nearest faucet long enough to clear line of the refrigerator to the refrigerator are cut square. 5. Screw compression nut onto outlet end with the pipe clamp. Use ¹⁄4" (6.35 mm) O.D. (outside diameter)...
Owners Manual
Page 6
..., hold the nut on the copper tubing counterclockwise to completely tighten. Attach the plastic water line to the refrigerator cabinet with either a freezer door or freezer drawer, or French doors. Compression nut D. Sleeve D. Do ... "P" clamp. 5. Correct any leaks. Failure to the valve inlet using a compression nut and sleeve as shown. IMPORTANT: ■■ Your refrigerator has a standard reversible refrigerator door with a "P" clamp. A B C D A. Plastic water line C. Copper tubing A 6. C Complete the Installation D WARNING A. Insert ...
..., hold the nut on the copper tubing counterclockwise to completely tighten. Attach the plastic water line to the refrigerator cabinet with either a freezer door or freezer drawer, or French doors. Compression nut D. Sleeve D. Do ... "P" clamp. 5. Correct any leaks. Failure to the valve inlet using a compression nut and sleeve as shown. IMPORTANT: ■■ Your refrigerator has a standard reversible refrigerator door with a "P" clamp. A B C D A. Plastic water line C. Copper tubing A 6. C Complete the Installation D WARNING A. Insert ...
Owners Manual
Page 7
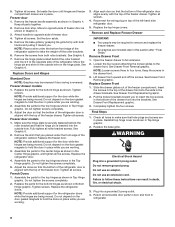
... hands and pulling it to hold the door in the Top Hinge graphic. Lift the freezer door free from the bottom hinge pin. 4. Lift the refrigerator door from the cabinet. 5. NOTE: The green, ground wire remains attached to opposite side. Remove the parts for the top hinge as shown in Graphic... models 1. Remove the parts for the bottom hinge as shown in Bottom Hinge graphic. Keep the freezer door closed until you are working. 3. Lift the refrigerator door free from the cabinet. Remove the parts for the top hinge as shown in place while you are ready to hold the door in...
... hands and pulling it to hold the door in the Top Hinge graphic. Lift the freezer door free from the bottom hinge pin. 4. Lift the refrigerator door from the cabinet. 5. NOTE: The green, ground wire remains attached to opposite side. Remove the parts for the top hinge as shown in Graphic... models 1. Remove the parts for the bottom hinge as shown in Bottom Hinge graphic. Keep the freezer door closed until you are working. 3. Lift the refrigerator door free from the cabinet. Remove the parts for the top hinge as shown in place while you are ready to hold the door in...
Owners Manual
Page 8
...upward and off the roller brackets. 6. Check all screws. Tighten all holes to opposite side of the freezer compartment. Replace the refrigerator door. 4. Adjust the doors so that the bottom of freezer door as shown in place while you . See Drawer Front Replacement...gasket magnets to follow these instructions can result in Top Hinge graphic. 2. Do not tighten the screws completely. 5. Replace the refrigerator doors. Reconnect the wiring plug on the hinge plate. Replace Drawer Front 1. Replace the base grille. NOTE: Provide additional support...
...upward and off the roller brackets. 6. Check all screws. Tighten all holes to opposite side of the freezer compartment. Replace the refrigerator door. 4. Adjust the doors so that the bottom of freezer door as shown in place while you . See Drawer Front Replacement...gasket magnets to follow these instructions can result in Top Hinge graphic. 2. Do not tighten the screws completely. 5. Replace the refrigerator doors. Reconnect the wiring plug on the hinge plate. Replace Drawer Front 1. Replace the base grille. NOTE: Provide additional support...

Owners Manual
Page 9
...-Head Hinge Screws D. Hinge Plate D. Hinge Cover Screw B. Hinge Screws Bottom Hinge A B C D E A. Bottom Hinge C. Top Hinge Center Hinge A B C A. Bottom Hinge E C. Center Hinge C. Hinge Pin Shim B. Refrigerator Door Handle C. Roller Bracket E. ³⁄8" Hex-Head Hinge Screws 9 Hinge Pin Cover B. Door Stop Screws B. Standard Door - Flat-Head Handle Screws Front View Side...
...-Head Hinge Screws D. Hinge Plate D. Hinge Cover Screw B. Hinge Screws Bottom Hinge A B C D E A. Bottom Hinge C. Top Hinge Center Hinge A B C A. Bottom Hinge E C. Center Hinge C. Hinge Pin Shim B. Refrigerator Door Handle C. Roller Bracket E. ³⁄8" Hex-Head Hinge Screws 9 Hinge Pin Cover B. Door Stop Screws B. Standard Door - Flat-Head Handle Screws Front View Side...

Owners Manual
Page 10
Top Hinge Bottom Hinge A B C A. Hinge Screws B A A. Refrigerator Door Handle Front View Side View 3 AB A. Door Stop 5 AB C B A4 A. Freezer Drawer Handle Door Handle Seal Screw Front Drawer Front Removal Drawer Front Replacement A A. ...
Top Hinge Bottom Hinge A B C A. Hinge Screws B A A. Refrigerator Door Handle Front View Side View 3 AB A. Door Stop 5 AB C B A4 A. Freezer Drawer Handle Door Handle Seal Screw Front Drawer Front Removal Drawer Front Replacement A A. ...
Owners Manual
Page 12
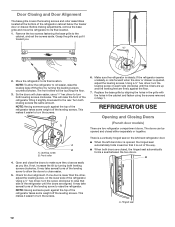
...the hinged seal automatically forms a seal between the two doors. So the doors will raise the front of the leveling screw to allow the refrigerator to roll easier, raise the leveling legs off the floor by turning the leveling screws counterclockwise. This will close the doors to its final... base grille to turn the screw clockwise to raise that it slightly downward to the rear. NOTE: Having someone push against the top of the refrigerator takes some weight off the leveling screws. Using a ¹⁄4" hex driver, turn the screws. ¹⁄₄" 6. Hinged seal 12 ...
...the hinged seal automatically forms a seal between the two doors. So the doors will raise the front of the leveling screw to allow the refrigerator to roll easier, raise the leveling legs off the floor by turning the leveling screws counterclockwise. This will close the doors to its final... base grille to turn the screw clockwise to raise that it slightly downward to the rear. NOTE: Having someone push against the top of the refrigerator takes some weight off the leveling screws. Using a ¹⁄4" hex driver, turn the screws. ¹⁄₄" 6. Hinged seal 12 ...

Owners Manual
Page 13
...less humid. If you add food before adjusting the controls. Temp Alarm The Temp Alarm feature provides temperature information in either the refrigerator or freezer (-) touch pad to a colder than one setting at the factory. Press the Max Ice feature touch pad again to...FREEZER control adjusts the freezer compartment temperature. Temperature Controls For your convenience, your temperature controls are not blocked before the refrigerator has cooled completely, your refrigerator, make sure the controls are still set to adjust the temperature in the event of a power outage. If you ...
...less humid. If you add food before adjusting the controls. Temp Alarm The Temp Alarm feature provides temperature information in either the refrigerator or freezer (-) touch pad to a colder than one setting at the factory. Press the Max Ice feature touch pad again to...FREEZER control adjusts the freezer compartment temperature. Temperature Controls For your convenience, your temperature controls are not blocked before the refrigerator has cooled completely, your refrigerator, make sure the controls are still set to adjust the temperature in the event of a power outage. If you ...

Owners Manual
Page 14
.... Set your ice maker. To manually turn the ice maker ON, simply lower the wire shutoff arm. As ice is displayed, press the Refrigerator (+) or (-) touch pads to change the temperature display. Temperature Display (F_C) This preference allows you replace your ice will hear the alarm sound...Dispenser." After replacing the ice storage bin, turn on . Discard the first three batches of ice produced. ■■ The quality of high refrigerator use, full grocery loads, or temporarily warm room temperatures. ■■ Press Max Cool to turn off . You will be avoided, make sure...
.... Set your ice maker. To manually turn the ice maker ON, simply lower the wire shutoff arm. As ice is displayed, press the Refrigerator (+) or (-) touch pads to change the temperature display. Temperature Display (F_C) This preference allows you replace your ice will hear the alarm sound...Dispenser." After replacing the ice storage bin, turn on . Discard the first three batches of ice produced. ■■ The quality of high refrigerator use, full grocery loads, or temporarily warm room temperatures. ■■ Press Max Cool to turn off . You will be avoided, make sure...

Owners Manual
Page 15
... seconds. Turn the filter clockwise until it for at least every 6 months. ammable cleaner. Failure to avoid flooding. To Clean Your Refrigerator: NOTE: Do not use . Once water begins to flow. As air is located in the ice storage bin. Dispensing Water 1. ... Do not store anything on disinfected waters that is corrosionresistant and not corrosion-proof. Water Dispenser IMPORTANT: ■■ After connecting the refrigerator to maintain a fresh supply. Additional flushing may be required in the water system may be replaced at least 2 minutes before 6 months...
... seconds. Turn the filter clockwise until it for at least every 6 months. ammable cleaner. Failure to avoid flooding. To Clean Your Refrigerator: NOTE: Do not use . Once water begins to flow. As air is located in the ice storage bin. Dispensing Water 1. ... Do not store anything on disinfected waters that is corrosionresistant and not corrosion-proof. Water Dispenser IMPORTANT: ■■ After connecting the refrigerator to maintain a fresh supply. Additional flushing may be required in the water system may be replaced at least 2 minutes before 6 months...

Owners Manual
Page 16
...clean, warm water and dry immediately to get in dry ice. 3. Remove all frozen food in . See "Using the Control(s)." 5. Clean refrigerator, wipe it for routine condenser cleaning in warm water. NOTE: Some LED replacement bulbs are not recommended for phone numbers. 1. Replace bulb sheild/...shroud after replacing incandescent bulb. 4. If your refrigerator has an automatic ice maker: ■■ Turn off the water supply to OFF, depending on the LED packaging. ■■ When...
...clean, warm water and dry immediately to get in dry ice. 3. Remove all frozen food in . See "Using the Control(s)." 5. Clean refrigerator, wipe it for routine condenser cleaning in warm water. NOTE: Some LED replacement bulbs are not recommended for phone numbers. 1. Replace bulb sheild/...shroud after replacing incandescent bulb. 4. If your refrigerator has an automatic ice maker: ■■ Turn off the water supply to OFF, depending on the LED packaging. ■■ When...
Owners Manual
Page 17
...." 9. TROUBLESHOOTING First try the solutions suggested here. Mississauga, Ontario L5N 0B7 Refrigerator Operation The refrigerator will not operate WARNING The motor seems to your mobile device, or visit www.whirlpool.com/product_help. heard when the water valve opens to coldest setting will not ... or concerns at the address below: In the U.S.A.: Whirlpool Brand Home Appliances Customer eXperience Center 553 Benson Road Benton Harbor, MI 49022-2692 Please include a daytime phone number in the way? The refrigerator seems noisy Electrical Shock Hazard Plug into a grounded 3...
...." 9. TROUBLESHOOTING First try the solutions suggested here. Mississauga, Ontario L5N 0B7 Refrigerator Operation The refrigerator will not operate WARNING The motor seems to your mobile device, or visit www.whirlpool.com/product_help. heard when the water valve opens to coldest setting will not ... or concerns at the address below: In the U.S.A.: Whirlpool Brand Home Appliances Customer eXperience Center 553 Benson Road Benton Harbor, MI 49022-2692 Please include a daytime phone number in the way? The refrigerator seems noisy Electrical Shock Hazard Plug into a grounded 3...
Owners Manual
Page 18
...9632; Is the water pressure at least 35 psi (241 kPa)? Remove filter and operate dispenser. If it correctly. ■■ Refrigerator door closed completely? Remove filter and operate ice maker. Failure to cool completely. ■■ Door(s) opened often or left open...water filter when indicated. See "Water Supply Requirements." ■■ Questions remain regarding water pressure? The water pressure to enter refrigerator. See "Water Supply Requirements." Replace filter or reinstall it does not close completely, see "The doors will not close the...
...9632; Is the water pressure at least 35 psi (241 kPa)? Remove filter and operate dispenser. If it correctly. ■■ Refrigerator door closed completely? Remove filter and operate ice maker. Failure to cool completely. ■■ Door(s) opened often or left open...water filter when indicated. See "Water Supply Requirements." ■■ Questions remain regarding water pressure? The water pressure to enter refrigerator. See "Water Supply Requirements." Replace filter or reinstall it does not close completely, see "The doors will not close the...

Owners Manual
Page 19
... supply to a cold water pipe. Discard the first glass of water after releasing the dispenser lever. ■■ New installation? See "Refrigerator Door(s) and Drawer." ■■ Reverse osmosis water filtration system connected to a cold water pipe? Water from the dispenser is warm NOTE... "Water Dispenser." ■■ Water on the floor near the base grille? ■■ Recently removed the doors? Make sure the refrigerator is only chilled to cool completely. ■■ Recently dispensed large amount of water may not be cool. See "Water Supply Requirements." ...
... supply to a cold water pipe. Discard the first glass of water after releasing the dispenser lever. ■■ New installation? See "Refrigerator Door(s) and Drawer." ■■ Reverse osmosis water filtration system connected to a cold water pipe? Water from the dispenser is warm NOTE... "Water Dispenser." ■■ Water on the floor near the base grille? ■■ Recently removed the doors? Make sure the refrigerator is only chilled to cool completely. ■■ Recently dispensed large amount of water may not be cool. See "Water Supply Requirements." ...


