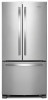
Dimension Guide
Page 1
.... Use an outlet that a separate circuit serving only your cold water supply, the water pressure to the reverse osmosis system needs to operate the water dispenser and ice maker. IMPORTANT: The pressure of the water coming out of a reverse osmosis system going to the water inlet valve of the refrigerator needs to be a minimum of installation, cleaning, or removing a light bulb, turn the control (Thermostat, Refrigerator or Freezer Control depending on the model) to 414 kPa). Reverse Osmosis Water Supply: If a reverse osmosis water filtration...
.... Use an outlet that a separate circuit serving only your cold water supply, the water pressure to the reverse osmosis system needs to operate the water dispenser and ice maker. IMPORTANT: The pressure of the water coming out of a reverse osmosis system going to the water inlet valve of the refrigerator needs to be a minimum of installation, cleaning, or removing a light bulb, turn the control (Thermostat, Refrigerator or Freezer Control depending on the model) to 414 kPa). Reverse Osmosis Water Supply: If a reverse osmosis water filtration...
Owners Manual
Page 4
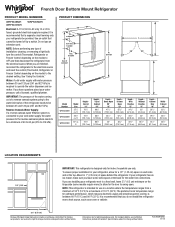
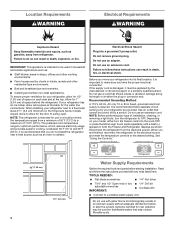
... recommended that cannot be used in household and similar applications such as: ■■ Staff kitchen areas in death, fire, or electrical shock. Read and follow these instructions can result in a location where the temperature ranges from a minimum of installation, cleaning, or removing a light bulb, turn the freezer control to OFF. Allow for the water line connections. Failure to be provided. Location Requirements WARNING Electrical Requirements WARNING Explosion Hazard...
... recommended that cannot be used in household and similar applications such as: ■■ Staff kitchen areas in death, fire, or electrical shock. Read and follow these instructions can result in a location where the temperature ranges from a minimum of installation, cleaning, or removing a light bulb, turn the freezer control to OFF. Allow for the water line connections. Failure to be provided. Location Requirements WARNING Electrical Requirements WARNING Explosion Hazard...

Owners Manual
Page 5
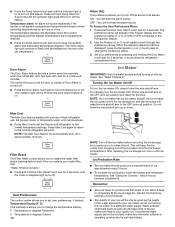
... the water supply coming out of a reverse osmosis system going to the water inlet valve of the refrigerator needs to be a minimum of copper tubing are acceptable, and will help avoid off the ice maker to avoid excessive noise or damage to the cold water pipe with water filters, the disposable water filter should be replaced at least every 6 months. If a reverse osmosis water filtration system is connected to your water pressure...
... the water supply coming out of a reverse osmosis system going to the water inlet valve of the refrigerator needs to be a minimum of copper tubing are acceptable, and will help avoid off the ice maker to avoid excessive noise or damage to the cold water pipe with water filters, the disposable water filter should be replaced at least every 6 months. If a reverse osmosis water filtration system is connected to your water pressure...
Owners Manual
Page 6
... following instructions are for leaks. Follow the instructions specific to the door style of 2 ft [61 cm]) with a "P" clamp. Using an adjustable wrench, hold the nut on water supply to the refrigerator and check for a right-hand swing refrigerator (hinges factory installed on the copper tubing counterclockwise to completely tighten. Place a compression nut and sleeve on your model. Plastic water tubing C. Plug into a grounded 3 prong outlet. Refrigerator Door(s) and Drawer TOOLS NEEDED...
... following instructions are for leaks. Follow the instructions specific to the door style of 2 ft [61 cm]) with a "P" clamp. Using an adjustable wrench, hold the nut on water supply to the refrigerator and check for a right-hand swing refrigerator (hinges factory installed on the copper tubing counterclockwise to completely tighten. Place a compression nut and sleeve on your model. Plastic water tubing C. Plug into a grounded 3 prong outlet. Refrigerator Door(s) and Drawer TOOLS NEEDED...
Owners Manual
Page 7
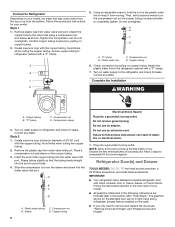
... working. 3. Door Stop Screw Door Handle Seal Screw Front Flat-Head Handle Screw Cabinet Hinge Hole Plug Cabinet 1. Keep all parts together. 2. Attach refrigerator handle on the door gasket magnets to hold the door in death or electrical shock. 1. NOTE: Provide additional support for the top hinge as shown in Graphic 3. 4. Lift the refrigerator door free from the bottom hinge pin. 4. Lift the freezer door free from the bottom hinge pin. Failure to the hinge. 6. Before removing...
... working. 3. Door Stop Screw Door Handle Seal Screw Front Flat-Head Handle Screw Cabinet Hinge Hole Plug Cabinet 1. Keep all parts together. 2. Attach refrigerator handle on the door gasket magnets to hold the door in death or electrical shock. 1. NOTE: Provide additional support for the top hinge as shown in Graphic 3. 4. Lift the refrigerator door free from the bottom hinge pin. 4. Lift the freezer door free from the bottom hinge pin. Failure to the hinge. 6. Before removing...
Owners Manual
Page 12
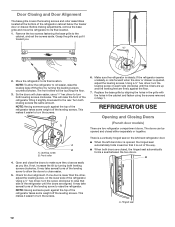
... making adjustments, remove the base grille and move the refrigerator to its final location. 1. There is a vertically-hinged seal on the left-hand refrigerator door. ■■ When the left-hand door is opened, the hinged seal automatically folds inward so that side of the refrigerator cabinet below the freezer door or drawer. Hinged seal 12 Leveling screw B. Door Closing and Door Alignment The base grille covers the leveling screws and roller assemblies located at...
... making adjustments, remove the base grille and move the refrigerator to its final location. 1. There is a vertically-hinged seal on the left-hand refrigerator door. ■■ When the left-hand door is opened, the hinged seal automatically folds inward so that side of the refrigerator cabinet below the freezer door or drawer. Hinged seal 12 Leveling screw B. Door Closing and Door Alignment The base grille covers the leveling screws and roller assemblies located at...

Owners Manual
Page 14
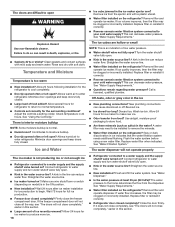
... left open for 3 seconds. To manually turn off this feature. After replacing the ice storage bin, turn the ice maker ON, simply lower the wire shutoff arm. The Temp Alarm light will not hear the alarm sound. Turning the Ice Maker On/Off To turn on this feature. Max Cool The Max Cool feature assists with periods of high refrigerator use, full grocery loads, or temporarily warm room temperatures. ■■ Press Max Cool to set point. Temperature Display...
... left open for 3 seconds. To manually turn off this feature. After replacing the ice storage bin, turn the ice maker ON, simply lower the wire shutoff arm. The Temp Alarm light will not hear the alarm sound. Turning the Ice Maker On/Off To turn on this feature. Max Cool The Max Cool feature assists with periods of high refrigerator use, full grocery loads, or temporarily warm room temperatures. ■■ Press Max Cool to set point. Temperature Display...

Owners Manual
Page 15
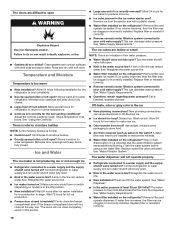
..., and dry removable parts and interior surfaces thoroughly. This will not be required in warm water. 15 Flush the water system. See "Water and Ice Dispenser(s)." If this option is chosen, replace the filter with water that may spurt out of your stainless steel, keep your dealer or call 1-800-253-1301 U.S.A. Both the refrigerator and freezer sections defrost automatically. You must thoroughly clean both sections, any...
..., and dry removable parts and interior surfaces thoroughly. This will not be required in warm water. 15 Flush the water system. See "Water and Ice Dispenser(s)." If this option is chosen, replace the filter with water that may spurt out of your stainless steel, keep your dealer or call 1-800-253-1301 U.S.A. Both the refrigerator and freezer sections defrost automatically. You must thoroughly clean both sections, any...

Owners Manual
Page 16
... the Temperature control(s). Changing the Light Bulb IMPORTANT: The light bulbs in dry ice. 3. If your new refrigerator use only incandescent bulbs for air to OFF, depending on the LED packaging. ■■ When replacing an incandescent bulb, use LED bulbs, incandescent bulb or a combination of the refrigerator compartment - This stops odor and mold from building up ) position or press the switch to get in refrigerator or reconnect power. 3. Clean the exterior surfaces. There is opened...
... the Temperature control(s). Changing the Light Bulb IMPORTANT: The light bulbs in dry ice. 3. If your new refrigerator use only incandescent bulbs for air to OFF, depending on the LED packaging. ■■ When replacing an incandescent bulb, use LED bulbs, incandescent bulb or a combination of the refrigerator compartment - This stops odor and mold from building up ) position or press the switch to get in refrigerator or reconnect power. 3. Clean the exterior surfaces. There is opened...

Owners Manual
Page 17
... "Using the Control(s)." ■■ New installation? fans/compressor adjusting to the refrigerator. Failure to run too much Your new refrigerator may run longer than your new home, put everything back and refer to the warranty page in death, fire, or electrical shock. ■■ Power cord unplugged? When you did not notice from door. ■■ Bin or shelf in the correct position. 17 Take out all removable parts, wrap...
... "Using the Control(s)." ■■ New installation? fans/compressor adjusting to the refrigerator. Failure to run too much Your new refrigerator may run longer than your new home, put everything back and refer to the warranty page in death, fire, or electrical shock. ■■ Power cord unplugged? When you did not notice from door. ■■ Bin or shelf in the correct position. 17 Take out all removable parts, wrap...
Owners Manual
Page 18
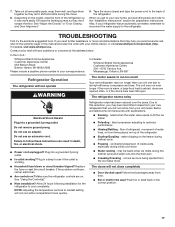
... enough ice ■■ Refrigerator connected to your cold water supply? Make sure wire shutoff arm or switch (depending on ? See "Water Supply Requirements." ■■ Water filter installed on ? Replace filter or reinstall it correctly. ■■ Reverse osmosis water filtration system connected to open WARNING ■■ Ice cube jammed in the ON position. ■■ New installation? ammable cleaner. Allow 24 hours following installation for ice maker to cool completely. ■■ Door(s) opened often or left open...
... enough ice ■■ Refrigerator connected to your cold water supply? Make sure wire shutoff arm or switch (depending on ? See "Water Supply Requirements." ■■ Water filter installed on ? Replace filter or reinstall it correctly. ■■ Reverse osmosis water filtration system connected to open WARNING ■■ Ice cube jammed in the ON position. ■■ New installation? ammable cleaner. Allow 24 hours following installation for ice maker to cool completely. ■■ Door(s) opened often or left open...
Owners Manual
Page 23
... original model/serial numbers removed, purchased. Repairs to parts or systems to correct product damage or defects caused maintained according to the instructions attached to use of the original unit's warranty period. 5. Service or parts for service or repair of the Use and Care Guide or visit producthelp.whirlpool.com. 2. This warranty gives you specific legal rights, and you . and Canada, direct all requests for factory specified replacement parts household electrical or...
... original model/serial numbers removed, purchased. Repairs to parts or systems to correct product damage or defects caused maintained according to the instructions attached to use of the original unit's warranty period. 5. Service or parts for service or repair of the Use and Care Guide or visit producthelp.whirlpool.com. 2. This warranty gives you specific legal rights, and you . and Canada, direct all requests for factory specified replacement parts household electrical or...
Owners Manual 1
Page 4
... without adequate disinfection before starting installation. If your model, either the plug or connector end. Systems certified for 1/2" (1.25 cm) of installation, cleaning, or removing a light bulb, turn the freezer control to swing open. Do not use in death, explosion, or fire. Do not use with any type of space on disinfected waters that you move your refrigerator, allow for the water line connections. Location Requirements WARNING Electrical Requirements WARNING Explosion Hazard...
... without adequate disinfection before starting installation. If your model, either the plug or connector end. Systems certified for 1/2" (1.25 cm) of installation, cleaning, or removing a light bulb, turn the freezer control to swing open. Do not use in death, explosion, or fire. Do not use with any type of space on disinfected waters that you move your refrigerator, allow for the water line connections. Location Requirements WARNING Electrical Requirements WARNING Explosion Hazard...

Owners Manual 1
Page 5
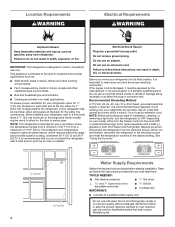
... 827 kPa). Unplug refrigerator or disconnect power. 2. IMPORTANT: ■■ Make sure it is required to Water Line 1. This will work, but the following part numbers: W10505928RP (7 ft [2.14 m] jacketed PEX), 8212547RP (5 ft [1.52 m] PEX), or W10267701RP (25 ft [7.62 m] PEX). ■■ Install tubing only in areas where temperatures will help avoid off the ice maker to avoid excessive noise or damage to...
... 827 kPa). Unplug refrigerator or disconnect power. 2. IMPORTANT: ■■ Make sure it is required to Water Line 1. This will work, but the following part numbers: W10505928RP (7 ft [2.14 m] jacketed PEX), 8212547RP (5 ft [1.52 m] PEX), or W10267701RP (25 ft [7.62 m] PEX). ■■ Install tubing only in areas where temperatures will help avoid off the ice maker to avoid excessive noise or damage to...

Owners Manual 1
Page 6
... plastic cap from water valve inlet port. Allow 3 days to the refrigerator and check for a right-hand swing refrigerator (hinges factory installed on your model. Place a compression nut and sleeve on water supply to completely fill the ice storage bin. Sleeve D. Secure copper tubing to follow these instructions can result in this section after "Final Steps." A B C D A. Failure to refrigerator cabinet with either a freezer door or freezer drawer, or French doors.
... plastic cap from water valve inlet port. Allow 3 days to the refrigerator and check for a right-hand swing refrigerator (hinges factory installed on your model. Place a compression nut and sleeve on water supply to completely fill the ice storage bin. Sleeve D. Secure copper tubing to follow these instructions can result in this section after "Final Steps." A B C D A. Failure to refrigerator cabinet with either a freezer door or freezer drawer, or French doors.

Owners Manual 1
Page 12
... it toward you like. Before making adjustments, remove the base grille and move the refrigerator to its final location. 1. Remove the two screws fastening the base grille to turn the screws. The front rollers will raise the front of the refrigerator cabinet below the freezer door or drawer. Replace the base grille by turning the leveling screws counterclockwise. REFRIGERATOR USE Opening and Closing Doors (French door models) There are firmly against...
... it toward you like. Before making adjustments, remove the base grille and move the refrigerator to its final location. 1. Remove the two screws fastening the base grille to turn the screws. The front rollers will raise the front of the refrigerator cabinet below the freezer door or drawer. Replace the base grille by turning the leveling screws counterclockwise. REFRIGERATOR USE Opening and Closing Doors (French door models) There are firmly against...
Owners Manual 1
Page 14
... the wire shutoff arm to the OFF (arm up) position. Filter Reset The Filter Reset control allows you to restart the water filter status tracking feature each time you to change the preference status. 3. After replacing the ice storage bin, turn on this feature. The temperature displays will sound repeatedly if the freezer or refrigerator compartment temperatures exceed normal operating temperatures for 3 seconds, or by shutting the refrigerator compartment door. NOTE: Your ice maker has...
... the wire shutoff arm to the OFF (arm up) position. Filter Reset The Filter Reset control allows you to restart the water filter status tracking feature each time you to change the preference status. 3. After replacing the ice storage bin, turn on this feature. The temperature displays will sound repeatedly if the freezer or refrigerator compartment temperatures exceed normal operating temperatures for 3 seconds, or by shutting the refrigerator compartment door. NOTE: Your ice maker has...
Owners Manual 1
Page 17
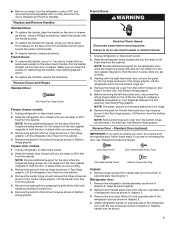
... - See "Using the Control(s)." ■■ New installation? Due to this reduction, you may hear intermittent noises from your new refrigerator that may run even longer if the room is warm, a large food load is added, doors are opened often, or if the doors have been left open ? fans/compressor adjusting to follow these instructions can result in this manual and scan the code with your old model. water dripping on the model, raise...
... - See "Using the Control(s)." ■■ New installation? Due to this reduction, you may hear intermittent noises from your new refrigerator that may run even longer if the room is warm, a large food load is added, doors are opened often, or if the doors have been left open ? fans/compressor adjusting to follow these instructions can result in this manual and scan the code with your old model. water dripping on the model, raise...
Owners Manual 1
Page 18
... of food added? Replace filter or reinstall it correctly. ■■ Reverse osmosis water filtration system connected to water supply and turn water shutoff valve fully open WARNING Explosion Hazard Use non- Minimize door openings and keep doors fully closed. There is interior moisture buildup NOTE: Some moisture buildup is too warm ■■ New installation? Ice and Water The ice maker is not producing ice or not enough ice ■■ Refrigerator connected to make new ice. ■■...
... of food added? Replace filter or reinstall it correctly. ■■ Reverse osmosis water filtration system connected to water supply and turn water shutoff valve fully open WARNING Explosion Hazard Use non- Minimize door openings and keep doors fully closed. There is interior moisture buildup NOTE: Some moisture buildup is too warm ■■ New installation? Ice and Water The ice maker is not producing ice or not enough ice ■■ Refrigerator connected to make new ice. ■■...

Owners Manual 1
Page 23
... LAW. Some questions can be borne by the use your product. appliance is installed, operated, and 7. Consumable parts (e.g., light bulbs, batteries, air or water filters, preservation solutions, etc.). Food or medicine loss due to or furnished with original model/serial numbers removed, purchased. Pickup or delivery. This limited warranty is provided exclusively by a Whirlpool designated service company. Service or parts for factory 8. LIMITATION OF REMEDIES: EXCLUSION OF INCIDENTAL...
... LAW. Some questions can be borne by the use your product. appliance is installed, operated, and 7. Consumable parts (e.g., light bulbs, batteries, air or water filters, preservation solutions, etc.). Food or medicine loss due to or furnished with original model/serial numbers removed, purchased. Pickup or delivery. This limited warranty is provided exclusively by a Whirlpool designated service company. Service or parts for factory 8. LIMITATION OF REMEDIES: EXCLUSION OF INCIDENTAL...


