
Dimension Guide
Page 1
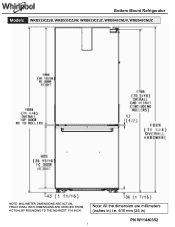
Bottom Mount Refrigerator Models WRB533CZJB, WRB533CZJW, WRB533CZJZ, WRB543CMJV, WRB543CMJZ NOTE: MILLIMETER DIMENSIONS ARE ACTUAL. Note: All the dimension are millimeters (inches in) i.e. 610 mm (24 in) PN W11440352 1 FRACTIONAL INCH DIMENSIONS ARE DERIVED FROM ACTUAL BY ROUNDING TO THE NEAREST 1/16 INCH.
Bottom Mount Refrigerator Models WRB533CZJB, WRB533CZJW, WRB533CZJZ, WRB543CMJV, WRB543CMJZ NOTE: MILLIMETER DIMENSIONS ARE ACTUAL. Note: All the dimension are millimeters (inches in) i.e. 610 mm (24 in) PN W11440352 1 FRACTIONAL INCH DIMENSIONS ARE DERIVED FROM ACTUAL BY ROUNDING TO THE NEAREST 1/16 INCH.
Dimension Guide
Page 3
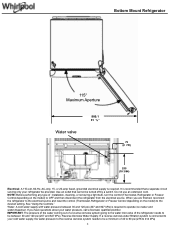
... type of installation, cleaning, or removing a light bulb, turn the control (Thermostat, Refrigerator or Freezer Control depending on the model) to OFF and then disconnect the refrigerator from the electrical source. When you have questions about your refrigerator be provided. Reverse ...If you are finished, reconnect the refrigerator to the electrical source and reset the control (Thermostat, Refrigerator or Freezer Control depending on the model) to the desired setting. Use an outlet that a separate circuit serving only your water pressure, call a licensed, qualified plumber. ...
... type of installation, cleaning, or removing a light bulb, turn the control (Thermostat, Refrigerator or Freezer Control depending on the model) to OFF and then disconnect the refrigerator from the electrical source. When you have questions about your refrigerator be provided. Reverse ...If you are finished, reconnect the refrigerator to the electrical source and reset the control (Thermostat, Refrigerator or Freezer Control depending on the model) to the desired setting. Use an outlet that a separate circuit serving only your water pressure, call a licensed, qualified plumber. ...
Dimension Guide
Page 4
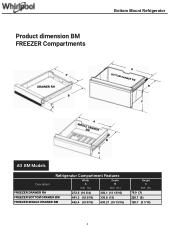
Bottom Mount Refrigerator Product dimension BM FREEZER Compartments A DRAWER RH B C A BOTTOM DRAWER BM B C A MIDDLEBMDRAWER B C All BM Models Refrigerator Compartment Features Description Width A mm (in) Depth B mm (in) FREEZER DRAWER RH 272.5 (10 3/4) 350.1 (13 13/16) FREEZER BOTTOM DRAWER BM 461.3 (18 3/16) 330.8 (13) FREEZER MIDDLE DRAWER BM 462.4 (18 3/16) 430.21 (16 15/16) Height C mm (in) 76.0 (3) 228.7 (9) 128.7 (5 1/16) 4
Bottom Mount Refrigerator Product dimension BM FREEZER Compartments A DRAWER RH B C A BOTTOM DRAWER BM B C A MIDDLEBMDRAWER B C All BM Models Refrigerator Compartment Features Description Width A mm (in) Depth B mm (in) FREEZER DRAWER RH 272.5 (10 3/4) 350.1 (13 13/16) FREEZER BOTTOM DRAWER BM 461.3 (18 3/16) 330.8 (13) FREEZER MIDDLE DRAWER BM 462.4 (18 3/16) 430.21 (16 15/16) Height C mm (in) 76.0 (3) 228.7 (9) 128.7 (5 1/16) 4
Dimension Guide
Page 6
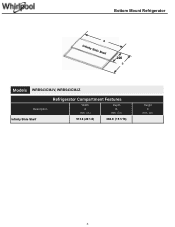
Bottom Mount Refrigerator A Infinity Slide Shelf 200 B Models WRB543CMJV, WRB543CMJZ Description Infinity Slide Shelf Refrigerator Compartment Features Width A mm (in) Depth B mm (in) 513.6 (20 1/4) 382.8 (15 1/16) Height C mm (in) 6
Bottom Mount Refrigerator A Infinity Slide Shelf 200 B Models WRB543CMJV, WRB543CMJZ Description Infinity Slide Shelf Refrigerator Compartment Features Width A mm (in) Depth B mm (in) 513.6 (20 1/4) 382.8 (15 1/16) Height C mm (in) 6

Dimension Guide
Page 7
Glass Shelf Bottom Mount Refrigerator A B WRB533CZJB, WRB533CZJW, WRB533CZJZ, WRB543CMJV, WRB543CMJZ Models Refrigerator Compartment Features Description Width mm (in) A Depth mm (in) B Height mm (in) C REFRIGERATOR GLASS SHELF CRISPER BM 514 (20 1/4) 321.4 (12 5/8) N/A WRB533CZJB, WRB533CZJW, WRB533CZJZ, WRB543CMJV, WRB543CMJZ Models Refrigerator Compartment Features Description REFRIGERATOR GLASS SHELF STANDARD Width mm (in) A 514 (20 1/4) Depth mm (in) B 382.49 (15 1/16) Height mm (in) C N/A 7
Glass Shelf Bottom Mount Refrigerator A B WRB533CZJB, WRB533CZJW, WRB533CZJZ, WRB543CMJV, WRB543CMJZ Models Refrigerator Compartment Features Description Width mm (in) A Depth mm (in) B Height mm (in) C REFRIGERATOR GLASS SHELF CRISPER BM 514 (20 1/4) 321.4 (12 5/8) N/A WRB533CZJB, WRB533CZJW, WRB533CZJZ, WRB543CMJV, WRB543CMJZ Models Refrigerator Compartment Features Description REFRIGERATOR GLASS SHELF STANDARD Width mm (in) A 514 (20 1/4) Depth mm (in) B 382.49 (15 1/16) Height mm (in) C N/A 7

Dimension Guide
Page 8
Glass Shelf GLASS A Bottom Mount Refrigerator B Models WRB533CZJB, WRB533CZJW, WRB533CZJZ, WRB543CMJV, WRB543CMJZ Description GLASS SHELF BM Refrigerator Compartment Features Width A mm (in) Depth B mm (in) 505.6 (19 7/8) 326.5 (12 7/8) Height C mm (in) 8
Glass Shelf GLASS A Bottom Mount Refrigerator B Models WRB533CZJB, WRB533CZJW, WRB533CZJZ, WRB543CMJV, WRB543CMJZ Description GLASS SHELF BM Refrigerator Compartment Features Width A mm (in) Depth B mm (in) 505.6 (19 7/8) 326.5 (12 7/8) Height C mm (in) 8

Owners Manual
Page 1
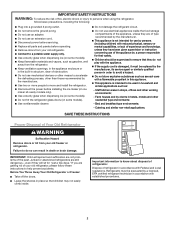
... includes a condensed User Guide. This is located on your refrigerator at www.whirlpool.ca. WARNING You can be downloaded at www.whirlpool.com. Para una version de estas instrucciones en español, visite www.whirlpool.com. These words mean: DANGER You can happen if the instructions are very...Learn More In an effort to conserve natural resources, this manual and on the inside wall of the refrigerator compartment. The model number is the safety alert symbol. All safety messages will follow the safety alert symbol and either the word "DANGER" or "WARNING."
... includes a condensed User Guide. This is located on your refrigerator at www.whirlpool.ca. WARNING You can be downloaded at www.whirlpool.com. Para una version de estas instrucciones en español, visite www.whirlpool.com. These words mean: DANGER You can happen if the instructions are very...Learn More In an effort to conserve natural resources, this manual and on the inside wall of the refrigerator compartment. The model number is the safety alert symbol. All safety messages will follow the safety alert symbol and either the word "DANGER" or "WARNING."
Owners Manual
Page 2
...doors from your old refrigerator. Connect to a potable water supply only. Use a sturdy glass when dispensing ice (on some models). Keep flammable materials and vapors, such as gasoline, well away from your old refrigerator, please follow basic precautions, including the following:...and panels before installing the ice maker (on ice maker kit-ready models only). Use a sturdy glass when dispensing ice (on some models). Do not hit the refrigerator glass doors (on some models). Use nonflammable cleaner. Do not damage the refrigerant...
...doors from your old refrigerator. Connect to a potable water supply only. Use a sturdy glass when dispensing ice (on some models). Keep flammable materials and vapors, such as gasoline, well away from your old refrigerator, please follow basic precautions, including the following:...and panels before installing the ice maker (on ice maker kit-ready models only). Use a sturdy glass when dispensing ice (on some models). Do not hit the refrigerator glass doors (on some models). Use nonflammable cleaner. Do not damage the refrigerant...

Owners Manual
Page 3
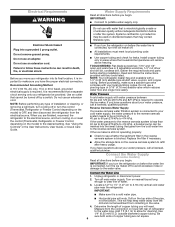
... the electrical source and turn cooling on or reset the control (Thermostat, Refrigerator or Freezer Control depending on the model) to OFF, and then disconnect the refrigerator from surfaces before turning on the model) to the desired setting. These products can damage the surface of installation or cleaning, or removing a light bulb...
... the electrical source and turn cooling on or reset the control (Thermostat, Refrigerator or Freezer Control depending on the model) to OFF, and then disconnect the refrigerator from surfaces before turning on the model) to the desired setting. These products can damage the surface of installation or cleaning, or removing a light bulb...
Owners Manual
Page 6
...are finished, reconnect the refrigerator to the electrical source, and turn cooling on or reset the control (Thermostat, Refrigerator or Freezer Control, depending on the model) to the desired setting. Determine the length of refrigerator to 414 kPa). Do not use a piercing-type or 3/16" (4.76 mm) saddle ...be inserted into the small tubing that goes from the electrical source. If you are cut square. 6 Connect the Water Supply (on some models) Read all directions before you turn the refrigerator on before the water line is connected, turn the ice maker off to avoid excessive noise ...
...are finished, reconnect the refrigerator to the electrical source, and turn cooling on or reset the control (Thermostat, Refrigerator or Freezer Control, depending on the model) to the desired setting. Determine the length of refrigerator to 414 kPa). Do not use a piercing-type or 3/16" (4.76 mm) saddle ...be inserted into the small tubing that goes from the electrical source. If you are cut square. 6 Connect the Water Supply (on some models) Read all directions before you turn the refrigerator on before the water line is connected, turn the ice maker off to avoid excessive noise ...
Owners Manual
Page 7
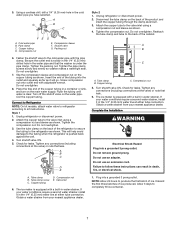
... not use an adapter. Valve inlet 6. The ice maker is equipped with the pipe clamp. Pipe clamp C. Shutoff valve G. A B 6. Connect to Refrigerator NOTE: On kit models, attach water valve to refrigerator according to produce the first batch of the copper tubing in the 1/4" (6.35 mm) water line at the valve) or...
... not use an adapter. Valve inlet 6. The ice maker is equipped with the pipe clamp. Pipe clamp C. Shutoff valve G. A B 6. Connect to Refrigerator NOTE: On kit models, attach water valve to refrigerator according to produce the first batch of the copper tubing in the 1/4" (6.35 mm) water line at the valve) or...
Owners Manual
Page 10
... has two adjustable levelers, one didn't make sure the refrigerator is tilted slightly (approximately 1/2") downward to the refrigerant flowing in back or other . If your model, the refrigerator may take several turns to eliminate odors. NOTE: Having someone push against the top of the new sounds are new to lower that...
... has two adjustable levelers, one didn't make sure the refrigerator is tilted slightly (approximately 1/2") downward to the refrigerant flowing in back or other . If your model, the refrigerator may take several turns to eliminate odors. NOTE: Having someone push against the top of the new sounds are new to lower that...
Owners Manual
Page 11
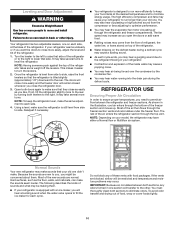
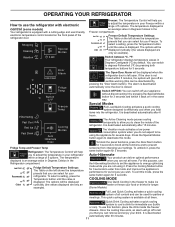
...;F Freezer Default Temperature Settings: The Table on the left shows the temperature presets that you are not using the appliance for longer. (Some Models) Fast Ice Full Load Quick Cooling activates a quick cooling system of 5 options. Switch OFF/ON: You can switch off an Lock .... Press the Cooling Modes button for parties or meetings. OPERATING YOUR REFRIGERATOR How to use the refrigerator with electronic control (some models) Your refrigerator is equipped with a cutting-edge and user-friendly electronic temperature control located on the front panel of the refrigerator....
...;F Freezer Default Temperature Settings: The Table on the left shows the temperature presets that you are not using the appliance for longer. (Some Models) Fast Ice Full Load Quick Cooling activates a quick cooling system of 5 options. Switch OFF/ON: You can switch off an Lock .... Press the Cooling Modes button for parties or meetings. OPERATING YOUR REFRIGERATOR How to use the refrigerator with electronic control (some models) Your refrigerator is equipped with a cutting-edge and user-friendly electronic temperature control located on the front panel of the refrigerator....
Owners Manual
Page 12
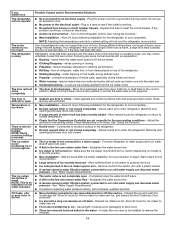
...break up the ice in the storage bin. Unplug refrigerator or disconnect power. 2. Plug in crisper. ICE AND WATER Ice Maker (on some models - If a softened water supply cannot be avoided, make sure the water softener is operating properly and is located on plastic parts, interior ...lifting and opening the ice maker door. Hand wash, rinse, and dry removable parts and interior surfaces thoroughly. Crisper Humidity Control (on some models) You control the amount of humidity in the moisture-sealed crisper. Accessory) ■■ Allow 24 hours to a softened water supply. As...
...break up the ice in the storage bin. Unplug refrigerator or disconnect power. 2. Plug in crisper. ICE AND WATER Ice Maker (on some models - If a softened water supply cannot be avoided, make sure the water softener is operating properly and is located on plastic parts, interior ...lifting and opening the ice maker door. Hand wash, rinse, and dry removable parts and interior surfaces thoroughly. Crisper Humidity Control (on some models) You control the amount of humidity in the moisture-sealed crisper. Accessory) ■■ Allow 24 hours to a softened water supply. As...
Owners Manual
Page 14
.../Snapping - moisture buildup is in the line can cause discolored or off -taste - Make sure the ice maker wire shutoff arm or switch (depending on model) is normal. Straighten the water source line. ■■ A reverse osmosis water filtration system connected to make new ice, and discard the first 3 batches of...
.../Snapping - moisture buildup is in the line can cause discolored or off -taste - Make sure the ice maker wire shutoff arm or switch (depending on model) is normal. Straighten the water source line. ■■ A reverse osmosis water filtration system connected to make new ice, and discard the first 3 batches of...

Owners Manual
Page 1
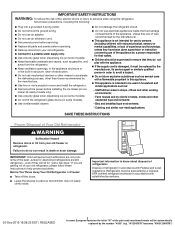
...if the instructions are very important. WARNING You can be automatically replaced by the number "4000" (e.g. The model number is the safety alert symbol. Register your refrigerator at www.whirlpool.ca. Always read and obey all safety messages. In the U.S.A.: For assistance or service, call 1-800-807...-6777. In Canada: For assistance or service, call 1-800-253-1301. These words mean: DANGER You can be downloaded at www.whirlpool.com. A complete User Instructions manual can kill or hurt you don't follow the safety alert symbol and either the word "DANGER" or "...
...if the instructions are very important. WARNING You can be automatically replaced by the number "4000" (e.g. The model number is the safety alert symbol. Register your refrigerator at www.whirlpool.ca. Always read and obey all safety messages. In the U.S.A.: For assistance or service, call 1-800-807...-6777. In Canada: For assistance or service, call 1-800-253-1301. These words mean: DANGER You can be downloaded at www.whirlpool.com. A complete User Instructions manual can kill or hurt you don't follow the safety alert symbol and either the word "DANGER" or "...
Owners Manual
Page 2
... doors from your old refrigerator. Connect to a potable water supply only. Use a sturdy glass when dispensing ice (on some models). Keep flammable materials and vapors, such as gasoline, well away from your old freezer or refrigerator. Before You Throw Away Your Old Refrigerator...cord is not intended for use by persons (including children) with established procedures. 03-Dec-2019 18:58:20 EST | RELEASED 2 In some models). Use nonflammable cleaner. Do not damage the refrigerant circuit. Do not use of the appliance by a licensed, EPA...
... doors from your old refrigerator. Connect to a potable water supply only. Use a sturdy glass when dispensing ice (on some models). Keep flammable materials and vapors, such as gasoline, well away from your old freezer or refrigerator. Before You Throw Away Your Old Refrigerator...cord is not intended for use by persons (including children) with established procedures. 03-Dec-2019 18:58:20 EST | RELEASED 2 In some models). Use nonflammable cleaner. Do not damage the refrigerant circuit. Do not use of the appliance by a licensed, EPA...

Owners Manual
Page 3
... amount of your refrigerator be turned off or turn cooling on or reset the control (Thermostat, Refrigerator or Freezer Control depending on the model) to avoid oor damage. For more people to puncture of re or explosion due to move and install refrigerator. Always pull the refrigerator...source. Do not wiggle or "walk" the refrigerator when trying to OFF, and then disconnect the refrigerator from surfaces before turning on the model) to move your fingers. Do not remove ground prong. NOTE: Do not use sharp instruments, rubbing alcohol, flammable fluids, or abrasive cleaners...
... amount of your refrigerator be turned off or turn cooling on or reset the control (Thermostat, Refrigerator or Freezer Control depending on the model) to avoid oor damage. For more people to puncture of re or explosion due to move and install refrigerator. Always pull the refrigerator...source. Do not wiggle or "walk" the refrigerator when trying to OFF, and then disconnect the refrigerator from surfaces before turning on the model) to move your fingers. Do not remove ground prong. NOTE: Do not use sharp instruments, rubbing alcohol, flammable fluids, or abrasive cleaners...
Owners Manual
Page 6
...to operate the ice maker. Measure from collecting in death, fire, or electrical shock. When you are cut square. 6 In some models) Read all directions before you begin . Read and follow these instructions can be a minimum of water. 3. Before purchasing, make sure...valve. 4. Water Pressure A cold water supply with any type of refrigerator to the desired setting. Connect the Water Supply (on the model) to the water pipe. "W12345678" becomes "400012345678") Electrical Requirements WARNING Water Supply Requirements Read all directions before you begin . Electrical...
...to operate the ice maker. Measure from collecting in death, fire, or electrical shock. When you are cut square. 6 In some models) Read all directions before you begin . Read and follow these instructions can be a minimum of water. 3. Before purchasing, make sure...valve. 4. Water Pressure A cold water supply with any type of refrigerator to the desired setting. Connect the Water Supply (on the model) to the water pipe. "W12345678" becomes "400012345678") Electrical Requirements WARNING Water Supply Requirements Read all directions before you begin . Electrical...

Owners Manual
Page 7
... strainer, install it will go. Discard the first three batches of the cabinet. Do not overtighten. Do not overtighten. 7. Connect to Refrigerator NOTE: On kit models, attach water valve to refrigerator according to the back of ice produced. Valve inlet 6. 5. Tighten the compression nut. Reattach the tube clamp and tube to...
... strainer, install it will go. Discard the first three batches of the cabinet. Do not overtighten. Do not overtighten. 7. Connect to Refrigerator NOTE: On kit models, attach water valve to refrigerator according to the back of ice produced. Valve inlet 6. 5. Tighten the compression nut. Reattach the tube clamp and tube to...


