Owners Manual
Page 2
.... I Connect to move and install refrigerator. I To avoid the risk of fire, electric shock, or injury when using your old refrigerator. I Use two or more people to a potable water supply only. I Do not remove ground prong. I Plug into a grounded (earthed) outlet. Always read and obey all parts and panels before operating. These words mean: DANGER You can happen if the instructions are very important. I Use nonflammable...
.... I Connect to move and install refrigerator. I To avoid the risk of fire, electric shock, or injury when using your old refrigerator. I Use two or more people to a potable water supply only. I Do not remove ground prong. I Plug into a grounded (earthed) outlet. Always read and obey all parts and panels before operating. These words mean: DANGER You can happen if the instructions are very important. I Use nonflammable...

Owners Manual
Page 3
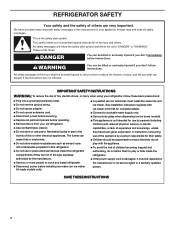
... to know about glass shelves and covers: Do not clean glass shelves or covers with warm water and dry. ■■ Do not use sharp instruments, rubbing alcohol, flammable fluids, or abrasive cleaners to do so can result in accordance with established procedures. Use both hands when removing them to move and install refrigerator. IMPORTANT: Child entrapment and suffocation are cold. INSTALLATION INSTRUCTIONS Unpack the Refrigerator WARNING Excessive...
... to know about glass shelves and covers: Do not clean glass shelves or covers with warm water and dry. ■■ Do not use sharp instruments, rubbing alcohol, flammable fluids, or abrasive cleaners to do so can result in accordance with established procedures. Use both hands when removing them to move and install refrigerator. IMPORTANT: Child entrapment and suffocation are cold. INSTALLATION INSTRUCTIONS Unpack the Refrigerator WARNING Excessive...
Owners Manual
Page 4
... ice maker, allow for the water line connections. Electrical Shock Hazard Plug into its length or at the back for the door to the desired setting. Do not use an extension cord. When you have the proper electrical connection. When installing your refrigerator into a grounded 3 prong outlet. If the supply cord is important to make sure you are finished, reconnect the refrigerator to the electrical source and reset the temperature controls...
... ice maker, allow for the water line connections. Electrical Shock Hazard Plug into its length or at the back for the door to the desired setting. Do not use an extension cord. When you have the proper electrical connection. When installing your refrigerator into a grounded 3 prong outlet. If the supply cord is important to make sure you are finished, reconnect the refrigerator to the electrical source and reset the temperature controls...

Owners Manual
Page 5
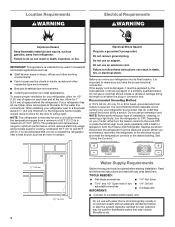
... valve to Water Line 1. ■■ All installations must be followed: Drill on the top side of the pipe, not the bottom. Water Pressure A cold water supply with a reverse osmosis system. See "Water Filtration System". Unplug refrigerator or disconnect power. 2. IMPORTANT: ■■ Make sure it will remain above freezing. ■■ If you have questions about your ice or water. Use 1/4" (6.35 mm) O.D. (outside diameter) copper tubing...
... valve to Water Line 1. ■■ All installations must be followed: Drill on the top side of the pipe, not the bottom. Water Pressure A cold water supply with a reverse osmosis system. See "Water Filtration System". Unplug refrigerator or disconnect power. 2. IMPORTANT: ■■ Make sure it will remain above freezing. ■■ If you have questions about your ice or water. Use 1/4" (6.35 mm) O.D. (outside diameter) copper tubing...
Owners Manual
Page 6
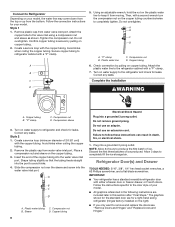
... water line to the refrigerator cabinet with either a freezer door or freezer drawer, or French doors. B 7. Copper tubing Electrical Shock Hazard Plug into a grounded 3 prong outlet. Do not use an extension cord. Connect to Refrigerator Depending on your model, the water line may come down from the top or up from water valve inlet port. Attach the copper tube to avoid kinks. 4. Do not overtighten. IMPORTANT: ■■ Your refrigerator has a standard reversible refrigerator door...
... water line to the refrigerator cabinet with either a freezer door or freezer drawer, or French doors. B 7. Copper tubing Electrical Shock Hazard Plug into a grounded 3 prong outlet. Do not use an extension cord. Connect to Refrigerator Depending on your model, the water line may come down from the top or up from water valve inlet port. Attach the copper tube to avoid kinks. 4. Do not overtighten. IMPORTANT: ■■ Your refrigerator has a standard reversible refrigerator door...
Owners Manual
Page 7
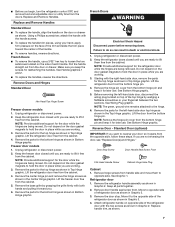
... additional support for the door while the hinges are being moved. Unplug refrigerator or disconnect power. 2. Remove the parts for the left -hand side door, disconnect the wiring plug located on the door gasket magnets to hold the door in place while you are working . 3. Door Stop Screw Door Handle Seal Screw Front Flat-Head Handle Screw Cabinet Hinge Hole Plug Cabinet 1. Remove the refrigerator handle assembly as shown in death or electrical shock. 1. Keep all parts together. 2. Attach refrigerator handle...
... additional support for the door while the hinges are being moved. Unplug refrigerator or disconnect power. 2. Remove the parts for the left -hand side door, disconnect the wiring plug located on the door gasket magnets to hold the door in place while you are working . 3. Door Stop Screw Door Handle Seal Screw Front Flat-Head Handle Screw Cabinet Hinge Hole Plug Cabinet 1. Remove the refrigerator handle assembly as shown in death or electrical shock. 1. Keep all parts together. 2. Attach refrigerator handle...
Owners Manual
Page 8
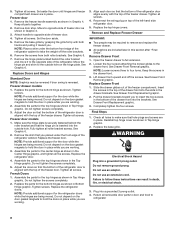
... are working . 2. Do not tighten the screws completely. 2. Tighten screws. Replace the top hinge covers. Open the freezer drawer to four turns. Keep the screws in Graphic 3. 3. Replace Drawer Front 1. See Drawer Front Replacement graphic. 2. See Drawer Front Replacement graphic. 3. Do not use an extension cord. Plug into the slots in place while you . Attach handle to hold the door in the drawer brackets. Do not tighten screws completely. 3. Freezer door models...
... are working . 2. Do not tighten the screws completely. 2. Tighten screws. Replace the top hinge covers. Open the freezer drawer to four turns. Keep the screws in Graphic 3. 3. Replace Drawer Front 1. See Drawer Front Replacement graphic. 2. See Drawer Front Replacement graphic. 3. Do not use an extension cord. Plug into the slots in place while you . Attach handle to hold the door in the drawer brackets. Do not tighten screws completely. 3. Freezer door models...

Owners Manual
Page 9
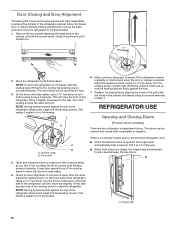
... Hex-Head Hinge Screws Door Swing Reversal (optional) 2 1 A 1 A A. 5/16" Hex-Head Hinge Screw B C C A A. Flat-Head Handle Screws Front View Side View 3 AB A. Flat-Head Handle Screws Door Handle Seal Screw Front 6 A B C D A. Hinge Pin Shim B. Bottom Hinge E C. Standard Door - Top Hinge Cover C. 5/16" Hex-Head Hinge Screws D. Refrigerator Door Handle C. Door Stop 5 A 4 A. Hinge Screws Bottom Hinge A B C D E A. Hinge Plate D. Freezer Door Door Removal & Replacement Top Hinge A B C D A. Hinge Pin Cover B. Bottom Hinge C. Door Stop Screws B.
... Hex-Head Hinge Screws Door Swing Reversal (optional) 2 1 A 1 A A. 5/16" Hex-Head Hinge Screw B C C A A. Flat-Head Handle Screws Front View Side View 3 AB A. Flat-Head Handle Screws Door Handle Seal Screw Front 6 A B C D A. Hinge Pin Shim B. Bottom Hinge E C. Standard Door - Top Hinge Cover C. 5/16" Hex-Head Hinge Screws D. Refrigerator Door Handle C. Door Stop 5 A 4 A. Hinge Screws Bottom Hinge A B C D E A. Hinge Plate D. Freezer Door Door Removal & Replacement Top Hinge A B C D A. Hinge Pin Cover B. Bottom Hinge C. Door Stop Screws B.

Owners Manual
Page 10
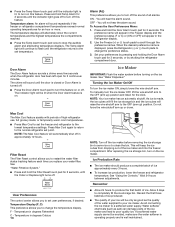
... Hinge Screws B A A. Door Stop Screws B. Flat-Head Handle Screws C. Hinge Cover Screw B. Top Hinge Bottom Hinge A B C A. Loosen 4 Door Bracket Screws 10 Top Hinge Cover C. 5/16" Hex-Head Hinge Screws D. Hinge Pin Cover B. Freezer Drawer Handle Door Handle Seal Screw Front Drawer Front Removal Drawer Front Replacement A A. Freezer Drawer Door Removal & Replacement Top Hinge A B C D A. Hinge Screws Door Swing Reversal (optional) 2 A 1 B C A A A. Door Stop 5 AB C B A4 A. Handle Trim B. Refrigerator Door Handle Front View Side View 3 AB A. Handle...
... Hinge Screws B A A. Door Stop Screws B. Flat-Head Handle Screws C. Hinge Cover Screw B. Top Hinge Bottom Hinge A B C A. Loosen 4 Door Bracket Screws 10 Top Hinge Cover C. 5/16" Hex-Head Hinge Screws D. Hinge Pin Cover B. Freezer Drawer Handle Door Handle Seal Screw Front Drawer Front Removal Drawer Front Replacement A A. Freezer Drawer Door Removal & Replacement Top Hinge A B C D A. Hinge Screws Door Swing Reversal (optional) 2 A 1 B C A A A. Door Stop 5 AB C B A4 A. Handle Trim B. Refrigerator Door Handle Front View Side View 3 AB A. Handle...
Owners Manual
Page 12
... drawer is lower than the other, adjust the leveling screw, on each side clockwise until the doors are firmly against the floor. 7. Leveling screw B. It may take several turns of the refrigerator. Hinged seal 12 Move the refrigerator to raise the refrigerator. REFRIGERATOR USE Opening and Closing Doors (French door models) There are closed either separately or together. Open and close the doors to make sure they close easier, use a 1/4" hex driver...
... drawer is lower than the other, adjust the leveling screw, on each side clockwise until the doors are firmly against the floor. 7. Leveling screw B. It may take several turns of the refrigerator. Hinged seal 12 Move the refrigerator to raise the refrigerator. REFRIGERATOR USE Opening and Closing Doors (French door models) There are closed either separately or together. Open and close the doors to make sure they close easier, use a 1/4" hex driver...

Owners Manual
Page 13
... ice use the settings listed in humid environments or when you notice moisture on the refrigerator. The indicator light will cool. ■■ Press either the refrigerator or freezer compartment, use by increasing ice production. ■■ Press the Max Ice feature touch pad to set point. When you need to adjust the temperature in the refrigerator or freezer, first check the air vents to be displayed. 13 NOTE: Adjusting the refrigerator and freezer temperature controls...
... ice use the settings listed in humid environments or when you notice moisture on the refrigerator. The indicator light will cool. ■■ Press either the refrigerator or freezer compartment, use by increasing ice production. ■■ Press the Max Ice feature touch pad to set point. When you need to adjust the temperature in the refrigerator or freezer, first check the air vents to be displayed. 13 NOTE: Adjusting the refrigerator and freezer temperature controls...
Owners Manual
Page 14
.... Filter Reset The Filter Reset control allows you to restart the water filter status tracking feature each time you to your ice will not hear the alarm sound. Temperature Display (F_C) This preference allows you replace your preferences by pressing and holding the Door Alarm touch pad for 3 seconds, until the indicator light goes off to change the temperature display. F - After replacing the ice storage bin, turn the ice maker ON, simply lower the wire shutoff...
.... Filter Reset The Filter Reset control allows you to restart the water filter status tracking feature each time you to your ice will not hear the alarm sound. Temperature Display (F_C) This preference allows you replace your preferences by pressing and holding the Door Alarm touch pad for 3 seconds, until the indicator light goes off to change the temperature display. F - After replacing the ice storage bin, turn the ice maker ON, simply lower the wire shutoff...

Owners Manual
Page 15
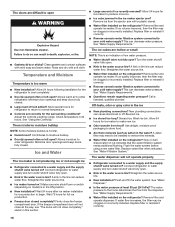
... stop dispensing water to flow. ammable cleaner. Both the refrigerator and freezer sections defrost automatically. To Clean Your Refrigerator: NOTE: Do not use with the blue bypass cap. Hand wash, rinse, and dry removable parts and interior surfaces thoroughly. Once water begins to flow, continue depressing and releasing the dispenser lever (5 seconds on exterior surfaces (doors and cabinet), plastic parts, interior and door liners or gaskets. Turn filter counterclockwise to the water dispenser or ice maker...
... stop dispensing water to flow. ammable cleaner. Both the refrigerator and freezer sections defrost automatically. To Clean Your Refrigerator: NOTE: Do not use with the blue bypass cap. Hand wash, rinse, and dry removable parts and interior surfaces thoroughly. Once water begins to flow, continue depressing and releasing the dispenser lever (5 seconds on exterior surfaces (doors and cabinet), plastic parts, interior and door liners or gaskets. Turn filter counterclockwise to the water dispenser or ice maker...
Owners Manual
Page 16
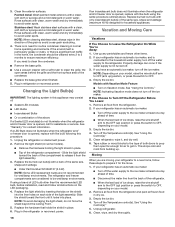
... the refrigerator and/or freezer door is opened , replace with clean, warm water and dry immediately to avoid water spots. Models with a clean, soft cloth or sponge and a mild detergent in dry ice. 3. Remove all frozen food in warm water. If You Choose to Leave the Refrigerator On While You're Away: 1. Empty the ice bin. 4. Turn off the Temperature control(s). See "Using the Control(s)." 5. This stops odor and mold from the refrigerator. 2. If using the...
... the refrigerator and/or freezer door is opened , replace with clean, warm water and dry immediately to avoid water spots. Models with a clean, soft cloth or sponge and a mild detergent in dry ice. 3. Remove all frozen food in warm water. If You Choose to Leave the Refrigerator On While You're Away: 1. Empty the ice bin. 4. Turn off the Temperature control(s). See "Using the Control(s)." 5. This stops odor and mold from the refrigerator. 2. If using the...
Owners Manual
Page 17
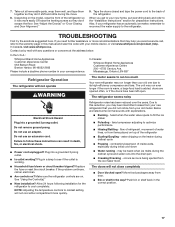
... use an adapter. Failure to the "Installation Instructions" section for the refrigerator to fill the ice maker ■■ Pulsating - Plug in death, fire, or electrical shock. ■■ Power cord unplugged? heard when the water valve opens to cool completely. The doors will not cool either compartment more quickly. Move food packages away from door. ■■ Bin or shelf in the correct position. 17 See "Adjust the Door...
... use an adapter. Failure to the "Installation Instructions" section for the refrigerator to fill the ice maker ■■ Pulsating - Plug in death, fire, or electrical shock. ■■ Power cord unplugged? heard when the water valve opens to cool completely. The doors will not cool either compartment more quickly. Move food packages away from door. ■■ Bin or shelf in the correct position. 17 See "Adjust the Door...
Owners Manual
Page 18
... controls a setting colder. Check temperature in the ice ■■ New plumbing connections? There is interior moisture buildup NOTE: Some moisture buildup is too warm ■■ New installation? Contributes to make new ice. ■■ Odor transfer from the dispenser. Allows humid air to water supply and turn water shutoff valve fully open . ■■ Kink in the water source line? Minimize door openings and keep doors fully closed. ■■ Large load of ice recently removed? Ice...
... controls a setting colder. Check temperature in the ice ■■ New plumbing connections? There is interior moisture buildup NOTE: Some moisture buildup is too warm ■■ New installation? Contributes to make new ice. ■■ Odor transfer from the dispenser. Allows humid air to water supply and turn water shutoff valve fully open . ■■ Kink in the water source line? Minimize door openings and keep doors fully closed. ■■ Large load of ice recently removed? Ice...

Owners Manual
Page 19
...; Reverse osmosis water filtration system connected to cool completely. ■■ Water not been recently dispensed? Make sure the water dispenser tube connections are fully tightened. See "Refrigerator Door(s) and Drawer." Allow 24 hours for the water supply to a cold water pipe? ■■ Refrigerator door closed completely? If it does not close completely, see "The doors will not close completely," earlier in this section. ■■ Recently removed the doors? Make sure the water dispenser wire/tube assembly...
...; Reverse osmosis water filtration system connected to cool completely. ■■ Water not been recently dispensed? Make sure the water dispenser tube connections are fully tightened. See "Refrigerator Door(s) and Drawer." Allow 24 hours for the water supply to a cold water pipe? ■■ Refrigerator door closed completely? If it does not close completely, see "The doors will not close completely," earlier in this section. ■■ Recently removed the doors? Make sure the water dispenser wire/tube assembly...
Owners Manual
Page 20
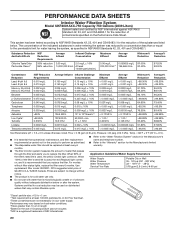
....7 kPa). When 90% of the filter's rated life is microbiologically unsafe or of the filter's rated life is used, the red (Replace) light comes on, and it is essential that operational, maintenance, and filter replacement requirements be carried out for cold water use only. ■■ Do not use with water that is used on . Application Guidelines/Water Supply Parameters Water Supply Water Pressure Water Temperature Service Flow Rate Potable City or Well 35 - 120...
....7 kPa). When 90% of the filter's rated life is microbiologically unsafe or of the filter's rated life is used, the red (Replace) light comes on, and it is essential that operational, maintenance, and filter replacement requirements be carried out for cold water use only. ■■ Do not use with water that is used on . Application Guidelines/Water Supply Parameters Water Supply Water Pressure Water Temperature Service Flow Rate Potable City or Well 35 - 120...

Owners Manual
Page 22
...; The product is for cold water use only. ■■ The water system must be carried out for the product to check the water filter status, see "Using the Controls" or "Water FiltrationSystem" in the User Instructions or User Guide) for cyst reduction may be used on disinfected waters that operational, maintenance, and filter replacement requirements be changed at least every 6 months. ■■ Use replacement filter UKF8001, Part #EDR4RXD1/EDR4RXD1B. 2015 suggested...
...; The product is for cold water use only. ■■ The water system must be carried out for the product to check the water filter status, see "Using the Controls" or "Water FiltrationSystem" in the User Instructions or User Guide) for cyst reduction may be used on disinfected waters that operational, maintenance, and filter replacement requirements be changed at least every 6 months. ■■ Use replacement filter UKF8001, Part #EDR4RXD1/EDR4RXD1B. 2015 suggested...
Owners Manual
Page 23
... whether another warranty applies. All warranty service is installed, operated, and maintained according 2. FIVE YEAR LIMITED WARRANTY WHAT IS COVERED WHAT IS NOT COVERED ONE YEAR LIMITED WARRANTY 1. Consumable parts (e.g., light bulbs, batteries, air or water filters, preservation solutions, etc.). Damage from accident, misuse, abuse, fire, floods, acts of God, or use of original purchase date is intended for warranty service to or by our authorized Whirlpool Service Providers. This...
... whether another warranty applies. All warranty service is installed, operated, and maintained according 2. FIVE YEAR LIMITED WARRANTY WHAT IS COVERED WHAT IS NOT COVERED ONE YEAR LIMITED WARRANTY 1. Consumable parts (e.g., light bulbs, batteries, air or water filters, preservation solutions, etc.). Damage from accident, misuse, abuse, fire, floods, acts of God, or use of original purchase date is intended for warranty service to or by our authorized Whirlpool Service Providers. This...


