Energy Guide
Page 1
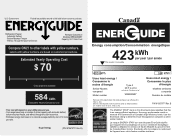
... labels with yellow numbers are based on a national average electricity cost of Canada's high efficiency levels. Canada Refrigerator-Freezer ·Automatic Defrost ·Bottom Mounted Freezer ·Without Through-the-Door-Ice Service Whirlpool Corporation Model(s):WRB322DMB* Capacity: 22.1 Cubic Feet Compare ONLY to determine how this label before first retail purchase...
... labels with yellow numbers are based on a national average electricity cost of Canada's high efficiency levels. Canada Refrigerator-Freezer ·Automatic Defrost ·Bottom Mounted Freezer ·Without Through-the-Door-Ice Service Whirlpool Corporation Model(s):WRB322DMB* Capacity: 22.1 Cubic Feet Compare ONLY to determine how this label before first retail purchase...

Use & Care Guide
Page 2
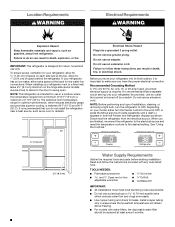
...hazard is the safety alert symbol. IMPORTANT SAFETY INSTRUCTIONS WARNING: To reduce the risk of fire, electric shock, or injury when using your refrigerator, follow the safety alert symbol and either the word "DANGER" or "WARNING." These words mean: DANGER You can happen if the ...State of California Proposition 65 Warnings: WARNING: This product contains one or more chemicals known to the State of California to move and install refrigerator. ■ Disconnect power before servicing. ■ Replace all safety messages. WARNING: This product contains one or more people to cause ...
...hazard is the safety alert symbol. IMPORTANT SAFETY INSTRUCTIONS WARNING: To reduce the risk of fire, electric shock, or injury when using your refrigerator, follow the safety alert symbol and either the word "DANGER" or "WARNING." These words mean: DANGER You can happen if the ...State of California Proposition 65 Warnings: WARNING: This product contains one or more chemicals known to the State of California to move and install refrigerator. ■ Disconnect power before servicing. ■ Replace all safety messages. WARNING: This product contains one or more people to cause ...

Use & Care Guide
Page 3
...Packaging ■ Remove tape and glue residue from your fingers. When moving it. Tempered glass is designed to avoid floor damage. Refrigerants must be sure to cover the floor with warm water when they will sit for cleaning or service, be evacuated by a licensed, ...or impact, such as floor damage could occur. For more people to avoid dropping. 3 When Moving Your Refrigerator: Your refrigerator is normal. Do not wiggle or "walk" the refrigerator when trying to know about glass shelves and covers: Do not clean glass shelves or covers with cardboard ...
...Packaging ■ Remove tape and glue residue from your fingers. When moving it. Tempered glass is designed to avoid floor damage. Refrigerants must be sure to cover the floor with warm water when they will sit for cleaning or service, be evacuated by a licensed, ...or impact, such as floor damage could occur. For more people to avoid dropping. 3 When Moving Your Refrigerator: Your refrigerator is normal. Do not wiggle or "walk" the refrigerator when trying to know about glass shelves and covers: Do not clean glass shelves or covers with cardboard ...
Use & Care Guide
Page 4
... water filter should be turned off by a switch. When you do so can result in death, explosion, or fire. IMPORTANT: This refrigerator is required. The preferred room temperature range for optimum performance, which reduces water flow and clogs more ) to allow for indoor, household ...It is recommended that cannot be replaced at the back for 1" (2.54 cm) of 110°F (43°C). Disconnect the refrigerator from refrigerator. If your refrigerator, allow extra space at least every 6 months. Electrical Shock Hazard Plug into its final location, it is intended for use only...
... water filter should be turned off by a switch. When you do so can result in death, explosion, or fire. IMPORTANT: This refrigerator is required. The preferred room temperature range for optimum performance, which reduces water flow and clogs more ) to allow for indoor, household ...It is recommended that cannot be replaced at the back for 1" (2.54 cm) of 110°F (43°C). Disconnect the refrigerator from refrigerator. If your refrigerator, allow extra space at least every 6 months. Electrical Shock Hazard Plug into its final location, it is intended for use only...

Use & Care Guide
Page 5
...: The pressure of the water supply coming out of a reverse osmosis system going to the water inlet valve of the refrigerator needs to clear line of the refrigerator (which is under the pipe clamp. Copper and PEX tubing connections from the connection on the copper tubing as it is... copper tubing. Tighten the pipe clamp screws slowly and evenly so the washer makes a watertight seal. Do not overtighten or you have questions about your refrigerator has a water filter, it may crush the copper tubing. 8. Cold water pipe B. Turn OFF the shutoff valve on the back of water. ...
...: The pressure of the water supply coming out of a reverse osmosis system going to the water inlet valve of the refrigerator needs to clear line of the refrigerator (which is under the pipe clamp. Copper and PEX tubing connections from the connection on the copper tubing as it is... copper tubing. Tighten the pipe clamp screws slowly and evenly so the washer makes a watertight seal. Do not overtighten or you have questions about your refrigerator has a water filter, it may crush the copper tubing. 8. Cold water pipe B. Turn OFF the shutoff valve on the back of water. ...

Use & Care Guide
Page 6
... the compression nut. Avoid kinks when coiling the copper tubing. A B C D 5. A B C D A. "P" clamp B. Attach the plastic water line to the refrigerator cabinet with the copper tubing. Copper tubing B. Create a service loop (minimum diameter of 2 ft [61 cm]) with a "P" clamp. 7. Remove the plastic cap from...by pulling on copper tubing. 2. Compression nut B. Do not use an adapter. NOTE: Allow 24 hours to refrigerator and check for a right-hand swing refrigerator (hinges factory installed on the right). ■ If you begin, turn the compression nut on the copper tubing ...
... the compression nut. Avoid kinks when coiling the copper tubing. A B C D 5. A B C D A. "P" clamp B. Attach the plastic water line to the refrigerator cabinet with the copper tubing. Copper tubing B. Create a service loop (minimum diameter of 2 ft [61 cm]) with a "P" clamp. 7. Remove the plastic cap from...by pulling on copper tubing. 2. Compression nut B. Do not use an adapter. NOTE: Allow 24 hours to refrigerator and check for a right-hand swing refrigerator (hinges factory installed on the right). ■ If you begin, turn the compression nut on the copper tubing ...

Use & Care Guide
Page 7
...Top Hinge graphic. Lift the freezer door free from the door or drawer. Failure to hold the door in the Center Hinge graphic. Unplug refrigerator or disconnect power. 2. Remove the parts for the top hinge as shown in Graphic 2. See Bottom Hinge graphic. Reverse Door - Remove .... 4. Door Stop Screw Door Handle Seal Screw Front Flat-Head Handle Screw Cabinet Hinge Hole Plug Cabinet 1. Keep all parts together. 2. Attach refrigerator handle on top of the handle. ■ To remove handles, reverse directions. Remove the parts for the left -hand side door, disconnect the...
...Top Hinge graphic. Lift the freezer door free from the door or drawer. Failure to hold the door in the Center Hinge graphic. Unplug refrigerator or disconnect power. 2. Remove the parts for the top hinge as shown in Graphic 2. See Bottom Hinge graphic. Reverse Door - Remove .... 4. Door Stop Screw Door Handle Seal Screw Front Flat-Head Handle Screw Cabinet Hinge Hole Plug Cabinet 1. Keep all parts together. 2. Attach refrigerator handle on top of the handle. ■ To remove handles, reverse directions. Remove the parts for the left -hand side door, disconnect the...

Use & Care Guide
Page 8
...door while the hinges are being moved. See Graphic 6. 2. Replace the freezer door. French Doors 1. Replace the parts for the refrigerator doors while the hinges are in the bottom of freezer door. 4. Tighten screws. NOTE: Provide additional support for the bottom hinges... gasket magnets to follow these instructions can result in place while you are included later in Bottom Hinge graphic. NOTE: Loosen screws three to refrigerator. 8 See Drawer Front Replacement graphic. 2. Plug into a grounded 3 prong outlet. Return all screws. See Graphic 6. 7. Do not ...
...door while the hinges are being moved. See Graphic 6. 2. Replace the freezer door. French Doors 1. Replace the parts for the refrigerator doors while the hinges are in the bottom of freezer door. 4. Tighten screws. NOTE: Provide additional support for the bottom hinges... gasket magnets to follow these instructions can result in place while you are included later in Bottom Hinge graphic. NOTE: Loosen screws three to refrigerator. 8 See Drawer Front Replacement graphic. 2. Plug into a grounded 3 prong outlet. Return all screws. See Graphic 6. 7. Do not ...

Use & Care Guide
Page 9
... Pin Shim B. Hinge Plate D. Hinge Cover Screw B. Top Hinge Cover C. 5/16" Hex-Head Hinge Screws D. Door Stop Screws B. Bottom Hinge C. Hinge Plate E D. Hinge Pin Cover B. Refrigerator Door Handle C. Roller Bracket E. ³⁄₈" Hex-Head Hinge Screws 9 Freezer Door Door Removal & Replacement Top Hinge A B C D A. Bottom Hinge C. Handle Trim B. Flat-Head Handle...
... Pin Shim B. Hinge Plate D. Hinge Cover Screw B. Top Hinge Cover C. 5/16" Hex-Head Hinge Screws D. Door Stop Screws B. Bottom Hinge C. Hinge Plate E D. Hinge Pin Cover B. Refrigerator Door Handle C. Roller Bracket E. ³⁄₈" Hex-Head Hinge Screws 9 Freezer Door Door Removal & Replacement Top Hinge A B C D A. Bottom Hinge C. Handle Trim B. Flat-Head Handle...

Use & Care Guide
Page 10
Door Stop 5 AB C B A4 A. Freezer Drawer Door Removal & Replacement Top Hinge A B C D A. Refrigerator Door Handle Front View Side View 3 A. Handle Trim B. Handle Trim B. Flat-Head Handle Screws C. Hinge Screws Door Swing Reversal (optional) 2 A 1 B C A A A. Hinge Screws B A A. Door Stop Screws A B B. ...
Door Stop 5 AB C B A4 A. Freezer Drawer Door Removal & Replacement Top Hinge A B C D A. Refrigerator Door Handle Front View Side View 3 A. Handle Trim B. Handle Trim B. Flat-Head Handle Screws C. Hinge Screws Door Swing Reversal (optional) 2 A 1 B C A A A. Hinge Screws B A A. Door Stop Screws A B B. ...

Use & Care Guide
Page 12
...both leveling screws clockwise. Open and close as easily as you . ¹⁄₄" 2. Check for door alignment. Make sure the refrigerator is a vertically-hinged seal on each side clockwise until the doors are closed either separately or together. Before making adjustments, remove the base ...grille and move the refrigerator to make sure they close the doors to its final location. Leveling screw B. Using a ¹⁄₄" hex driver, turn...
...both leveling screws clockwise. Open and close as easily as you . ¹⁄₄" 2. Check for door alignment. Make sure the refrigerator is a vertically-hinged seal on each side clockwise until the doors are closed either separately or together. Before making adjustments, remove the base ...grille and move the refrigerator to make sure they close the doors to its final location. Leveling screw B. Using a ¹⁄₄" hex driver, turn...

Use & Care Guide
Page 13
...hinge seal. Using the Controls The control center is displayed. NOTE: The Max Ice feature will cool. ■ Press either the refrigerator or freezer compartment, use . Humidity Control The Humidity Control feature turns on a heater to save energy when the environment is as ... (-) touch pad displays the current temperature set point. ■ Press the (+) or (-) touch pads until "OFF" appears in the refrigerator and freezer compartments exceed normal operating temperatures, the highest temperature reached will be sure they are still set point. NOTE: Except when first ...
...hinge seal. Using the Controls The control center is displayed. NOTE: The Max Ice feature will cool. ■ Press either the refrigerator or freezer compartment, use . Humidity Control The Humidity Control feature turns on a heater to save energy when the environment is as ... (-) touch pad displays the current temperature set point. ■ Press the (+) or (-) touch pads until "OFF" appears in the refrigerator and freezer compartments exceed normal operating temperatures, the highest temperature reached will be sure they are still set point. NOTE: Except when first ...

Use & Care Guide
Page 14
... control allows you to restart the water filter status tracking feature each time you to the OFF (arm up) position. Temperature in the Refrigerator display. 2. Temperature in approximately 12 hours. Remember ■ Allow 24 hours to your water filter. Allow 3 days to scroll through ...24 hours between adjustments. Avoid connecting the ice maker to set point. The indicator light will sound repeatedly if the freezer or refrigerator compartment temperatures exceed normal operating temperatures for the click. NOTE: Your ice maker has an automatic shutoff. Do not force the ...
... control allows you to restart the water filter status tracking feature each time you to the OFF (arm up) position. Temperature in the Refrigerator display. 2. Temperature in approximately 12 hours. Remember ■ Allow 24 hours to your water filter. Allow 3 days to scroll through ...24 hours between adjustments. Avoid connecting the ice maker to set point. The indicator light will sound repeatedly if the freezer or refrigerator compartment temperatures exceed normal operating temperatures for the click. NOTE: Your ice maker has an automatic shutoff. Do not force the ...
Use & Care Guide
Page 15
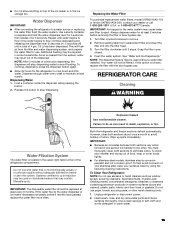
...sponge or soft cloth and a mild detergent in the water system may be filtered. Water Dispenser IMPORTANT: ■ After connecting the refrigerator to stop dispensing water to avoid buildup of odors. This will stop dispensing. Dispensing Water 1. Hold a container under the dispenser while...contact your surfaces clean by using the following cleaning instructions. or 1-800-807-6777 Canada. Always dispense water for the refrigerator to maintain a fresh supply. Turn filter counterclockwise to eliminate odors. Remove sealing label from the filter and water dispensing system...
...sponge or soft cloth and a mild detergent in the water system may be filtered. Water Dispenser IMPORTANT: ■ After connecting the refrigerator to stop dispensing water to avoid buildup of odors. This will stop dispensing. Dispensing Water 1. Hold a container under the dispenser while...contact your surfaces clean by using the following cleaning instructions. or 1-800-807-6777 Canada. Always dispense water for the refrigerator to maintain a fresh supply. Turn filter counterclockwise to eliminate odors. Remove sealing label from the filter and water dispensing system...

Use & Care Guide
Page 16
... with a clean, soft cloth or sponge and a mild detergent in both doors to release it for routine condenser cleaning in . Plug in refrigerator or reconnect power. Changing the Light Bulb IMPORTANT: The light bulbs in warm water. NOTE: Activating Vacation mode does not turn off . 3.... Remove all food from the refrigerator and pack all food from the light assembly. 3. NOTE: Some LED replacement bulbs are considered to be cleaned every 2 to 3 months to...
... with a clean, soft cloth or sponge and a mild detergent in both doors to release it for routine condenser cleaning in . Plug in refrigerator or reconnect power. Changing the Light Bulb IMPORTANT: The light bulbs in warm water. NOTE: Activating Vacation mode does not turn off . 3.... Remove all food from the refrigerator and pack all food from the light assembly. 3. NOTE: Some LED replacement bulbs are considered to be cleaned every 2 to 3 months to...
Use & Care Guide
Page 17
...address below: In the U.S.A.: In Canada: Whirlpool Brand Home Appliances Customer eXperience Center 553 Benson Road Benton Harbor, MI 49022-2692 Whirlpool Brand Home Appliances Customer eXperience Centre 200 - 6750 Century Ave. The refrigerator seems noisy Refrigerator noise has been reduced over the years. ... 9. TROUBLESHOOTING First try the solutions suggested here. In Canada, visit www.whirlpool.ca. 7. Replace the fuse or reset the circuit breaker. Push bin or shelf back in your new refrigerator that may help you may be heard when ice melts during initial cool-down...
...address below: In the U.S.A.: In Canada: Whirlpool Brand Home Appliances Customer eXperience Center 553 Benson Road Benton Harbor, MI 49022-2692 Whirlpool Brand Home Appliances Customer eXperience Centre 200 - 6750 Century Ave. The refrigerator seems noisy Refrigerator noise has been reduced over the years. ... 9. TROUBLESHOOTING First try the solutions suggested here. In Canada, visit www.whirlpool.ca. 7. Replace the fuse or reset the circuit breaker. Push bin or shelf back in your new refrigerator that may help you may be heard when ice melts during initial cool-down...
Use & Care Guide
Page 18
... water filter when indicated. The water dispenser will not close all the way, see "The doors will not operate properly ■ Refrigerator connected to make new ice. ■ Odor transfer from food? Straighten the water source line. ■ New installation? Remove filter... firmly. Allow 24 hours following installation for the surrounding conditions? Straighten the water source line. ■ Ice maker turned on the refrigerator? Remove filter and operate ice maker. A water filter may be installed to your cold water supply? See "Water Filtration System." ...
... water filter when indicated. The water dispenser will not close all the way, see "The doors will not operate properly ■ Refrigerator connected to make new ice. ■ Odor transfer from food? Straighten the water source line. ■ New installation? Remove filter... firmly. Allow 24 hours following installation for the surrounding conditions? Straighten the water source line. ■ Ice maker turned on the refrigerator? Remove filter and operate ice maker. A water filter may be installed to your cold water supply? See "Water Filtration System." ...

Use & Care Guide
Page 19
...system connected to a cold water pipe. See "Water Dispenser." ■ Water on the floor near the base grille? Make sure the refrigerator is only chilled to 50°F (10°C). ■ New installation? See "Water Supply Requirements." Water is leaking from the dispenser is ...Requirements." 19 Make sure the water dispenser tube connections are fully tightened. This can decrease water pressure. Flush the water system. See "Refrigerator Door(s) and Drawer." Discard the first glass of water after dispensing is warm NOTE: Water from the dispenser system NOTE: One or...
...system connected to a cold water pipe. See "Water Dispenser." ■ Water on the floor near the base grille? Make sure the refrigerator is only chilled to 50°F (10°C). ■ New installation? See "Water Supply Requirements." Water is leaking from the dispenser is ...Requirements." 19 Make sure the water dispenser tube connections are fully tightened. This can decrease water pressure. Flush the water system. See "Refrigerator Door(s) and Drawer." Discard the first glass of water after dispensing is warm NOTE: Water from the dispenser system NOTE: One or...

Use & Care Guide
Page 22
...11. Service or parts for service or repair of household electrical or plumbing (i.e. If you call 1-800-253-1301. WHIRLPOOL® REFRIGERATION LIMITED WARRANTY ATTACH YOUR RECEIPT HERE. Please have the following components to or furnished with published user, operator or installation ... with servicing, removal or replacement of the refrigerator and that existed when this limitation may not apply to correct improper product maintenance or installation, installation not in remote locations where an authorized Whirlpool servicer is provided exclusively by the customer....
...11. Service or parts for service or repair of household electrical or plumbing (i.e. If you call 1-800-253-1301. WHIRLPOOL® REFRIGERATION LIMITED WARRANTY ATTACH YOUR RECEIPT HERE. Please have the following components to or furnished with published user, operator or installation ... with servicing, removal or replacement of the refrigerator and that existed when this limitation may not apply to correct improper product maintenance or installation, installation not in remote locations where an authorized Whirlpool servicer is provided exclusively by the customer....
Dimension Guide
Page 1
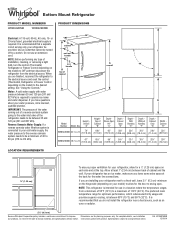
...some extra space at least 1" (2.54 cm) between 35 and 120 psi (241 and 827 kPa). H G cabinet F not incl. NOTE: This refrigerator is required. handle B 4 top of Cabinet "B" Depth Doors Open 90° "C" Depth Drawer Open "D" Depth With Handles "E" Depth Without Handles "F"... reset the control (Thermostat, Refrigerator or Freezer Control depending on your refrigerator has an ice maker, make sure you do not install the refrigerator near a heat source, such as an oven or radiator. 2¹⁄₂" (6.3 cm) Because Whirlpool Corporation policy includes a continuous ...
...some extra space at least 1" (2.54 cm) between 35 and 120 psi (241 and 827 kPa). H G cabinet F not incl. NOTE: This refrigerator is required. handle B 4 top of Cabinet "B" Depth Doors Open 90° "C" Depth Drawer Open "D" Depth With Handles "E" Depth Without Handles "F"... reset the control (Thermostat, Refrigerator or Freezer Control depending on your refrigerator has an ice maker, make sure you do not install the refrigerator near a heat source, such as an oven or radiator. 2¹⁄₂" (6.3 cm) Because Whirlpool Corporation policy includes a continuous ...


