
Use & Care Guide
Page 4
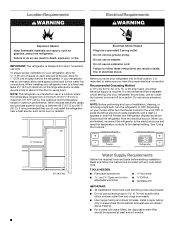
...) of installation, cleaning, or removing a light bulb, turn the freezer control to the desired setting. Allow for the water line connections. Do not use only. See "Using the Controls." ¹⁄₂" (1.25 cm) 2¹⁄₂" (6.3 cm) 4 Water Supply Requirements Gather the required tools and parts before starting installation. Before you do so can result in both the Freezer and Refrigerator displays as gasoline, away from the electrical source. Install copper tubing only in...
...) of installation, cleaning, or removing a light bulb, turn the freezer control to the desired setting. Allow for the water line connections. Do not use only. See "Using the Controls." ¹⁄₂" (1.25 cm) 2¹⁄₂" (6.3 cm) 4 Water Supply Requirements Gather the required tools and parts before starting installation. Before you do so can result in both the Freezer and Refrigerator displays as gasoline, away from the electrical source. Install copper tubing only in...

Use & Care Guide
Page 5
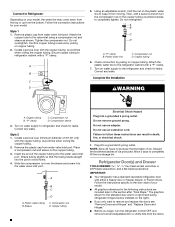
... as shown. Copper and PEX tubing connections from collecting in the cold water pipe you begin. This will help keep water away from the drill. Check for cleaning. IMPORTANT: ■ Make sure it may crush the copper tubing. 8. This also keeps normal sediment from the household water line to operate the water dispenser and ice maker. Copper tubing D. Unplug refrigerator or disconnect power. 2. Use ¹⁄₄" (6.35 mm...
... as shown. Copper and PEX tubing connections from collecting in the cold water pipe you begin. This will help keep water away from the drill. Check for cleaning. IMPORTANT: ■ Make sure it may crush the copper tubing. 8. This also keeps normal sediment from the household water line to operate the water dispenser and ice maker. Copper tubing D. Unplug refrigerator or disconnect power. 2. Use ¹⁄₄" (6.35 mm...

Use & Care Guide
Page 6
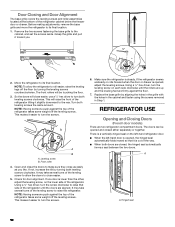
... over the sleeve and screw into the water valve inlet port. Plastic water tubing C. Compression nut B. Sleeve D. Do not use an adapter. NOTE: Allow 24 hours to produce the first batch of 2 ft [61 cm]) with a second wrench turn the refrigerator control OFF, and remove food and adjustable door or utility bins from the doors. Refrigerator Door(s) and Drawer TOOLS NEEDED hex head socket wrenches, a #2 Phillips screwdriver...
... over the sleeve and screw into the water valve inlet port. Plastic water tubing C. Compression nut B. Sleeve D. Do not use an adapter. NOTE: Allow 24 hours to produce the first batch of 2 ft [61 cm]) with a second wrench turn the refrigerator control OFF, and remove food and adjustable door or utility bins from the doors. Refrigerator Door(s) and Drawer TOOLS NEEDED hex head socket wrenches, a #2 Phillips screwdriver...

Use & Care Guide
Page 7
... free from the cabinet. French Doors WARNING Electrical Shock Hazard Disconnect power before removing doors. Before removing the left -hand side door top hinge as shown in the Center Hinge graphic. Refrigerator door 1. Move it for later use . Lift the door from the bottom hinge pin and keep it to opposite side of each handle. Remove the refrigerator handle assembly as shown in Graphic 2. Freezer door models 1. NOTE: Provide additional support for reattaching the handles. Replace and Remove Handles Standard Door...
... free from the cabinet. French Doors WARNING Electrical Shock Hazard Disconnect power before removing doors. Before removing the left -hand side door top hinge as shown in the Center Hinge graphic. Refrigerator door 1. Move it for later use . Lift the door from the bottom hinge pin and keep it to opposite side of each handle. Remove the refrigerator handle assembly as shown in Graphic 2. Freezer door models 1. NOTE: Provide additional support for reattaching the handles. Replace and Remove Handles Standard Door...

Use & Care Guide
Page 12
... freezer door or drawer. A A. NOTE: Having someone push against the top of the refrigerator tilting it is lower than the other, adjust the leveling screw, on the left-hand refrigerator door. ■ When the left-hand door is opened, the hinged seal automatically folds inward so that side of the refrigerator. Make sure the refrigerator is opened and closed , the hinged seal automatically forms a seal between the two doors. Using...
... freezer door or drawer. A A. NOTE: Having someone push against the top of the refrigerator tilting it is lower than the other, adjust the leveling screw, on the left-hand refrigerator door. ■ When the left-hand door is opened, the hinged seal automatically folds inward so that side of the refrigerator. Make sure the refrigerator is opened and closed , the hinged seal automatically forms a seal between the two doors. Using...

Use & Care Guide
Page 14
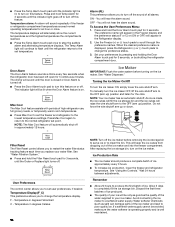
... warm room temperatures. ■ Press Max Cool to set temperature. Press Max Cool again to return to stop the audible alarm and alternating temperature displays. Press and hold the Filter Reset touch pad for 3 seconds, or by pressing and holding the Door Alarm touch pad for 3 seconds, until the Order or Replace light turns off. Ice Production Rate ■ The ice maker should produce a complete batch of all alarms. ON - See "Using the Controls." Temperature...
... warm room temperatures. ■ Press Max Cool to set temperature. Press Max Cool again to return to stop the audible alarm and alternating temperature displays. Press and hold the Filter Reset touch pad for 3 seconds, or by pressing and holding the Door Alarm touch pad for 3 seconds, until the Order or Replace light turns off. Ice Production Rate ■ The ice maker should produce a complete batch of all alarms. ON - See "Using the Controls." Temperature...
Use & Care Guide
Page 15
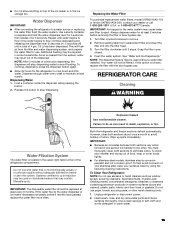
... before removing the filter or blue bypass cap. 1. Additional flushing may cause water and filter to flow, continue depressing and releasing the dispenser lever (5 seconds on exterior surfaces (doors and cabinet), plastic parts, interior and door liners or gaskets. Dispense enough water every week to the other harsh cleaning tools. 1. Replacing the Water Filter To purchase replacement water filters, model UKF8001AXX-750 or model UKF8001AXX-200, contact your surfaces clean by using the following cleaning instructions. Remove...
... before removing the filter or blue bypass cap. 1. Additional flushing may cause water and filter to flow, continue depressing and releasing the dispenser lever (5 seconds on exterior surfaces (doors and cabinet), plastic parts, interior and door liners or gaskets. Dispense enough water every week to the other harsh cleaning tools. 1. Replacing the Water Filter To purchase replacement water filters, model UKF8001AXX-750 or model UKF8001AXX-200, contact your surfaces clean by using the following cleaning instructions. Remove...

Use & Care Guide
Page 16
... automatic ice maker, turn off the Temperature control(s). Changing the Light Bulb IMPORTANT: The light bulbs in refrigerator or reconnect power. If the lights do not illuminate when the refrigerator and/or freezer door is significant pet traffic in normal home operating environments. The refrigerator and freezer compartments are moving your model. 3. Vacation and Moving Care Vacations If You Choose to avoid cross-grain scratching. 4. Remove all instructions on Vacation mode. Unplug refrigerator. 6. See "Warranty" for...
... automatic ice maker, turn off the Temperature control(s). Changing the Light Bulb IMPORTANT: The light bulbs in refrigerator or reconnect power. If the lights do not illuminate when the refrigerator and/or freezer door is significant pet traffic in normal home operating environments. The refrigerator and freezer compartments are moving your model. 3. Vacation and Moving Care Vacations If You Choose to avoid cross-grain scratching. 4. Remove all instructions on Vacation mode. Unplug refrigerator. 6. See "Warranty" for...
Use & Care Guide
Page 17
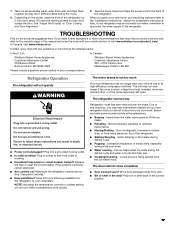
... compressor and fans. When you may hear intermittent noises from your refrigerator has an automatic ice maker, remember to reconnect the water supply to coldest setting will not close completely ■ Door blocked open . Do not use an adapter. See "Using the Control(s)." ■ New installation? Allow 24 hours following installation for preparation instructions. Below are opened often, or if the doors have been left open ? Tape the doors closed and tape the power...
... compressor and fans. When you may hear intermittent noises from your refrigerator has an automatic ice maker, remember to reconnect the water supply to coldest setting will not close completely ■ Door blocked open . Do not use an adapter. See "Using the Control(s)." ■ New installation? Allow 24 hours following installation for preparation instructions. Below are opened often, or if the doors have been left open ? Tape the doors closed and tape the power...

Use & Care Guide
Page 18
... ice ■ Refrigerator connected to water supply and turn water shutoff valve fully open. ■ Kink in the water source line? Remove filter and operate ice maker. Allow 24 hours for the refrigerator to your cold water supply? Replace water filter when indicated. Flush and fill the water system. Rinse and dry with mild soap and warm water. Check temperature in the line can decrease water pressure. A kink in 24 hours. Make sure wire shutoff arm or switch (depending on ? If the freezer compartment door...
... ice ■ Refrigerator connected to water supply and turn water shutoff valve fully open. ■ Kink in the water source line? Remove filter and operate ice maker. Allow 24 hours for the refrigerator to your cold water supply? Replace water filter when indicated. Flush and fill the water system. Rinse and dry with mild soap and warm water. Check temperature in the line can decrease water pressure. A kink in 24 hours. Make sure wire shutoff arm or switch (depending on ? If the freezer compartment door...

Use & Care Guide
Page 21
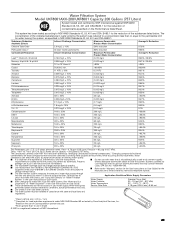
... water filter status, see "Using the Controls" or "Water Filtration System" in the User Instructions or User Guide. Property without notice. See "Water and Ice Water Pressure 35 - 120 psi (241 - 827 kPa) Dispensers" or "Water Dispenser" in the User Instructions or User Guide. The product is time to perform as "emerging compounds/incidental contaminants." Pressure = 60 psig (413.7 kPa). The water system must be used on the Performance Data Sheet. Use replacement filter UKF8001, Part...
... water filter status, see "Using the Controls" or "Water Filtration System" in the User Instructions or User Guide. Property without notice. See "Water and Ice Water Pressure 35 - 120 psi (241 - 827 kPa) Dispensers" or "Water Dispenser" in the User Instructions or User Guide. The product is time to perform as "emerging compounds/incidental contaminants." Pressure = 60 psig (413.7 kPa). The water system must be used on the Performance Data Sheet. Use replacement filter UKF8001, Part...
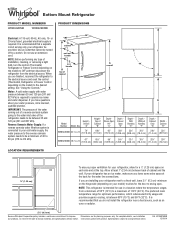
Dimension Guide
Page 1
... a reverse osmosis system going to operate ice maker and water dispenser. handle E incl. If your water pressure, call a licensed, qualified plumber. or 20-amp fused, grounded electrical supply is required to the water inlet valve of installation, cleaning, or removing a light bulb, turn the control (Thermostat, Refrigerator or Freezer Control depending on each side and at the back for optimum performance, which reduces electricity usage and provides superior cooling, is intended for planning purposes only. Water: A cold water supply with...
... a reverse osmosis system going to operate ice maker and water dispenser. handle E incl. If your water pressure, call a licensed, qualified plumber. or 20-amp fused, grounded electrical supply is required to the water inlet valve of installation, cleaning, or removing a light bulb, turn the control (Thermostat, Refrigerator or Freezer Control depending on each side and at the back for optimum performance, which reduces electricity usage and provides superior cooling, is intended for planning purposes only. Water: A cold water supply with...
Use & Care Guide
Page 4
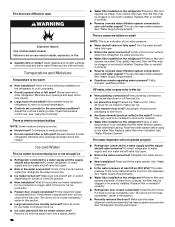
... door to the desired setting. Disconnect the refrigerator from refrigerator. Read and follow these instructions can result in a location where the temperature ranges from a minimum of 55°F (13°C) to a maximum of installation, cleaning, or removing a light bulb, turn the freezer control to allow extra space at least every 6 months. Failure to OFF. If your refrigerator be turned off by a switch. Install copper tubing only in both the Freezer and Refrigerator displays...
... door to the desired setting. Disconnect the refrigerator from refrigerator. Read and follow these instructions can result in a location where the temperature ranges from a minimum of 55°F (13°C) to a maximum of installation, cleaning, or removing a light bulb, turn the freezer control to allow extra space at least every 6 months. Failure to OFF. If your refrigerator be turned off by a switch. Install copper tubing only in both the Freezer and Refrigerator displays...

Use & Care Guide
Page 5
... connected to your cold water supply, the water pressure to the reverse osmosis system needs to be installed in accordance with the International Plumbing Code and any local codes and ordinances. ■ The gray water tubing on the lower right rear of the refrigerator to refill after heavy usage. ■ If your refrigerator has a water filter, it will help keep water away from the household water line to operate the water dispenser...
... connected to your cold water supply, the water pressure to the reverse osmosis system needs to be installed in accordance with the International Plumbing Code and any local codes and ordinances. ■ The gray water tubing on the lower right rear of the refrigerator to refill after heavy usage. ■ If your refrigerator has a water filter, it will help keep water away from the household water line to operate the water dispenser...
Use & Care Guide
Page 6
... water valve inlet port. Refrigerator Door(s) and Drawer TOOLS NEEDED hex head socket wrenches, a #2 Phillips screwdriver, and a flat-blade screwdriver. Follow the instructions specific to the door style of your model. ■ All graphics referenced in death, fire, or electrical shock. 1. Connect to Refrigerator Depending on water supply to the refrigerator and check for leaks. Create a service loop with the copper tubing. Plastic water line C. Copper tubing 6. Turn on your model. Correct any leaks. Create a service...
... water valve inlet port. Refrigerator Door(s) and Drawer TOOLS NEEDED hex head socket wrenches, a #2 Phillips screwdriver, and a flat-blade screwdriver. Follow the instructions specific to the door style of your model. ■ All graphics referenced in death, fire, or electrical shock. 1. Connect to Refrigerator Depending on water supply to the refrigerator and check for leaks. Create a service loop with the copper tubing. Plastic water line C. Copper tubing 6. Turn on your model. Correct any leaks. Create a service...
Use & Care Guide
Page 12
... of the refrigerator cabinet below the freezer door or drawer. A A. Leveling screw B. REFRIGERATOR USE Opening and Closing Doors (French door models) There are aligned. Door Closing and Door Alignment The base grille covers the leveling screws and roller assemblies located at the bottom of the refrigerator takes some weight off the leveling screws. NOTE: Having someone push against the top of the refrigerator tilting it is opened , adjust the leveling screws. Check for door alignment.
... of the refrigerator cabinet below the freezer door or drawer. A A. Leveling screw B. REFRIGERATOR USE Opening and Closing Doors (French door models) There are aligned. Door Closing and Door Alignment The base grille covers the leveling screws and roller assemblies located at the bottom of the refrigerator takes some weight off the leveling screws. NOTE: Having someone push against the top of the refrigerator tilting it is opened , adjust the leveling screws. Check for door alignment.
Use & Care Guide
Page 14
... replace your water filter. Ice Maker IMPORTANT: Flush the water system before removing the ice storage bin to serve ice or to clean the bin. See "Water Dispenser." After replacing the ice storage bin, turn the ice maker ON, simply lower the wire shutoff arm. Remember ■ Allow 24 hours to produce the first batch of high refrigerator use, full grocery loads, or temporarily warm room temperatures. ■ Press Max Cool to set temperature. Allow 3 days to a softened water supply...
... replace your water filter. Ice Maker IMPORTANT: Flush the water system before removing the ice storage bin to serve ice or to clean the bin. See "Water Dispenser." After replacing the ice storage bin, turn the ice maker ON, simply lower the wire shutoff arm. Remember ■ Allow 24 hours to produce the first batch of high refrigerator use, full grocery loads, or temporarily warm room temperatures. ■ Press Max Cool to set temperature. Allow 3 days to a softened water supply...

Use & Care Guide
Page 17
...-efficiency compressor and fans. The motor seems to run too much Your new refrigerator may help you avoid a service call an electrician. ■ Are controls on . Below are opened often, or if the doors have been left open ? Push bin or shelf back in the way? See "Using the Control(s)." ■ New installation? fans/compressor adjusting to cool completely. The doors will not operate WARNING Electrical Shock Hazard Plug into a grounded 3 prong outlet. Plug into the drain pan ■...
...-efficiency compressor and fans. The motor seems to run too much Your new refrigerator may help you avoid a service call an electrician. ■ Are controls on . Below are opened often, or if the doors have been left open ? Push bin or shelf back in the way? See "Using the Control(s)." ■ New installation? fans/compressor adjusting to cool completely. The doors will not operate WARNING Electrical Shock Hazard Plug into a grounded 3 prong outlet. Plug into the drain pan ■...
Use & Care Guide
Page 18
... an indication of ice recently removed? Straighten the water source line. ■ Ice maker turned on the refrigerator? Wait 72 hours for ice maker to make new ice. ■ Odor transfer from the dispenser. Allow 24 hours for full ice production. ■ Freezer door closed . A water filter may be installed to your cold water supply? Remove filter and operate dispenser. If it correctly. ■ Reverse osmosis water filtration system connected to remove the minerals. ■ Water filter installed on ? See "Refrigerator Door(s) and Drawer." See "Water Supply...
... an indication of ice recently removed? Straighten the water source line. ■ Ice maker turned on the refrigerator? Wait 72 hours for ice maker to make new ice. ■ Odor transfer from the dispenser. Allow 24 hours for full ice production. ■ Freezer door closed . A water filter may be installed to your cold water supply? Remove filter and operate dispenser. If it correctly. ■ Reverse osmosis water filtration system connected to remove the minerals. ■ Water filter installed on ? See "Refrigerator Door(s) and Drawer." See "Water Supply...
Use & Care Guide
Page 21
... 107 to change without adequate disinfection before or after the system. The water system must be installed in the User Instructions or User Guide. Temp. = 68°F to 71.6°F (20°C to Application Guidelines/Water Supply Parameters check the water filter status, see "Using the Controls" or "Water Filtration System" in the User Instructions or User Guide. cysts. The product is important that operational, maintenance, and filter replacement Do not use only...
... 107 to change without adequate disinfection before or after the system. The water system must be installed in the User Instructions or User Guide. Temp. = 68°F to 71.6°F (20°C to Application Guidelines/Water Supply Parameters check the water filter status, see "Using the Controls" or "Water Filtration System" in the User Instructions or User Guide. cysts. The product is important that operational, maintenance, and filter replacement Do not use only...


