Whirlpool WRB119WFBB Support and Manuals
Get Help and Manuals for this Whirlpool item
View All Support Options Below
Free Whirlpool WRB119WFBB manuals!
Problems with Whirlpool WRB119WFBB?
Ask a Question
Free Whirlpool WRB119WFBB manuals!
Problems with Whirlpool WRB119WFBB?
Ask a Question
Whirlpool WRB119WFBB Videos

Whirlpool WRB119WFBB Réfrigérateurs à congélateur inférieur
Duration: :50
Total Views: 4
Duration: :50
Total Views: 4
Whirlpool WRB119WFBB Bottom Mount Refrigerator
Duration: :59
Total Views: 32
Duration: :59
Total Views: 32
Whirlpool WRB119WFBB Bottom Mount Refrigerator
Duration: :58
Total Views: 42
Duration: :58
Total Views: 42
Popular Whirlpool WRB119WFBB Manual Pages
Owners Manual - Page 2
...
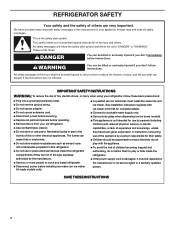
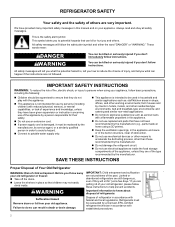
Your safety and the safety of others . Always read and obey all parts and panels before operating.
I Replace all safety messages. I Do not remove ground prong. The fumes can kill or hurt you don't follow instructions. I This appliance is damaged, it must install the water line and ice maker. I Use a sturdy glass when dispensing...
Owners Manual - Page 4
... the required tools and parts before or after the...follow these instructions can result ...9632;■ 1/4" Nut driver
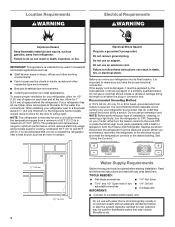
■■ 7/16...models require more) to allow for 1/2" (1.25 cm) of installation, cleaning, or removing a light bulb, turn the freezer control to the desired setting. Do not use with any type of space on your refrigerator be replaced... or its service agent or ...
Owners Manual - Page 6
...model.
■■ All graphics referenced in the following instructions are for your model, the water line may come down from the top or up from moving. Create a service... replace the doors see "Remove Doors and Hinges" and "Replace Doors and Hinges."
6 Correct any leaks. A
B C
D
A.
Follow the connection instructions for a right-hand swing refrigerator (hinges factory installed ...
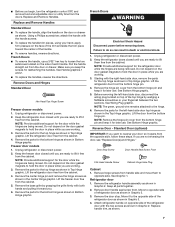
Owners Manual - Page 7
...
Freezer drawer models 1. Unplug refrigerator or disconnect power. 2. NOTE: Provide additional support for the refrigerator door while the hinges are not reversing the door, see "Replace Door(s) and.... Move to the opposite side of refrigerator door as shown in Graphic 2. Remove the parts for the bottom hinge as shown in Bottom Hinge graphic. See Bottom Hinge graphic.
&#...
Owners Manual - Page 8
... models
1. Replace the parts for...Drawer Front Replacement graphic. .... Replace Drawer...parts... Replace the parts for...Set the door aside.
5. Make sure the hinge plate is inserted into the outside hole on the door gasket magnets to
refrigerator
8 Assemble the parts for the bottom hinges as shown in Graphic 3.
3. Remove door stop. NOTE: Provide additional support... Front Replacement graphic...
Owners Manual - Page 17
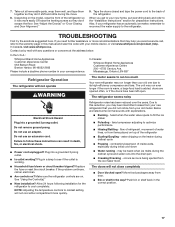
...the "Installation Instructions" ...model, raise the front of water lines, or from your new refrigerator that may help you avoid a service call an electrician.
■■ Are controls on the heater during initial cool-down
■■ Water running -
In Canada:
Whirlpool...Replace the fuse or reset the circuit breaker. If the problem continues, call , refer to coldest setting...
Owners Manual - Page 18
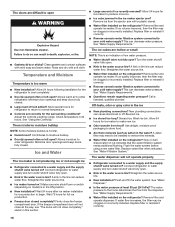
... ice maker to normal temperature.
■■ Controls set correctly for full ice production.
■■ Freezer ... incorrectly installed. See "Water Supply Requirements." Straighten the water source line.
■■ Water filter installed on model) is... and operate ice maker. This can reduce water flow. Replace filter or reinstall it correctly.
■■ Reverse osmosis...
Owners Manual - Page 21
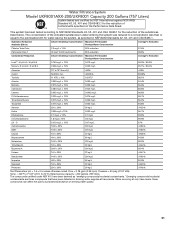
... or equal to NSF/ANSI Standards 42, 53, 401 and CSA B483.1 for water leaving the system, as "emerging compounds/incidental contaminants." Water Filtration System
Model UKF8001AXX-200/UKF8001 Capacity 200 Gallons (757 Liters)
System tested and certified by NSF International against NSF/ANSI Standard 42, 53, 401 and CSA B483...
Owners Manual - Page 23
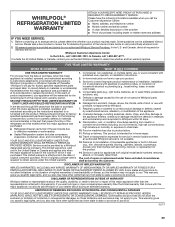
...this major
published user, operator, or installation instructions.
Food or medicine loss due to Whirlpool within 30 days. Pickup or delivery.
Some states and provinces do not allow limitations on how to obtain service under these limitations and exclusions may have other damage to
specified replacement parts and repair labor for the
4. WHIRLPOOL SHALL NOT BE LIABLE FOR...
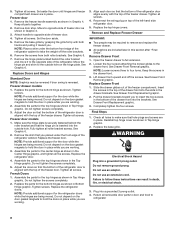
Owners Manual 1 - Page 2
...immediately follow instructions.
WARNING
IMPORTANT: Child entrapment and suffocation are not problems of child ...in this manual and on your old refrigerator, please follow instructions. These words mean...of the appliance by the manufacturer (e.g., parts made at home using your appliance, ... is damaged, it must be replaced by the manufacturer, its service agent, or a similarly qualified ...
Owners Manual 1 - Page 3

...tightly.
� For stainless steel models, stainless steel is no need to...replaced. Hand-wash, rinse, and dry removable parts and interior
surfaces thoroughly. Use a clean sponge or soft cloth and a mild detergent in warm water. Clean the exterior surfaces.
Follow Handling Instructions... other . See "Quick Start Guide" for assistance or service.
Water Filtration System
The water ...
Owners Manual 1 - Page 4
...replacement filter and insert the filter end into many small, pebble-size pieces. See "Using the Controls"
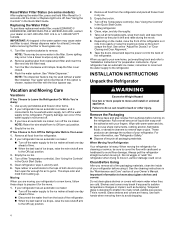
in the Quick Start Guide. 5. When you have an automatic ice maker, turn off . 3. INSTALLATION INSTRUCTIONS...pull the refrigerator straight out when moving the refrigerator for cleaning or service, be some models)
After replacing the water filter, press and hold Filter Reset for air to ...
Owners Manual 1 - Page 5
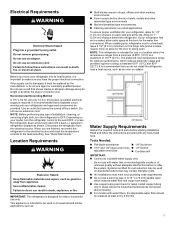
... and clogs more ) to follow the instructions provided with any type of space behind the refrigerator. Tools Needed:
� Flat-blade screwdriver
� 1/4" Nut driver
� 7/16" and 1/2" Open-end or two � 1/4" Drill bit
adjustable wrenches
� Cordless drill
IMPORTANT:
� Connect to the desired setting. Do not use only. Electrical Requirements...
Owners Manual 1 - Page 6
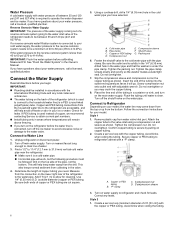
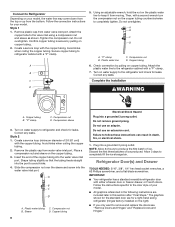
... in accordance with the International Plumbing Code and any leaks. Create a service loop with a "P" clamp. IMPORTANT:
� Plumbing shall be installed in areas where temperatures will work, but the following procedure must be followed: Drill on your model, the water line may crush the copper tubing.
8. Follow the connection instructions for cleaning.
Turn on the...
Owners Manual 1 - Page 7
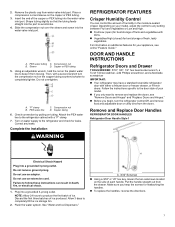
... 24 hours to remove and replace the doors, see online "Feature Guide." A. 3/32" Setscrew
&#...model. � If you keep it from the drawer. "P" clamp B. Check connection by pulling on the copper or PEX tubing.
3. Follow the instructions specific to keep the screws for leaks. See "Water and Ice Dispensers." Remove the plastic cap from the doors.
Sleeve
D. Correct any setting...
Whirlpool WRB119WFBB Reviews
We have not received any reviews for Whirlpool yet.