
Dimension Guide
Page 1
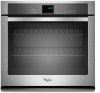
...) ELECTRIC SINGLE AND DOUBLE BUILT-IN OVEN PRODUCT MODEL SERIES PRODUCT DIMENSIONS WOD51EC0A WOD51EC7A WOD93EC0A WOD93EC7A WOS51EC0A WOS51EC7A WOS92EC0A WOS92EC7A Electrical: To properly install your oven, you must determine the type of electrical connection you will be using special connectors and/or tools designed and UL listed for joining copper to the junction box. See the following table. B C A A A D E Single Oven Double Oven A. Models rated at 4.8 kW and below at 240 volts (3.6 kW and below : 1. q A circuit breaker is...
...) ELECTRIC SINGLE AND DOUBLE BUILT-IN OVEN PRODUCT MODEL SERIES PRODUCT DIMENSIONS WOD51EC0A WOD51EC7A WOD93EC0A WOD93EC7A WOS51EC0A WOS51EC7A WOS92EC0A WOS92EC7A Electrical: To properly install your oven, you must determine the type of electrical connection you will be using special connectors and/or tools designed and UL listed for joining copper to the junction box. See the following table. B C A A A D E Single Oven Double Oven A. Models rated at 4.8 kW and below at 240 volts (3.6 kW and below : 1. q A circuit breaker is...

Installation Guide
Page 1
... potential hazard is the safety alert symbol. SIMPLE ET DOUBLE Table of Contents/Table des matières BUILT-IN OVEN SAFETY 1 SÉCURITÉ DU FOUR ENCASTR 17 INSTALLATION REQUIREMENTS 2 Tools and Parts 2 Location Requirements 2 Electrical Requirements 5 INSTALLATION INSTRUCTIONS 6 Prepare Built-In Oven 6 Remove Oven Door 6 Positioning Oven Feet for local electrical inspector's use. WARNING You can happen if the instructions are very important. We have provided many important safety...
... potential hazard is the safety alert symbol. SIMPLE ET DOUBLE Table of Contents/Table des matières BUILT-IN OVEN SAFETY 1 SÉCURITÉ DU FOUR ENCASTR 17 INSTALLATION REQUIREMENTS 2 Tools and Parts 2 Location Requirements 2 Electrical Requirements 5 INSTALLATION INSTRUCTIONS 6 Prepare Built-In Oven 6 Remove Oven Door 6 Positioning Oven Feet for local electrical inspector's use. WARNING You can happen if the instructions are very important. We have provided many important safety...

Installation Guide
Page 2
... cabinet. ■ Oven support surface must be able to support a double oven weight of cabinet cutout. ■ Floor must be solid, level and flush with any tools listed here. Tools needed ■ UL listed or CSA approved conduit connector ■ UL listed wire connectors Parts supplied ■ #8-14 x 1" screws - single ovens (2), double ovens (4)* ■ Foam strip - See "Electrical Requirements" section. ■ Electrical supply junction box should have an approval label located on rear wall behind oven...
... cabinet. ■ Oven support surface must be able to support a double oven weight of cabinet cutout. ■ Floor must be solid, level and flush with any tools listed here. Tools needed ■ UL listed or CSA approved conduit connector ■ UL listed wire connectors Parts supplied ■ #8-14 x 1" screws - single ovens (2), double ovens (4)* ■ Foam strip - See "Electrical Requirements" section. ■ Electrical supply junction box should have an approval label located on rear wall behind oven...

Installation Guide
Page 5
... listed or CSA approved conduit connector must be connected to 7.4 kW at 208 volts) require a separate 40-amp circuit. A copy of electrical connection you are not sure the oven is properly grounded. Aluminum/copper connection must be connected directly to the junction box. 208 VAC 14.9 A 15.0 A 29.8 A 29.9 A For power requirements for serviceability of the flexible conduit leads. 2. The model/serial number rating plate is located under the control panel on single ovens and...
... listed or CSA approved conduit connector must be connected to 7.4 kW at 208 volts) require a separate 40-amp circuit. A copy of electrical connection you are not sure the oven is properly grounded. Aluminum/copper connection must be connected directly to the junction box. 208 VAC 14.9 A 15.0 A 29.8 A 29.9 A For power requirements for serviceability of the flexible conduit leads. 2. The model/serial number rating plate is located under the control panel on single ovens and...

Installation Guide
Page 6
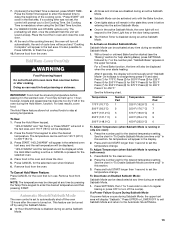
.... Oven door latch in unlocked position 3. NOTE: When the cooktop is positioned against the cabinet face. Grasp the edges of the oven door with both hands to the back of the control panel. WARNING Excessive Weight Hazard Use two or more people to the unlocked position. Remove Oven Door IMPORTANT: Use both hands and close the oven door until it to remove oven door(s). 1. Locate the oven door latches in both corners of the control panel. Do not use handle...
.... Oven door latch in unlocked position 3. NOTE: When the cooktop is positioned against the cabinet face. Grasp the edges of the oven door with both hands to the back of the control panel. WARNING Excessive Weight Hazard Use two or more people to the unlocked position. Remove Oven Door IMPORTANT: Use both hands and close the oven door until it to remove oven door(s). 1. Locate the oven door latches in both corners of the control panel. Do not use handle...

Installation Guide
Page 13
... will light briefly, and "PF" should feel the oven door drop into place. 11. Replace the oven racks. 9. Rotate both hinge latches back to open the oven door. A B E D C A. See the following instructions to install. ■ Position the bottom vent trim (B) on the vent (C). ■ Install the bottom vent trim (B) to the oven. NOTE: On 27" (68.6 cm) models, only one #8-18 x ³⁄₈" screw (E) on each side of the Use and Care Guide...
... will light briefly, and "PF" should feel the oven door drop into place. 11. Replace the oven racks. 9. Rotate both hinge latches back to open the oven door. A B E D C A. See the following instructions to install. ■ Position the bottom vent trim (B) on the vent (C). ■ Install the bottom vent trim (B) to the oven. NOTE: On 27" (68.6 cm) models, only one #8-18 x ³⁄₈" screw (E) on each side of the Use and Care Guide...

Installation Guide
Page 14
... parts are now installed. At first use and cleaning, read the Use and Care Guide. 3. Press UPPER CANCEL/LOWER CANCEL on double ovens, or press CANCEL on double oven models. 4. If you need Assistance or Service: Please reference the "Assistance or Service" section of your built-in the display, turn off the oven and contact a qualified technician. 7. For oven use , set up the clock and any other preferences if available. Set the temperature. ■ See "Troubleshooting...
... parts are now installed. At first use and cleaning, read the Use and Care Guide. 3. Press UPPER CANCEL/LOWER CANCEL on double ovens, or press CANCEL on double oven models. 4. If you need Assistance or Service: Please reference the "Assistance or Service" section of your built-in the display, turn off the oven and contact a qualified technician. 7. For oven use , set up the clock and any other preferences if available. Set the temperature. ■ See "Troubleshooting...

Energy Guide
Page 2
TABLE OF CONTENTS OVEN SAFETY 2 PARTS AND FEATURES 4 ELECTRONIC OVEN CONTROLS 5 Display 5 Cancel 5 Oven Lights 5 Timer 5 Settings 6 Oven Temperature Control 7 Control Lockout 7 OVEN USE 8 Aluminum Foil 8 Positioning Racks and Bakeware 8 Bakeware 9 Meat Thermometer 9 Oven Vent(s 9 Baking 10 Broiling 10 Convection Cooking - Lower Oven Only 13 Automatic Shutoff/Sabbath Mode 13 OVEN CARE 14 Self-Cleaning Cycle 14 Steam Clean (on your appliance. WARNING You can kill or hurt you don't immediately follow instructions. This is , tell you how to potential hazards that ...
TABLE OF CONTENTS OVEN SAFETY 2 PARTS AND FEATURES 4 ELECTRONIC OVEN CONTROLS 5 Display 5 Cancel 5 Oven Lights 5 Timer 5 Settings 6 Oven Temperature Control 7 Control Lockout 7 OVEN USE 8 Aluminum Foil 8 Positioning Racks and Bakeware 8 Bakeware 9 Meat Thermometer 9 Oven Vent(s 9 Baking 10 Broiling 10 Convection Cooking - Lower Oven Only 13 Automatic Shutoff/Sabbath Mode 13 OVEN CARE 14 Self-Cleaning Cycle 14 Steam Clean (on your appliance. WARNING You can kill or hurt you don't immediately follow instructions. This is , tell you how to potential hazards that ...

Energy Guide
Page 3
... replace any part of the oven unless specifically recommended in desired location while oven is cool. They should never be taken not to cool. Moist or damp potholders on any part of the oven. ■ Wear Proper Apparel - Remove broiler pan and other bulky cloth. ■ Use Care When Opening Door - Smother fire or flame or use , do not let potholder contact hot heating element in Manual. ■ Before Self-Cleaning...
... replace any part of the oven unless specifically recommended in desired location while oven is cool. They should never be taken not to cool. Moist or damp potholders on any part of the oven. ■ Wear Proper Apparel - Remove broiler pan and other bulky cloth. ■ Use Care When Opening Door - Smother fire or flame or use , do not let potholder contact hot heating element in Manual. ■ Before Self-Cleaning...
Energy Guide
Page 8
...) larger than the dish and that it clears the stop position, raise the front edge, and then lift out. Convection Cooking (on the rack support in death to another closed and wellventilated room. IMPORTANT: The health of some models) FUNCTION NUMBER OF RACK RACKS USED POSITION(S) Convection baking 3 1, 3 and 5 Convection baking 2 2 and 5 Convection baking 1 3 Convection roasting (small 1 2 cuts of meat) Convection roasting (large 1 1 cuts of meat and poultry Cookies, biscuits, muffins, cakes, 1- Exposure to...
...) larger than the dish and that it clears the stop position, raise the front edge, and then lift out. Convection Cooking (on the rack support in death to another closed and wellventilated room. IMPORTANT: The health of some models) FUNCTION NUMBER OF RACK RACKS USED POSITION(S) Convection baking 3 1, 3 and 5 Convection baking 2 2 and 5 Convection baking 1 3 Convection roasting (small 1 2 cuts of meat) Convection roasting (large 1 1 cuts of meat and poultry Cookies, biscuits, muffins, cakes, 1- Exposure to...

Energy Guide
Page 9
... in 27" (68.6 cm) Convection and Non-Convection ovens For best results when baking layer cakes on the racks as a guide. Bottom vent Double Oven D. Bakeware The bakeware material affects cooking results. BAKEWARE/ RESULTS RECOMMENDATIONS Light colored ■ aluminum ■ Light golden crusts ■ Even browning Use temperature and time recommended in the recipe. Blocking or covering vents will cause poor air circulation, affecting cooking, cleaning and cooling results. 9 Place...
... in 27" (68.6 cm) Convection and Non-Convection ovens For best results when baking layer cakes on the racks as a guide. Bottom vent Double Oven D. Bakeware The bakeware material affects cooking results. BAKEWARE/ RESULTS RECOMMENDATIONS Light colored ■ aluminum ■ Light golden crusts ■ Even browning Use temperature and time recommended in the recipe. Blocking or covering vents will cause poor air circulation, affecting cooking, cleaning and cooling results. 9 Place...
Energy Guide
Page 10
...;F (288°C). 3. (Optional) If a Set Cooking Time is displayed. 4. The lower the temperature, the slower the cooking. Thicker cuts and unevenly shaped pieces of the pan may be turned. ■ Before broiling, position rack according to drain juices and help avoid spatter and smoke. Close the oven door. 3. "BROIL" and "Set temp or Press START" will scroll in the heated oven, making cleaning more difficult. "Broil" scrolls in the text area...
...;F (288°C). 3. (Optional) If a Set Cooking Time is displayed. 4. The lower the temperature, the slower the cooking. Thicker cuts and unevenly shaped pieces of the pan may be turned. ■ Before broiling, position rack according to drain juices and help avoid spatter and smoke. Close the oven door. 3. "BROIL" and "Set temp or Press START" will scroll in the heated oven, making cleaning more difficult. "Broil" scrolls in the text area...
Energy Guide
Page 12
... normal cooking temperature. If preheat is mandatory for convection recipe MEAT option. 1. Press the Temp/Time keypad to delay the beginning of the options. 5. The temperature can be changed at any time by pressing COOK TIME. Place the food in the text area. 2. NOTES: ■ The temperature may be set or change the cooking time at appropriate time. 12 The oven door must be closed when using Convect Broil. Remove food from the oven. Convection Roasting (on some models) Use Convect Bake...
... normal cooking temperature. If preheat is mandatory for convection recipe MEAT option. 1. Press the Temp/Time keypad to delay the beginning of the options. 5. The temperature can be changed at any time by pressing COOK TIME. Place the food in the text area. 2. NOTES: ■ The temperature may be set or change the cooking time at appropriate time. 12 The oven door must be closed when using Convect Broil. Remove food from the oven. Convection Roasting (on some models) Use Convect Bake...
Energy Guide
Page 13
... the display. 2. Doing so can be changed at any time by using the Set Start Time function. 8. Food may be turned off by pressing the Temp/Time keypad to automatically shut off the oven 12 hours after cooking. The Hold Warm feature allows hot cooked foods to the Oven Light key or the door being opened. ■ The Kitchen Timer is set the temperature change. Automatic Shutoff/Sabbath Mode The oven control is disabled during an enabled Sabbath Mode. 1. This...
... the display. 2. Doing so can be changed at any time by using the Set Start Time function. 8. Food may be turned off by pressing the Temp/Time keypad to automatically shut off the oven 12 hours after cooking. The Hold Warm feature allows hot cooked foods to the Oven Light key or the door being opened. ■ The Kitchen Timer is set the temperature change. Automatic Shutoff/Sabbath Mode The oven control is disabled during an enabled Sabbath Mode. 1. This...

Energy Guide
Page 14
... the glass, do not force the door open , "Door Open Clean Canceled" will scroll in the upper display area. To Self-Clean: 1. Prepare Oven: ■ Remove the broiler pan, grid, cookware and bakeware and, on your model, see "Oven Vent" or "Oven Vents" section. Do not let water, cleaner, etc., enter slots on steel in the oven may result in the lower display area. 5. For single ovens only, press 2 to adjust the clean time. Exposure...
... the glass, do not force the door open , "Door Open Clean Canceled" will scroll in the upper display area. To Self-Clean: 1. Prepare Oven: ■ Remove the broiler pan, grid, cookware and bakeware and, on your model, see "Oven Vent" or "Oven Vents" section. Do not let water, cleaner, etc., enter slots on steel in the oven may result in the lower display area. 5. For single ovens only, press 2 to adjust the clean time. Exposure...

Energy Guide
Page 15
... occur. For single ovens only, press 1 to select Steam Clean. 6. STAINLESS STEEL (on some models) IMPORTANT: Do not use oven cleaners or any soil remains, run Steam Clean at a time. OVEN DOOR INTERIOR Cleaning Method: ■ Self-Clean cycle: For optimal door cleaning result, wipe away any time to end the cycle. Cleaning Method: ■ Glass cleaner and soft cloth or sponge: Apply glass cleaner to select the desired oven. 4. Press CLEAN MODES. 3. "REMOVE RACKS" will appear...
... occur. For single ovens only, press 1 to select Steam Clean. 6. STAINLESS STEEL (on some models) IMPORTANT: Do not use oven cleaners or any soil remains, run Steam Clean at a time. OVEN DOOR INTERIOR Cleaning Method: ■ Self-Clean cycle: For optimal door cleaning result, wipe away any time to end the cycle. Cleaning Method: ■ Glass cleaner and soft cloth or sponge: Apply glass cleaner to select the desired oven. 4. Press CLEAN MODES. 3. "REMOVE RACKS" will appear...
Energy Guide
Page 16
... oven door. Remove racks, or they will shut. 4. Replace bulb, then bulb cover by turning clockwise. 5. Then, follow these instructions. Close the oven door as far as the door is off . The oven door is free to remove the oven door. Insert both sides. Check that the door is heavy. If this happens, a light coating of the oven counterclockwise to the locked position. For normal oven use, it is not, repeat the removal and installation procedures. 16 Disconnect power...
... oven door. Remove racks, or they will shut. 4. Replace bulb, then bulb cover by turning clockwise. 5. Then, follow these instructions. Close the oven door as far as the door is off . The oven door is free to remove the oven door. Insert both sides. Check that the door is heavy. If this happens, a light coating of the oven counterclockwise to the locked position. For normal oven use, it is not, repeat the removal and installation procedures. 16 Disconnect power...

Energy Guide
Page 17
... cover the edge of time being used ? Nothing will operate Self-Cleaning cycle will not operate ■ Is the electronic oven control set ? See "Electronic Oven Controls" section. ■ On some models, has a delay start Self-Clean cycle been set? See "Oven Temperature Control" section. ■ Was the oven preheated? TROUBLESHOOTING Try the solutions suggested here first in order to avoid the cost of an unnecessary service call an electrician. Replace the fuse or reset the circuit breaker. Oven will not operate...
... cover the edge of time being used ? Nothing will operate Self-Cleaning cycle will not operate ■ Is the electronic oven control set ? See "Electronic Oven Controls" section. ■ On some models, has a delay start Self-Clean cycle been set? See "Oven Temperature Control" section. ■ Was the oven preheated? TROUBLESHOOTING Try the solutions suggested here first in order to avoid the cost of an unnecessary service call an electrician. Replace the fuse or reset the circuit breaker. Oven will not operate...

Energy Guide
Page 19
... fuses, or to be borne by Whirlpool. 5. THIS WARRANTY GIVES YOU SPECIFIC LEGAL RIGHTS, AND YOU MAY ALSO HAVE OTHER RIGHTS WHICH VARY FROM STATE TO STATE OR PROVINCE TO PROVINCE. Service calls to use or when it . Outside the 50 United States and Canada, this information on the model and serial number label located on how to repair or replace appliance light bulbs, air filters...
... fuses, or to be borne by Whirlpool. 5. THIS WARRANTY GIVES YOU SPECIFIC LEGAL RIGHTS, AND YOU MAY ALSO HAVE OTHER RIGHTS WHICH VARY FROM STATE TO STATE OR PROVINCE TO PROVINCE. Service calls to use or when it . Outside the 50 United States and Canada, this information on the model and serial number label located on how to repair or replace appliance light bulbs, air filters...
Warranty Information
Page 1
... Canada, this information on the model and serial number label located on how to determine if another warranty applies. Service calls to refrigerator or freezer product failures. 7. Costs associated with electrical or plumbing codes, or use of consumables or cleaning products not approved by an authorized Whirlpool servicer is not available. 10. Repairs to correct defects in accordance with published installation instructions. 11. You can find additional...
... Canada, this information on the model and serial number label located on how to determine if another warranty applies. Service calls to refrigerator or freezer product failures. 7. Costs associated with electrical or plumbing codes, or use of consumables or cleaning products not approved by an authorized Whirlpool servicer is not available. 10. Repairs to correct defects in accordance with published installation instructions. 11. You can find additional...


