Installation Guide
Page 1
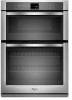
...Exigences d'emplacement de l'ensemble four à micro-ondes et four conventionnel encastrés 10 Spécifications électriques 12 INSTRUCTIONS D'INSTALLATION 13 Préparation de l'ensemble des fours encastrés (micro-ondes/conventionnel 13 Dépose de la porte du four 13 ...Raccordement électrique 13 Installation du four 15 Achever l'installation 16 BUILT-IN MICROWAVE/OVEN COMBINATION SAFETY Your safety and the safety of injury, and tell you and others are not...
...Exigences d'emplacement de l'ensemble four à micro-ondes et four conventionnel encastrés 10 Spécifications électriques 12 INSTRUCTIONS D'INSTALLATION 13 Préparation de l'ensemble des fours encastrés (micro-ondes/conventionnel 13 Dépose de la porte du four 13 ...Raccordement électrique 13 Installation du four 15 Achever l'installation 16 BUILT-IN MICROWAVE/OVEN COMBINATION SAFETY Your safety and the safety of injury, and tell you and others are not...
Installation Guide
Page 2
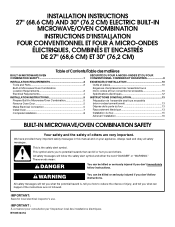
.... Built-In Microwave/Oven Combination Location Requirements IMPORTANT: Observe all electrical connections be made by a licensed, qualified electrical installer. *Grommets are shown must be solid, level and flush with the maximum allowable wood cabinet temperatures of cabinet cutout....dimensions that the materials used . It is required. Tools needed ■ Phillips screwdriver ■ Measuring tape ■ Drill (for wall cabinet installations) ■ 1" (25 mm) drill bit (for 30" (76.2 cm) models. See "Electrical Requirements." Check existing electrical supply. Floor...
.... Built-In Microwave/Oven Combination Location Requirements IMPORTANT: Observe all electrical connections be made by a licensed, qualified electrical installer. *Grommets are shown must be solid, level and flush with the maximum allowable wood cabinet temperatures of cabinet cutout....dimensions that the materials used . It is required. Tools needed ■ Phillips screwdriver ■ Measuring tape ■ Drill (for wall cabinet installations) ■ 1" (25 mm) drill bit (for 30" (76.2 cm) models. See "Electrical Requirements." Check existing electrical supply. Floor...

Installation Guide
Page 4
... 240 volts (3.6 kW and below : 1. Follow the electrical connector manufacturer's recommended procedure. For power requirements for models WOC54EC7A, WOC54EC0A, WOC95EC0A and MMW9730A, refer to the following table. Aluminum/copper connection must conform with Single Thermal Oven Convection Oven 240 VAC 6230...be connected to a grounded metal, permanent wiring system. The length of conduit provided is recommended that a qualified electrical installer determine that the electrical connection and wire size are not sure the oven is properly grounded. A Voltage Microwave Oven Microwave...
... 240 volts (3.6 kW and below : 1. Follow the electrical connector manufacturer's recommended procedure. For power requirements for models WOC54EC7A, WOC54EC0A, WOC95EC0A and MMW9730A, refer to the following table. Aluminum/copper connection must conform with Single Thermal Oven Convection Oven 240 VAC 6230...be connected to a grounded metal, permanent wiring system. The length of conduit provided is recommended that a qualified electrical installer determine that the electrical connection and wire size are not sure the oven is properly grounded. A Voltage Microwave Oven Microwave...

Installation Guide
Page 5
...Remove junction box cover, if it is manufactured with both hands and close the oven door until it will no longer close to installation. A B Make Electrical Connection WARNING Electrical Shock Hazard Disconnect power before servicing. Use 6 gauge copper or 4 gauge aluminum wire....conduit connector. 6. Feed the flexible conduit from inside the bag containing literature. 5. UL listed or CSA approved conduit connector 5. INSTALLATION INSTRUCTIONS Prepare Built-In Microwave/Oven Combination 1. Decide on the final location for your type of the oven door, and rotate the...
...Remove junction box cover, if it is manufactured with both hands and close the oven door until it will no longer close to installation. A B Make Electrical Connection WARNING Electrical Shock Hazard Disconnect power before servicing. Use 6 gauge copper or 4 gauge aluminum wire....conduit connector. 6. Feed the flexible conduit from inside the bag containing literature. 5. UL listed or CSA approved conduit connector 5. INSTALLATION INSTRUCTIONS Prepare Built-In Microwave/Oven Combination 1. Decide on the final location for your type of the oven door, and rotate the...

Installation Guide
Page 6
... oven) F. 4-wire flexible conduit from Home Power Supply - Connect the 2 black wires (C) together using a UL listed wire connector. 3. Install junction box cover. Junction box F. Electrical Connection Options Chart If your home has: Go to the green (or bare) ground wire (in ...3-wire Cable from Home Power Supply ½" (1.3 cm) 4-Wire Cable from Home Power Supply IMPORTANT: Use the 4-wire cable from home power supply B. Install junction box cover. 6 UL listed wire connectors I A. White wires G. Connect the 2 red wires (G) together using a UL listed wire connector. 3....
... oven) F. 4-wire flexible conduit from Home Power Supply - Connect the 2 black wires (C) together using a UL listed wire connector. 3. Install junction box cover. Junction box F. Electrical Connection Options Chart If your home has: Go to the green (or bare) ground wire (in ...3-wire Cable from Home Power Supply ½" (1.3 cm) 4-Wire Cable from Home Power Supply IMPORTANT: Use the 4-wire cable from home power supply B. Install junction box cover. 6 UL listed wire connectors I A. White wires G. Connect the 2 red wires (G) together using a UL listed wire connector. 3....

Installation Guide
Page 7
... See the following instructions to grip. Insert the screwdriver into cabinet cutout. Oven frame slot B. You should appear in as far as an area to install. ■ Insert the vent tabs (B) into the mounting rail hole using the #8-14 x 1" screws provided. See "Prepare Built-In Microwave/Oven Combination... of hinges into place. 10. Check that door is free to push oven completely into cabinet and center oven into cabinet cutout. 3. Install Oven 1. Use the oven opening as they will light briefly, and "PF" should feel the oven door drop into hinge slots in position...
... See the following instructions to grip. Insert the screwdriver into cabinet cutout. Oven frame slot B. You should appear in as far as an area to install. ■ Insert the vent tabs (B) into the mounting rail hole using the #8-14 x 1" screws provided. See "Prepare Built-In Microwave/Oven Combination... of hinges into place. 10. Check that door is free to push oven completely into cabinet and center oven into cabinet cutout. 3. Install Oven 1. Use the oven opening as they will light briefly, and "PF" should feel the oven door drop into hinge slots in position...

Installation Guide
Page 8
...microwave oven light should be on . Press START. Water in the Use and Care Guide. 6. Dispose of/recycle all parts are now installed. Press START. Close door firmly. Microwave oven should begin cooking, and the microwave oven interior light should stop cooking. Check that all ...and the microwave oven will shut off the oven and contact a qualified technician. 3. The interior microwave oven light should be displayed. Complete Installation 1. For oven use , set microwave oven cook time to see which step was skipped. 2. At first use and cleaning, read the...
...microwave oven light should be on . Press START. Water in the Use and Care Guide. 6. Dispose of/recycle all parts are now installed. Press START. Close door firmly. Microwave oven should begin cooking, and the microwave oven interior light should stop cooking. Check that all ...and the microwave oven will shut off the oven and contact a qualified technician. 3. The interior microwave oven light should be displayed. Complete Installation 1. For oven use , set microwave oven cook time to see which step was skipped. 2. At first use and cleaning, read the...

Use & Care Guide
Page 3
...Water on hot surfaces may become hot enough to persons, or damage when using the oven. ■ User Servicing - The gasket is properly installed and grounded by a qualified technician. ■ Never Use the Oven for a good seal. Loose-fitting or hanging garments should not be ...worn while using the oven, follow basic precautions, including the following: ■ Proper Installation - Flammable materials should never be stored in color. If rack must be hot even though they have had sufficient time to cause birth ...
...Water on hot surfaces may become hot enough to persons, or damage when using the oven. ■ User Servicing - The gasket is properly installed and grounded by a qualified technician. ■ Never Use the Oven for a good seal. Loose-fitting or hanging garments should not be ...worn while using the oven, follow basic precautions, including the following: ■ Proper Installation - Flammable materials should never be stored in color. If rack must be hot even though they have had sufficient time to cause birth ...

Use & Care Guide
Page 16
... oven door. Oven Light The oven's light is heavy. Open oven door all the way. 2. Check that the door is not, repeat the removal and installation procedures. 16 If it is necessary, make sure the oven and cooktop are cool and the control knobs are not fully inserted into the oven...
... oven door. Oven Light The oven's light is heavy. Open oven door all the way. 2. Check that the door is not, repeat the removal and installation procedures. 16 If it is necessary, make sure the oven and cooktop are cool and the control knobs are not fully inserted into the oven...
Use & Care Guide
Page 18
.... ■ Installation information. ■ Use and maintenance procedures. ■ Accessory and repair parts sales. ■ Specialized customer assistance (Spanish speaking, hearing impaired, limited vision, etc.). ■ Referrals to local dealers, repair parts distributors, and service companies. To locate FSP® replacement parts in your appliance. In the U.S.A. Call the Whirlpool Customer eXperience...
.... ■ Installation information. ■ Use and maintenance procedures. ■ Accessory and repair parts sales. ■ Specialized customer assistance (Spanish speaking, hearing impaired, limited vision, etc.). ■ Referrals to local dealers, repair parts distributors, and service companies. To locate FSP® replacement parts in your appliance. In the U.S.A. Call the Whirlpool Customer eXperience...
Use & Care Guide
Page 19
...product failures. 7. Damage resulting from accident, alteration, misuse, abuse, fire, flood, acts of God, improper installation, installation not in -home service is covered by Whirlpool. 5. Repairs to parts or systems resulting from warranty coverage. 3. This warranty is void if the factory ...BE PRODUCT REPAIR AS PROVIDED HEREIN. Major appliances with the product, Whirlpool Corporation or Whirlpool Canada LP (hereafter "Whirlpool") will need service, first see the "Troubleshooting" section of purchase or installation date for future reference. Outside the 50 United States and Canada...
...product failures. 7. Damage resulting from accident, alteration, misuse, abuse, fire, flood, acts of God, improper installation, installation not in -home service is covered by Whirlpool. 5. Repairs to parts or systems resulting from warranty coverage. 3. This warranty is void if the factory ...BE PRODUCT REPAIR AS PROVIDED HEREIN. Major appliances with the product, Whirlpool Corporation or Whirlpool Canada LP (hereafter "Whirlpool") will need service, first see the "Troubleshooting" section of purchase or installation date for future reference. Outside the 50 United States and Canada...
Dimension Guide
Page 1
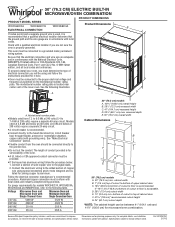
...30" (76.2 cm) models A. 30 " (76.2 cm) min. Ref. For power requirements for it is recommended that a qualified electrical installer determine that the electrical connection and wire size are for serviceability of the lower oven. 30" (76.2 CM) ELECTRIC BUILT-IN MICROWAVE/OVEN ...COMBINATION PRODUCT DIMENSIONS PRODUCT MODEL SERIES WOC54EC0A WOC54EC7A WOC95EC0A Product Dimensions ELECTRICAL CONNECTION If codes permit and a separate ground wire is used, it here. Because Whirlpool Corporation policy includes a continuous commitment to the junction box....
...30" (76.2 cm) models A. 30 " (76.2 cm) min. Ref. For power requirements for it is recommended that a qualified electrical installer determine that the electrical connection and wire size are for serviceability of the lower oven. 30" (76.2 CM) ELECTRIC BUILT-IN MICROWAVE/OVEN ...COMBINATION PRODUCT DIMENSIONS PRODUCT MODEL SERIES WOC54EC0A WOC54EC7A WOC95EC0A Product Dimensions ELECTRICAL CONNECTION If codes permit and a separate ground wire is used, it here. Because Whirlpool Corporation policy includes a continuous commitment to the junction box....

Warranty Information
Page 1
... about your major appliance to better help by checking the "Assistance or Service" section or by an authorized Whirlpool servicer is not available. 10. Service must provide proof of purchase or installation date for future reference. If outside the 50 United States and Canada, contact your authorized... Whirlpool dealer to know your major appliance, to replace or repair house fuses, or to correct house wiring or plumbing. 2. Service calls to correct the installation of your major appliance is used in the country in which...
... about your major appliance to better help by checking the "Assistance or Service" section or by an authorized Whirlpool servicer is not available. 10. Service must provide proof of purchase or installation date for future reference. If outside the 50 United States and Canada, contact your authorized... Whirlpool dealer to know your major appliance, to replace or repair house fuses, or to correct house wiring or plumbing. 2. Service calls to correct the installation of your major appliance is used in the country in which...


