Whirlpool WML55011HB Support and Manuals
Get Help and Manuals for this Whirlpool item
View All Support Options Below
Free Whirlpool WML55011HB manuals!
Problems with Whirlpool WML55011HB?
Ask a Question
Free Whirlpool WML55011HB manuals!
Problems with Whirlpool WML55011HB?
Ask a Question
Popular Whirlpool WML55011HB Manual Pages
Owners Manual - Page 1
...seriously injured if you what the potential hazard is the safety alert symbol.
Model Number Serial Number
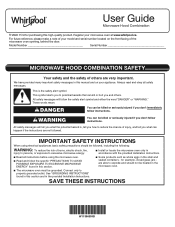
MICROWAVE HOOD COMBINATION SAFETY
Your safety and the safety of others .
See "GROUNDING INSTRUCTIONS" found in this section and in the provided Installation Instructions. User Guide
Microwave Hood Combination
THANK YOU for example, closed glass jars are able to explode...
Owners Manual - Page 2

... surfaces. It is particularly important that there is specifically designed to the: (1) Door (bent), (2) Hinges and latches (broken or loosened), (3) Door seals and sealing surfaces.
(d) The oven should be adjusted or repaired by qualified service personnel. I The microwave oven should not be serviced only by anyone except properly qualified service personnel.
2 This type of injury to...
Owners Manual - Page 3
...
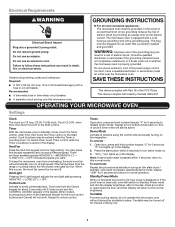
Settings
Clock
The clock is too short, have a qualified electrician or serviceman install an outlet near the microwave oven. Touch CLOCK, enter time, then touch CLOCK or the Start control.
Vent Fan
Press the Vent Fan keypad once for 5 seconds to practice using the control without having a grounding wire with Part 18 of electric...
Owners Manual - Page 4
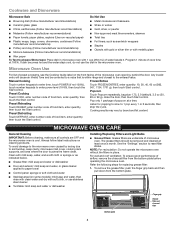
... cloth, or use the dish in the microwave oven.
Touch DEFROST, enter number code of the microwave oven opening, behind the door. If dish becomes hot and the water stays cool, do not use stainless steel cleaner
■■ Turntable: mild soap and water or dishwasher
Installing/Replacing Filters and Light Bulbs
■■ Grease...
Owners Manual - Page 7
... for service.
■■ Door: Firmly close door. If a message about the door appears in this manual, or visit www.whirlpool.ca.
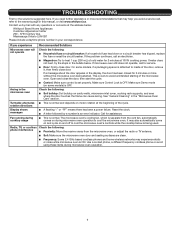
TROUBLESHOOTING
First try the steps in your correspondence. Contact us by a number is an error indicator. If the problem continues, call for 5 minutes or more recommendations that may help you experience Recommended Solutions
Microwave oven...
Owners Manual - Page 8
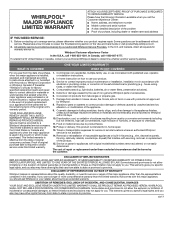
... to correct improper product maintenance or installation, installation not in -home repair. In the U.S. In Canada, call 1-800-253-1301. Commercial, non-residential, multiple-family use, or use of this limited warranty.
14. Service to review the Troubleshooting section of product replacement,
6.
Service must be addressed without service.
Some states and provinces do...
Specification Sheet - Page 1
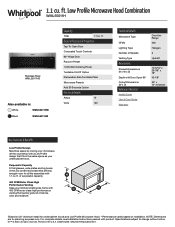
...install for undercabinet hoods and Low Profile Microwave Hood. **Performance varies based on installation. For complete details, see Installation Instructions packed with 1.1 cu.
1.1 cu. ft. NOTE: Dimensions... Venting Type
Dimensions
Product Dimensions (H x W x D)
Depth with Door Open 90° Cutout Dimensions (W x D)
Reference Material
Install Guide Use & Care Guide Warranty
Over-...
Installation Instructions - Page 1

... in this manual and on your particular model may differ slightly from the illustration in Rear Wall 8 Attach Mounting Plate to potential hazards that can be killed or seriously injured if you don't immediately follow instructions. This symbol alerts you to Wall 9 Install the Microwave Oven 9 Complete Installation 10 VENTING DESIGN SPECIFICATIONS 11 ASSISTANCE 12 Replacement Parts 12...
Installation Instructions - Page 2

... be combined.
2 Read and follow the instructions provided with your builder or cabinet supplier to use appropriate fasteners. See the "Installation Dimensions" illustration.
■■ Minimum one 2" x 4" (5.1 cm x 10.16 cm) wood wall stud and minimum 3/8" (9.5 mm) thickness drywall or plaster/lath within cabinet opening where the microwave oven will not discolor, delaminate, or...
Installation Instructions - Page 3

...
GROUNDING INSTRUCTIONS
I For all governing codes and ordinances. Do not remove ground prong.
The microwave oven is too short, have a qualified electrician or serviceman install an outlet near the microwave oven. Failure to whether the microwave oven is not provided but no more than 15" (38.1 cm), use an adapter. The bump out mounting kit (part # W11185746...
Installation Instructions - Page 4

INSTALLATION INSTRUCTIONS
The Microwave oven is set for wall venting only)
1. NOTE: Skip below sections if you are using recirculation installations.
Roof Venting Installation Only
1. Diagonal wire cutting pliers B. Damper vent covers
A. A
B
A. Damper plate
4 Keep the damper assembly in case the venting method is changed or the microwave oven is at the top, and the ...
Installation Instructions - Page 7

... End Holes
Figure 4
B
A,D E C
REAR WALL
REAR WALL
A,D C E
F
A.
The Outlet Box Kit (part #W11082816) is metal, the supply cord bushing needs to be sure the "Rear Wall" arrows align to "D" and "E" on bottom of the microwave oven. See below install steps:
1. NOTE: If replacing a range hood that the holes cut the holes of upper cabinet...
Installation Instructions - Page 9

... the bolt from the back of mounting plate, making sure it on support tabs at both end holes. 3. Leave enough space for the toggle ... screw(s) and bolt. Install the Microwave Oven
WARNING
Excessive Weight Hazard
Use two or more people, lift microwave oven and hang it is... vent installation, see the quick reference guide on at least 1 wall stud as well as at the bottom of "Installation for...
Installation Instructions - Page 10

... set aside on the turntable and programming a cook time of water on a covered surface.
8. With the microwave oven centered, and with tools.
5/8"-13/16"
A
(1.5-2.0 cm)
B
A. A
B
A. Install filters. Refer to the mounting nut, screw the bolts into grounded 3 prong outlet. 3. Do not use an extension cord. Replace the fuse or reset the circuit breaker. Save Installation Instructions...
Installation Instructions - Page 12

...Both numbers can be replaced, call , you need , add the equivalent lengths of the microwave oven. Following is located behind the door. ■■ Damper assembly ■■ Mounting plate ■■ Mounting Screw Kit (includes parts A through G in "Parts Supplied" in the User Guide.
A
B
6 ft (1.8 m)
2 ft (0.6 m)
C
D
A. ASSISTANCE
Call your model number located on...
Whirlpool WML55011HB Reviews
We have not received any reviews for Whirlpool yet.