Whirlpool WMH32519HW Support and Manuals
Get Help and Manuals for this Whirlpool item
View All Support Options Below
Free Whirlpool WMH32519HW manuals!
Problems with Whirlpool WMH32519HW?
Ask a Question
Free Whirlpool WMH32519HW manuals!
Problems with Whirlpool WMH32519HW?
Ask a Question
Popular Whirlpool WMH32519HW Manual Pages
Installation Instructions - Page 2

... Needed
Standard fittings for wood studs. See User Instructions.)
NOTE: Depending on model, aluminum grease filter and charcoal filter may not be included. hole drill bit for wall or roof venting)
■■ Charcoal filters (Depending on reordering, see the "Replacement Parts" section. See the "Venting Design Specifications" section.
2 Damper assembly (for wood or metal...
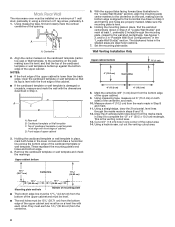
Installation Instructions - Page 3

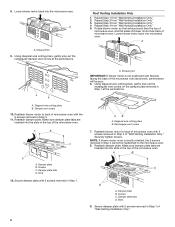
...-round transition piece, the 3" (7.6 cm) clearance needs to Round Transition" illustration in the "Venting Design Specifications" section.
Set the cardboard template to the side and refer to withstand the heat produced by the microwave oven for 66" (167.6 cm) installation height. upper cabinet and side cabinet depth
A. 2" x 4" (5.1 x 10.2 cm) wall stud B. The bump out...
Installation Instructions - Page 4
...microwave oven
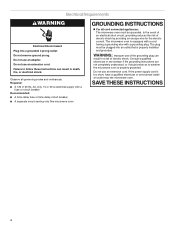
GROUNDING INSTRUCTIONS
For all governing codes and ordinances. Consult a qualified electrician or serviceman if the grounding instructions are not completely understood, or if doubt exists as to follow these instructions...that is too short, have a qualified electrician or serviceman install an outlet near the microwave oven. In the event of an electrical short circuit, ...
Installation Instructions - Page 5

...connector. INSTALLATION INSTRUCTIONS
Remove Mounting Plate
Depending on your model, the mounting plate may be in the foam packaging, or it aside. 3. Remove any remaining contents from the microwave oven
... attached to the microwave oven, do not grip or use the door or door handle while the microwave oven is set for recirculation installation.
A
Wall Venting Installation Only
1. Damper ...
Installation Instructions - Page 6
... damper plate. Diagonal wire cutting pliers B. Securely tighten screws.
Damper plate B. Slots
9. 8. Roof Venting Installation Only
1. Repeat Step 1 from "Wall Venting Installation Only." 3. Repeat Step 3 from "Wall Venting Installation Only." 5. Reattach blower motor to the microwave oven. 8.
A
B
C
D
A. Damper plate tabs D. NOTE: If blower motor is not positioned with 2 screws...
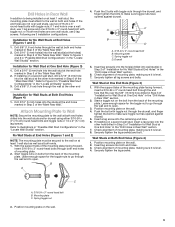
Installation Instructions - Page 7
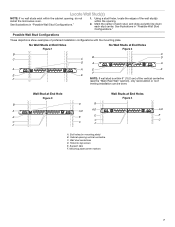
...illustrations in "Possible Wall Stud Configurations."
1. End holes (on mounting plate) B. Support tabs F.
Cabinet opening , do not install the microwave oven.
Wall Stud at End Hole Figure 3
Wall Studs at End Holes Figure ...centerline C. Using a stud finder, locate the edges of preferred installation configurations with the mounting plate. Possible Wall Stud Configurations
These ...
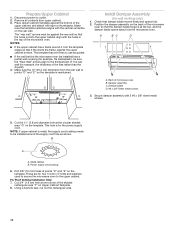
Installation Instructions - Page 8
Mark Rear Wall
The microwave oven must be installed on a minimum of 1 wall stud, preferably 2, using a minimum of cabinet. ...), align the mounting plate center markers to complete the 12" x 4" (30.5 x 10.2 cm) rectangle. Set the mounting plate aside. D A
C B
A. With the support tabs facing forward (see illustrations in Step 4.
Mark the centerline 3/8" (1 cm) down 4" (10.2 cm)...
Installation Instructions - Page 9
...Locate Wall Stud(s)" section. Start a toggle nut on the wall.
9 or if both end holes are 3 installation configurations. Following are over the 5/8" (16 mm) hole drilled in Step 3 of the "Mark Rear Wall."...Holes in Rear Wall" section.
2. Installation for the toggle nuts to go through both end holes of the "Mark Rear Wall."
2.
With the support tabs of the mounting plate. Position ...
Installation Instructions - Page 10
...one corner of the microwave oven. Remove all contents from the rear wall to the thickest part of t he rear wall (for example, the thickness of the microwave
oven so that the ...has trim lines to use as guides.
■■ If the wall behind the microwave oven (as installed) has a partial wall covering (for two 1/4-20 x 3" bolts and washers used to secure the microwave oven to be sure the "...
Installation Instructions - Page 11

...person holding it on your model, it does not have packing spacers. To avoid warping, wood filler blocks (installer to move and install microwave oven. NOTE: To avoid...microwave oven is being handled. Bolts
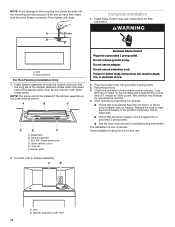
11 Install the Microwave Oven
WARNING
5. IMPORTANT: The control side of the microwave oven. Packing spacers (2) NOTE: Depending on support tabs at the bottom of mounting plate, and set...
Installation Instructions - Page 12
... F. Do not use .
2. Failure to damper assembly. If the microwave oven does not operate:
■■ Check that a household fuse has not blown, or that the long tab of the damper plate. Save Installation Instructions for future use an adapter. WARNING
A.
If the problem continues, call an electrician.
■■ Check that the power...
Installation Instructions - Page 13
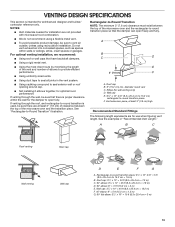
...) of clearance between the top of the microwave oven and the rectangular-to seal exterior wall or roof opening around cap.
■■ Not installing 2 elbows together, for use when figuring ...VENTING DESIGN SPECIFICATIONS
This section is used, be sure there are at least 3" (7.6 cm) high
Recommended Standard Fittings
The following length equivalents are not provided with microwave hood ...
Installation Instructions - Page 14

... front frame of the microwave oven. Replacement Parts
If any of the installation hardware needs to be used.
Each panel is a list of available replacement parts. Following is 3" (7.6 cm) wide. Recommended Vent Length
A 31⁄4" x 10" (8.3 x 25.4 cm) rectangular or 6" (15.2 cm) round vent should be installed to keep the damper from your model and serial numbers located...
Specification Sheet - Page 1
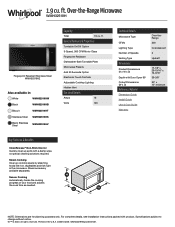
... and fish right in the microwave. Specifications subject to change without notice. ®/™ © 2020.
All rights reserved.
Printed in :
White
WMH32519HW
Black
WMH32519HB
Biscuit
WMH32519HT
Stainless Steel WMH32519HS
BStlaecekl Stainless WMH32519HV
Capacity
Total
1.9 cu. D200104XXE.
For complete details, see Installation Instructions packed with a damp wipe...
Whirlpool WMH32519HW Reviews
We have not received any reviews for Whirlpool yet.