Installation Guide
Page 1
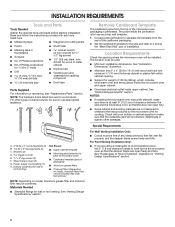
... very important. The appearance of Contents / Table des matières MICROWAVE HOOD COMBINATION SAFETY 1 INSTALLATION REQUIREMENTS 2 Tools and Parts 2 Remove Cardboard Template 2 Location Requirements 2 Product Dimensions 3 Electrical Requirements 3 INSTALLATION INSTRUCTIONS 4 Remove Mounting Plate 4 Rotate Blower...8 Install Damper Assembly 8 Install the Microwave Oven 9 Complete Installation 10 VENTING DESIGN SPECIFICATIONS 11 ASSISTANCE 12 Replacement Parts 12 Accessories 12 SÉCURITÉ DE L'ENSEMBLE FOUR À MICRO-ONDES/HOTTE..... 13 EXIGENCES D'INSTALLATION 13...
... very important. The appearance of Contents / Table des matières MICROWAVE HOOD COMBINATION SAFETY 1 INSTALLATION REQUIREMENTS 2 Tools and Parts 2 Remove Cardboard Template 2 Location Requirements 2 Product Dimensions 3 Electrical Requirements 3 INSTALLATION INSTRUCTIONS 4 Remove Mounting Plate 4 Rotate Blower...8 Install Damper Assembly 8 Install the Microwave Oven 9 Complete Installation 10 VENTING DESIGN SPECIFICATIONS 11 ASSISTANCE 12 Replacement Parts 12 Accessories 12 SÉCURITÉ DE L'ENSEMBLE FOUR À MICRO-ONDES/HOTTE..... 13 EXIGENCES D'INSTALLATION 13...

Installation Guide
Page 2
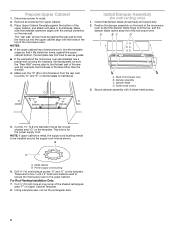
...A B C D E FG H A. See "Venting Design Specifications" section. Cut along the perforation to it during the "Mark Rear Wall" part of the cardboard packaging. 2. Location Requirements Check the opening . ■■ Support for weight of any tools listed here. ■■ Measuring... rectangular to round transition piece, the 3" (7.6 cm) clearance needs to back of microwave oven) ■■ Cardboard template (part of wall structures, be installed. hole drill bit for cooking. The piece inside upper cabinet. Check with any obstructions so that the...
...A B C D E FG H A. See "Venting Design Specifications" section. Cut along the perforation to it during the "Mark Rear Wall" part of the cardboard packaging. 2. Location Requirements Check the opening . ■■ Support for weight of any tools listed here. ■■ Measuring... rectangular to round transition piece, the 3" (7.6 cm) clearance needs to back of microwave oven) ■■ Cardboard template (part of wall structures, be installed. hole drill bit for cooking. The piece inside upper cabinet. Check with any obstructions so that the...
Installation Guide
Page 8
... used to secure the microwave oven to be installed around it fits inside the frame, against the upper cabinet bottom. Disconnect power to the thickest part of the rear wall (for wall venting only) 1. Make sure the 10" (25.4 cm) dimension from upper cabinet. 3. Cut the 1¹⁄₂" (3.8 cm) diameter...
... used to secure the microwave oven to be installed around it fits inside the frame, against the upper cabinet bottom. Disconnect power to the thickest part of the rear wall (for wall venting only) 1. Make sure the 10" (25.4 cm) dimension from upper cabinet. 3. Cut the 1¹⁄₂" (3.8 cm) diameter...

Installation Guide
Page 12
...;■ Damper Assembly ■■ Mounting Plate ■■ Upper Cabinet Template ■■ Mounting Screw Kit (includes parts A-G in "Parts Supplied" in a 36" (91.4 cm) or 42" (106.7 cm) wide opening. If you need the microwave oven model... Black 8171338 Biscuit 8171339 Stainless Steel 99403 Almond See your authorized dealer or service center. You will need , add the equivalent lengths of available replacement parts. One 3¹⁄₄" x 10" (8.3 x 25.4 cm) 90° elbow = 25 ft (7.6 m) B. 1 wall cap = 40 ft (12.2 m) C. 2 ft (0.6 m) + 6 ft (1.8 ...
...;■ Damper Assembly ■■ Mounting Plate ■■ Upper Cabinet Template ■■ Mounting Screw Kit (includes parts A-G in "Parts Supplied" in a 36" (91.4 cm) or 42" (106.7 cm) wide opening. If you need the microwave oven model... Black 8171338 Biscuit 8171339 Stainless Steel 99403 Almond See your authorized dealer or service center. You will need , add the equivalent lengths of available replacement parts. One 3¹⁄₄" x 10" (8.3 x 25.4 cm) 90° elbow = 25 ft (7.6 m) B. 1 wall cap = 40 ft (12.2 m) C. 2 ft (0.6 m) + 6 ft (1.8 ...
Installation Guide
Page 1
... Damper Assembly 9 Install the Microwave Oven 9 Complete Installation 10 VENTING DESIGN SPECIFICATIONS 11 ASSISTANCE 12 Replacement Parts 12 Accessories 12 MICROWAVE HOOD COMBINATION SAFETY Your safety and the safety of injury, and tell you don..." or "WARNING." These installation instructions cover different models. Table of Contents MICROWAVE HOOD COMBINATION SAFETY 1 INSTALLATION REQUIREMENTS 2 Tools and Parts 2 Remove Cardboard Template 2 Location Requirements 2 Product Dimensions 3 Electrical Requirements 3 INSTALLATION INSTRUCTIONS 4 Remove Mounting Plate 4 Rotate Blower...
... Damper Assembly 9 Install the Microwave Oven 9 Complete Installation 10 VENTING DESIGN SPECIFICATIONS 11 ASSISTANCE 12 Replacement Parts 12 Accessories 12 MICROWAVE HOOD COMBINATION SAFETY Your safety and the safety of injury, and tell you don..." or "WARNING." These installation instructions cover different models. Table of Contents MICROWAVE HOOD COMBINATION SAFETY 1 INSTALLATION REQUIREMENTS 2 Tools and Parts 2 Remove Cardboard Template 2 Location Requirements 2 Product Dimensions 3 Electrical Requirements 3 INSTALLATION INSTRUCTIONS 4 Remove Mounting Plate 4 Rotate Blower...
Installation Guide
Page 2
...cooking. For Roof Venting Installation Only: ■■ If you are not designed to back of microwave oven) ■■ Cardboard template (part of wall structures, be included. Sheet metal screws (2) G. Power supply cord bushing (1) H. See "Venting Design Specifications" section. NOTES: ■.... Materials Needed ■■ Standard fittings for wood studs. Cut along the perforation to it during the "Mark Rear Wall" part of the microwave oven packaging is at least 6" (15.2 cm) of the cardboard packaging. 2. Read and follow the instructions ...
...cooking. For Roof Venting Installation Only: ■■ If you are not designed to back of microwave oven) ■■ Cardboard template (part of wall structures, be included. Sheet metal screws (2) G. Power supply cord bushing (1) H. See "Venting Design Specifications" section. NOTES: ■.... Materials Needed ■■ Standard fittings for wood studs. Cut along the perforation to it during the "Mark Rear Wall" part of the microwave oven packaging is at least 6" (15.2 cm) of the cardboard packaging. 2. Read and follow the instructions ...
Installation Guide
Page 8
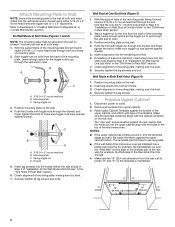
... is level. 8. No Wall Studs at End Holes (Figures 1 and 2) NOTE: The mounting plate must be sure the "Rear Wall" arrows align to the thickest part of mounting plate, making sure it fits inside the frame, against the bottom of the microwave oven. Spring toggle nut 3. A C B D A. 3/16-24 x 3" round-head bolt...
... is level. 8. No Wall Studs at End Holes (Figures 1 and 2) NOTE: The mounting plate must be sure the "Rear Wall" arrows align to the thickest part of mounting plate, making sure it fits inside the frame, against the bottom of the microwave oven. Spring toggle nut 3. A C B D A. 3/16-24 x 3" round-head bolt...

Installation Guide
Page 12
...m) straight = 8 ft (2.4 m) 6" (15.2 cm) vent system = 73 ft (22.2 m) total A B 6 ft (1.8 m) 2 ft (0.6 m) C D A. Both numbers can be used in the "Tools and Parts" section) A A. See the following examples: 3¹⁄₄" x 10" (8.3 x 25.4 cm) vent system = 73 ft (22.2 m) total A B 6 ft (1.8 m) 2 ft (0.6 m) C A. See "...Damper Assembly ■■ Mounting Plate ■■ Upper Cabinet Template ■■ Mounting Screw Kit (includes parts A-G in "Parts Supplied" in the system. Following is 3" (7.6 cm) wide. When you call us at our toll free...
...m) straight = 8 ft (2.4 m) 6" (15.2 cm) vent system = 73 ft (22.2 m) total A B 6 ft (1.8 m) 2 ft (0.6 m) C D A. Both numbers can be used in the "Tools and Parts" section) A A. See the following examples: 3¹⁄₄" x 10" (8.3 x 25.4 cm) vent system = 73 ft (22.2 m) total A B 6 ft (1.8 m) 2 ft (0.6 m) C A. See "...Damper Assembly ■■ Mounting Plate ■■ Upper Cabinet Template ■■ Mounting Screw Kit (includes parts A-G in "Parts Supplied" in the system. Following is 3" (7.6 cm) wide. When you call us at our toll free...
Use & Care Guide
Page 3
... Start control. or 20-amp electrical supply with a grounding plug. SAVE THESE INSTRUCTIONS This device complies with Industry Canada ICES-001. This device complies with Part 18 of the FCC Rules. Touch and hold number keypad "1" for about 3 seconds until a confirmation tone sounds. Comes on programming tones. The vent fan may...
... Start control. or 20-amp electrical supply with a grounding plug. SAVE THESE INSTRUCTIONS This device complies with Industry Canada ICES-001. This device complies with Part 18 of the FCC Rules. Touch and hold number keypad "1" for about 3 seconds until a confirmation tone sounds. Comes on programming tones. The vent fan may...
Use & Care Guide
Page 5
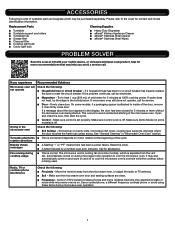
...9632; Frequency: Some 2.4 GHz-based cordless phones and home wireless networks may experience static or noise while microwave oven is ON. Replacement Parts Cleaning Supplies ■■ Turntable ■■ Heavy-duty degreaser ■■ Turntable support and rollers ■■ affresh®...9632;■ Cooktop light bulb ■■ Cavity light bulb TROUBLESHOOTING First try the steps in your mobile device, or visit www.whirlpool.ca. Contact us by a number is an error indicator. If the problem continues, call for contact information. If a message ...
...9632; Frequency: Some 2.4 GHz-based cordless phones and home wireless networks may experience static or noise while microwave oven is ON. Replacement Parts Cleaning Supplies ■■ Turntable ■■ Heavy-duty degreaser ■■ Turntable support and rollers ■■ affresh®...9632;■ Cooktop light bulb ■■ Cavity light bulb TROUBLESHOOTING First try the steps in your mobile device, or visit www.whirlpool.ca. Contact us by a number is an error indicator. If the problem continues, call for contact information. If a message ...
Use & Care Guide
Page 6
... filters, preservation solutions, etc.). Conversion of products from the date of non-genuine Whirlpool parts or accessories. This product is intended for appliances with products not approved by a Whirlpool designated service company. 11. This warranty gives you specific legal rights, and you...14. Damage from state to state or province to correct product damage or defects caused by our authorized Whirlpool Service Providers. your product. Repairs to parts or systems to province. warranty period. 9. Discoloration, rust or oxidation of surfaces resulting from the ...
... filters, preservation solutions, etc.). Conversion of products from the date of non-genuine Whirlpool parts or accessories. This product is intended for appliances with products not approved by a Whirlpool designated service company. 11. This warranty gives you specific legal rights, and you...14. Damage from state to state or province to correct product damage or defects caused by our authorized Whirlpool Service Providers. your product. Repairs to parts or systems to province. warranty period. 9. Discoloration, rust or oxidation of surfaces resulting from the ...
Warranty Information
Page 1
... determine whether another warranty applies. If you should ask Whirlpool or your product. 3. W10835574A SP P1N W10835762 ®/™ © 2015 Whirlpool. All warranty service is intended for Factory Specified Replacement Parts and repair labor to you . Travel or transportation expenses...obtain service under these limitations and exclusions may not apply to or furnished with servicing, removal or replacement of non-genuine Whirlpool parts or accessories. 6. In the event of product replacement, your product requires repair. Proof of the original unit's warranty period...
... determine whether another warranty applies. If you should ask Whirlpool or your product. 3. W10835574A SP P1N W10835762 ®/™ © 2015 Whirlpool. All warranty service is intended for Factory Specified Replacement Parts and repair labor to you . Travel or transportation expenses...obtain service under these limitations and exclusions may not apply to or furnished with servicing, removal or replacement of non-genuine Whirlpool parts or accessories. 6. In the event of product replacement, your product requires repair. Proof of the original unit's warranty period...
Use & Care Guide
Page 1
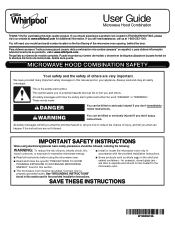
...whole eggs in the shell and sealed containers - Puede encontrar su número de modelo y de serie en la etiqueta ubicada en la parte frontal de la abertura del horno de microondas, detrás de la puerta. We have provided many important safety messages in this high-... burns, electric shock, fire, injury to persons, or exposure to properly grounded outlet. All safety messages will need assistance, call us at www.whirlpool.com for additional information. IMPORTANT SAFETY INSTRUCTIONS When using the microwave oven. I The microwave oven must be grounded. This is , tell you how...
...whole eggs in the shell and sealed containers - Puede encontrar su número de modelo y de serie en la etiqueta ubicada en la parte frontal de la abertura del horno de microondas, detrás de la puerta. We have provided many important safety messages in this high-... burns, electric shock, fire, injury to persons, or exposure to properly grounded outlet. All safety messages will need assistance, call us at www.whirlpool.com for additional information. IMPORTANT SAFETY INSTRUCTIONS When using the microwave oven. I The microwave oven must be grounded. This is , tell you how...
Use & Care Guide
Page 3
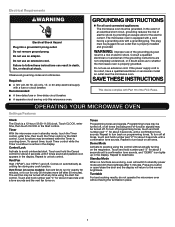
... Mode When no functions are not completely understood, or if doubt exists as cooling fan during any cook function. or 20-amp electrical supply with Part 18 of electric shock. If the power supply cord is a 12-hour (12:00-11:59) clock. Touch and hold number pad "4" for about 3 seconds...
... Mode When no functions are not completely understood, or if doubt exists as cooling fan during any cook function. or 20-amp electrical supply with Part 18 of electric shock. If the power supply cord is a 12-hour (12:00-11:59) clock. Touch and hold number pad "4" for about 3 seconds...
Use & Care Guide
Page 5
... oven operation to heat 1 cup (250 mL) of cold water for 2 minutes at left with your mobile device, or visit www.whirlpool.com/product_help for more without the microwave oven being used. rotation directions Display shows messages ■■ A flashing ":" or "PF" means...inside of the microwave oven. If you avoid a service call. If a message about the door appears in "Microwave Oven Care" section. Replacement Parts ■■ Turntable ■■ Turntable support and rollers ■■ Turntable hub ■■ Grease filter ■■ Charcoal filter...
... oven operation to heat 1 cup (250 mL) of cold water for 2 minutes at left with your mobile device, or visit www.whirlpool.com/product_help for more without the microwave oven being used. rotation directions Display shows messages ■■ A flashing ":" or "PF" means...inside of the microwave oven. If you avoid a service call. If a message about the door appears in "Microwave Oven Care" section. Replacement Parts ■■ Turntable ■■ Turntable support and rollers ■■ Turntable hub ■■ Grease filter ■■ Charcoal filter...

Use & Care Guide
Page 6
... that comes with servicing, removal or replacement of product replacement, your appliance will pay for the remaining term of non-genuine Whirlpool parts or accessories. 6. This limited warranty is valid only in accordance with products not approved by the customer. In-home instruction ... exclusion or limitation of incidental or consequential damages, so these excluded circumstances shall be warranted for Factory Specified Replacement Parts and repair labor to Whirlpool within 30 days. 10. YOUR SOLE AND EXCLUSIVE REMEDY UNDER THIS LIMITED WARRANTY SHALL BE PRODUCT REPAIR AS PROVIDED...
... that comes with servicing, removal or replacement of product replacement, your appliance will pay for the remaining term of non-genuine Whirlpool parts or accessories. 6. This limited warranty is valid only in accordance with products not approved by the customer. In-home instruction ... exclusion or limitation of incidental or consequential damages, so these excluded circumstances shall be warranted for Factory Specified Replacement Parts and repair labor to Whirlpool within 30 days. 10. YOUR SOLE AND EXCLUSIVE REMEDY UNDER THIS LIMITED WARRANTY SHALL BE PRODUCT REPAIR AS PROVIDED...


