Installation Instructions
Page 1
... particular model may differ slightly from the illustration in RearWall 7.. All safety messages will follow instructions. Tools and Parts 2.. Product Dimensions 3.. All safety messages will tell you what the potential hazard is, tell you how to and including 36" (91.4 cm...cooking products up to reduce the chance of your appliance. This symbol alerts you to Wall 8. Remove Mounting Plate 4. Tableof Contents MICROWAVE HOOD COMBINATION SAFETY 1 INSTALLATION REQUIREMENTS 2. You can kill or hurt you don't immediately follow the safety alert symbol and either the word ...
... particular model may differ slightly from the illustration in RearWall 7.. All safety messages will follow instructions. Tools and Parts 2.. Product Dimensions 3.. All safety messages will tell you what the potential hazard is, tell you how to and including 36" (91.4 cm...cooking products up to reduce the chance of your appliance. This symbol alerts you to Wall 8. Remove Mounting Plate 4. Tableof Contents MICROWAVE HOOD COMBINATION SAFETY 1 INSTALLATION REQUIREMENTS 2. You can kill or hurt you don't immediately follow the safety alert symbol and either the word ...
Installation Instructions
Page 2
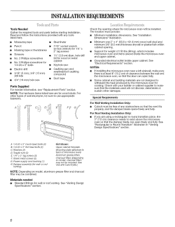
...• No. 2 Phillips screwdriver bit for wood or metal • No. 3 Phillips screwdriver for weight of 150 Ibs (68 kg), which includes microwave oven and items placed inside upper cabinet. A Check the opening . Minimum one 2" x 4" (50.8 x 101.6 mm) wood wall stud and minimum... fasteners. Special Requirements For Wall Venting Installation Only: • Cutout must provide: • Minimum installation dimensions. See "Rectangular to back of wall structures, be combined. See Use and Care Guide.) NOTE: Depending on model, charcoal filters may be sure to withstand the...
...• No. 2 Phillips screwdriver bit for wood or metal • No. 3 Phillips screwdriver for weight of 150 Ibs (68 kg), which includes microwave oven and items placed inside upper cabinet. A Check the opening . Minimum one 2" x 4" (50.8 x 101.6 mm) wood wall stud and minimum... fasteners. Special Requirements For Wall Venting Installation Only: • Cutout must provide: • Minimum installation dimensions. See "Rectangular to back of wall structures, be combined. See Use and Care Guide.) NOTE: Depending on model, charcoal filters may be sure to withstand the...
Installation Instructions
Page 3
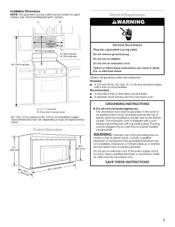
...death, fire, or electrical shock. Do not use an adapter. Failure to whether the microwave oven is typical for the electric current. Required: • A 120 Volt, 60 Hz, AC only, 15- Exact dimensions may vary depending on type of electric shock by providing an escape wire for 66"... in a risk of electric shock. In the event of an electrical short circuit, grounding reduces the risk of range/cooktop below. Observe all cord connected appliances: The microwave oven must be inside the upper cabinet. or 20-amp electrical supply with a grounding plug. Do not remove ground...
...death, fire, or electrical shock. Do not use an adapter. Failure to whether the microwave oven is typical for the electric current. Required: • A 120 Volt, 60 Hz, AC only, 15- Exact dimensions may vary depending on type of electric shock by providing an escape wire for 66"... in a risk of electric shock. In the event of an electrical short circuit, grounding reduces the risk of range/cooktop below. Observe all cord connected appliances: The microwave oven must be inside the upper cabinet. or 20-amp electrical supply with a grounding plug. Do not remove ground...
Installation Instructions
Page 8
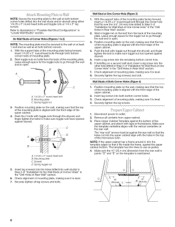
...2 bolts with toggle nut through the drywall, and finger tighten the bolts to make sure toggle nuts have opened against drywall. 1. Check alignment of the microwave oven. // // .// // A. 1/4-20 x 3" round-head bolt B. Start toggle nuts on the bolt from the back of the mounting plate. ...C the rear wall. // = L The "rear wall" arrows must be against the upper cabinet bottom. Make sure the 10" (25.4 cm) dimension from upper cabinet. 3. No Wall Studs at Corner Holes (Figures I & 2) NOTE: The mounting plate must be secured to go through both bottom ...
...2 bolts with toggle nut through the drywall, and finger tighten the bolts to make sure toggle nuts have opened against drywall. 1. Check alignment of the microwave oven. // // .// // A. 1/4-20 x 3" round-head bolt B. Start toggle nuts on the bolt from the back of the mounting plate. ...C the rear wall. // = L The "rear wall" arrows must be against the upper cabinet bottom. Make sure the 10" (25.4 cm) dimension from upper cabinet. 3. No Wall Studs at Corner Holes (Figures I & 2) NOTE: The mounting plate must be secured to go through both bottom ...


