

Installation Instructions
Page 2
... for cooking. The piece inside upper cabinet. Location Requirements Check the opening . ■ Support for weight of clearance between the wall and the microwave oven, so that the damper blade can open freely and fully. See "Electrical Requirements" section. Read... and follow the instructions provided with your builder or cabinet supplier to back of microwave oven) Cardboard template (part of the cardboard packaging. 2. A B C D E FG H A 1/4-20 x 3" round-head bolts (2) B. 1/4-20 x 3" flat-head ...
... for cooking. The piece inside upper cabinet. Location Requirements Check the opening . ■ Support for weight of clearance between the wall and the microwave oven, so that the damper blade can open freely and fully. See "Electrical Requirements" section. Read... and follow the instructions provided with your builder or cabinet supplier to back of microwave oven) Cardboard template (part of the cardboard packaging. 2. A B C D E FG H A 1/4-20 x 3" round-head bolts (2) B. 1/4-20 x 3" flat-head ...
Installation Instructions
Page 9
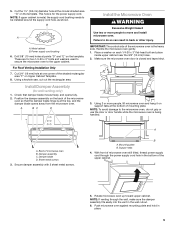
... damper blade opens away from the microwave oven. Back of the microwave oven is being handled. Secure damper assembly with 2 sheet metal screws. Mounting plate B. A B C D Install the Microwave Oven WARNING Excessive Weight Hazard Use two or more people, lift microwave oven and hang it on support tabs... hole in the wall cutout. 6. Position the damper assembly on the back of the shaded rectangular area "F" on the template. Handle the microwave oven gently. 1. Cut the 1¹⁄₂" (3.8 cm) diameter hole at the circular shaded area "G" on each 1/4-20 x 3"...
... damper blade opens away from the microwave oven. Back of the microwave oven is being handled. Secure damper assembly with 2 sheet metal screws. Mounting plate B. A B C D Install the Microwave Oven WARNING Excessive Weight Hazard Use two or more people, lift microwave oven and hang it on support tabs... hole in the wall cutout. 6. Position the damper assembly on the back of the shaded rectangular area "F" on the template. Handle the microwave oven gently. 1. Cut the 1¹⁄₂" (3.8 cm) diameter hole at the circular shaded area "G" on each 1/4-20 x 3"...