

Ventilation Specification
Page 4
...not use a plastic vent. To avoid lint accumulation in paragraph 7.3. 4. International Fuel Gas Code: In the 2003 version, section 614. 3. ANSI Z21.5.1 - Other sections of...dryer unit venting systems for Whirlpool Corporation dryers sold in death or fire. Lint Even though the dryer is not exhausted outside, this section: 1. Consult your dryer for sufficient capacity to handle the maximum number of dryers... water column back pressure at the connection of the dryer will keep lint from the washer. Exhausting the dryer outdoors removes excess heat from laundry area. Four inch...
...not use a plastic vent. To avoid lint accumulation in paragraph 7.3. 4. International Fuel Gas Code: In the 2003 version, section 614. 3. ANSI Z21.5.1 - Other sections of...dryer unit venting systems for Whirlpool Corporation dryers sold in death or fire. Lint Even though the dryer is not exhausted outside, this section: 1. Consult your dryer for sufficient capacity to handle the maximum number of dryers... water column back pressure at the connection of the dryer will keep lint from the washer. Exhausting the dryer outdoors removes excess heat from laundry area. Four inch...
Ventilation Specification
Page 6
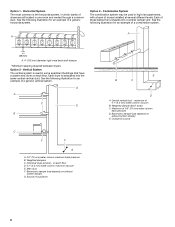
... of outside air E B C D A. A A 1"* (25 mm) A. 4" (102 mm) diameter rigid metal back draft damper *Minimum spacing required between dryers Option 2 - Vertical System The vertical system is used in some apartment buildings that have a washer and dryer on each floor. on each floor D. 0.1" (2.5 mm) water column maximum vacuum E. Barometric damper (use depends on exhaust system...
... of outside air E B C D A. A A 1"* (25 mm) A. 4" (102 mm) diameter rigid metal back draft damper *Minimum spacing required between dryers Option 2 - Vertical System The vertical system is used in some apartment buildings that have a washer and dryer on each floor. on each floor D. 0.1" (2.5 mm) water column maximum vacuum E. Barometric damper (use depends on exhaust system...
Owners Manual
Page 5
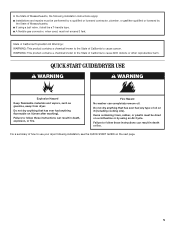
...dryer following installation instructions apply: ■ Installations and repairs must not exceed 3 feet. Do not dry anything flammable on it (including cooking oils). Fire Hazard No washer can result in death or fire. Items containing foam, rubber, or plastic must be a T-handle type. ■ A flexible gas... Failure to follow these instructions can completely remove oil. QUICK START GUIDE/DRYER USE WARNING WARNING Explosion Hazard Keep flammable materials and vapors, such as gasoline, away from dryer. In the State of Massachusetts, the following installation, see the QUICK ...
...dryer following installation instructions apply: ■ Installations and repairs must not exceed 3 feet. Do not dry anything flammable on it (including cooking oils). Fire Hazard No washer can result in death or fire. Items containing foam, rubber, or plastic must be a T-handle type. ■ A flexible gas... Failure to follow these instructions can completely remove oil. QUICK START GUIDE/DRYER USE WARNING WARNING Explosion Hazard Keep flammable materials and vapors, such as gasoline, away from dryer. In the State of Massachusetts, the following installation, see the QUICK ...
Installation Instructions
Page 4
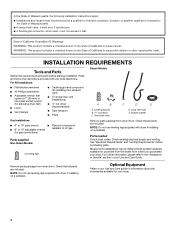
...; ¼" nut driver (recommended) ■ Tape measure ■ Pliers A B A. Check that all parts are included. "Y" connector C. Rubber washer Gas Installations: ■ 8" or 10" pipe wrench ■ Pipe-joint compound ■ 8" or 10" adjustable wrench resistant to the "Assistance or Service"...your Use and Care guide for information about the accessories available for purchase from the dealer from whom you purchased your dryer. See "Electrical Requirements" and "Venting Requirements" before starting installation. In the State of Massachusetts, the following installation ...
...; ¼" nut driver (recommended) ■ Tape measure ■ Pliers A B A. Check that all parts are included. "Y" connector C. Rubber washer Gas Installations: ■ 8" or 10" pipe wrench ■ Pipe-joint compound ■ 8" or 10" adjustable wrench resistant to the "Assistance or Service"...your Use and Care guide for information about the accessories available for purchase from the dealer from whom you purchased your dryer. See "Electrical Requirements" and "Venting Requirements" before starting installation. In the State of Massachusetts, the following installation ...
Installation Instructions
Page 5
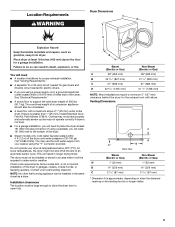
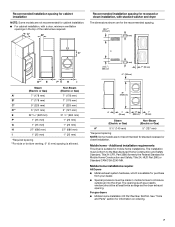
...in the same closet as a dryer. Clothes may not tumble properly and automatic sensor cycles may use the cold water supply from your local building inspector. Contact your washer using the "Y" connector provided. Steam (Electric or Gas) A 38" (965 mm) B 32 9/16" (827 mm) C 27" (686 mm) D 52... 9/16" (1335 mm) Non-Steam (Electric or Gas) 38" (965 mm) 31 1/2" (800 mm) 27" (686 mm) 51 1/2" (1308 mm)...
...in the same closet as a dryer. Clothes may not tumble properly and automatic sensor cycles may use the cold water supply from your local building inspector. Contact your washer using the "Y" connector provided. Steam (Electric or Gas) A 38" (965 mm) B 32 9/16" (827 mm) C 27" (686 mm) D 52... 9/16" (1335 mm) Non-Steam (Electric or Gas) 38" (965 mm) 31 1/2" (800 mm) 27" (686 mm) 51 1/2" (1308 mm)...
Installation Instructions
Page 7
... not recommended for cabinet installation. ■ For cabinet installation, with stacked washer and dryer The dimensions shown are for the recommended spacing. 48 in.2 * (310 cm2) 3"* (76 mm) C* D** E F* G H I Steam (Electric or Gas) Non-Steam (Electric or Gas) A* 7" (178 mm) B* 7" (178 mm) C* 9" (... (1930 mm) A* 1" 27" 1" (25 mm) (686 mm) (25 mm) Steam (Electric or Gas) Non-Steam (Electric or Gas) A* 5 ½" (140 mm) 5" (127 mm) *Required spacing NOTE: Some models are required. Additional installation requirements This dryer is available for recessed or closet...
... not recommended for cabinet installation. ■ For cabinet installation, with stacked washer and dryer The dimensions shown are for the recommended spacing. 48 in.2 * (310 cm2) 3"* (76 mm) C* D** E F* G H I Steam (Electric or Gas) Non-Steam (Electric or Gas) A* 7" (178 mm) B* 7" (178 mm) C* 9" (... (1930 mm) A* 1" 27" 1" (25 mm) (686 mm) (25 mm) Steam (Electric or Gas) Non-Steam (Electric or Gas) A* 5 ½" (140 mm) 5" (127 mm) *Required spacing NOTE: Some models are required. Additional installation requirements This dryer is available for recessed or closet...

Installation Instructions
Page 13
... Rigid metal 35 ft (10.7 m) 29 ft (8.8 m) 4 Rigid metal 27 ft (8.2 m) 21 ft (6.4 m) Install Vent System 1. Place a carton corner post from the dryer carton. Leave enough room to exhaust hood. Turn cold water faucet off and remove washer inlet hose. 2. Continue with 4" (102 mm) clamp. 3. Vent system chart...Do not use vent runs longer than those specified in the flexible gas line. 4. If connecting to existing vent, make sure the vent is secured to exhaust hood with new rubber washer provided. Once the exhaust vent connection is close to its final ...
... Rigid metal 35 ft (10.7 m) 29 ft (8.8 m) 4 Rigid metal 27 ft (8.2 m) 21 ft (6.4 m) Install Vent System 1. Place a carton corner post from the dryer carton. Leave enough room to exhaust hood. Turn cold water faucet off and remove washer inlet hose. 2. Continue with 4" (102 mm) clamp. 3. Vent system chart...Do not use vent runs longer than those specified in the flexible gas line. 4. If connecting to existing vent, make sure the vent is secured to exhaust hood with new rubber washer provided. Once the exhaust vent connection is close to its final ...

Installation Instructions
Page 14
... on . 11. Steam Models Only: 12. Screw on the console and any dust. 8. Attach this end to back. NOTE: Do not overtighten. Gas Models Only: 10. Using pliers, tighten the couplings with a damp cloth to see which will not start, check the following: ■ Controls are ...that you live in a running or "On" position. ■ Start button has been pushed firmly. ■ Dryer is plugged into a grounded outlet. If you have all packaging materials. 4. Attach washer cold inlet hose to other end of long hose to control the buildup of small hose. Dispose of "Y" connector...
... on . 11. Steam Models Only: 12. Screw on the console and any dust. 8. Attach this end to back. NOTE: Do not overtighten. Gas Models Only: 10. Using pliers, tighten the couplings with a damp cloth to see which will not start, check the following: ■ Controls are ...that you live in a running or "On" position. ■ Start button has been pushed firmly. ■ Dryer is plugged into a grounded outlet. If you have all packaging materials. 4. Attach washer cold inlet hose to other end of long hose to control the buildup of small hose. Dispose of "Y" connector...


