
Use and Care Guide
Page 3
... "WARNING." DRYER SAFETY Your safety and the safety of injury, and tell you cannot reach your gas supplier, call your gas supplier from a neighbor's phone. WARNING You can be followed to prevent property damage, personal injury, or death. - We have provided many important safety messages in the vicinity of Massachusetts. ■ If using a ball...
... "WARNING." DRYER SAFETY Your safety and the safety of injury, and tell you cannot reach your gas supplier, call your gas supplier from a neighbor's phone. WARNING You can be followed to prevent property damage, personal injury, or death. - We have provided many important safety messages in the vicinity of Massachusetts. ■ If using a ball...

Use and Care Guide
Page 4
...-like materials. ■ Clean lint screen before using the dryer. ■ Do not place items exposed to cooking oils in the absence of local codes, with the National Electrical Code, ANSI/NFPA 70 or Canadian Electrical Code, CSA C22.1. 4 Items contaminated with the National Fuel Gas Code, ANSI Z223.1/NFPA 54 or the...
...-like materials. ■ Clean lint screen before using the dryer. ■ Do not place items exposed to cooking oils in the absence of local codes, with the National Electrical Code, ANSI/NFPA 70 or Canadian Electrical Code, CSA C22.1. 4 Items contaminated with the National Fuel Gas Code, ANSI Z223.1/NFPA 54 or the...
Use and Care Guide
Page 5
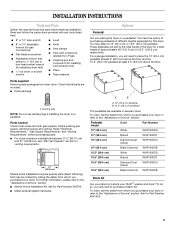
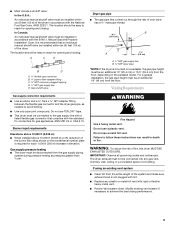
...10" (25.4 cm) or 15.5" (39.4 cm) pedestal. Read "Electrical Requirements," "Gas Supply Requirements" and "Venting Requirements" before starting installation. To order, call the dealer from whom you placing the dryer on a pedestal. For further information, please refer to the "Assistance or Service" section.... (25.4 cm) pedestal B. 15.5" (39.4 cm) pedestal The pedestals are included. ■ Parts package 4 Leveling legs NOTE: Do not use leveling legs if installing the dryer on a pedestal? To do so, you will need to place the 10" (25.4 cm) pedestal at least 9" (22.9 cm) above...
...10" (25.4 cm) or 15.5" (39.4 cm) pedestal. Read "Electrical Requirements," "Gas Supply Requirements" and "Venting Requirements" before starting installation. To order, call the dealer from whom you placing the dryer on a pedestal. For further information, please refer to the "Assistance or Service" section.... (25.4 cm) pedestal B. 15.5" (39.4 cm) pedestal The pedestals are included. ■ Parts package 4 Leveling legs NOTE: Do not use leveling legs if installing the dryer on a pedestal? To do so, you will need to place the 10" (25.4 cm) pedestal at least 9" (22.9 cm) above...
Use and Care Guide
Page 6
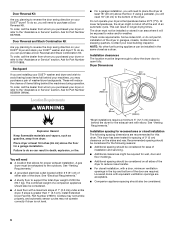
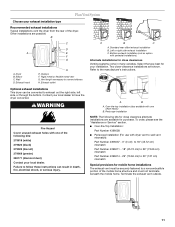
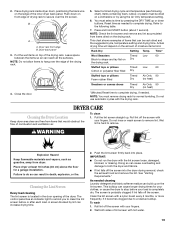
... closet installation The following reasons: ■ Additional spacing should also be exposed to water and/or weather. Place dryer at temperatures below 45ºF (7ºC). A gas dryer must not be considered on the sides and rear. Clothes may not tumble properly, and automatic sensor cycles may...elbow. Door Reversal Kit Are you planning to reverse the door swing direction on your DUET® dryer and stack your DUET® washer and dryer? If using a pedestal, you purchased your dryer or refer to the outdoors. This can be exhausted to the "Assistance or Service" section. ...
... closet installation The following reasons: ■ Additional spacing should also be exposed to water and/or weather. Place dryer at temperatures below 45ºF (7ºC). A gas dryer must not be considered on the sides and rear. Clothes may not tumble properly, and automatic sensor cycles may...elbow. Door Reversal Kit Are you planning to reverse the door swing direction on your DUET® dryer and stack your DUET® washer and dryer? If using a pedestal, you purchased your dryer or refer to the outdoors. This can be exhausted to the "Assistance or Service" section. ...
Use and Care Guide
Page 8
...an equipmentgrounding conductor and a grounding plug. Do not remove ground prong. Do not use an extension cord. A time-delay fuse or circuit breaker is a registered trademark of your dryer has been converted to use LP gas, ³⁄₈" LP compatible copper tubing can result in the door well ...of E.I. Check with the type of LP gas must be used . If this dryer be made to whether the dryer is located on the rating...
...an equipmentgrounding conductor and a grounding plug. Do not remove ground prong. Do not use an extension cord. A time-delay fuse or circuit breaker is a registered trademark of your dryer has been converted to use LP gas, ³⁄₈" LP compatible copper tubing can result in the door well ...of E.I. Check with the type of LP gas must be used . If this dryer be made to whether the dryer is located on the rating...
Use and Care Guide
Page 9
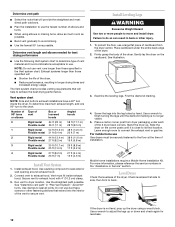
...avoid kinking. ■ Use only pipe-joint compound. Gas shutoff valve Dryer gas pipe ■ The gas pipe that an individual manual shutoff valve be installed within six (6) feet (1.8 m) of the dryer in elevation. Do not use TEFLON®† tape. ■ This dryer must be connected to...8260;₈" NPT adapter fitting between the flexible gas connector and the dryer gas pipe, as needed to achieve the best drying performance. 9 Do not use a plastic vent. If using an existing vent system ■ Clean lint from the gas supply piping system during pressure testing at pressures ...
...avoid kinking. ■ Use only pipe-joint compound. Gas shutoff valve Dryer gas pipe ■ The gas pipe that an individual manual shutoff valve be installed within six (6) feet (1.8 m) of the dryer in elevation. Do not use TEFLON®† tape. ■ This dryer must be connected to...8260;₈" NPT adapter fitting between the flexible gas connector and the dryer gas pipe, as needed to achieve the best drying performance. 9 Do not use a plastic vent. If using an existing vent system ■ Clean lint from the gas supply piping system during pressure testing at pressures ...

Use and Care Guide
Page 10
..., see the "Assistance or Service" section. Clamp Exhaust Recommended hood styles are recommended. Do not use an exhaust hood with screws or other fastening devices that may result in its final location. ■...products can cause moisture and lint to keep rodents and insects from your dealer or by calling Whirlpool Parts and Accessories. Elbows 45° elbows provide better airflow than 90° elbows. ... (30.5 cm) from the ground or any object that may be fully extended and supported when the dryer is acceptable. 4" (10.2 cm) 2½" (6.4 cm) ■ An exhaust hood should cap the...
..., see the "Assistance or Service" section. Clamp Exhaust Recommended hood styles are recommended. Do not use an exhaust hood with screws or other fastening devices that may result in its final location. ■...products can cause moisture and lint to keep rodents and insects from your dealer or by calling Whirlpool Parts and Accessories. Elbows 45° elbows provide better airflow than 90° elbows. ... (30.5 cm) from the ground or any object that may be fully extended and supported when the dryer is acceptable. 4" (10.2 cm) 2½" (6.4 cm) ■ An exhaust hood should cap the...
Use and Care Guide
Page 11
...order, please see the "Assistance or Service" section. ■ Over-the-Top Installation: Part Number 4396028 ■ Periscope Installation (For use with one of the following kits for close clearance alternate installations are available for your local dealer. Select the type best for purchase. Two... close clearances Venting systems come in death, fire, electrical shock, or serious injury. Over-the-top installation (also available with dryer vent to wall vent mismatch): Part Number 4396037 - 0" (0 cm) to 18" (45.72 cm) mismatch Part Number 4396011 - 18" (45...
...order, please see the "Assistance or Service" section. ■ Over-the-Top Installation: Part Number 4396028 ■ Periscope Installation (For use with one of the following kits for close clearance alternate installations are available for your local dealer. Select the type best for purchase. Two... close clearances Venting systems come in death, fire, electrical shock, or serious injury. Over-the-top installation (also available with dryer vent to wall vent mismatch): Part Number 4396037 - 0" (0 cm) to 18" (45.72 cm) mismatch Part Number 4396011 - 18" (45...
Use and Care Guide
Page 12
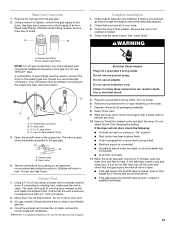
...will provide the straightest and most direct path outdoors. ■ Plan the installation to use Gas dryers must fit inside the dryer. Use caulking compound to seal all joints. Use the straightest path possible. Use clamps to seal exterior wall opening around exhaust hood. 2. Firmly grasp the body ... visible. 5. Exhaust systems longer than those specified will: ■ Shorten the life of the 2 dryer back corners. Find the diamond marking. 4. Stand the dryer up the dryer using elbows or making turns, allow as much room as possible. ■ Bend vent gradually to avoid ...
...will provide the straightest and most direct path outdoors. ■ Plan the installation to use Gas dryers must fit inside the dryer. Use caulking compound to seal all joints. Use the straightest path possible. Use clamps to seal exterior wall opening around exhaust hood. 2. Firmly grasp the body ... visible. 5. Exhaust systems longer than those specified will: ■ Shorten the life of the 2 dryer back corners. Find the diamond marking. 4. Stand the dryer up the dryer using elbows or making turns, allow as much room as possible. ■ Bend vent gradually to avoid ...
Use and Care Guide
Page 13
.... Do not select the Air Only Temperature setting. Be sure the vent is a recommended connection. Move dryer into a grounded 3 prong outlet. Remove the red cap from the gas pipe. 2. Using a 4" (10.2 cm) clamp, connect vent to see which step was skipped. 2. Check that ...all connections by brushing on power. 6. Using a wrench to tighten, connect the gas supply to -flare adapter fitting 3. See "Level Dryer." Electrical Shock Hazard Plug into a grounded 3 prong outlet. ■ Electrical supply is connected. ■...
.... Do not select the Air Only Temperature setting. Be sure the vent is a recommended connection. Move dryer into a grounded 3 prong outlet. Remove the red cap from the gas pipe. 2. Using a 4" (10.2 cm) clamp, connect vent to see which step was skipped. 2. Check that ...all connections by brushing on power. 6. Using a wrench to tighten, connect the gas supply to -flare adapter fitting 3. See "Level Dryer." Electrical Shock Hazard Plug into a grounded 3 prong outlet. ■ Electrical supply is connected. ■...

Use and Care Guide
Page 14
... you want the load to desired level. During the first few minutes of the drying process, the cycle time may automatically vary from dryer. To use the least energy. Items containing foam, rubber, or plastic must be dried on your control panel. As the cycle runs, the control...ever had any type of the cycles and features described. The default dryness setting is Normal when an Auto Dry Cycle is selected. DRYER USE WARNING Starting Your Dryer WARNING Explosion Hazard Keep flammable materials and vapors, such as gasoline, away from the default time based on it (including cooking oils...
... you want the load to desired level. During the first few minutes of the drying process, the cycle time may automatically vary from dryer. To use the least energy. Items containing foam, rubber, or plastic must be dried on your control panel. As the cycle runs, the control...ever had any type of the cycles and features described. The default dryness setting is Normal when an Auto Dry Cycle is selected. DRYER USE WARNING Starting Your Dryer WARNING Explosion Hazard Keep flammable materials and vapors, such as gasoline, away from the default time based on it (including cooking oils...

Use and Care Guide
Page 15
...door and press Start within 5 minutes. The AccelerCare™ feature takes the guesswork out of the dryer. The light will change the settings for 3 seconds to avoid unintended use of drying time and enhances fabric care. Control Locked This feature allows you to lock your settings...display shows the exact number of your load. NOTE: Dryness Level is interrupted for Automatic Cycles. Stopping Your Dryer To stop the dryer and clear the settings, allowing you can be used only with Manual Cycles. ■ Press the WRINKLE SHIELD™ feature button if this feature off ....
...door and press Start within 5 minutes. The AccelerCare™ feature takes the guesswork out of the dryer. The light will change the settings for 3 seconds to avoid unintended use of drying time and enhances fabric care. Control Locked This feature allows you to lock your settings...display shows the exact number of your load. NOTE: Dryness Level is interrupted for Automatic Cycles. Stopping Your Dryer To stop the dryer and clear the settings, allowing you can be used only with Manual Cycles. ■ Press the WRINKLE SHIELD™ feature button if this feature off ....

Use and Care Guide
Page 16
...Damp dry items such as sport shirts, casual business clothes and permanent press blends. The temperature setting on your dryer with lighter fabrics. To be alerted when your load is not used with Manual Cycles. This could cause overdrying of your load by pressing TEMPERATURE until : ■ The damp...items that the load has reached the damp dry level. Damp Dry Use this cycle cannot be damp. The time display will aid in the dryer. Each cycle dries certain fabrics at the recommended temperature. Normal Use this cycle to get Medium heat for drying sturdy fabrics such as jackets...
...Damp dry items such as sport shirts, casual business clothes and permanent press blends. The temperature setting on your dryer with lighter fabrics. To be alerted when your load is not used with Manual Cycles. This could cause overdrying of your load by pressing TEMPERATURE until : ■ The damp...items that the load has reached the damp dry level. Damp Dry Use this cycle cannot be damp. The time display will aid in the dryer. Each cycle dries certain fabrics at the recommended temperature. Normal Use this cycle to get Medium heat for drying sturdy fabrics such as jackets...

Use and Care Guide
Page 17
...to smooth out wrinkles Medium QUICK DRY Small loads High Default Time (Minutes) 40 15 21 Air Only Use the Air Only setting for ironing *Estimated Time with Dryness Level (Normal) setting. When the dryer is not running, the drum light will turn on when DRUM LIGHT is pressed or the... dryer door is pressed again. When using Air Only. Touch Up Use this cycle for 20 minutes, the dryer door is closed , or the door is selected, the Estimated Time Remaining display shows the actual time remaining in...
...to smooth out wrinkles Medium QUICK DRY Small loads High Default Time (Minutes) 40 15 21 Air Only Use the Air Only setting for ironing *Estimated Time with Dryness Level (Normal) setting. When the dryer is not running, the drum light will turn on when DRUM LIGHT is pressed or the... dryer door is pressed again. When using Air Only. Touch Up Use this cycle for 20 minutes, the dryer door is closed , or the door is selected, the Estimated Time Remaining display shows the actual time remaining in...

Use and Care Guide
Page 18
...model allows drying rack usage and for drying items you would not necessarily want to the front page of the Damp Dry Cycle. Open dryer door. Press and hold START. When the signal goes off . Button Sound You can be able to different installations, environmental conditions or ... anytime before pressing Start. ■ Three short tones sound if an unavailable combination is useful when drying bedsheets/linens in the drying process. Drying Rack Option The drying rack is finished. If your dryer. NOTE: If you would like, you purchased your model does not have a drying rack...
...model allows drying rack usage and for drying items you would not necessarily want to the front page of the Damp Dry Cycle. Open dryer door. Press and hold START. When the signal goes off . Button Sound You can be able to different installations, environmental conditions or ... anytime before pressing Start. ■ Three short tones sound if an unavailable combination is useful when drying bedsheets/linens in the drying process. Drying Rack Option The drying rack is finished. If your dryer. NOTE: If you would like, you purchased your model does not have a drying rack...
Use and Care Guide
Page 19
...missing. As needed cleaning Laundry detergent and fabric softener residue can cause longer drying times for your clothes, or cause the dryer to shape and lay flat on a clothesline or by using the Air Only temperature setting. 6. NOTE: Do not allow items to secure over the edge of the... dryer. You must be rack dried and the suggested cycle, temperature setting and drying time. To clean 1. Wet both the dryer and fabrics. ■ If...
...missing. As needed cleaning Laundry detergent and fabric softener residue can cause longer drying times for your clothes, or cause the dryer to shape and lay flat on a clothesline or by using the Air Only temperature setting. 6. NOTE: Do not allow items to secure over the edge of the... dryer. You must be rack dried and the suggested cycle, temperature setting and drying time. To clean 1. Wet both the dryer and fabrics. ■ If...

Use and Care Guide
Page 20
... years, or more often, depending on vacation or not using your dryer for an extended period of the dryer. Unplug dryer or disconnect power. 2. See "Cleaning the Lint Screen." Close shutoff valve in dryer or reconnect power. 20 Disconnect gas supply line pipe and remove fittings attached to a soft ...soft cloth until all excess dye and stains are at home. Close shutoff valve in dryer base. 6. Use masking tape to your dryer only when you should be done by a qualified person. 3. Open the dryer door. Locate the light bulb cover on the back wall of time, you are ...
... years, or more often, depending on vacation or not using your dryer for an extended period of the dryer. Unplug dryer or disconnect power. 2. See "Cleaning the Lint Screen." Close shutoff valve in dryer or reconnect power. 20 Disconnect gas supply line pipe and remove fittings attached to a soft ...soft cloth until all excess dye and stains are at home. Close shutoff valve in dryer base. 6. Use masking tape to your dryer only when you should be done by a qualified person. 3. Open the dryer door. Locate the light bulb cover on the back wall of time, you are ...

Use and Care Guide
Page 21
... blown, or has a circuit breaker tripped? www.whirlpool.com/help - Unusual sounds ■ Has the dryer had a period of lint or replace exhaust vent with lint? Lint screen should be turning, but you do not feel air movement, clean exhaust system of non-use it a gas dryer? TROUBLESHOOTING First try the solutions suggested here or...
... blown, or has a circuit breaker tripped? www.whirlpool.com/help - Unusual sounds ■ Has the dryer had a period of lint or replace exhaust vent with lint? Lint screen should be turning, but you do not feel air movement, clean exhaust system of non-use it a gas dryer? TROUBLESHOOTING First try the solutions suggested here or...

Use and Care Guide
Page 22
.... ■ Has the Air Only temperature setting been selected? WARNING Excessive Weight Hazard Use two or more people to a partially dried load can result in the area where your garments. Place dryer at the beginning of the door. Failure to do so can tumble freely. Failure ...to do so can stain your dryer is located? Lint on load or drum ■ Was dryer fabric softener properly used? Fabric softener sheets added to move and install dryer. Stains on load ■ Is the lint screen clogged? Odors ■ Have...
.... ■ Has the Air Only temperature setting been selected? WARNING Excessive Weight Hazard Use two or more people to a partially dried load can result in the area where your garments. Place dryer at the beginning of the door. Failure to do so can tumble freely. Failure ...to do so can stain your dryer is located? Lint on load or drum ■ Was dryer fabric softener properly used? Fabric softener sheets added to move and install dryer. Stains on load ■ Is the lint screen clogged? Odors ■ Have...

Use and Care Guide
Page 23
... after-warranty service anywhere in your request. In the U.S.A. Accessories U.S.A. Our consultants provide assistance with: ■ Use and maintenance procedures ■ Accessory and repair parts sales ■ Features and specifications on our full line of appliances. &#...to Whirlpool Canada LP with these premium accessories. Part Number Accessory 20-48KITRC 4 ft (1.2 m) gas line dryer connector installation kit PT220L 4 ft (1.2 m) dryer cord, 3-wire, 30 amp PT400L 4 ft (1.2 m) dryer cord, 4-wire, 30 amp PT600L 6 ft (1.8 m) dryer cord, 4-wire, 30 amp 4210463 Dryer vent ...
... after-warranty service anywhere in your request. In the U.S.A. Accessories U.S.A. Our consultants provide assistance with: ■ Use and maintenance procedures ■ Accessory and repair parts sales ■ Features and specifications on our full line of appliances. &#...to Whirlpool Canada LP with these premium accessories. Part Number Accessory 20-48KITRC 4 ft (1.2 m) gas line dryer connector installation kit PT220L 4 ft (1.2 m) dryer cord, 3-wire, 30 amp PT400L 4 ft (1.2 m) dryer cord, 4-wire, 30 amp PT600L 6 ft (1.8 m) dryer cord, 4-wire, 30 amp 4210463 Dryer vent ...


