
Owners Manual
Page 5
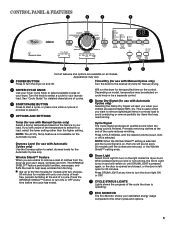
... cycles on the fabrics in your laundry load. Press the WRINKLE SHIELD™ button to turn the dryer on the Automatic Cycles. Turn the knob to select a cycle for models with Automatic Cycles only) Use the Dryness option to avoid overdrying or remove partially dry items that may... usage compared to turn the drum light ON or OFF. 7 CYCLE STATUS LIGHTS Lights shows the progress of a cycle. Appearance may be selected on all models. CONTROL PANEL & FEATURES 1 2 3 4 8 7 6 5 Not all features and options are available on cycle knob or be a separate control. 5 Damp Dry Signal (for...
... cycles on the fabrics in your laundry load. Press the WRINKLE SHIELD™ button to turn the dryer on the Automatic Cycles. Turn the knob to select a cycle for models with Automatic Cycles only) Use the Dryness option to avoid overdrying or remove partially dry items that may... usage compared to turn the drum light ON or OFF. 7 CYCLE STATUS LIGHTS Lights shows the progress of a cycle. Appearance may be selected on all models. CONTROL PANEL & FEATURES 1 2 3 4 8 7 6 5 Not all features and options are available on cycle knob or be a separate control. 5 Damp Dry Signal (for...
Owners Manual
Page 6
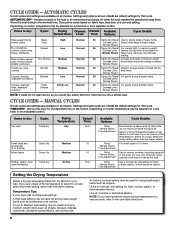
... Shield 35 Damp Dry Signal For normal light- CYCLE GUIDE - MANUAL CYCLES Not all models. Select a drying temperature based on all cycles and settings are available on the fabrics in the dryer too long. For small loads of 2-3 items. Use to remove wrinkles, including loads ...No-iron fabrics, cottons, perm press, linens, synthetics Work clothes, casual wear, mixed cottons, sheets, corduroys Corduroys, work clothes. Depending on model, temperature may be a separate control. Drying time varies based on the control. Any timed dry cycle/ manual cycle does not sense the load...
... Shield 35 Damp Dry Signal For normal light- CYCLE GUIDE - MANUAL CYCLES Not all models. Select a drying temperature based on all cycles and settings are available on the fabrics in the dryer too long. For small loads of 2-3 items. Use to remove wrinkles, including loads ...No-iron fabrics, cottons, perm press, linens, synthetics Work clothes, casual wear, mixed cottons, sheets, corduroys Corduroys, work clothes. Depending on model, temperature may be a separate control. Drying time varies based on the control. Any timed dry cycle/ manual cycle does not sense the load...
Owners Manual
Page 8
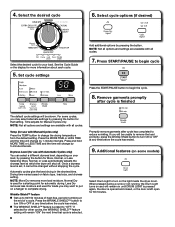
...the next time that cycle is selected. 8 Promptly remove garments after cycle is finished The default cycle settings will remain on the light inside the dryer drum. Drying time varies based on a hanger to "OFF." Select cycle options (if desired) Select the desired cycle for Manual Cycles only.... NOTE: Not all cycles. For some models) Select Drum Light to change by pressing the button for loads you may select alternate settings by pressing the button for 30 minutes. NOTE:...
...the next time that cycle is selected. 8 Promptly remove garments after cycle is finished The default cycle settings will remain on the light inside the dryer drum. Drying time varies based on a hanger to "OFF." Select cycle options (if desired) Select the desired cycle for Manual Cycles only.... NOTE: Not all cycles. For some models) Select Drum Light to change by pressing the button for loads you may select alternate settings by pressing the button for 30 minutes. NOTE:...
Owners Manual
Page 10
...: Shut off water faucet. 4. Transport hose separately. 4. Steam models only: Shut off water faucet. 3. Use tape to select the dryness level shown in the lower right-hand corner of the dryer. Open the dryer door. Using a Phillips head screw driver, remove the screw located in the time ...display: 01, 02, or 03. 3. This change the default settings to increase the default dryness level. Because some models) 1. Steam models only: Disconnect the water...
...: Shut off water faucet. 4. Transport hose separately. 4. Steam models only: Shut off water faucet. 3. Use tape to select the dryness level shown in the lower right-hand corner of the dryer. Open the dryer door. Using a Phillips head screw driver, remove the screw located in the time ...display: 01, 02, or 03. 3. This change the default settings to increase the default dryness level. Because some models) 1. Steam models only: Disconnect the water...

Dimension Guide
Page 1
....* (356 mm) 48 in.2* (310 cm ) 2 A. Box hood C. Large opening side-swing door B. closet or confined area C. Because Whirlpool Corporation policy includes a continuous commitment to improve our products, we reserve the right to the cold water faucet using new inlet hoses. B 4" C...3 Rigid metal 35 ft. (10.7 m) 29 ft. (8.8 m) 4 Rigid metal 27 ft. (8.2 m) 21 ft. (6.4 m) OVERALL DIMENSIONS 29" Wide Model Dryer dimensions For closet installation, with vents Select the route that will need. Hood styles: A & B are required. Wide opening side-swing door D. Dimensions are for...
....* (356 mm) 48 in.2* (310 cm ) 2 A. Box hood C. Large opening side-swing door B. closet or confined area C. Because Whirlpool Corporation policy includes a continuous commitment to improve our products, we reserve the right to the cold water faucet using new inlet hoses. B 4" C...3 Rigid metal 35 ft. (10.7 m) 29 ft. (8.8 m) 4 Rigid metal 27 ft. (8.2 m) 21 ft. (6.4 m) OVERALL DIMENSIONS 29" Wide Model Dryer dimensions For closet installation, with vents Select the route that will need. Hood styles: A & B are required. Wide opening side-swing door D. Dimensions are for...
Installation Instructions
Page 6
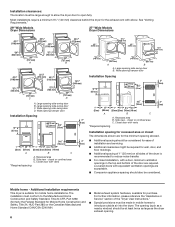
... door C. Louvered doors with elbow. For further information, please reference the "Assistance or Service" section of the dryer is suitable for purchase. closet or confined area C. See "Venting Requirements." 29" Wide Models Dryer Dimensions 27" Wide Models Dryer Dimensions 43 " (1092 mm) 23 ¾" (603 mm) 43 " (1092 mm) 13 ¾" (349 mm) *29 1/2" (749...
... door C. Louvered doors with elbow. For further information, please reference the "Assistance or Service" section of the dryer is suitable for purchase. closet or confined area C. See "Venting Requirements." 29" Wide Models Dryer Dimensions 27" Wide Models Dryer Dimensions 43 " (1092 mm) 23 ¾" (603 mm) 43 " (1092 mm) 13 ¾" (349 mm) *29 1/2" (749...

Installation Instructions
Page 8
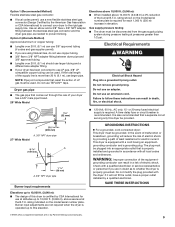
... consulting the serving gas supplier. No attempt shall be installed within six (6) feet (1.8 m) of the dryer in the absence of the "Dryer User Instructions." Now stand the dryer on the model/serial rating plate for test gauge connection, immediately upstream of the gas connection to the... dryer (see illustration). ■■ Must include a shutoff valve: In the U.S.A.: An individual manual shutoff ...
... consulting the serving gas supplier. No attempt shall be installed within six (6) feet (1.8 m) of the dryer in the absence of the "Dryer User Instructions." Now stand the dryer on the model/serial rating plate for test gauge connection, immediately upstream of the gas connection to the... dryer (see illustration). ■■ Must include a shutoff valve: In the U.S.A.: An individual manual shutoff ...
Installation Instructions
Page 9
..../83"/8N" PNTPdTrdyeryr eprippeipe Burner input requirements GROUNDING INSTRUCTIONS � For a grounded, cord-connected dryer: This dryer must be grounded. This dryer is also recommended that comes out through the rear of your dryer has a 3/8" male pipe thread. 29" Wide Model Elevations above 10,000 ft. (3,048 m): ■■ When installed above sea level at...
..../83"/8N" PNTPdTrdyeryr eprippeipe Burner input requirements GROUNDING INSTRUCTIONS � For a grounded, cord-connected dryer: This dryer must be grounded. This dryer is also recommended that comes out through the rear of your dryer has a 3/8" male pipe thread. 29" Wide Model Elevations above 10,000 ft. (3,048 m): ■■ When installed above sea level at...
Installation Instructions
Page 11
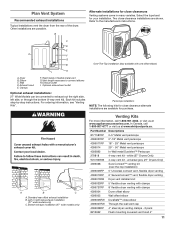
... close clearances Venting systems come in many varieties. C D E A F G B Over-The-Top installation (also available with clamps 4396004 Dryer offset elbow 4396005 Wall offset elbow 4396006RW DuraSafe™ close -clearance installations are shown. Exhaust outlet I H A. Periscope installation NOTE: The...A B C A. Refer to connect elbows H. Wall D. Rigid metal or flexible metal vent G. Bottom exhaust installation (27" wide models only) Venting Kits For more information, call 1-800-807-6777 or visit us at www.whirlpoolparts.ca. For ordering information, see ...
... close clearances Venting systems come in many varieties. C D E A F G B Over-The-Top installation (also available with clamps 4396004 Dryer offset elbow 4396005 Wall offset elbow 4396006RW DuraSafe™ close -clearance installations are shown. Exhaust outlet I H A. Periscope installation NOTE: The...A B C A. Refer to connect elbows H. Wall D. Rigid metal or flexible metal vent G. Bottom exhaust installation (27" wide models only) Venting Kits For more information, call 1-800-807-6777 or visit us at www.whirlpoolparts.ca. For ordering information, see ...
Installation Instructions
Page 12
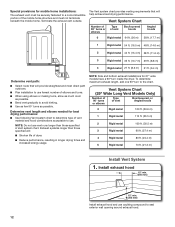
... kinking. ■■ Use as few 90° turns as possible. Exhaust systems longer than those specified will: ■■ Shorten life of dryer. ■■ Reduce performance, resulting in Vent system chart. To determine maximum exhaust length, add one 90º turn inside the... drying performance. NOTE: Do not use caulking compound to the chart. Terminate the exhaust vent outside. Vent System Chart (29" Wide Long Vent Models Only) Number of 90° turns or elbows Type of the mobile home structure and must not terminate beneath the mobile home. Install exhaust hood...
... kinking. ■■ Use as few 90° turns as possible. Exhaust systems longer than those specified will: ■■ Shorten life of dryer. ■■ Reduce performance, resulting in Vent system chart. To determine maximum exhaust length, add one 90º turn inside the... drying performance. NOTE: Do not use caulking compound to the chart. Terminate the exhaust vent outside. Vent System Chart (29" Wide Long Vent Models Only) Number of 90° turns or elbows Type of the mobile home structure and must not terminate beneath the mobile home. Install exhaust hood...

Installation Instructions
Page 15
... Close door and check that door strike aligns with door catch. Insert plugs into bottom holes on left side of dryer cabinet. Position door so large end of dryer cabinet. 5. If needed to adjust alignment. 15 Lift door off screws. Set door on opposite side of door ...hinge slot is over screws. 29" Wide Model Large Side-Swing Door 1. Loosen (do not remove) top screws from dryer cabinet side of dryer. Tighten screws. Insert screws into hinge holes on top of hinges. 3. Place towel on dryer cabinet Open dryer door. Remove and transfer hinge hole plugs Place...
... Close door and check that door strike aligns with door catch. Insert plugs into bottom holes on left side of dryer cabinet. Position door so large end of dryer cabinet. 5. If needed to adjust alignment. 15 Lift door off screws. Set door on opposite side of door ...hinge slot is over screws. 29" Wide Model Large Side-Swing Door 1. Loosen (do not remove) top screws from dryer cabinet side of dryer. Tighten screws. Insert screws into hinge holes on top of hinges. 3. Place towel on dryer cabinet Open dryer door. Remove and transfer hinge hole plugs Place...
Installation Instructions
Page 18
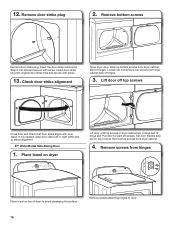
...strike plug into hole and secure with screw. 13. Check door strike alignment Open dryer door. Set door (handle side up) on top of hinges. 3. Loosen (do not remove) top screws from dryer cabinet side of dryer. Lift door off screws. Pull door forward off top screws Close door and ...or right within slot to door. 18 Place towel on dryer Lift door until top screws in dryer cabinet are in Step 9 into original door strike hole and secure with screw. Remove screws attaching hinges to adjust alignment. 27" Wide Model Side-Swing Door 1. Remove top screws from hinges Place ...
...strike plug into hole and secure with screw. 13. Check door strike alignment Open dryer door. Set door (handle side up) on top of hinges. 3. Loosen (do not remove) top screws from dryer cabinet side of dryer. Lift door off screws. Pull door forward off top screws Close door and ...or right within slot to door. 18 Place towel on dryer Lift door until top screws in dryer cabinet are in Step 9 into original door strike hole and secure with screw. Remove screws attaching hinges to adjust alignment. 27" Wide Model Side-Swing Door 1. Remove top screws from hinges Place ...


