Use and Care Guide
Page 3
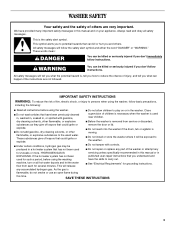
... Under certain conditions, hydrogen gas may be exposed to carry out. As the gas is moving. ■ Do not install or store the washer where it will release ■ See "Electrical Requirements" for 2 weeks or more. dry-cleaning solvents, other flammable, or explosive substances to ... user-repair instructions that has not been used near children. All safety messages will follow instructions. This will be produced in the washer. WASHER SAFETY Your safety and the safety of others . We have provided many important safety messages in this manual and on or in ...
... Under certain conditions, hydrogen gas may be exposed to carry out. As the gas is moving. ■ Do not install or store the washer where it will release ■ See "Electrical Requirements" for 2 weeks or more. dry-cleaning solvents, other flammable, or explosive substances to ... user-repair instructions that has not been used near children. All safety messages will follow instructions. This will be produced in the washer. WASHER SAFETY Your safety and the safety of others . We have provided many important safety messages in this manual and on or in ...
Use and Care Guide
Page 4
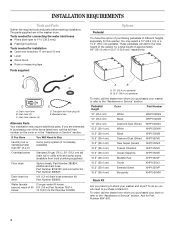
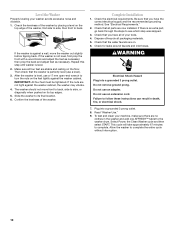
... the items listed here, call the dealer from local plumbing suppliers) Floor drain Siphon break, Part Number 285834; If you purchased your washer and dryer? Transport bolt hole plug (4) E. If You Have You Will Need to the "Assistance or Service" section. Ask for ...connecting the water inlet hoses Pliers (that open to stack your dryer or refer to purchase a Stack Kit. Tools needed for this washer. additional drain hose Part Number 8318155; The parts supplied are interested in purchasing one of fill 6 ft (1.8 m) Part Number 76314, hoses 10...
... the items listed here, call the dealer from local plumbing suppliers) Floor drain Siphon break, Part Number 285834; If you purchased your washer and dryer? Transport bolt hole plug (4) E. If You Have You Will Need to the "Assistance or Service" section. Ask for ...connecting the water inlet hoses Pliers (that open to stack your dryer or refer to purchase a Stack Kit. Tools needed for this washer. additional drain hose Part Number 8318155; The parts supplied are interested in purchasing one of fill 6 ft (1.8 m) Part Number 76314, hoses 10...
Use and Care Guide
Page 5
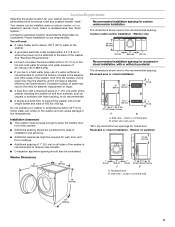
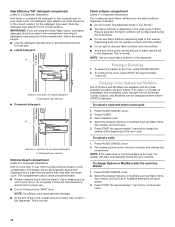
...) A B 3" (7.6 cm) Installation clearances ■ The location must be large enough to allow the washer door to the back of scale in temperatures below 32°F (0°C). Closet door with a total weight (water and load) of 1" (2.5 cm) under a custom counter, or in .2 * (310 cm2) 3" (7.6 cm...) ■ A sturdy and solid floor to control the buildup of the washer. See "Drain System." Recommended installation spacing for custom undercounter ...
...) A B 3" (7.6 cm) Installation clearances ■ The location must be large enough to allow the washer door to the back of scale in temperatures below 32°F (0°C). Closet door with a total weight (water and load) of 1" (2.5 cm) under a custom counter, or in .2 * (310 cm2) 3" (7.6 cm...) ■ A sturdy and solid floor to control the buildup of the washer. See "Drain System." Recommended installation spacing for custom undercounter ...

Use and Care Guide
Page 6
...spacing. ■ For cabinet installation, with a door, the minimum ventilation openings in the top are for recessed or closet installation, with stacked washer and dryer The dimensions shown are required. 7" (17.8 cm) 7" (17.8 cm) 30" min. (76.2 cm) A B Laundry ... (2.5 cm) (68.6 cm) (2.5 cm) 6 Recommended installation spacing for the recommended spacing. 48 in.2 * (310 cm2) 3"* (7.6 cm) Drain System The washer can be no higher than 17 gal. (64 L) per minute. Standpipe drain system - Additional hoses might be purchased separately. Select the drain hose installation method...
...spacing. ■ For cabinet installation, with a door, the minimum ventilation openings in the top are for recessed or closet installation, with stacked washer and dryer The dimensions shown are required. 7" (17.8 cm) 7" (17.8 cm) 30" min. (76.2 cm) A B Laundry ... (2.5 cm) (68.6 cm) (2.5 cm) 6 Recommended installation spacing for the recommended spacing. 48 in.2 * (310 cm2) 3"* (7.6 cm) Drain System The washer can be no higher than 17 gal. (64 L) per minute. Standpipe drain system - Additional hoses might be purchased separately. Select the drain hose installation method...

Use and Care Guide
Page 7
...not available, it is properly installed and grounded in a risk of the equipment- GROUNDING INSTRUCTIONS For a grounded, cord-connected washer: This washer must be plugged into an appropriate outlet that is the personal responsibility and obligation of the customer to whether the appliance is...a grounded metal, permanent wiring system, or an equipment grounding conductor must be run with the appliance - For a permanently connected washer: This washer must be connected to the equipment-grounding terminal or lead on the appliance. 7 Check with a power supply cord having an equipment...
...not available, it is properly installed and grounded in a risk of the equipment- GROUNDING INSTRUCTIONS For a grounded, cord-connected washer: This washer must be plugged into an appropriate outlet that is the personal responsibility and obligation of the customer to whether the appliance is...a grounded metal, permanent wiring system, or an equipment grounding conductor must be run with the appliance - For a permanently connected washer: This washer must be connected to the equipment-grounding terminal or lead on the appliance. 7 Check with a power supply cord having an equipment...

Use and Care Guide
Page 8
... injury. Attach the hose with the blue color indicator to the coupling can result. 8 Screw on coupling by hand until it is seated on the washer. 7. H. Damage to the Cold (right) water inlet valve. Attach hot water hose to the center of the hole and completely pull out the bolt,... already attached to your local service center. Close the bolt holes with the 4 transport bolt hole plugs. To avoid suspension and structural damage to the washer. Cold water inlet 5. Using pliers, check the tightness of the rear panel and close the hole with an additional two-thirds turn. NOTE: Do...
... injury. Attach the hose with the blue color indicator to the coupling can result. 8 Screw on coupling by hand until it is seated on the washer. 7. H. Damage to the Cold (right) water inlet valve. Attach hot water hose to the center of the hole and completely pull out the bolt,... already attached to your local service center. Close the bolt holes with the 4 transport bolt hole plugs. To avoid suspension and structural damage to the washer. Cold water inlet 5. Using pliers, check the tightness of the rear panel and close the hole with an additional two-thirds turn. NOTE: Do...
Use and Care Guide
Page 9
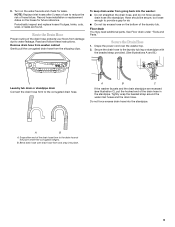
..., cuts, wear, or leaks are recessed (see illustration C), put the hooked end of the drain hose in the standpipe. Remove drain hose from washer cabinet Gently pull the corrugated drain hose from damage due to water leakage. See Floor drain under "Tools and Parts." Secure the drain hose to... for future reference. Floor drain You may need additional parts. Read and follow these instructions. To keep drain water from going back into the washer: ■ Do not straighten the drain hose, and do not force excess drain hose into standpipe. Snap either end of the drain hose ...
..., cuts, wear, or leaks are recessed (see illustration C), put the hooked end of the drain hose in the standpipe. Remove drain hose from washer cabinet Gently pull the corrugated drain hose from damage due to water leakage. See Floor drain under "Tools and Parts." Secure the drain hose to... for future reference. Floor drain You may need additional parts. Read and follow these instructions. To keep drain water from going back into the washer: ■ Do not straighten the drain hose, and do not force excess drain hose into standpipe. Snap either end of the drain hose ...
Use and Care Guide
Page 10
... be tightened. Confirm the levelness of /recycle all of the washer, first side to side, then front to its top edges. 5. Do not remove ground prong. Allow the washer to complete. Be sure that the washer is against a wall, move front to back, side to turn the nuts on the floor.... part, go back through the steps to the washer drum. Make sure all parts are now installed. After the washer is not level, first prop the front with a wood block and adjust the feet as necessary. The washer should not move the washer out slightly before tipping back. If there is level...
... be tightened. Confirm the levelness of /recycle all of the washer, first side to side, then front to its top edges. 5. Do not remove ground prong. Allow the washer to complete. Be sure that the washer is against a wall, move front to back, side to turn the nuts on the floor.... part, go back through the steps to the washer drum. Make sure all parts are now installed. After the washer is not level, first prop the front with a wood block and adjust the feet as necessary. The washer should not move the washer out slightly before tipping back. If there is level...

Use and Care Guide
Page 11
... at one time, which includes separate compartments for optimal cleaning and rinsing performance. High-Efficiency Wash System Your new front-loading, high-efficiency washer saves time with detergent first, then the water is then sprayed from garments. The 6-Point Suspension System reduces the amount...of stains from the top front onto the center of force transmitted to remove stains (such as a king-sized bedspread. The water is heated. Deep Clean with Steam This washer has a built-in and mixed with fewer, larger loads. Spin Speeds This washer automatically selects the spin speed...
... at one time, which includes separate compartments for optimal cleaning and rinsing performance. High-Efficiency Wash System Your new front-loading, high-efficiency washer saves time with detergent first, then the water is then sprayed from garments. The 6-Point Suspension System reduces the amount...of stains from the top front onto the center of force transmitted to remove stains (such as a king-sized bedspread. The water is heated. Deep Clean with Steam This washer has a built-in and mixed with fewer, larger loads. Spin Speeds This washer automatically selects the spin speed...
Use and Care Guide
Page 12
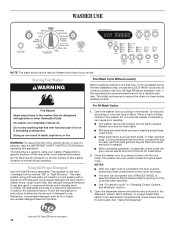
... light is normal during operation. Follow the manufacturer's instructions to use less detergent based on it (including cooking oils). Place a load of your washer. Use only HE High Efficiency detergent. 12 For All Wash Cycles 1. It is recommended that of sorted clothes in "Changing Cycles..., occasionally check under the gray colored seal at the front of detergent to determine the amount of the tub for this appliance. The washer door will create too much sudsing with equal amounts of this washer. Close drawer slowly to the detergent, bleach, fabric ...
... light is normal during operation. Follow the manufacturer's instructions to use less detergent based on it (including cooking oils). Place a load of your washer. Use only HE High Efficiency detergent. 12 For All Wash Cycles 1. It is recommended that of sorted clothes in "Changing Cycles..., occasionally check under the gray colored seal at the front of detergent to determine the amount of the tub for this appliance. The washer door will create too much sudsing with equal amounts of this washer. Close drawer slowly to the detergent, bleach, fabric ...

Use and Care Guide
Page 13
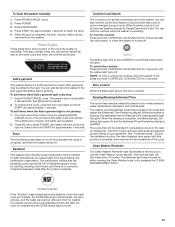
... glows, the door unlocks, and the wash load can be dispensed during Delay Wash, before the wash cycle begins. To begin the wash cycle later Select DELAY WASH until the desired delay time (in hours) shows in washer errors, longer cycle times, and reduced rinsing performance...the cycles by selecting POWER. Detergent type selector D. IMPORTANT: When delaying a cycle, use less detergent based on the washer by turning the cycle selector. Turn on load size. The preset settings provide the recommended fabric care for approximately 1 second. See "Options." 6. Select and hold START...
... glows, the door unlocks, and the wash load can be dispensed during Delay Wash, before the wash cycle begins. To begin the wash cycle later Select DELAY WASH until the desired delay time (in hours) shows in washer errors, longer cycle times, and reduced rinsing performance...the cycles by selecting POWER. Detergent type selector D. IMPORTANT: When delaying a cycle, use less detergent based on the washer by turning the cycle selector. Turn on load size. The preset settings provide the recommended fabric care for approximately 1 second. See "Options." 6. Select and hold START...
Use and Care Guide
Page 14
.... Do not spill or drip any time, press PAUSE/CANCEL. 2. To continue the cycle, press START (for load size. To cancel a cycle and select a new cycle 1. The washer powers down, the door unlocks, and clothes can be removed. Use a measuring cup with all cycles. Do not.... Select desired cycle. 4. Follow the manufacturer's directions for powdered detergent A. Dispensing balls will drain automatically before START is too high, the washer will not operate correctly with a selected cycle, the light will glow amber. If Extra Rinse is dispensed in this compartment for approximately 1 ...
.... Do not spill or drip any time, press PAUSE/CANCEL. 2. To continue the cycle, press START (for load size. To cancel a cycle and select a new cycle 1. The washer powers down, the door unlocks, and clothes can be removed. Use a measuring cup with all cycles. Do not.... Select desired cycle. 4. Follow the manufacturer's directions for powdered detergent A. Dispensing balls will drain automatically before START is too high, the washer will not operate correctly with a selected cycle, the light will glow amber. If Extra Rinse is dispensed in this compartment for approximately 1 ...
Use and Care Guide
Page 15
...found on clothing, bedding, and towels, and there is no carryover of the cycle the washer is locked. Controls Lock/Unlock The Controls Lock avoids unintended use the control lock feature to the load. The status light next to begin the drain. 5. The reminder light will automatically sense ...Estimated Time Remaining display. This will illuminate, the door unlocks, and the wash load can add an additional item to use the Clean Washer cycle regularly. You can be extended if oversudsing occurs or the load is off . 15 To lock the controls Press and hold CONTROLS LOCK/UNLOCK for...
...found on clothing, bedding, and towels, and there is no carryover of the cycle the washer is locked. Controls Lock/Unlock The Controls Lock avoids unintended use the control lock feature to the load. The status light next to begin the drain. 5. The reminder light will automatically sense ...Estimated Time Remaining display. This will illuminate, the door unlocks, and the wash load can add an additional item to use the Clean Washer cycle regularly. You can be extended if oversudsing occurs or the load is off . 15 To lock the controls Press and hold CONTROLS LOCK/UNLOCK for...

Use and Care Guide
Page 16
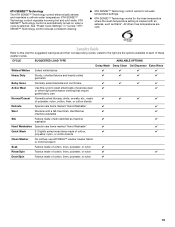
...Low Quick Wash Light (2-3 items) (0:25) Warm/Cold Extra High 16 Each cycle is designed for this cycle to the optimum temperature. Cycle Clean Washer Soil Level (cycle time) N/A (0:67) Water Temp N/A Spin Speed N/A Soak Normal (0:30) Warm/Cold No Spin Rinse/Spin Normal (0:22...bleach activity. Whitest Whites This cycle is especially designed for the selected cycle. An additional rinse provides optimal rinse performance to maintain load balance. Bulky Items Use this cycle to the desired cycle. The preset settings provide the recommended fabric care for gentle fabric care...
...Low Quick Wash Light (2-3 items) (0:25) Warm/Cold Extra High 16 Each cycle is designed for this cycle to the optimum temperature. Cycle Clean Washer Soil Level (cycle time) N/A (0:67) Water Temp N/A Spin Speed N/A Soak Normal (0:30) Warm/Cold No Spin Rinse/Spin Normal (0:22...bleach activity. Whitest Whites This cycle is especially designed for the selected cycle. An additional rinse provides optimal rinse performance to maintain load balance. Bulky Items Use this cycle to the desired cycle. The preset settings provide the recommended fabric care for gentle fabric care...

Use and Care Guide
Page 17
...starting a cycle anytime before the selected option begins. Clean Washer Use the Clean Washer cycle once a month to some cycles. See "Cleaning Your Washer" in a hurry. Drain without spinning to drain and spin your wash load. Between changes in stains. Available options will hear sounds ... will be interrupted. Soak Use the Soak cycle to wash small loads of normal washer operation. Quick Wash Use this cycle to clean machine washable woolen garments. (Check the care instructions to a load. Normal Washer Sounds As with all options are available with any new product, ...
...starting a cycle anytime before the selected option begins. Clean Washer Use the Clean Washer cycle once a month to some cycles. See "Cleaning Your Washer" in a hurry. Drain without spinning to drain and spin your wash load. Between changes in stains. Available options will hear sounds ... will be interrupted. Soak Use the Soak cycle to wash small loads of normal washer operation. Quick Wash Use this cycle to clean machine washable woolen garments. (Check the care instructions to a load. Normal Washer Sounds As with all options are available with any new product, ...

Use and Care Guide
Page 18
...: When delaying a cycle, use the Clean Washer cycle regularly. Deep Clean with Steam Use this option when using the "Oxi / Color-safe bleach" section of the selected wash cycle is helpful when you suspect as blood and grass. Oxi Dispenser Use this option for heavily soiled loads that you to remove. 18 Selecting...
...: When delaying a cycle, use the Clean Washer cycle regularly. Deep Clean with Steam Use this option when using the "Oxi / Color-safe bleach" section of the selected wash cycle is helpful when you suspect as blood and grass. Oxi Dispenser Use this option for heavily soiled loads that you to remove. 18 Selecting...
Use and Care Guide
Page 19
... items marked "Hand Washable" Quick Wash 2-3 lightly soiled wear items made of cotton, polyester, nylon, or cotton blends Clean Washer No clothes, use AFFRESH™ washer cleaner tablet or chlorine bleach Soak Fabrics made of cotton, linen, polyester, or nylon Rinse/Spin Fabrics made of cotton, linen... a cycle is marked with a felt-free finish, identified as machine washable Silk Fabrics made of these washer cycles. Laundry Guide Refer to this cycle to wash small loads of exercise wear or other rinse temperatures are the options available to the right are cold. Listed to ...
... items marked "Hand Washable" Quick Wash 2-3 lightly soiled wear items made of cotton, polyester, nylon, or cotton blends Clean Washer No clothes, use AFFRESH™ washer cleaner tablet or chlorine bleach Soak Fabrics made of cotton, linen, polyester, or nylon Rinse/Spin Fabrics made of cotton, linen... a cycle is marked with a felt-free finish, identified as machine washable Silk Fabrics made of these washer cycles. Laundry Guide Refer to this cycle to wash small loads of exercise wear or other rinse temperatures are the options available to the right are cold. Listed to ...
Use and Care Guide
Page 20
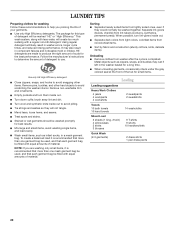
...as zippers, snaps, and buckles may also result in the washer basket for a long time. Turn down cuffs; When unloading garments, occasionally check under the gray colored seal at the front of detergent to avoid pilling. It may rust if left in...High Efficiency." LAUNDRY TIPS Preparing clothes for washing Follow these recommendations to avoid scratching the washer interior. Follow the manufacturer's instructions to determine the amount of the tub for small items. Loading Loading suggestions Heavy Work Clothes 4 jeans 4 workpants 4 workshirts 2 sweatpants 2 sweatshirts Towels ...
...as zippers, snaps, and buckles may also result in the washer basket for a long time. Turn down cuffs; When unloading garments, occasionally check under the gray colored seal at the front of detergent to avoid pilling. It may rust if left in...High Efficiency." LAUNDRY TIPS Preparing clothes for washing Follow these recommendations to avoid scratching the washer interior. Follow the manufacturer's instructions to determine the amount of the tub for small items. Loading Loading suggestions Heavy Work Clothes 4 jeans 4 workpants 4 workshirts 2 sweatpants 2 sweatshirts Towels ...
Use and Care Guide
Page 21
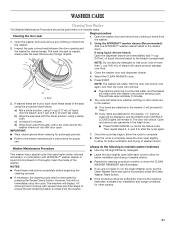
... you are detected in the washer, "rL" (remove load) will be displayed, and the WASH and CONTROLS LOCKED lights will display "int" (interrupt) and continue with several rinse and drain steps to ensure that uses higher water volumes and steam, in the wash drum. If using a damp cloth. Pull back the seal to...
... you are detected in the washer, "rL" (remove load) will be displayed, and the WASH and CONTROLS LOCKED lights will display "int" (interrupt) and continue with several rinse and drain steps to ensure that uses higher water volumes and steam, in the wash drum. If using a damp cloth. Pull back the seal to...

Use and Care Guide
Page 22
...To avoid suspension and structural damage to your washer during freezing weather, put in 1 qt (1 L) of HE detergent for a medium-size load, to clean the washer and remove the antifreeze, if used . Vacation, Storage, and Moving Care Install and store your washer only when you are at home. Put ...8260;2 the manufacturer's recommended amount of R.V.-type antifreeze in the drum. If storing or moving your washer, it . To transport the washer: 1. When replacing your washer for a medium-size load, to the rear panel of replacement. Use mild soap and water. Turn on vacation or not using...
...To avoid suspension and structural damage to your washer during freezing weather, put in 1 qt (1 L) of HE detergent for a medium-size load, to clean the washer and remove the antifreeze, if used . Vacation, Storage, and Moving Care Install and store your washer only when you are at home. Put ...8260;2 the manufacturer's recommended amount of R.V.-type antifreeze in the drum. If storing or moving your washer, it . To transport the washer: 1. When replacing your washer for a medium-size load, to the rear panel of replacement. Use mild soap and water. Turn on vacation or not using...


