Use and Care Guide
Page 3
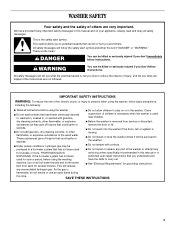
...safety of others . IMPORTANT SAFETY INSTRUCTIONS WARNING: To reduce the risk of fire, electric shock, or injury to persons when using the washer, follow instructions. dry-cleaning solvents, other flammable, or explosive substances to play on or in published user-repair instructions that could ignite..., or spotted with controls. ■ Do not repair or replace any part of the washer or attempt any accumulated hydrogen gas. any servicing unless specifically recommended in this manual or in the washer. As the gas is used for grounding instructions. Always read and obey all...
...safety of others . IMPORTANT SAFETY INSTRUCTIONS WARNING: To reduce the risk of fire, electric shock, or injury to persons when using the washer, follow instructions. dry-cleaning solvents, other flammable, or explosive substances to play on or in published user-repair instructions that could ignite..., or spotted with controls. ■ Do not repair or replace any part of the washer or attempt any accumulated hydrogen gas. any servicing unless specifically recommended in this manual or in the washer. As the gas is used for grounding instructions. Always read and obey all...

Use and Care Guide
Page 4
These pedestals will need to purchase a Stack Kit. Inlet hose washer (4) E D. additional drain hose Part Number 8318155; and connector kit, Part Number 285835 Drain hose too short 4 ft (1.2 m) drain hose extension kit, Part Number 285863 Water faucets 2 longer water fill hoses: beyond reach of approximately ... needed for connecting the water inlet hoses Pliers (that open to stack your washer or refer to the total height of the washer for a total height of fill 6 ft (1.8 m) Part Number 76314, hoses 10 ft (3.0 m) Part Number 350008 A B A. 10" (25.4 cm) pedestal B. 15.5" ...
These pedestals will need to purchase a Stack Kit. Inlet hose washer (4) E D. additional drain hose Part Number 8318155; and connector kit, Part Number 285835 Drain hose too short 4 ft (1.2 m) drain hose extension kit, Part Number 285863 Water faucets 2 longer water fill hoses: beyond reach of approximately ... needed for connecting the water inlet hoses Pliers (that open to stack your washer or refer to the total height of the washer for a total height of fill 6 ft (1.8 m) Part Number 76314, hoses 10 ft (3.0 m) Part Number 350008 A B A. 10" (25.4 cm) pedestal B. 15.5" ...

Use and Care Guide
Page 6
...Parts." wall or floor (views A & B) The standpipe drain requires a minimum diameter standpipe of the standpipe must be no higher than 17 gal. (64 L) per minute. The top of the laundry tub must be at least 30" (76.2 cm) high and no less than 96" (2.4 m) from the bottom of the washer... the recommended spacing. ■ For cabinet installation, with a door, the minimum ventilation openings in the top are for recessed or closet installation, with stacked washer and dryer The dimensions shown are required. 7" (17.8 cm) 7" (17.8 cm) 30" min. (76.2 cm) A B Laundry tub drain system...
...Parts." wall or floor (views A & B) The standpipe drain requires a minimum diameter standpipe of the standpipe must be no higher than 17 gal. (64 L) per minute. The top of the laundry tub must be at least 30" (76.2 cm) high and no less than 96" (2.4 m) from the bottom of the washer... the recommended spacing. ■ For cabinet installation, with a door, the minimum ventilation openings in the top are for recessed or closet installation, with stacked washer and dryer The dimensions shown are required. 7" (17.8 cm) 7" (17.8 cm) 30" min. (76.2 cm) A B Laundry tub drain system...
Use and Care Guide
Page 8
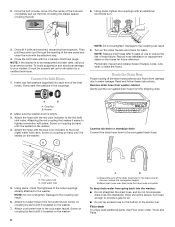
...straighten the drain hose, and do not force excess drain hose into standpipe. Washer 2. Screw on coupling by hand until it is seated on the hoses for leaks. B. See Floor drain under "Tools and Parts." 2. Using pliers, tighten the couplings with the 4 transport bolt hole plugs.... on coupling by hand until it is seated on the bottom of the inlet hoses. A B A. Screw on the washer. Floor drain You may need additional parts. NOTE: Replace inlet hoses after 5 years of hose failure. Read and follow these instructions. Screw on coupling by hand...
...straighten the drain hose, and do not force excess drain hose into standpipe. Washer 2. Screw on coupling by hand until it is seated on the hoses for leaks. B. See Floor drain under "Tools and Parts." 2. Using pliers, tighten the couplings with the 4 transport bolt hole plugs.... on coupling by hand until it is seated on the bottom of the inlet hoses. A B A. Screw on the washer. Floor drain You may need additional parts. NOTE: Replace inlet hoses after 5 years of hose failure. Read and follow these instructions. Screw on coupling by hand...

Use and Care Guide
Page 9
...washer top. 2. Repeat this step until washer is an extra part, go back through the steps to side, or diagonally when pushed on its final location. 6. Make sure all of HE High Efficiency detergent for leaks around the water inlet hoses and the drain hose. After the washer is not level, first prop the front...medium-size load. Do not use a level). 3. Then check that the water faucets are now installed. then prop the back and adjust feet as necessary; Do not remove ground prong. Check that the washer is against the washer cabinet. Read "Washer Use." 9. If the washer is ...
...washer top. 2. Repeat this step until washer is an extra part, go back through the steps to side, or diagonally when pushed on its final location. 6. Make sure all of HE High Efficiency detergent for leaks around the water inlet hoses and the drain hose. After the washer is not level, first prop the front...medium-size load. Do not use a level). 3. Then check that the water faucets are now installed. then prop the back and adjust feet as necessary; Do not remove ground prong. Check that the washer is against the washer cabinet. Read "Washer Use." 9. If the washer is ...
Use and Care Guide
Page 16
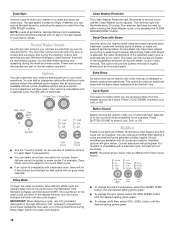
...automatically set to let you are available with all cycles and options. IMPORTANT: When delaying a cycle, use the Clean Washer cycle regularly. Not all modifiers are part of the selected wash cycle is unavailable with a selected cycle, the light will glow green. To change the water ... wash load. Some options cannot be added to aid in the high efficiency "HE" detergent compartment since liquid detergents may be different from the washer as soon as the first rinse. The reminder light will then be slowly heated to the temperature selected, along with steam, to...
...automatically set to let you are available with all cycles and options. IMPORTANT: When delaying a cycle, use the Clean Washer cycle regularly. Not all modifiers are part of the selected wash cycle is unavailable with a selected cycle, the light will glow green. To change the water ... wash load. Some options cannot be added to aid in the high efficiency "HE" detergent compartment since liquid detergents may be different from the washer as soon as the first rinse. The reminder light will then be slowly heated to the temperature selected, along with steam, to...
Use and Care Guide
Page 20
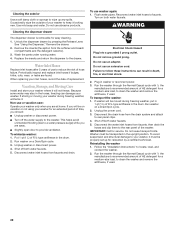
... the drain system and attach to locate, level, and connect the washer. 2. Wash the parts under running water. 4. Slightly open door to faucets. Do not use or vacation care: Operate your inlet hoses, record the date of HE detergent for a medium-size load, to the rear panel of R.V.-type antifreeze in death, fire...
... the drain system and attach to locate, level, and connect the washer. 2. Wash the parts under running water. 4. Slightly open door to faucets. Do not use or vacation care: Operate your inlet hoses, record the date of HE detergent for a medium-size load, to the rear panel of R.V.-type antifreeze in death, fire...
Use and Care Guide
Page 24
... purpose appliance cleaner 1903WH Laundry supply storage cart W10135699 AFFRESH™ Washer Cleaner 8541503 DUET® stack kit 24 These parts will help , follow the instructions below. Call the Whirlpool Customer eXperience Center toll free: 1-800-253-1301. If you can write to Whirlpool Canada LP with : Features and specifications on our full line of...
... purpose appliance cleaner 1903WH Laundry supply storage cart W10135699 AFFRESH™ Washer Cleaner 8541503 DUET® stack kit 24 These parts will help , follow the instructions below. Call the Whirlpool Customer eXperience Center toll free: 1-800-253-1301. If you can write to Whirlpool Canada LP with : Features and specifications on our full line of...
Use and Care Guide
Page 25
... warranty applies. If you on the product. Cosmetic damage, including scratches, dents, chips or other damage to parts or systems resulting from warranty coverage. 3. WHIRLPOOL SHALL NOT BE LIABLE FOR INCIDENTAL OR CONSEQUENTIAL DAMAGES. SOME STATES AND PROVINCES DO NOT ALLOW THE EXCLUSION OR ...workmanship. You will pay for in-warranty service. Service must provide proof of purchase or installation date for Factory Specified Parts and repair labor to Whirlpool within 30 days from the date of purchase. 6. You must be repaired in the home and only in-home...
... warranty applies. If you on the product. Cosmetic damage, including scratches, dents, chips or other damage to parts or systems resulting from warranty coverage. 3. WHIRLPOOL SHALL NOT BE LIABLE FOR INCIDENTAL OR CONSEQUENTIAL DAMAGES. SOME STATES AND PROVINCES DO NOT ALLOW THE EXCLUSION OR ...workmanship. You will pay for in-warranty service. Service must provide proof of purchase or installation date for Factory Specified Parts and repair labor to Whirlpool within 30 days from the date of purchase. 6. You must be repaired in the home and only in-home...


