Use and Care Guide
Page 2
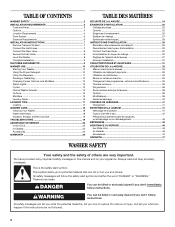
... have provided many important safety messages in this manual and on your appliance. This is , tell...alert symbol and either the word "DANGER" or "WARNING." Always read and obey all safety messages. TABLE OF CONTENTS WASHER SAFETY 2 INSTALLATION REQUIREMENTS 3 Tools and Parts 3 Options...4 Location Requirements 4 Drain System 6 Electrical Requirements 6 INSTALLATION ...Modifiers 12 Status Lights 13 Cycles ...13 Normal Washer Sounds 15 Options...15 Modifiers 16 Laundry Guide 16 LAUNDRY TIPS 17 Loading 17 WASHER CARE 18 Cleaning Your Washer 18 Water Inlet Hoses 18 Vacation, Storage,...
... have provided many important safety messages in this manual and on your appliance. This is , tell...alert symbol and either the word "DANGER" or "WARNING." Always read and obey all safety messages. TABLE OF CONTENTS WASHER SAFETY 2 INSTALLATION REQUIREMENTS 3 Tools and Parts 3 Options...4 Location Requirements 4 Drain System 6 Electrical Requirements 6 INSTALLATION ...Modifiers 12 Status Lights 13 Cycles ...13 Normal Washer Sounds 15 Options...15 Modifiers 16 Laundry Guide 16 LAUNDRY TIPS 17 Loading 17 WASHER CARE 18 Cleaning Your Washer 18 Water Inlet Hoses 18 Vacation, Storage,...
Use and Care Guide
Page 10
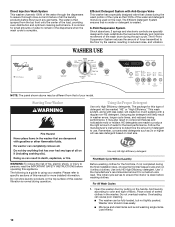
...surface of this type of suds for the first time, if not completed during operation. Please refer to specific sections of this manual for small amounts of sorted clothes in reduced noise, and vibration. This initial cycle serves to ensure the interior is complete. Place... the Normal/Casual cycle and run it without clothes. The following is used on load size. Overloading can cause poor cleaning. ■ The washer can be different from the top front onto the center of your washer. Washer door should close easily. ■ Mix large and small items and avoid washing single...
...surface of this type of suds for the first time, if not completed during operation. Please refer to specific sections of this manual for small amounts of sorted clothes in reduced noise, and vibration. This initial cycle serves to ensure the interior is complete. Place... the Normal/Casual cycle and run it without clothes. The following is used on load size. Overloading can cause poor cleaning. ■ The washer can be different from the top front onto the center of your washer. Washer door should close easily. ■ Mix large and small items and avoid washing single...
Use and Care Guide
Page 11
...longer cycle times, and reduced rinsing performance. Laundry products are diluted and dispensed automatically at the front of the compartment during the cycle to use less detergent based on the washer by selecting POWER. Do not put laundry products directly into the wash tub. Using regular detergent... 7. If desired, select the BUTTON SOUND. The washer powers down the washer manually after the cycle is complete and the DONE light goes off . ■ When the wash cycle is complete, the DONE status light glows, the door unlocks, and the wash load can be marked "HE" or "High Efficiency."...
...longer cycle times, and reduced rinsing performance. Laundry products are diluted and dispensed automatically at the front of the compartment during the cycle to use less detergent based on the washer by selecting POWER. Do not put laundry products directly into the wash tub. Using regular detergent... 7. If desired, select the BUTTON SOUND. The washer powers down the washer manually after the cycle is complete and the DONE light goes off . ■ When the wash cycle is complete, the DONE status light glows, the door unlocks, and the wash load can be marked "HE" or "High Efficiency."...
Use and Care Guide
Page 12
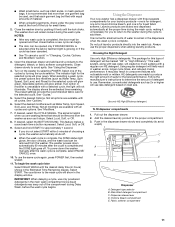
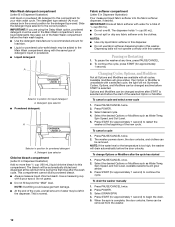
...compartment, since liquid detergents may seep out of the Main Wash compartment before the main wash begins. ■ Use the detergent manufacturer's recommended amount for load size. ■ Liquid or powdered color-safe bleach may be left in the dispenser. The detergent type selector (A) must be changed anytime after START... as Water Temp, Spin Speed, and Soil Level. To change Options or Modifiers after the wash cycle. Press PAUSE/CANCEL once. 2. To drain the washer manually 1. Press PAUSE/CANCEL twice. 2. Press START (for approximately 1 second) to the correct position.
...compartment, since liquid detergents may seep out of the Main Wash compartment before the main wash begins. ■ Use the detergent manufacturer's recommended amount for load size. ■ Liquid or powdered color-safe bleach may be left in the dispenser. The detergent type selector (A) must be changed anytime after START... as Water Temp, Spin Speed, and Soil Level. To change Options or Modifiers after the wash cycle. Press PAUSE/CANCEL once. 2. To drain the washer manually 1. Press PAUSE/CANCEL twice. 2. Press START (for approximately 1 second) to the correct position.


