Warranty Information
Page 1
... existed when this major appliance was purchased. You will pay for Factory Specified Parts and repair labor to correct defects in your complete model number and serial number. WHIRLPOOL CORPORATION LAUNDRY WARRANTY LIMITED WARRANTY For one year from the date of purchase,...repair service, first see the "Troubleshooting" section of your authorized Whirlpool dealer to province. You must be found by checking the "Assistance or Service" section or by a Whirlpool designated service company. Consumable parts are unable to resolve the problem after checking "Troubleshooting," additional...
... existed when this major appliance was purchased. You will pay for Factory Specified Parts and repair labor to correct defects in your complete model number and serial number. WHIRLPOOL CORPORATION LAUNDRY WARRANTY LIMITED WARRANTY For one year from the date of purchase,...repair service, first see the "Troubleshooting" section of your authorized Whirlpool dealer to province. You must be found by checking the "Assistance or Service" section or by a Whirlpool designated service company. Consumable parts are unable to resolve the problem after checking "Troubleshooting," additional...

Use & Care Guide
Page 22
... in accordance with electrical or plumbing codes, or use of products not approved by calling Whirlpool. Pick up and delivery. Expenses for travel and transportation for Factory Specified Parts and repair labor to correct defects in an inaccessible location or is not available. 9. ... applies only when the major appliance is intended to be provided by an authorized Whirlpool servicer is not installed in a remote area where service by a Whirlpool designated service company. Consumable parts are unable to resolve the problem after checking "Troubleshooting," additional help you obtain...
... in accordance with electrical or plumbing codes, or use of products not approved by calling Whirlpool. Pick up and delivery. Expenses for travel and transportation for Factory Specified Parts and repair labor to correct defects in an inaccessible location or is not available. 9. ... applies only when the major appliance is intended to be provided by an authorized Whirlpool servicer is not installed in a remote area where service by a Whirlpool designated service company. Consumable parts are unable to resolve the problem after checking "Troubleshooting," additional help you obtain...
Installation Guide
Page 2
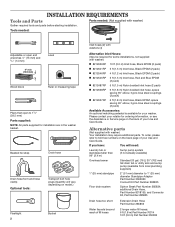
... Assistance or Service page on the back of fill hoses 2 longer water fill hoses; 6 ft (1.8 m) Part Number 76314 10 ft (3.0 m) Part Number 350008 additional Drain Hose, Part Number 8318155; Parts needed: (Not supplied with washer) Tools needed: Adjustable or open end wrenches 1⁄2" (13 mm) and... Wood block Ruler or measuring tape Pliers that open to 1" (25 mm) diameter Standpipe Adapter Part Number 3363920 Connect Kit Part Number 285835 Floor drain system Siphon Break Part Number 285834; Beaded tie strap Drain hose Drain hose form and hose clamp Optional tools: Transport ...
... Assistance or Service page on the back of fill hoses 2 longer water fill hoses; 6 ft (1.8 m) Part Number 76314 10 ft (3.0 m) Part Number 350008 additional Drain Hose, Part Number 8318155; Parts needed: (Not supplied with washer) Tools needed: Adjustable or open end wrenches 1⁄2" (13 mm) and... Wood block Ruler or measuring tape Pliers that open to 1" (25 mm) diameter Standpipe Adapter Part Number 3363920 Connect Kit Part Number 285835 Floor drain system Siphon Break Part Number 285834; Beaded tie strap Drain hose Drain hose form and hose clamp Optional tools: Transport ...
Installation Guide
Page 4
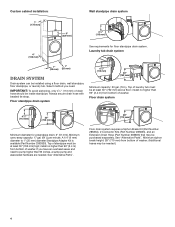
...(113 mm) 30" (762 mm) Minimum diameter for floor standpipe drain system. See "Alternative Parts". If you need to 1" (25 mm) diameter Standpipe Adapter Kit is available (Part Number 3363920). Minimum siphon break height: 28" (710 mm) from bottom of washer. Select method... should be needed . install no higher than 96" (2.4 m) from bottom of washer. See "Alternative Parts". 3208" (76120 mm) Floor drain system requires a Siphon Break Kit (Part Number 285834), 2 Connector Kits (Part Number 285835), and an Extension Drain Hose (Part Number 285863) that may be inside standpipe.
...(113 mm) 30" (762 mm) Minimum diameter for floor standpipe drain system. See "Alternative Parts". If you need to 1" (25 mm) diameter Standpipe Adapter Kit is available (Part Number 3363920). Minimum siphon break height: 28" (710 mm) from bottom of washer. Select method... should be needed . install no higher than 96" (2.4 m) from bottom of washer. See "Alternative Parts". 3208" (76120 mm) Floor drain system requires a Siphon Break Kit (Part Number 285834), 2 Connector Kits (Part Number 285835), and an Extension Drain Hose (Part Number 285863) that may be inside standpipe.
Installation Guide
Page 6
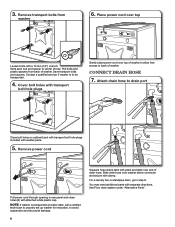
...transport bolt hole plugs Gently place power cord over top Loosen bolts with washer parts. 5. CONNECT DRAIN HOSE 7. NOTE: If washer is to back of hole. 3. See Floor drain system under "Alternative Parts". Pull bolts and plastic spacers from washer 6. Contact a qualified servicer if ...call a certified technician to properly set up washer for relocation, to step 8. Save transport bolts and spacers. You may need additional parts with clamp. Attach drain hose to center of washer. Remove transport bolts from back of drain hose. Slide drain hose onto washer ...
...transport bolt hole plugs Gently place power cord over top Loosen bolts with washer parts. 5. CONNECT DRAIN HOSE 7. NOTE: If washer is to back of hole. 3. See Floor drain system under "Alternative Parts". Pull bolts and plastic spacers from washer 6. Contact a qualified servicer if ...call a certified technician to properly set up washer for relocation, to step 8. Save transport bolts and spacers. You may need additional parts with clamp. Attach drain hose to center of washer. Remove transport bolts from back of drain hose. Slide drain hose onto washer ...
Installation Guide
Page 8
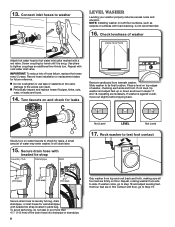
..., replace the hoses every 5 years. If washer is snug. n Do not overtighten or use tape or sealants on soft floor surfaces, such as shown in parts bag. Slide washer to side. Screw coupling by hand until it is against a wall, move out slightly before tipping back. Record hose installation or replacement...
..., replace the hoses every 5 years. If washer is snug. n Do not overtighten or use tape or sealants on soft floor surfaces, such as shown in parts bag. Slide washer to side. Screw coupling by hand until it is against a wall, move out slightly before tipping back. Record hose installation or replacement...
Installation Guide
Page 9
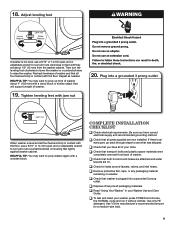
...jam nuts counterclockwise on . q Check for a medium-size load. 9 q Read "Using Your Washer" in contact with a wood block or similar object that all parts supplied are firmly in your washer, press POWER and choose the NORMAL cycle and run it without clothes. HELPFUL TIP: You may want to raise...plastic spacer materials were completely removed from the washer cabinet. 18. Adjust leveling feet Lower Washer Jam nut Raise Washer If washer is an extra part, go back through steps to prop washer again with jam nut 20. HELPFUL TIP: You may want to see what was skipped. q ...
...jam nuts counterclockwise on . q Check for a medium-size load. 9 q Read "Using Your Washer" in contact with a wood block or similar object that all parts supplied are firmly in your washer, press POWER and choose the NORMAL cycle and run it without clothes. HELPFUL TIP: You may want to raise...plastic spacer materials were completely removed from the washer cabinet. 18. Adjust leveling feet Lower Washer Jam nut Raise Washer If washer is an extra part, go back through steps to prop washer again with jam nut 20. HELPFUL TIP: You may want to see what was skipped. q ...


