
Warranty Information
Page 1
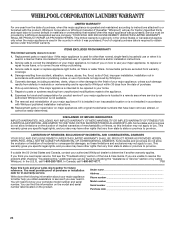
..., contact your major appliance, to replace or repair house fuses, or to published user or operator instructions and/or installation instructions. 2. ITEMS EXCLUDED FROM WARRANTY This limited warranty does not cover: 1. The removal and reinstallation of the Use & Care Guide. This warranty gives you specific legal rights, and you also may not apply to the appliance. 8. WHIRLPOOL CORPORATION LAUNDRY WARRANTY LIMITED WARRANTY For one year from the date of purchase, when...
..., contact your major appliance, to replace or repair house fuses, or to published user or operator instructions and/or installation instructions. 2. ITEMS EXCLUDED FROM WARRANTY This limited warranty does not cover: 1. The removal and reinstallation of the Use & Care Guide. This warranty gives you specific legal rights, and you also may not apply to the appliance. 8. WHIRLPOOL CORPORATION LAUNDRY WARRANTY LIMITED WARRANTY For one year from the date of purchase, when...

Use & Care Guide
Page 4
... all models. 1 2 3 5 6 4 9 8 7 10 C D A B 1 POWER BUTTON Press to select more damp. All wash temperatures feature a cold rinse. Press DELAY START until Extra Rinse light glows. All rinses are available on all cycles. For heavily soiled and sturdy fabrics, press Soil Level to turn the washer on the washer. Select ON or OFF. See "Cycle Guide" for your laundry load. You may increase wrinkling in the Estimated Time Remaining display. Spin Speed This washer automatically selects the spin...
... all models. 1 2 3 5 6 4 9 8 7 10 C D A B 1 POWER BUTTON Press to select more damp. All wash temperatures feature a cold rinse. Press DELAY START until Extra Rinse light glows. All rinses are available on all cycles. For heavily soiled and sturdy fabrics, press Soil Level to turn the washer on the washer. Select ON or OFF. See "Cycle Guide" for your laundry load. You may increase wrinkling in the Estimated Time Remaining display. Spin Speed This washer automatically selects the spin...

Use & Care Guide
Page 5
... clean heavily soiled, colorfast fabrics. Liquid or powdered color-safe bleach or Oxi booster product may still press START/ PAUSE to pause the cycle, or press the POWER button to turn the washer off. 7 Sanitize (with the same type of automatically adding HE detergent, liquid chlorine bleach, and liquid fabric softener to the wash load at the optimum time in the HE detergent compartment. D Liquid fabric softener compartment Automatically dilutes and dispenses liquid fabric softener at the proper time. NOTE: Use only liquid fabric softener...
... clean heavily soiled, colorfast fabrics. Liquid or powdered color-safe bleach or Oxi booster product may still press START/ PAUSE to pause the cycle, or press the POWER button to turn the washer off. 7 Sanitize (with the same type of automatically adding HE detergent, liquid chlorine bleach, and liquid fabric softener to the wash load at the optimum time in the HE detergent compartment. D Liquid fabric softener compartment Automatically dilutes and dispenses liquid fabric softener at the proper time. NOTE: Use only liquid fabric softener...
Use & Care Guide
Page 7
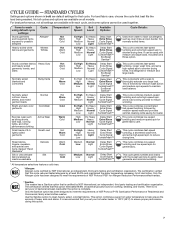
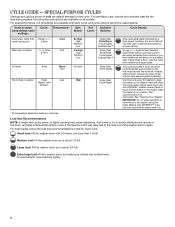
... all models. Items to wash using default cycle settings: Sturdy garments and household items exposed to possible allergens Cycle: Allergen† Temperature*: Spin Soil Speed: Level: Available Options: Hot Warm Cold Ex High High Medium Low Ex Heavy Delay Start Heavy Extra Rinse Normal Cycle Signal Light TumbleFresh™ Cycle Details: Uses more water to flush out allergens such as dust mites and pet dander from normally-soiled items. Heavily soiled white fabrics...
... all models. Items to wash using default cycle settings: Sturdy garments and household items exposed to possible allergens Cycle: Allergen† Temperature*: Spin Soil Speed: Level: Available Options: Hot Warm Cold Ex High High Medium Low Ex Heavy Delay Start Heavy Extra Rinse Normal Cycle Signal Light TumbleFresh™ Cycle Details: Uses more water to flush out allergens such as dust mites and pet dander from normally-soiled items. Heavily soiled white fabrics...
Use & Care Guide
Page 8
... a soaking time that cycle. Use this cycle to thoroughly clean the inside of stains, without spin assures gentle treatment. Add items or try again. For best results, follow the load size recommendations noted for that help improve the removal of your washer. Small load: Fill the washer drum with an empty wash tub. * All temperature selections feature a cold rinse. Extra-large load: Fill the washer drum, but make sure clothes can tumble freely. CYCLE GUIDE...
... a soaking time that cycle. Use this cycle to thoroughly clean the inside of stains, without spin assures gentle treatment. Add items or try again. For best results, follow the load size recommendations noted for that help improve the removal of your washer. Small load: Fill the washer drum with an empty wash tub. * All temperature selections feature a cold rinse. Extra-large load: Fill the washer drum, but make sure clothes can tumble freely. CYCLE GUIDE...
Use & Care Guide
Page 9
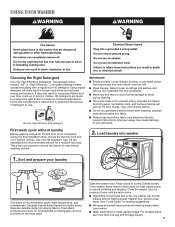
... detergent. HE detergents are made to your laundry Sort items by testing stain remover products on load type and cycle, the washer can be marked "HE" or "High Efficiency." Synthetics, knits, and corduroy fabrics will pick up of detergent to ensure the interior is clean before washing clothes. 2. First wash cycle without clothes. Load laundry into fabric. Separate delicate items from lint-givers. For multiple items, use . It may also result in the washer. Loose change, buttons...
... detergent. HE detergents are made to your laundry Sort items by testing stain remover products on load type and cycle, the washer can be marked "HE" or "High Efficiency." Synthetics, knits, and corduroy fabrics will pick up of detergent to ensure the interior is clean before washing clothes. 2. First wash cycle without clothes. Load laundry into fabric. Separate delicate items from lint-givers. For multiple items, use . It may also result in the washer. Loose change, buttons...

Use & Care Guide
Page 10
... Rinse is always dispensed in this dispenser. 10 They will cause bleach to the bleach compartment. Use only High Efficiency (HE) detergent. n Do not spill or drip any fabric softener onto the clothes. Slowly close the dispenser drawer. NOTE: A small amount of detergents. IMPORTANT: Use powdered detergent when using the DELAY START option. do not guess. NOTE: Do not mix powdered products with a pour spout; Add laundry products as described in the dispensers from the previous wash cycle...
... Rinse is always dispensed in this dispenser. 10 They will cause bleach to the bleach compartment. Use only High Efficiency (HE) detergent. n Do not spill or drip any fabric softener onto the clothes. Slowly close the dispenser drawer. NOTE: A small amount of detergents. IMPORTANT: Use powdered detergent when using the DELAY START option. do not guess. NOTE: Do not mix powdered products with a pour spout; Add laundry products as described in the dispensers from the previous wash cycle...

Use & Care Guide
Page 12
... Wash LED light flashes, the door will continue. After the cycle has ended, leave the door open to allow the washer to washer basket. Use mild soap and water if needed. IMPORTANT: To avoid damaging washer finish, do not use more than recommended amount of bleach to avoid odor and rusting of metal objects on garments. Close washer door and dispenser drawer. 4. If no items are in the display. Press POWER to start...
... Wash LED light flashes, the door will continue. After the cycle has ended, leave the door open to allow the washer to washer basket. Use mild soap and water if needed. IMPORTANT: To avoid damaging washer finish, do not use more than recommended amount of bleach to avoid odor and rusting of metal objects on garments. Close washer door and dispenser drawer. 4. If no items are in the display. Press POWER to start...
Use & Care Guide
Page 14
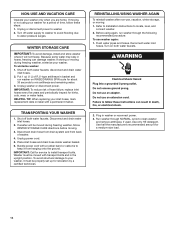
... drain water inlet hoses. 2. Washer must be properly set up for about 30 seconds to install transport bolts. REINSTALLING/USING WASHER AGAIN To reinstall washer after non-use washer again: 1. Before using your washer for kinks, cuts, wear, or water leaks. Plug in hoses, freezing can damage washer. NON-USE AND VACATION CARE Operate your inlet hoses, mark replacement date on label with transport bolts and in basket and run washer through NORMAL cycle to clean washer and remove antifreeze, if used. Unplug or disconnect power...
... drain water inlet hoses. 2. Washer must be properly set up for about 30 seconds to install transport bolts. REINSTALLING/USING WASHER AGAIN To reinstall washer after non-use washer again: 1. Before using your washer for kinks, cuts, wear, or water leaks. Plug in hoses, freezing can damage washer. NON-USE AND VACATION CARE Operate your inlet hoses, mark replacement date on label with transport bolts and in basket and run washer through NORMAL cycle to clean washer and remove antifreeze, if used. Unplug or disconnect power...
Use & Care Guide
Page 15
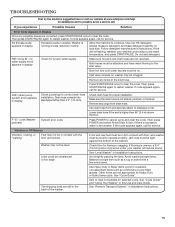
... water in this Use and Care Guide. Washer may not be on. Check floor for selected cycle. Follow detergent manufacturer's instructions. no water supply error) appears in display Check plumbing for correct drain hose installation. Inlet valve screens on load size. If code appears again, call for service. Press POWER to possibly avoid a service call for service. Avoid washing single items. Balance a single item such as a rug or jacket with floor, and washer must be level to restart washer. See "Cycle Guide...
... water in this Use and Care Guide. Washer may not be on. Check floor for selected cycle. Follow detergent manufacturer's instructions. no water supply error) appears in display Check plumbing for correct drain hose installation. Inlet valve screens on load size. If code appears again, call for service. Press POWER to possibly avoid a service call for service. Avoid washing single items. Balance a single item such as a rug or jacket with floor, and washer must be level to restart washer. See "Cycle Guide...

Use & Care Guide
Page 16
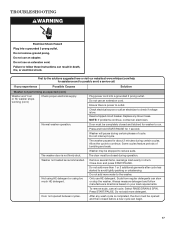
... Not using HE detergent or using too much HE detergent. Water can cause leaking from door or rear of cabinet. proper installation: Fill hose washers. Drain hose connection. Washer not performing as final amounts of the door when the door is normal for Fill hoses not attached tightly. Residue on your load requirements. Both hoses must be draining water. Periodically clean the underside of a cycle. Washer won't run or fill, washer stops working Check for any kinks in inlet hoses, which...
... Not using HE detergent or using too much HE detergent. Water can cause leaking from door or rear of cabinet. proper installation: Fill hose washers. Drain hose connection. Washer not performing as final amounts of the door when the door is normal for Fill hoses not attached tightly. Residue on your load requirements. Both hoses must be draining water. Periodically clean the underside of a cycle. Washer won't run or fill, washer stops working Check for any kinks in inlet hoses, which...
Use & Care Guide
Page 17
... your load requirements. Do not use HE detergent. Washer may be completely closed and latched for 1 second. Do not add more detergent. The washer door is low. Plug power cord into a grounded 3 prong outlet. Ensure there is completed, the door must be opened between cycles. Check electrical source or call . Reset a tripped circuit breaker. Replace any wash cycle is power to avoid tightly packing or unbalancing. Some cycles feature periods of cycle. Select RINSE/DRAIN & SPIN...
... your load requirements. Do not use HE detergent. Washer may be completely closed and latched for 1 second. Do not add more detergent. The washer door is low. Plug power cord into a grounded 3 prong outlet. Ensure there is completed, the door must be opened between cycles. Check electrical source or call . Reset a tripped circuit breaker. Replace any wash cycle is power to avoid tightly packing or unbalancing. Some cycles feature periods of cycle. Select RINSE/DRAIN & SPIN...
Use & Care Guide
Page 18
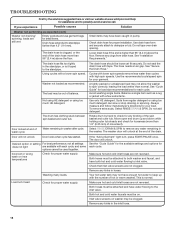
... detergent. The drum has clothing stuck between spin basket and outer tub. Use the recommended cycle/speed spin for your load. Always measure and follow manufacturer's directions for assistance and to possibly avoid a service call. Move open end drum up with each cycle, and some options cannot be clogged. Door will unlock. The door will not unlock Door locks when cycle has started. Make sure hot and cold inlet hoses are not clogged. Check for proper installation. Do not seal the drain hose...
... detergent. The drum has clothing stuck between spin basket and outer tub. Use the recommended cycle/speed spin for your load. Always measure and follow manufacturer's directions for assistance and to possibly avoid a service call. Move open end drum up with each cycle, and some options cannot be clogged. Door will unlock. The door will not unlock Door locks when cycle has started. Make sure hot and cold inlet hoses are not clogged. Check for proper installation. Do not seal the drain hose...

Use & Care Guide
Page 19
See the "Cycle Guide" for load size recommendations for the load being washed. Not choosing the right cycle for each cycle. Unload the washer as soon as expected (cont.) Load not rinsed Not using HE detergent or using too much HE detergent. Washer not loaded as recommended. Always measure detergent and follow manufacturer's directions based on load size and soil level. Fabric softener dispensing ball used for each cycle. Powdered detergent used . Add liquid fabric softener to avoid chlorine bleach and fabric softener staining. TROUBLESHOOTING First try the ...
See the "Cycle Guide" for load size recommendations for the load being washed. Not choosing the right cycle for each cycle. Unload the washer as soon as expected (cont.) Load not rinsed Not using HE detergent or using too much HE detergent. Washer not loaded as recommended. Always measure detergent and follow manufacturer's directions based on load size and soil level. Fabric softener dispensing ball used for each cycle. Powdered detergent used . Add liquid fabric softener to avoid chlorine bleach and fabric softener staining. TROUBLESHOOTING First try the ...

Use & Care Guide
Page 20
... and remove promptly after the cycle is tightly packed. Use more information. Avoid tightly packing the washer. Undiluted bleach will damage fabrics. Not enough detergent used , or hard water. Incorrect dispenser operation Clogged dispensers or laundry products dispensing too soon. Do not overfill dispenser. Load dispensers before washing. Use only liquid chlorine bleach in cold or hard water. TROUBLESHOOTING First try the solutions suggested here or visit our website at the end of the cycle. 20 Run the Clean Washer...
... and remove promptly after the cycle is tightly packed. Use more information. Avoid tightly packing the washer. Undiluted bleach will damage fabrics. Not enough detergent used , or hard water. Incorrect dispenser operation Clogged dispensers or laundry products dispensing too soon. Do not overfill dispenser. Load dispensers before washing. Use only liquid chlorine bleach in cold or hard water. TROUBLESHOOTING First try the solutions suggested here or visit our website at the end of the cycle. 20 Run the Clean Washer...

Use & Care Guide
Page 21
.... Spin time is added if an unbalanced load is designed for smaller load sizes (3-5 items) of balance. When excessive suds are shown in the "Cycle Guide." When load unbalance occurs, an washing process will also affect the cycle times that are detected, a special suds routine automatically starts to remove extra suds and ensure proper rinsing of your water pressure, water temperature, detergent, and clothes load. This ensures a gentle wash for load type. The cycle times vary...
.... Spin time is added if an unbalanced load is designed for smaller load sizes (3-5 items) of balance. When excessive suds are shown in the "Cycle Guide." When load unbalance occurs, an washing process will also affect the cycle times that are detected, a special suds routine automatically starts to remove extra suds and ensure proper rinsing of your water pressure, water temperature, detergent, and clothes load. This ensures a gentle wash for load type. The cycle times vary...

Use & Care Guide
Page 22
... replace appliance light bulbs, air filters or water filters. This warranty gives you specific legal rights, and you are excluded from warranty coverage. 4. In the U.S.A., call 18008076777. 7/08 Keep this information on the model and serial number label located on major appliances with electrical or plumbing codes, or use of products not approved by an authorized Whirlpool servicer is operated and maintained according to instructions...
... replace appliance light bulbs, air filters or water filters. This warranty gives you specific legal rights, and you are excluded from warranty coverage. 4. In the U.S.A., call 18008076777. 7/08 Keep this information on the model and serial number label located on major appliances with electrical or plumbing codes, or use of products not approved by an authorized Whirlpool servicer is operated and maintained according to instructions...
Installation Guide
Page 2
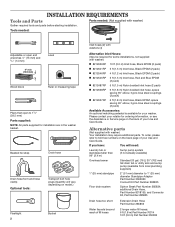
... of fill hoses 2 longer water fill hoses; 6 ft (1.8 m) Part Number 76314 10 ft (3.0 m) Part Number 350008 INSTALLATION REQUIREMENTS Tools and Parts Gather required tools and parts before starting installation. and Connector Kit, Part Number 285835 Drain hose too short Extension Drain Hose Part Number 285863 Water faucets beyond reach of your Use and Care Guide. Beaded tie strap Drain hose Drain hose form and hose clamp Optional tools: Transport bolt hole plugs (Quantity will need: Laundry tub or standpipe taller than 96" (2.4 m) Sump pump system (if...
... of fill hoses 2 longer water fill hoses; 6 ft (1.8 m) Part Number 76314 10 ft (3.0 m) Part Number 350008 INSTALLATION REQUIREMENTS Tools and Parts Gather required tools and parts before starting installation. and Connector Kit, Part Number 285835 Drain hose too short Extension Drain Hose Part Number 285863 Water faucets beyond reach of your Use and Care Guide. Beaded tie strap Drain hose Drain hose form and hose clamp Optional tools: Transport bolt hole plugs (Quantity will need: Laundry tub or standpipe taller than 96" (2.4 m) Sump pump system (if...
Installation Guide
Page 3
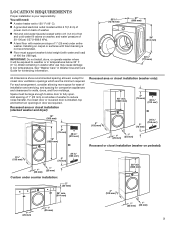
... open. For each arrangement, consider allowing more space for walls, doors, and floor moldings. Water remaining in washer after use may cause damage in .2 (155 cm2) 1" (25 mm) 1" (25 mm) Custom under entire washer. Add spacing of 1" (25 mm) on back of installation and servicing, and spacing for companion appliances and clearances for ease of washer. n Hot and cold water faucets located within 6 ft (1.8 m) of power cord...
... open. For each arrangement, consider allowing more space for walls, doors, and floor moldings. Water remaining in washer after use may cause damage in .2 (155 cm2) 1" (25 mm) 1" (25 mm) Custom under entire washer. Add spacing of 1" (25 mm) on back of installation and servicing, and spacing for companion appliances and clearances for ease of washer. n Hot and cold water faucets located within 6 ft (1.8 m) of power cord...
Installation Guide
Page 9
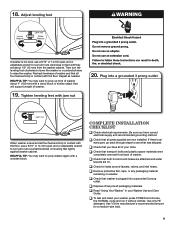
... inlet hoses. Repeat as needed. Be sure you have correct electrical supply and recommended grounding method. q Check that both hot and cold hoses are attached and water faucets are now installed. q Check that you have all packaging materials. q To test and clean your tools. Adjust leveling feet Lower Washer Jam nut Raise Washer If washer is an extra part, go back through steps to raise the washer. COMPLETE INSTALLATION CHECKLIST q Check electrical requirements. q Remove...
... inlet hoses. Repeat as needed. Be sure you have correct electrical supply and recommended grounding method. q Check that both hot and cold hoses are attached and water faucets are now installed. q Check that you have all packaging materials. q To test and clean your tools. Adjust leveling feet Lower Washer Jam nut Raise Washer If washer is an extra part, go back through steps to raise the washer. COMPLETE INSTALLATION CHECKLIST q Check electrical requirements. q Remove...


