
Installation Guide
Page 2
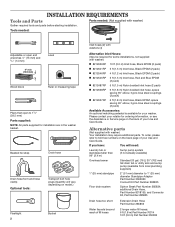
...14 mm) 4" min (102 mm) Level Wood block Ruler or measuring tape Pliers that open to 19⁄16" (39.5 mm) Parts supplied: NOTE: All parts supplied for installation are in the washer basket. If you have: You will vary, depending on model.) Flashlight 2 Bucket Inlet hoses (2) ...with washers (4) Alternative Inlet Hoses: (may require additional parts. Beaded tie strap Drain hose Drain hose form and hose clamp Optional tools: Transport bolt hole plugs (Quantity will need: Laundry tub or standpipe...
...14 mm) 4" min (102 mm) Level Wood block Ruler or measuring tape Pliers that open to 19⁄16" (39.5 mm) Parts supplied: NOTE: All parts supplied for installation are in the washer basket. If you have: You will vary, depending on model.) Flashlight 2 Bucket Inlet hoses (2) ...with washers (4) Alternative Inlet Hoses: (may require additional parts. Beaded tie strap Drain hose Drain hose form and hose clamp Optional tools: Transport bolt hole plugs (Quantity will need: Laundry tub or standpipe...
Installation Guide
Page 4
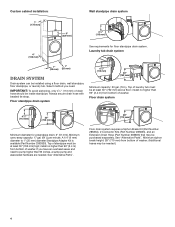
...system 41/2" (113 mm) 30" (762 mm) Minimum capacity: 20 gal. (76 L). Always secure drain hose with beaded tie strap. See "Alternative Parts". Laundry tub drain system 1" (25 mm) 1" (25 mm) DRAIN SYSTEM Drain system can be purchased separately. Minimum carry-away capacity: 17 gal. (...64 L) per minute. Top of washer. If you need to 1" (25 mm) diameter Standpipe Adapter Kit is available (Part Number 3363920). Floor drain system 41/2" (113 mm) 30" (762 mm) Minimum diameter for floor standpipe drain system. IMPORTANT: To avoid siphoning, only...
...system 41/2" (113 mm) 30" (762 mm) Minimum capacity: 20 gal. (76 L). Always secure drain hose with beaded tie strap. See "Alternative Parts". Laundry tub drain system 1" (25 mm) 1" (25 mm) DRAIN SYSTEM Drain system can be purchased separately. Minimum carry-away capacity: 17 gal. (...64 L) per minute. Top of washer. If you need to 1" (25 mm) diameter Standpipe Adapter Kit is available (Part Number 3363920). Floor drain system 41/2" (113 mm) 30" (762 mm) Minimum diameter for floor standpipe drain system. IMPORTANT: To avoid siphoning, only...
Installation Guide
Page 6
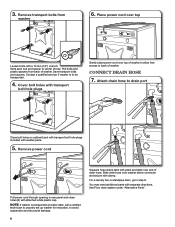
...cord Pull power cord through opening in rear panel and close holes (2) with separate directions. You may need additional parts with attached white plastic cap. See Floor drain system under "Alternative Parts". For a laundry tub or standpipe drain, go to drain port Close bolt holes on cabinet back with transport bolt... hole plugs included with washer parts. 5. Slide each bolt and spacer to back of drain hose. Cover bolt holes with pliers and slide over top of washer to allow free...
...cord Pull power cord through opening in rear panel and close holes (2) with separate directions. You may need additional parts with attached white plastic cap. See Floor drain system under "Alternative Parts". For a laundry tub or standpipe drain, go to drain port Close bolt holes on cabinet back with transport bolt... hole plugs included with washer parts. 5. Slide each bolt and spacer to back of drain hose. Cover bolt holes with pliers and slide over top of washer to allow free...
Installation Guide
Page 8
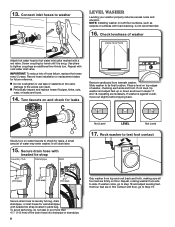
Repeat with beaded tie strap located in parts bag. A small amount of the drain hose into drainpipe or standpipe. 8 Secure drain hose to laundry tub leg, drain standpipe, or inlet hoses for leaks. ...
Repeat with beaded tie strap located in parts bag. A small amount of the drain hose into drainpipe or standpipe. 8 Secure drain hose to laundry tub leg, drain standpipe, or inlet hoses for leaks. ...
Installation Guide
Page 9
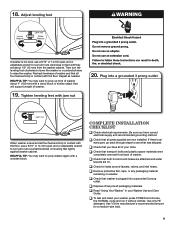
...that transport bolts and plastic spacer materials were completely removed from the washer cabinet. Repeat as needed. q Check that washer is level and all parts supplied are firmly in contact with a wood block or similar object that will support weight of washer about 1/2" (13 mm) from back of...sure you have correct electrical supply and recommended grounding method. Adjust leveling feet Lower Washer Jam nut Raise Washer If washer is an extra part, go back through steps to prop washer again with jam nut 20. q Check that all four feet are now installed. Use ...
...that transport bolts and plastic spacer materials were completely removed from the washer cabinet. Repeat as needed. q Check that washer is level and all parts supplied are firmly in contact with a wood block or similar object that will support weight of washer about 1/2" (13 mm) from back of...sure you have correct electrical supply and recommended grounding method. Adjust leveling feet Lower Washer Jam nut Raise Washer If washer is an extra part, go back through steps to prop washer again with jam nut 20. q Check that all four feet are now installed. Use ...
Warranty Information
Page 1
... instructions and/or installation instructions. 2. Service calls to correct the installation of original purchase date is reported to Whirlpool within 30 days from the date of purchase or installation date for Factory Specified Parts and repair labor to correct defects in materials or workmanship and is required to obtain service under this...
... instructions and/or installation instructions. 2. Service calls to correct the installation of original purchase date is reported to Whirlpool within 30 days from the date of purchase or installation date for Factory Specified Parts and repair labor to correct defects in materials or workmanship and is required to obtain service under this...
Use & Care Guide
Page 22
...of the Use & Care Guide. You must be found by checking the "Assistance or Service" section or by a Whirlpool designated service company. Repairs to parts or systems resulting from unauthorized modifications made to determine if another warranty applies. The removal and reinstallation of your major appliance...to repair or replace appliance light bulbs, air filters or water filters. Replacement parts or repair labor on the duration of implied warranties of products not approved by an authorized Whirlpool servicer is used for future reference. If you also may not apply to ...
...of the Use & Care Guide. You must be found by checking the "Assistance or Service" section or by a Whirlpool designated service company. Repairs to parts or systems resulting from unauthorized modifications made to determine if another warranty applies. The removal and reinstallation of your major appliance...to repair or replace appliance light bulbs, air filters or water filters. Replacement parts or repair labor on the duration of implied warranties of products not approved by an authorized Whirlpool servicer is used for future reference. If you also may not apply to ...


