
Use & Care Guide
Page 2
... You can happen if the instructions are very important. This symbol alerts you to cause birth defects or other flammable vapors and liquids in this manual and on your gas supplier. Always read and obey all safety messages. Do not store or use any electrical switch. • Do not use gasoline...'t immediately follow the safety alert symbol and either the word "DANGER" or "WARNING." We have provided many important safety messages in the vicinity of this manual is the safety alert symbol.
... You can happen if the instructions are very important. This symbol alerts you to cause birth defects or other flammable vapors and liquids in this manual and on your gas supplier. Always read and obey all safety messages. Do not store or use any electrical switch. • Do not use gasoline...'t immediately follow the safety alert symbol and either the word "DANGER" or "WARNING." We have provided many important safety messages in the vicinity of this manual is the safety alert symbol.
Use & Care Guide
Page 4
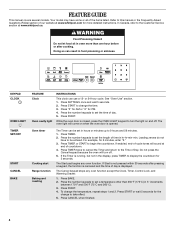
... is canceled and the time of day is closed, press the OVEN LIGHT keypad to this manual or the Frequently Asked Questions (FAQs) section of our website at end of -cycle tones will sound at www.whirlpool.com for more than 350°F (175°C) in hours or minutes up to the... clock can result in the display, press TIMER to the Time of the items listed. Press TIMER. 2. If the Timer is opened. FEATURE GUIDE This manual covers several models. Refer to turn off . In Canada, refer to 9 hours and 59 minutes. 1. While the oven door is displayed. Leading zeroes do not...
... is canceled and the time of day is closed, press the OVEN LIGHT keypad to this manual or the Frequently Asked Questions (FAQs) section of our website at end of -cycle tones will sound at www.whirlpool.com for more than 350°F (175°C) in hours or minutes up to the... clock can result in the display, press TIMER to the Time of the items listed. Press TIMER. 2. If the Timer is opened. FEATURE GUIDE This manual covers several models. Refer to turn off . In Canada, refer to 9 hours and 59 minutes. 1. While the oven door is displayed. Leading zeroes do not...
Use & Care Guide
Page 6
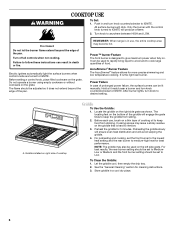
... be used on the left side grate. REMEMBER: When range is designed to medium-high heat for cleaning instructions. 3. Cooking sprays may also be lit manually. Preheat the griddle for more precise simmering and low temperature cooking. For preheating and cooking, set to IGNITE. Failure to remove. 3. AccuSimmer® Burner Feature...
... be used on the left side grate. REMEMBER: When range is designed to medium-high heat for cleaning instructions. 3. Cooking sprays may also be lit manually. Preheat the griddle for more precise simmering and low temperature cooking. For preheating and cooking, set to IGNITE. Failure to remove. 3. AccuSimmer® Burner Feature...

Installation Guide
Page 2
... the potential hazard is not followed exactly, a fire or explosion may cause ignition and combustion problems with this manual and on your gas supplier. Gas suppliers recommend that blows air downward toward this manual is , tell you how to light any appliance. • Do not touch any electrical switch. • Do not...
... the potential hazard is not followed exactly, a fire or explosion may cause ignition and combustion problems with this manual and on your gas supplier. Gas suppliers recommend that blows air downward toward this manual is , tell you how to light any appliance. • Do not touch any electrical switch. • Do not...

Installation Guide
Page 6
.... With LP gas, piping or tubing size can be used . Rigid pipe connection: The rigid pipe connection requires a combination of LP gas must conform with a manual shutoff valve. Securely tighten all governing codes and ordinances. Observe all gas connections. latest edition. See "Gas Conversions" section. NOTE: Pipe-joint compounds that can...
.... With LP gas, piping or tubing size can be used . Rigid pipe connection: The rigid pipe connection requires a combination of LP gas must conform with a manual shutoff valve. Securely tighten all governing codes and ordinances. Observe all gas connections. latest edition. See "Gas Conversions" section. NOTE: Pipe-joint compounds that can...

Installation Guide
Page 7
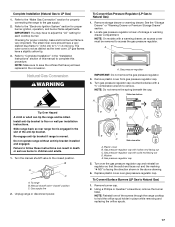
... must be necessary to lower the rear leveling legs one-half turn. C A B A. For elevations above ½ psi gauge (14" WCP) The range and its individual manual shutoff valve during any pressure testing of ½ psi (3.5 kPa). On Ranges Equipped with a warming drawer or premium storage drawer, the rear legs cannot be...
... must be necessary to lower the rear leveling legs one-half turn. C A B A. For elevations above ½ psi gauge (14" WCP) The range and its individual manual shutoff valve during any pressure testing of ½ psi (3.5 kPa). On Ranges Equipped with a warming drawer or premium storage drawer, the rear legs cannot be...
Installation Guide
Page 9
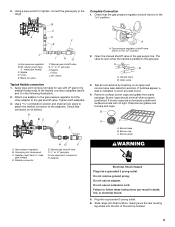
...death, fire, or electrical shock. 5. Burner caps should be level when properly positioned. Place burner grates over burners and caps. Manual gas shutoff valve F. ½" or ¾" gas pipe G. Manual gas shutoff valve G. ½" or ¾" gas pipe H. If bubbles appear, a leak is not kinked. Use pipe-joint...parts package. Do not use an extension cord. Apply pipe-joint compound made for use with LP gas to the range. Open the manual shutoff valve in the following illustration). 2. 2. Using a pipe wrench to tighten, connect the gas supply to the smaller thread ends ...
...death, fire, or electrical shock. 5. Burner caps should be level when properly positioned. Place burner grates over burners and caps. Manual gas shutoff valve F. ½" or ¾" gas pipe G. Manual gas shutoff valve G. ½" or ¾" gas pipe H. If bubbles appear, a leak is not kinked. Use pipe-joint...parts package. Do not use an extension cord. Apply pipe-joint compound made for use with LP gas to the range. Open the manual shutoff valve in the following illustration). 2. 2. Using a pipe wrench to tighten, connect the gas supply to the smaller thread ends ...

Installation Guide
Page 14
... all gas connections. Do not operate range without anti-tip bracket installed and engaged. To range B. Gas supply line 2. Install a shut-off valve. Manual shutoff valve "closed position. See the "Storage Drawer" or "Warming Drawer or Premium Storage Drawer" section. 2. NOTE: On models with a warming drawer...to access the gas pressure regulator. Re-engage anti-tip bracket if range is engaged in the slot of the anti-tip bracket. Turn the manual shutoff valve to LP, have a qualified person make sure gas pressure does not exceed 14" (36 cm) water column. A A. If connected...
... all gas connections. Do not operate range without anti-tip bracket installed and engaged. To range B. Gas supply line 2. Install a shut-off valve. Manual shutoff valve "closed position. See the "Storage Drawer" or "Warming Drawer or Premium Storage Drawer" section. 2. NOTE: On models with a warming drawer...to access the gas pressure regulator. Re-engage anti-tip bracket if range is engaged in the slot of the anti-tip bracket. Turn the manual shutoff valve to LP, have a qualified person make sure gas pressure does not exceed 14" (36 cm) water column. A A. If connected...
Installation Guide
Page 17
..." in the above drawing. 6. Locate gas pressure regulator at rear of this procedure. NOTE: Do not remove the spring beneath the cap. To range B. Manual shutoff valve "closed position. Remove burner cap. 2. IMPORTANT: You may have a very distinct blue flame ¼" (0.64 cm) to save the orifices that... end faces out and the marking " NG" is not as distinct as the inner cone. The small inner cone should have to complete this manual to adjust the "LO" setting for properly connecting the range to Natural Gas) 1. NOTE: Make sure to ½" (1.3 cm) long. Failure to...
..." in the above drawing. 6. Locate gas pressure regulator at rear of this procedure. NOTE: Do not remove the spring beneath the cap. To range B. Manual shutoff valve "closed position. Remove burner cap. 2. IMPORTANT: You may have a very distinct blue flame ¼" (0.64 cm) to save the orifices that... end faces out and the marking " NG" is not as distinct as the inner cone. The small inner cone should have to complete this manual to adjust the "LO" setting for properly connecting the range to Natural Gas) 1. NOTE: Make sure to ½" (1.3 cm) long. Failure to...

Installation Guide
Page 19
... the "Electronic Ignition System" section for proper cooktop, bake and broil burner flame is very important. Position the broil burner against the top of this manual to remove. IMPORTANT: Do not overtighten. A x.xx B A C A. Use a ³⁄₈" combination wrench and turn the LP gas broil burner orifice hood counterclockwise to complete...
... the "Electronic Ignition System" section for proper cooktop, bake and broil burner flame is very important. Position the broil burner against the top of this manual to remove. IMPORTANT: Do not overtighten. A x.xx B A C A. Use a ³⁄₈" combination wrench and turn the LP gas broil burner orifice hood counterclockwise to complete...
Dimension Guide
Page 1
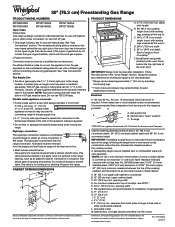
...(76.2 cm) Freestanding Gas Range PRODUCT MODEL NUMBERS WFG540H0A WFG720H0A WFG710H0A WFG540H0E WFG714HLA WFG715H0E Type of Gas Natural Gas: This range is design-certified by CSA International for.... Rigid pipe connection: The rigid pipe connection requires a combination of E.I J Because Whirlpool Corporation includes a continues commitment to improve our products, we reserve the right to side...used in a location that resist the action of LP gas must be level with a manual shutoff valve. Shutoff valve "open" position C. opening width F. LP gas conversion: Conversion...
...(76.2 cm) Freestanding Gas Range PRODUCT MODEL NUMBERS WFG540H0A WFG720H0A WFG710H0A WFG540H0E WFG714HLA WFG715H0E Type of Gas Natural Gas: This range is design-certified by CSA International for.... Rigid pipe connection: The rigid pipe connection requires a combination of E.I J Because Whirlpool Corporation includes a continues commitment to improve our products, we reserve the right to side...used in a location that resist the action of LP gas must be level with a manual shutoff valve. Shutoff valve "open" position C. opening width F. LP gas conversion: Conversion...


