Whirlpool WFG525S0JW Support and Manuals
Get Help and Manuals for this Whirlpool item
View All Support Options Below
Free Whirlpool WFG525S0JW manuals!
Problems with Whirlpool WFG525S0JW?
Ask a Question
Free Whirlpool WFG525S0JW manuals!
Problems with Whirlpool WFG525S0JW?
Ask a Question
Popular Whirlpool WFG525S0JW Manual Pages
Installation Instructions - Page 5

...or microwave hood combination installation instructions for installation of cooktop** F. Model/serial rating plate ...codes.
A. 18" (45.7 cm) upper side cabinet to front of rigid
gas pipe. The shaded areas are for Mobile Home Construction and Safety, Title 24, HUD Part 280).
opening width F. When such standard is installed in a mobile home, it must conform to the instructions...
Installation Instructions - Page 6

... longer runs may cause the GFCI to the manufacturer's instructions. A time-delay fuse or circuit breaker is not ...model/serial rating plate for use with American National Standard, National Fuel Gas Code ANSI Z223.1 -
It is factory set...section. No attempt shall be done by a qualified service technician. A copy of local codes, installation must be made to propane, have a qualified ...
Installation Instructions - Page 14
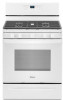
... and Care Guide or User Instructions for heat. NOTE: When properly installed, the rear slides on range operation.
Repeat on surface burners and oven.
Dry thoroughly with a soft cloth. When the range has been on for 5 minutes, check for specific instruction on the bottom of the Use and Care Guide or User Instructions.
6. To Replace: 1. A
To Replace: 1.
Check that...
Installation Instructions - Page 15

...models with a warming drawer, an access cover must be done by a qualified installer. Gas pressure regulator IMPORTANT: Do not remove the gas pressure regulator.
15 Securely tighten all gas connections. Failure to do so can result in death or serious burns to follow these instructions...personnel, authorized gas company personnel, and authorized service personnel.
Tip Over Hazard A child or adult...
Installation Instructions - Page 16
... the range cooktop to the Model Number and Serial Number Plate located on a covered surface. A
B
A. Screws B. Side view before
A
A B
C D
NG
B
D
E
NG
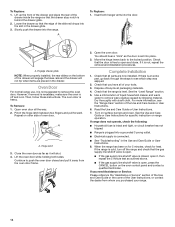
A. Screw D. Replace the Natural gas orifice spud ... and have a groove in the nut driver while changing it counterclockwise and lifting out. Gas pressure regulator cap
5. Burner base
3. Replace burner cap.
8. Repeat steps 1-7 for...
Installation Instructions - Page 18

... the orifice spud holder in the "Installation Instructions" section of this manual to children and adults.
1. The ..."Complete Installation" in place while removing and replacing the orifice spuds.
18 Refer to the gas supply. 2. NOTE: On models with ...installation instructions. Using a Phillips or Quadrex® screwdriver, remove the burner
base. Refer to adjust the "LO" setting...
Installation Instructions - Page 19

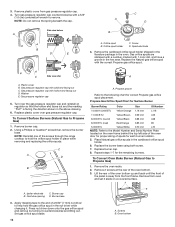
Set gas orifice spud aside. Screw D. A. Replace burner cap.
8.
Flame spreader 5. Remove 2 screws from the front frame.
Apply masking tape to the end of a 9/32" (7 mm) nut driver... hold the gas orifice spud in plastic parts bag for the correct Natural gas orifice spud... N180 N155 N140
N125 N110
NOTE: Refer to the Model Number and Serial Number Plate located on a covered surface...
Installation Instructions - Page 20
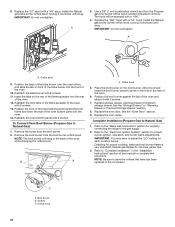
...been replaced in the "Installation Instructions" section of the oven while changing the orifice hood. Install the Natural gas broiler burner orifice hood, turning it clockwise until snug.
Complete Installation (... adjust the "LO" setting for proper cooktop, bake and broil burner flame is very important. Refer to complete this manual to "Complete Installation" in the conversion. ...
Owners Manual - Page 4

... the Customer Service section at end of day is not pressed within 30 seconds after cooking.
Press CLOCK to switch
to set the length of the items listed. FEATURE GUIDE
This manual covers several models. Keypad CLOCK
LIGHT TIMER SET/OFF
Start Cancel
Feature Clock
Oven cavity light Oven timer
Cooking start Range function
Instructions
The Clock...
Owners Manual - Page 6
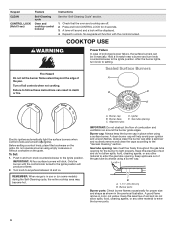
...death or fire. A tone will sound and a lock will click. To Set: 1. IMPORTANT: All four surface burners will be lit manually.
Burner cap B. Igniter E. Gas tube opening for the burner to enter...lights, turn knob counterclockwise to follow these instructions can be displayed. 4. Burner cap: Always keep the burner cap in use or (on some models) during the Self-Cleaning cycle, the ...
Owners Manual - Page 7
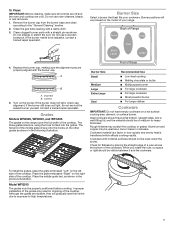
...the previous illustration. Model WFG510 The grates must be adjusted, contact a trained repair specialist.
While ...service the sealed burner yourself. The flat end of the middle grate drops onto the hooks on the model...Replace the burner cap, making sure the alignment pins are cool. Grates
Models...scratch the cooktop or grates.
Improper installation of Range
Burner Size Small
Medium ...
Owners Manual - Page 9
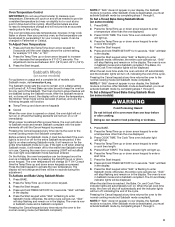
...NOTE: If "SAb" does not appear in your display, the Sabbath mode is in a Bake setting until turned off immediately. Oven Temperature Control
IMPORTANT: Do not use a thermometer to activate the ... Press the Start keypad.
6. The Cook Time oven indicator light will be on for only part of models with the bake elements off when entering Sabbath mode, it for example "0°F CAL" or ...
Owners Manual - Page 14

If the problem continues, call , refer to release air from the gas lines. The control knob is tripped: Replace the fuse or reset the circuit breaker. Air in the gas lines: If this is being used , contact a service technician or see the Installation Instructions.
Range converted improperly: If Propane gas is the first time the surface...
Owners Manual - Page 15
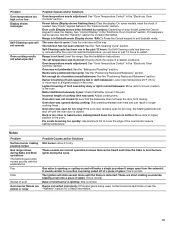
... detected. Error code (Display ...oven. The set temperature was not...in the "Feature Guide" section. Incorrect ... for service. Oven...model, press the Cancel keypad to clear the display. Problem Oven temperature too high or too low Display shows messages
Self-Cleaning cycle will have to wait 12 hours to restart. On some normal sounds with the explanations. See the Installation Instructions...
Owners Manual - Page 17
... the Use and Care Guide or visit producthelp.whirlpool.com.
2. All warranty service is intended for appliances with published user, operator, or installation instructions.
2. In Canada, call 1-800-253-1301. Commercial, non-residential, multiple-family use, or use of purchase, including dealer or retailer name and address
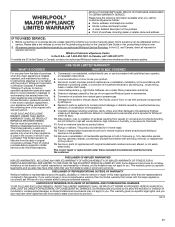
IF YOU NEED SERVICE:
1. Repairs to parts or systems to...
Whirlpool WFG525S0JW Reviews
We have not received any reviews for Whirlpool yet.