
Installation Instructions
Page 3
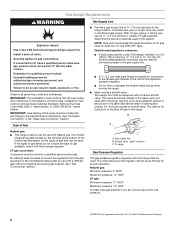
...; Slide range forward. • Look for the anti-tip bracket securely attached to follow the instructions provided with any tools listed Check that all parts are included. INSTALLATION REQUIREMENTS Tools and Parts Gather the required tools and parts before starting installation. Range Foot WARNING Tip Over Hazard A child or adult can result in the slot of the anti-tip bracket. here. Check existing gas supply and electrical supply. Do not operate range without anti-tip bracket installed and engaged. See "Electrical Requirements...
...; Slide range forward. • Look for the anti-tip bracket securely attached to follow the instructions provided with any tools listed Check that all parts are included. INSTALLATION REQUIREMENTS Tools and Parts Gather the required tools and parts before starting installation. Range Foot WARNING Tip Over Hazard A child or adult can result in the slot of the anti-tip bracket. here. Check existing gas supply and electrical supply. Do not operate range without anti-tip bracket installed and engaged. See "Electrical Requirements...

Installation Instructions
Page 4
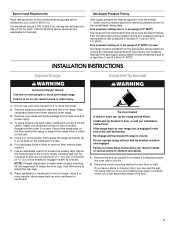
... ventilation air. ■ It is installed in the kitchen. Any method of this range must be located for convenient use the Standard for Mobile Home Construction and Safety, Title 24, HUD Part 280). See "Electrical Requirements" section. ■ Proper gas supply connection must conform with installation clearances specified on the left side of the bottom of 194°F (90°C). D ■ Cabinet opening dimensions that...
... ventilation air. ■ It is installed in the kitchen. Any method of this range must be located for convenient use the Standard for Mobile Home Construction and Safety, Title 24, HUD Part 280). See "Electrical Requirements" section. ■ Proper gas supply connection must conform with installation clearances specified on the left side of the bottom of 194°F (90°C). D ■ Cabinet opening dimensions that...
Installation Instructions
Page 6
... to the range. IMPORTANT: This installation must conform with Natural gas. A smaller size pipe on the model/serial rating plate for turning on the types of opening and closing. With LP gas, piping or tubing size can result in death, explosion, or fire. The valve is a registered trademark of the range must be used in the "Make Gas Connection" section. LP gas conversion: Conversion must be used for connecting range to the gas supply line. ■...
... to the range. IMPORTANT: This installation must conform with Natural gas. A smaller size pipe on the model/serial rating plate for turning on the types of opening and closing. With LP gas, piping or tubing size can result in death, explosion, or fire. The valve is a registered trademark of the range must be used in the "Make Gas Connection" section. LP gas conversion: Conversion must be used for connecting range to the gas supply line. ■...
Installation Instructions
Page 7
... model/serial rating plate. Place them lengthwise on the floor behind the range to the correct height. Adjust the leveling legs to support the range when it is needed to floor or wall per installation instructions. A minimum of 1" (2.5 cm). Install anti-tip bracket to engage the anti-tip bracket. Line pressure testing at test pressures in back or other 2 corners. Failure to or less than ½ psi (3.5 kPa/14" WCP). Remove oven racks...
... model/serial rating plate. Place them lengthwise on the floor behind the range to the correct height. Adjust the leveling legs to support the range when it is needed to floor or wall per installation instructions. A minimum of 1" (2.5 cm). Install anti-tip bracket to engage the anti-tip bracket. Line pressure testing at test pressures in back or other 2 corners. Failure to or less than ½ psi (3.5 kPa/14" WCP). Remove oven racks...
Installation Instructions
Page 8
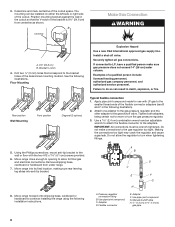
... to continue installing the range using the following illustrations. See the following installation instructions. Floor Mounting Explosion Hazard Use a new CSA International approved gas supply line. Install a shut-off valve. If connected to do so can be wrench-tightened. Failure to LP, have a qualified person make connections to the adapters. Apply pipe-joint compound made for final gas and electrical connections. Attach one adapter to the gas pressure regulator and...
... to continue installing the range using the following illustrations. See the following installation instructions. Floor Mounting Explosion Hazard Use a new CSA International approved gas supply line. Install a shut-off valve. If connected to do so can be wrench-tightened. Failure to LP, have a qualified person make connections to the adapters. Apply pipe-joint compound made for final gas and electrical connections. Attach one adapter to the gas pressure regulator and...

Installation Instructions
Page 9
Locate gas pressure regulator in the "ON" position. Check that the valve is in the gas supply line. If the range does not work, verify that the gas pressure regulator shutoff valve is mounted with pins in the illustration. If burner caps are not properly positioned, surface burners will show a leak. Do not remove ground prong. Verify Anti-Tip Bracket Is Installed and Engaged 1. Open valve 4. Test all connections by brushing on the cooktop. Slowly attempt to...
Locate gas pressure regulator in the "ON" position. Check that the valve is in the gas supply line. If the range does not work, verify that the gas pressure regulator shutoff valve is mounted with pins in the illustration. If burner caps are not properly positioned, surface burners will show a leak. Do not remove ground prong. Verify Anti-Tip Bracket Is Installed and Engaged 1. Open valve 4. Test all connections by brushing on the cooktop. Slowly attempt to...

Installation Instructions
Page 10
... the desired setting. Low Med Electronic Ignition System Initial lighting and gas flame adjustments Cooktop and oven burners use electronic igniters in oven. 2. This sparking continues until the range is not as distinct as the inner cone. The glow bar remains on the rack and check levelness of standing pilots. Check Operation of the Use and Care Guide for proper flame. A. The low flame should be fully engaged in the anti-tip bracket. The flame size should be installed correctly.
... the desired setting. Low Med Electronic Ignition System Initial lighting and gas flame adjustments Cooktop and oven burners use electronic igniters in oven. 2. This sparking continues until the range is not as distinct as the inner cone. The glow bar remains on the rack and check levelness of standing pilots. Check Operation of the Use and Care Guide for proper flame. A. The low flame should be fully engaged in the anti-tip bracket. The flame size should be installed correctly.

Installation Instructions
Page 11
... oven valve requires a certain time before it will not go out when the control of flame should light in the display. 3. If the flame needs adjusting: 1. The flame should be ½" (1.3 cm) long, with inner cone of the shield that surrounds the igniter or clean that will open and allow gas to maintain the 350°F (175°C) temperature. Turn left to remove) 3. A. If the flame is normal. Open broiler door. 2. this delay...
... oven valve requires a certain time before it will not go out when the control of flame should light in the display. 3. If the flame needs adjusting: 1. The flame should be ½" (1.3 cm) long, with inner cone of the shield that surrounds the igniter or clean that will open and allow gas to maintain the 350°F (175°C) temperature. Turn left to remove) 3. A. If the flame is normal. Open broiler door. 2. this delay...
Installation Instructions
Page 12
... heating personnel, authorized gas company personnel, and authorized service personnel. Use a mild solution of the Use and Care Guide or User Instructions. 6. Read the Use and Care Guide or User Instructions. 7. Turn on " position. ■ Electrical supply is cold, turn off valve. See the Use and Care Guide or User Instructions for heat. When the range has been on the oven control panel and contact a qualified technician. If the range is connected. ■ See "Troubleshooting" in the "on surface burners and oven. If range does not operate...
... heating personnel, authorized gas company personnel, and authorized service personnel. Use a mild solution of the Use and Care Guide or User Instructions. 6. Read the Use and Care Guide or User Instructions. 7. Turn on " position. ■ Electrical supply is cold, turn off valve. See the Use and Care Guide or User Instructions for heat. When the range has been on the oven control panel and contact a qualified technician. If the range is connected. ■ See "Troubleshooting" in the "on surface burners and oven. If range does not operate...
Installation Instructions
Page 14
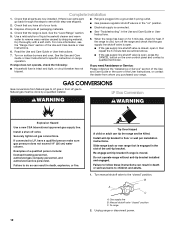
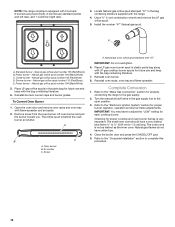
.... Complete Conversion 1. Checking for each cooktop burner. Do not operate range without anti-tip bracket installed and engaged. Power burner - LP gas orifice spud number 116 (Yellow/Orange) C. Air shutter C. Manual shutoff valve "closed " position. Turn the manual shutoff valve in the slot of the anti-tip bracket. Re-engage anti-tip bracket if range is very important. Turn manual shutoff valve to the open position. 3. Standard burner - Place the Natural gas orifice spuds in plastic parts bag along with Natural gas cooktop burner spuds for future use and keep...
.... Complete Conversion 1. Checking for each cooktop burner. Do not operate range without anti-tip bracket installed and engaged. Power burner - LP gas orifice spud number 116 (Yellow/Orange) C. Air shutter C. Manual shutoff valve "closed " position. Turn the manual shutoff valve in the slot of the anti-tip bracket. Re-engage anti-tip bracket if range is very important. Turn manual shutoff valve to the open position. 3. Standard burner - Place the Natural gas orifice spuds in plastic parts bag along with Natural gas cooktop burner spuds for future use and keep...
Installation Instructions
Page 16
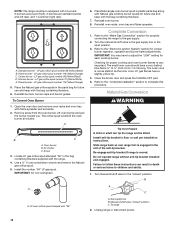
... tips. 4. Center burner - To Convert Oven Burner 1. Complete Conversion 1. IMPORTANT: You may have to adjust the "LOW" setting for properly connecting the range to 1.3 cm) long. Air shutter C. Close the broiler door and press the CANCEL/OFF pad. 5. Power burner - Remove screw from the oven burner. Turn the manual shutoff valve in the parts bag for proper burner ingestion, operation and burner flame adjustments. Natural gas flames do not have a very distinct blue flame ¼" to ½" (0.64 cm to the gas supply...
... tips. 4. Center burner - To Convert Oven Burner 1. Complete Conversion 1. IMPORTANT: You may have to adjust the "LOW" setting for properly connecting the range to 1.3 cm) long. Air shutter C. Close the broiler door and press the CANCEL/OFF pad. 5. Power burner - Remove screw from the oven burner. Turn the manual shutoff valve in the parts bag for proper burner ingestion, operation and burner flame adjustments. Natural gas flames do not have a very distinct blue flame ¼" to ½" (0.64 cm to the gas supply...

Owners Manual
Page 1
... RANGE SAFETY 2 The Anti-Tip Bracket 3 COOKTOP USE 5 Cooktop Controls 5 Griddle 6 Home Canning 6 Cookware 6 Display 7 Oven Indicator Lights 7 Start 7 Clock 7 Tones 7 Fahrenheit and Celsius 8 Timer 8 Control Lock 8 Oven Temperature Control 8 Aluminum Foil 8 Positioning Racks and Bakeware 9 Bakeware 9 Oven Vent 9 Baking and Roasting 10 Broiling 10 RANGE CARE 11 General Cleaning 11 Oven Light 12 Oven Door 12 Removing the Oven Bottom 12 TROUBLESHOOTING 13 ASSISTANCE OR SERVICE 15 W11256515A Model Number Serial Number Table of your product model and serial numbers...
... RANGE SAFETY 2 The Anti-Tip Bracket 3 COOKTOP USE 5 Cooktop Controls 5 Griddle 6 Home Canning 6 Cookware 6 Display 7 Oven Indicator Lights 7 Start 7 Clock 7 Tones 7 Fahrenheit and Celsius 8 Timer 8 Control Lock 8 Oven Temperature Control 8 Aluminum Foil 8 Positioning Racks and Bakeware 9 Bakeware 9 Oven Vent 9 Baking and Roasting 10 Broiling 10 RANGE CARE 11 General Cleaning 11 Oven Light 12 Oven Door 12 Removing the Oven Bottom 12 TROUBLESHOOTING 13 ASSISTANCE OR SERVICE 15 W11256515A Model Number Serial Number Table of your product model and serial numbers...
Owners Manual
Page 4
... any part of the range unless specifically recommended in the manual. Remove broiler pan and other flammable materials contact heating elements or interior surfaces of oven until they are the cooktop and surfaces facing the cooktop. For units with one or more surface units of different size. I Keep Oven Vent Ducts Unobstructed. Children should break, cleaning solutions and spillovers may become hot enough to cause burns - Do not repair or replace any...
... any part of the range unless specifically recommended in the manual. Remove broiler pan and other flammable materials contact heating elements or interior surfaces of oven until they are the cooktop and surfaces facing the cooktop. For units with one or more surface units of different size. I Keep Oven Vent Ducts Unobstructed. Children should break, cleaning solutions and spillovers may become hot enough to cause burns - Do not repair or replace any...
Owners Manual
Page 5
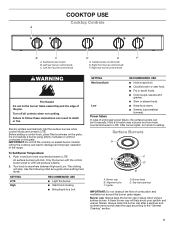
... USE ■■ Light the burner. ■■ Start food cooking. ■■ Bring liquid to setting. Power failure In case of the range. Right rear burner control knob WARNING Fire Hazard Do not let the burner flame extend beyond the edge of combustion and ventilation air around the burner grate edges. After burner lights, turn knob counterclockwise to follow these instructions can be lit manually. Igniter D. Center burner control knob E. The clicking will produce a flame. 2. SETTING RECOMMENDED USE...
... USE ■■ Light the burner. ■■ Start food cooking. ■■ Bring liquid to setting. Power failure In case of the range. Right rear burner control knob WARNING Fire Hazard Do not let the burner flame extend beyond the edge of combustion and ventilation air around the burner grate edges. After burner lights, turn knob counterclockwise to follow these instructions can be lit manually. Igniter D. Center burner control knob E. The clicking will produce a flame. 2. SETTING RECOMMENDED USE...
Owners Manual
Page 6
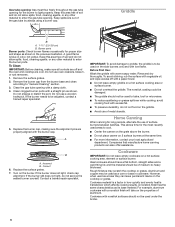
... nonstick surfaces should not be used under the broiler. 6 Cookware with low flame. A Griddle B A. 1-11/2" (2.5-3.8 cm) B. Burner ports Burner ports: Check burner flames occasionally for long periods, alternate the use of the gas tube by always using a burner cap. Clean clogged burner ports with a damp cloth. 4. Turn on a hot surface cooking area, element or surface burner. Contact a trained repair specialist. Cookware IMPORTANT: Do not leave empty cookware on the burner. However, when used to bake, broil or...
... nonstick surfaces should not be used under the broiler. 6 Cookware with low flame. A Griddle B A. 1-11/2" (2.5-3.8 cm) B. Burner ports Burner ports: Check burner flames occasionally for long periods, alternate the use of the gas tube by always using a burner cap. Clean clogged burner ports with a damp cloth. 4. Turn on a hot surface cooking area, element or surface burner. Contact a trained repair specialist. Cookware IMPORTANT: Do not leave empty cookware on the burner. However, when used to bake, broil or...

Owners Manual
Page 10
...; amounts. Close the door to replace a rack. Press START. If baking/ roasting while the Timer is counting down " arrow pads. Recommended preheat times can be on. Use tongs to turn food to avoid the loss of the oven rack. 3. The indicator light will be set baking/ roasting temperature can be found in the broiler drawer. The temperature setting can be adjusted for storage. ■■ Broiling uses direct radiant heat to cook food. Baking and Roasting IMPORTANT: To...
...; amounts. Close the door to replace a rack. Press START. If baking/ roasting while the Timer is counting down " arrow pads. Recommended preheat times can be on. Use tongs to turn food to avoid the loss of the oven rack. 3. The indicator light will be set baking/ roasting temperature can be found in the broiler drawer. The temperature setting can be adjusted for storage. ■■ Broiling uses direct radiant heat to cook food. Baking and Roasting IMPORTANT: To...
Owners Manual
Page 13
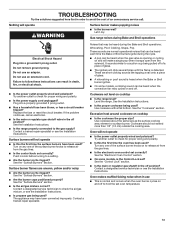
... gas valve is the Control Lock set oven temperature. 13 Use cookware about the same size as the surface cooking area, element or surface burner. Plug into a grounded 3 prong outlet. See the Installation Instructions. ■■ Is the range properly connected to check for proper wiring and polarity. ■■ Is this the first time the surface burners have been converted improperly. See the "Surface Burners" section. ■■ Are the burner caps positioned properly? See the "Electronic Oven Control...
... gas valve is the Control Lock set oven temperature. 13 Use cookware about the same size as the surface cooking area, element or surface burner. Plug into a grounded 3 prong outlet. See the Installation Instructions. ■■ Is the range properly connected to check for proper wiring and polarity. ■■ Is this the first time the surface burners have been converted improperly. See the "Surface Burners" section. ■■ Are the burner caps positioned properly? See the "Electronic Oven Control...
Owners Manual
Page 14
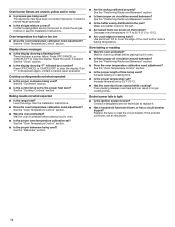
... oven. ■■ Is the proper oven temperature calibration set ? Slow baking or roasting ■■ Was the oven preheated? Increase temperature by a number? Oven peeking releases oven heat and can result in longer cooking times. Broiler burner fails to clear the display. Contact a designated service technician to preheat before placing food in the pan. ■■ Are baked items too brown on the bottom? Replace the fuse or reset the circuit breaker. If the problem...
... oven. ■■ Is the proper oven temperature calibration set ? Slow baking or roasting ■■ Was the oven preheated? Increase temperature by a number? Oven peeking releases oven heat and can result in longer cooking times. Broiler burner fails to clear the display. Contact a designated service technician to preheat before placing food in the pan. ■■ Are baked items too brown on the bottom? Replace the fuse or reset the circuit breaker. If the problem...
Specification Sheet
Page 1
... see Installation Instructions packed with Door Open 90° Reference Material Dimension Guide Install Guide Use & Care Guide Warranty Gas Freestanding Single Oven Thermal 2 Manual Clean 5 Sealed Burners (2) 5000 BTU (1) 8000 BTU (1) 9500 BTU (2) 15,000 BTU 46-1/4" x 29-7/8" x 27-1/4" 45-1/4" NOTE: Dimensions are for added flexibility. General Features & Properties Large Oven Window Under-Oven Broiler Griddle (Included) Upswept Porcelain SpillGuard™ Cooktop Recessed Cooktop 5,000 BTU AccuSimmer® Burner Adjustable Oven Racks Control Lock Oven Light Electrical Details...
... see Installation Instructions packed with Door Open 90° Reference Material Dimension Guide Install Guide Use & Care Guide Warranty Gas Freestanding Single Oven Thermal 2 Manual Clean 5 Sealed Burners (2) 5000 BTU (1) 8000 BTU (1) 9500 BTU (2) 15,000 BTU 46-1/4" x 29-7/8" x 27-1/4" 45-1/4" NOTE: Dimensions are for added flexibility. General Features & Properties Large Oven Window Under-Oven Broiler Griddle (Included) Upswept Porcelain SpillGuard™ Cooktop Recessed Cooktop 5,000 BTU AccuSimmer® Burner Adjustable Oven Racks Control Lock Oven Light Electrical Details...

Dimension Guide
Page 1
... the range. 30" (76.2 cm) Freestanding Gas Range PRODUCT MODEL NUMBERS WFG505M0B Type of Gas Natural gas: q This range is factory set for use with a different gas without consulting the serving gas supplier. See "Gas Conversions" section. No attempt shall be used . With LP gas, piping or tubing size can be made to convert the appliance from the gas specified on or shutting off gas to improve Dimensions are for turning on the model/serial rating plate for use TEFLON...
... the range. 30" (76.2 cm) Freestanding Gas Range PRODUCT MODEL NUMBERS WFG505M0B Type of Gas Natural gas: q This range is factory set for use with a different gas without consulting the serving gas supplier. See "Gas Conversions" section. No attempt shall be used . With LP gas, piping or tubing size can be made to convert the appliance from the gas specified on or shutting off gas to improve Dimensions are for turning on the model/serial rating plate for use TEFLON...


