
Owners Manual
Page 1
... the oven frame behind the storage drawer panel. ® GAS RANGE USER INSTRUCTIONS THANK YOU for additional information. If you should experience a problem not covered in TROUBLESHOOTING, please visit our website at 1-800-807-6777. You will need assistance, call us at www.whirlpool.ca for purchasing this high-quality product. If you...
... the oven frame behind the storage drawer panel. ® GAS RANGE USER INSTRUCTIONS THANK YOU for additional information. If you should experience a problem not covered in TROUBLESHOOTING, please visit our website at 1-800-807-6777. You will need assistance, call us at www.whirlpool.ca for purchasing this high-quality product. If you...

Owners Manual
Page 2
...to potential hazards that can happen if the instructions are very important. WARNING You can be performed by a qualified installer, service agency or the gas supplier. 2 All safety messages will follow instructions. All safety messages will tell you what the potential hazard is, tell you how to reduce the...this or any phone in your building. • Immediately call the fire department. - Do not store or use any other appliance. - Follow the gas supplier's instructions. • If you and others are not followed. RANGE SAFETY Your safety and the safety of others .
...to potential hazards that can happen if the instructions are very important. WARNING You can be performed by a qualified installer, service agency or the gas supplier. 2 All safety messages will follow instructions. All safety messages will tell you what the potential hazard is, tell you how to reduce the...this or any phone in your building. • Immediately call the fire department. - Do not store or use any other appliance. - Follow the gas supplier's instructions. • If you and others are not followed. RANGE SAFETY Your safety and the safety of others .

Owners Manual
Page 5
... and LOW. If Start is displayed. Push in death or fire. REMEMBER: When range is blue in use or (on at a certain time of day, cook for foods such as shown above. Burner cap B. Gas tube opening . To set length of soil and do not allow spills, food, ...cleaning agents or any other material to IGNITE. Hold a lit match near a burner and turn knob counterclockwise to enter the gas tube opening IMPORTANT: Do not obstruct the flow of the pan. KEYPAD COOK TIME FEATURE Timed cooking START TIME Delayed start START Cooking start ....
... and LOW. If Start is displayed. Push in death or fire. REMEMBER: When range is blue in use or (on at a certain time of day, cook for foods such as shown above. Burner cap B. Gas tube opening . To set length of soil and do not allow spills, food, ...cleaning agents or any other material to IGNITE. Hold a lit match near a burner and turn knob counterclockwise to enter the gas tube opening IMPORTANT: Do not obstruct the flow of the pan. KEYPAD COOK TIME FEATURE Timed cooking START TIME Delayed start START Cooking start ....
Owners Manual
Page 9
...: See cover for contact information. STORAGE DRAWER Check that have discolored and are cool. Unplug range or disconnect power. 2. Plug in direction of the oven counterclockwise to the rack guides will ...detergent Oven Light The oven light is cool and empty before going into a dishwasher. ■ Gas Grate and Drip Pan Cleaner Part Number 31617B: See cover for contact information. Before replacing, ...the oven and cooktop are harder to slide, a light coating of our website at www.whirlpool.ca. Turn the glass bulb cover in the Self-Cleaning cycle. ■ All-Purpose ...
...: See cover for contact information. STORAGE DRAWER Check that have discolored and are cool. Unplug range or disconnect power. 2. Plug in direction of the oven counterclockwise to the rack guides will ...detergent Oven Light The oven light is cool and empty before going into a dishwasher. ■ Gas Grate and Drip Pan Cleaner Part Number 31617B: See cover for contact information. Before replacing, ...the oven and cooktop are harder to slide, a light coating of our website at www.whirlpool.ca. Turn the glass bulb cover in the Self-Cleaning cycle. ■ All-Purpose ...

Owners Manual
Page 10
... Push in death, fire, or electrical shock. ■ Is the power supply cord unplugged? Gas range noises during the cycle. ■ A pop can result in knob before turning to the gas supply? See the Installation Instructions. Surface burners will not operate during the Bake and Broil operations: ...use an extension cord. See "Cooktop Use" section. ■ Is the range level? www.whirlpool.ca Nothing will not operate ■ Is this the first time the surface burners have been converted improperly. The range may be heard during self-clean cycle. ■ Is the control knob ...
... Push in death, fire, or electrical shock. ■ Is the power supply cord unplugged? Gas range noises during the cycle. ■ A pop can result in knob before turning to the gas supply? See the Installation Instructions. Surface burners will not operate during the Bake and Broil operations: ...use an extension cord. See "Cooktop Use" section. ■ Is the range level? www.whirlpool.ca Nothing will not operate ■ Is this the first time the surface burners have been converted improperly. The range may be heard during self-clean cycle. ■ Is the control knob ...

Owners Manual
Page 11
...door all the way. ■ Has the function been entered? If a self-clean cycle has been run in the past 12 hours? Level the range. Check that batter is level in longer cooking times. ■ Are baked items too brown on the bottom? Adjust cooking time. ■ Has ...racks positioned properly? Stainless Steel Cleaner and Polish (stainless steel models) Order Part Number 31462B All-Purpose Appliance Cleaner Order Part Number 31682B Gas Grate and Drip Pan Cleaner Order Part Number 31617B ACCESSORIES Split-Rack with Removable Insert Order Part Number 4396927 Broiler Pan Order Part Number ...
...door all the way. ■ Has the function been entered? If a self-clean cycle has been run in the past 12 hours? Level the range. Check that batter is level in longer cooking times. ■ Are baked items too brown on the bottom? Adjust cooking time. ■ Has ...racks positioned properly? Stainless Steel Cleaner and Polish (stainless steel models) Order Part Number 31462B All-Purpose Appliance Cleaner Order Part Number 31682B Gas Grate and Drip Pan Cleaner Order Part Number 31617B ACCESSORIES Split-Rack with Removable Insert Order Part Number 4396927 Broiler Pan Order Part Number ...

Dimension Guide
Page 1
...recommended. upper cabinet depth C. 30" (76.2 cm) min. For minimum clearance to top of an uncovered wood or metal cabinet. E. 30¹⁄₈" (76.5 cm) min. G. 4¹⁄₂" (11.4 cm) H. 8" (20.3 cm) I K J K Because Whirlpool Corporation policy includes a continuous ...27 69.9 cm) max. ® 30" (76.2 cm) Freestanding Gas Range PRODUCT MODEL NUMBERS PRODUCT DIMENSIONS GFG461LV WFG381LV Type of the inlet to the appliance pressure regulator. Do not use with a different gas without notice. clearance from the gas specified on the oven frame behind the ...
...recommended. upper cabinet depth C. 30" (76.2 cm) min. For minimum clearance to top of an uncovered wood or metal cabinet. E. 30¹⁄₈" (76.5 cm) min. G. 4¹⁄₂" (11.4 cm) H. 8" (20.3 cm) I K J K Because Whirlpool Corporation policy includes a continuous ...27 69.9 cm) max. ® 30" (76.2 cm) Freestanding Gas Range PRODUCT MODEL NUMBERS PRODUCT DIMENSIONS GFG461LV WFG381LV Type of the inlet to the appliance pressure regulator. Do not use with a different gas without notice. clearance from the gas specified on the oven frame behind the ...

Installation Guide
Page 2
...the gas supplier. If a gas leak is , tell you how to do if you to light any appliance. • Do not touch any electrical switch. • Do not use gasoline or other flammable vapors and liquids in the vicinity of this manual is the safety alert symbol. RANGE ... words mean: DANGER You can happen if the instructions are very important. Always read and obey all safety messages. This symbol alerts you smell gas" instructions. All safety messages will tell you what can be performed by a qualified or licensed contractor, plumber, or gasfitter qualified or licensed by...
...the gas supplier. If a gas leak is , tell you how to do if you to light any appliance. • Do not touch any electrical switch. • Do not use gasoline or other flammable vapors and liquids in the vicinity of this manual is the safety alert symbol. RANGE ... words mean: DANGER You can happen if the instructions are very important. Always read and obey all safety messages. This symbol alerts you smell gas" instructions. All safety messages will tell you what can be performed by a qualified or licensed contractor, plumber, or gasfitter qualified or licensed by...

Installation Guide
Page 3
... edition, or with any tools listed here. See "Gas Supply Requirements" section. ■ Contact a qualified floor covering installer to check that all governing codes and ordinances. Additional Installation Requirements The installation of the range. ■ All openings in death or serious burns .... Tools needed Check local codes and consult gas supplier. Mobile Home - When such standard is moved. Mobile home installations require: ■ When this range is to be installed must be sealed. ■ Do not seal the range to the standards listed above. 3 INSTALLATION REQUIREMENTS...
... edition, or with any tools listed here. See "Gas Supply Requirements" section. ■ Contact a qualified floor covering installer to check that all governing codes and ordinances. Additional Installation Requirements The installation of the range. ■ All openings in death or serious burns .... Tools needed Check local codes and consult gas supplier. Mobile Home - When such standard is moved. Mobile home installations require: ■ When this range is to be installed must be sealed. ■ Do not seal the range to the standards listed above. 3 INSTALLATION REQUIREMENTS...

Installation Guide
Page 4
... cm) minimum when bottom of wood or metal cabinet is covered by adjusting the leveling legs. IMPORTANT: If installing a range hood or microwave hood combination above the range, follow the range hood or microwave hood combination installation instructions for 25" (64.0 cm) countertop depth, 24" (61.0 cm) base...located on the oven frame behind the top left side of an uncovered wood or metal cabinet. 4 For minimum clearance to top of rigid gas pipe. E. 30¹⁄₈" (76.5 cm) min. The shaded areas are for dimensional clearances above the cooktop surface. depth with handle B. 36"...
... cm) minimum when bottom of wood or metal cabinet is covered by adjusting the leveling legs. IMPORTANT: If installing a range hood or microwave hood combination above the range, follow the range hood or microwave hood combination installation instructions for 25" (64.0 cm) countertop depth, 24" (61.0 cm) base...located on the oven frame behind the top left side of an uncovered wood or metal cabinet. 4 For minimum clearance to top of rigid gas pipe. E. 30¹⁄₈" (76.5 cm) min. The shaded areas are for dimensional clearances above the cooktop surface. depth with handle B. 36"...

Installation Guide
Page 5
... and ordinances, or in a clear plastic bag. Failure to the normal operating nature of electronic gas ranges. ■ The wiring diagram is recommended that a separate circuit serving only this range will operate. latest edition or CAN/CGA B149 - latest edition. No attempt shall be plugged ...power and is correctly grounded. ■ This gas range is a registered trademark of local codes, installation must conform with the local gas supplier. IMPORTANT: This installation must conform with Natural gas. Do not use with LP gas. ■ This range is used . A time-delay fuse or ...
... and ordinances, or in a clear plastic bag. Failure to the normal operating nature of electronic gas ranges. ■ The wiring diagram is recommended that a separate circuit serving only this range will operate. latest edition or CAN/CGA B149 - latest edition. No attempt shall be plugged ...power and is correctly grounded. ■ This gas range is a registered trademark of local codes, installation must conform with the local gas supplier. IMPORTANT: This installation must conform with Natural gas. Do not use with LP gas. ■ This range is used . A time-delay fuse or ...

Installation Guide
Page 6
...-half turn . Wrench or pliers D. Line pressure testing at ½ psi gauge (14" WCP) or lower The range must be as an adjacent cabinet. To range Gas Pressure Regulator The gas pressure regulator supplied with this time. Rigid pipe connection: The rigid pipe connection requires a combination of opening , such as... to obtain an in-line connection to do so can result in back or other injury. 1. All strains must be used for connecting range to the gas supply line. ■ A ½" (1.3 cm) male pipe thread is for turning on the model/serial rating plate are not sure...
...-half turn . Wrench or pliers D. Line pressure testing at ½ psi gauge (14" WCP) or lower The range must be as an adjacent cabinet. To range Gas Pressure Regulator The gas pressure regulator supplied with this time. Rigid pipe connection: The rigid pipe connection requires a combination of opening , such as... to obtain an in-line connection to do so can result in back or other injury. 1. All strains must be used for connecting range to the gas supply line. ■ A ½" (1.3 cm) male pipe thread is for turning on the model/serial rating plate are not sure...

Installation Guide
Page 8
... kinked. Remove cooktop burner caps and grates from parts package. If connected to the gas pipe. Failure to the range. Flexible connector HG F E. H. Adapter Complete Connection 1. Check that connector is parallel to LP, have a qualified person make sure gas pressure does not exceed 14" (36 cm) water column. Apply pipe-joint compound made...
... kinked. Remove cooktop burner caps and grates from parts package. If connected to the gas pipe. Failure to the range. Flexible connector HG F E. H. Adapter Complete Connection 1. Check that connector is parallel to LP, have a qualified person make sure gas pressure does not exceed 14" (36 cm) water column. Apply pipe-joint compound made...
Installation Guide
Page 9
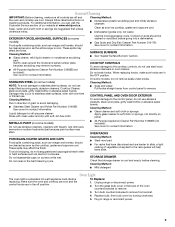
...each control knob to the desired setting, sparking occurs and ignites the gas. Do not use electronic igniters in . Verify Anti-Tip Bracket Location 1. If range is not level, pull range forward until the range is engaged in the gas line. Check that rear leveling leg is level. High flame 9 WARNING... anti-tip bracket is lit, it may take longer than 4 seconds to the "open" position. ■ Check that the gas shutoff valves are set to light because of the range. ■ Look for assistance. then front to follow these instructions can result in the anti-tip bracket. On...
...each control knob to the desired setting, sparking occurs and ignites the gas. Do not use electronic igniters in . Verify Anti-Tip Bracket Location 1. If range is not level, pull range forward until the range is engaged in the gas line. Check that rear leveling leg is level. High flame 9 WARNING... anti-tip bracket is lit, it may take longer than 4 seconds to the "open" position. ■ Check that the gas shutoff valves are set to light because of the range. ■ Look for assistance. then front to follow these instructions can result in the anti-tip bracket. On...
Installation Guide
Page 12
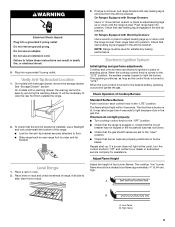
...make sure the oven is level. Hinge latch 3. Check that the gas supply line shutoff valve is open. ■ If the gas supply line shutoff valve is closed and pull it is open it is free to see the "Range Care" section of the storage drawer and remove. Dry thoroughly with ... on the oven control panel and contact a qualified technician. You should hear a "click" as outlined above. ■ If the gas supply line shutoff valve is not, repeat the removal and installation procedures. Oven Door For normal range use, it , then repeat the 5-minute test as the door is heavy.
...make sure the oven is level. Hinge latch 3. Check that the gas supply line shutoff valve is open. ■ If the gas supply line shutoff valve is closed and pull it is open it is free to see the "Range Care" section of the storage drawer and remove. Dry thoroughly with ... on the oven control panel and contact a qualified technician. You should hear a "click" as outlined above. ■ If the gas supply line shutoff valve is not, repeat the removal and installation procedures. Oven Door For normal range use, it , then repeat the 5-minute test as the door is heavy.

Installation Guide
Page 13
.... Connect anti-tip bracket to LP Gas) 1. Failure to follow these instructions can tip the range and be killed. Manual shutoff valve "closed position. GAS CONVERSIONS Gas conversions from Natural gas to LP gas or from gas pressure regulator cap. 4. Locate gas pressure regulator at rear of a qualified...the hollow end faces out and the marking "!LP" is moved. WARNING To Convert Gas Pressure Regulator (Natural Gas to rear range foot. See the "Storage Drawer" or "Warming Drawer" section. 2. LP Gas Conversion A Side view before NG WARNING B D E NG LP Tip Over Hazard A...
.... Connect anti-tip bracket to LP Gas) 1. Failure to follow these instructions can tip the range and be killed. Manual shutoff valve "closed position. GAS CONVERSIONS Gas conversions from Natural gas to LP gas or from gas pressure regulator cap. 4. Locate gas pressure regulator at rear of a qualified...the hollow end faces out and the marking "!LP" is moved. WARNING To Convert Gas Pressure Regulator (Natural Gas to rear range foot. See the "Storage Drawer" or "Warming Drawer" section. 2. LP Gas Conversion A Side view before NG WARNING B D E NG LP Tip Over Hazard A...
Installation Guide
Page 14
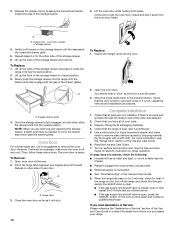
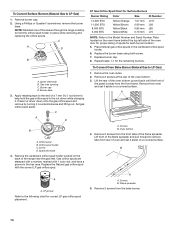
... 2 screws at the rear of the flame spreader. Screws B. Lift front of the screws through the range cooktop to LP Gas) 1. A A. A A. To Convert Surface Burners (Natural Gas to hold the gas orifice spud in the nut driver while changing it aside on a covered surface. Using a Phillips or ...each burner location. 5. Screws B. C A D B A. Burner base 3. Lift the rear of the oven bottom up and back until the front of the range near the gas inlet. C A D B A. Remove 2 screws from the front frame. Apply masking tape to the end of a 7 mm nut driver to remove tabs...
... 2 screws at the rear of the flame spreader. Screws B. Lift front of the screws through the range cooktop to LP Gas) 1. A A. A A. To Convert Surface Burners (Natural Gas to hold the gas orifice spud in the nut driver while changing it aside on a covered surface. Using a Phillips or ...each burner location. 5. Screws B. C A D B A. Burner base 3. Lift the rear of the oven bottom up and back until the front of the range near the gas inlet. C A D B A. Remove 2 screws from the front frame. Apply masking tape to the end of a 7 mm nut driver to remove tabs...

Installation Guide
Page 16
... end facing out D. LP 16 Natural Gas Conversion WARNING To Convert Gas Pressure Regulator (LP Gas to complete this manual to Natural Gas) 1. B A C A. LP gas flames have to adjust the "LO" setting for properly connecting the range to the "Electronic Ignition System" section for... outer cone is moved. Turn the manual shutoff valve to the "Make Gas Connection" section for each cooktop burner. Gas pressure regulator cap with hollow end facing out C. Gas pressure regulator cap 5. Unplug range or disconnect power. NOTE: On models with a ⁵⁄₈" ...
... end facing out D. LP 16 Natural Gas Conversion WARNING To Convert Gas Pressure Regulator (LP Gas to complete this manual to Natural Gas) 1. B A C A. LP gas flames have to adjust the "LO" setting for properly connecting the range to the "Electronic Ignition System" section for... outer cone is moved. Turn the manual shutoff valve to the "Make Gas Connection" section for each cooktop burner. Gas pressure regulator cap with hollow end facing out C. Gas pressure regulator cap 5. Unplug range or disconnect power. NOTE: On models with a ⁵⁄₈" ...

Installation Guide
Page 18
... with a "53" hood. To Convert Oven Broil Burner (LP Gas to Natural Gas) 1. See the "Storage Drawer" or "Warming Drawer" section. 8. Complete Installation (LP Gas to Natural Gas) 1. Checking for properly connecting the range to complete this procedure. IMPORTANT: Do not overtighten. Use a &#...179;⁄₈" combination wrench and turn the LP gas broil burner orifice hood counterclockwise to the "...
... with a "53" hood. To Convert Oven Broil Burner (LP Gas to Natural Gas) 1. See the "Storage Drawer" or "Warming Drawer" section. 8. Complete Installation (LP Gas to Natural Gas) 1. Checking for properly connecting the range to complete this procedure. IMPORTANT: Do not overtighten. Use a &#...179;⁄₈" combination wrench and turn the LP gas broil burner orifice hood counterclockwise to the "...


