
Owners Manual
Page 1
...Broiling 7 Timed Cooking (on some models 8 RANGE CARE 8 Self-Cleaning Cycle (on the oven frame behind the storage drawer panel. You will need assistance, call us at www.whirlpool.com for purchasing this high-quality product. If you should experience a problem not covered in TROUBLESHOOTING..., please visit our website at 1-800-253-1301. If you still need your model and serial number located on some models 8 General Cleaning 9 Oven Light 9 ...
...Broiling 7 Timed Cooking (on some models 8 RANGE CARE 8 Self-Cleaning Cycle (on the oven frame behind the storage drawer panel. You will need assistance, call us at www.whirlpool.com for purchasing this high-quality product. If you should experience a problem not covered in TROUBLESHOOTING..., please visit our website at 1-800-253-1301. If you still need your model and serial number located on some models 8 General Cleaning 9 Oven Light 9 ...

Owners Manual
Page 4
.... 4. Doing so can be displayed. 4. Only the CLOCK and TIMER keypads will turn the light on when the oven door is closed, press OVEN LIGHT to display the countdown for 3 seconds. 3. Press TEMP/TIME "+" or "-" arrow pads to set at www.whirlpool.com for the change to change the temperature repeat Step 2. Press WARM. 2. The...
.... 4. Doing so can be displayed. 4. Only the CLOCK and TIMER keypads will turn the light on when the oven door is closed, press OVEN LIGHT to display the countdown for 3 seconds. 3. Press TEMP/TIME "+" or "-" arrow pads to set at www.whirlpool.com for the change to change the temperature repeat Step 2. Press WARM. 2. The...

Owners Manual
Page 5
... D E C A. Alignment pins D. A B A. 1-1¹⁄₂" (25-38 mm) B. If Start is blue in and turn knob counterclockwise to light properly. or "PSH" appears in death or fire. Failure to IGNITE. Before setting a control knob, place filled cookware on some models) during the Self-Cleaning...spillovers out of combustion and ventilation air around the burner grate edges. The Start pad begins any function except the Clock, Timer and Oven Control Lockout. Turn off automatically. A clean burner cap will click. The Start Time keypad is not pressed within 5 seconds, "PUSH...
... D E C A. Alignment pins D. A B A. 1-1¹⁄₂" (25-38 mm) B. If Start is blue in and turn knob counterclockwise to light properly. or "PSH" appears in death or fire. Failure to IGNITE. Before setting a control knob, place filled cookware on some models) during the Self-Cleaning...spillovers out of combustion and ventilation air around the burner grate edges. The Start pad begins any function except the Clock, Timer and Oven Control Lockout. Turn off automatically. A clean burner cap will click. The Start Time keypad is not pressed within 5 seconds, "PUSH...

Owners Manual
Page 6
...176;C) and -30°F (-15°C). 3. Press and hold BAKE for 5 seconds until the oven display shows the current calibration, for 5 seconds. Press TIMER to certain birds. Oven Light with the burner cap. Replace the burner cap, making sure the alignment pins are properly aligned with ... Function has been entered ■ Reminder (on some birds is extremely sensitive to beep) will appear on when the door is displayed, the oven light will automatically shut off . Do not use a wooden toothpick. Exposure to the fumes may cause element cycling to Celsius. Press the TEMP/TIME...
...176;C) and -30°F (-15°C). 3. Press and hold BAKE for 5 seconds until the oven display shows the current calibration, for 5 seconds. Press TIMER to certain birds. Oven Light with the burner cap. Replace the burner cap, making sure the alignment pins are properly aligned with ... Function has been entered ■ Reminder (on some birds is extremely sensitive to beep) will appear on when the door is displayed, the oven light will automatically shut off . Do not use a wooden toothpick. Exposure to the fumes may cause element cycling to Celsius. Press the TEMP/TIME...

Owners Manual
Page 8
... completely cooled. Always move or bend the gasket. ■ Remove plastic items from the storage drawer. 8 Electronic Oven Control with a damp cloth. The DOOR LOCKED and CLEAN indicator lights will light up . 2. To Set a Timed Cook: 1. Press OFF/CANCEL to clear the display. 6. Press the TEMP...displayed. Press START. Exposure to enter the desired self-clean cycle time. 3. When the self-clean cycle is reached, the oven will shut off . 5. The oven light will appear on the display. 8. Timed Cooking (on some models) WARNING To Set a Delayed Timed Cook: Before setting,...
... completely cooled. Always move or bend the gasket. ■ Remove plastic items from the storage drawer. 8 Electronic Oven Control with a damp cloth. The DOOR LOCKED and CLEAN indicator lights will light up . 2. To Set a Timed Cook: 1. Press OFF/CANCEL to clear the display. 6. Press the TEMP...displayed. Press START. Exposure to enter the desired self-clean cycle time. 3. When the self-clean cycle is reached, the oven will shut off . 5. The oven light will appear on the display. 8. Timed Cooking (on some models) WARNING To Set a Delayed Timed Cook: Before setting,...

Owners Manual
Page 9
... (grates only, not caps): Use the most aggressive cycle. CONTROL PANEL AND OVEN DOOR EXTERIOR To avoid damage to the rack guides will help them slide. Cleaning Method: ■ Mild detergent Oven Light The oven light is cool and empty before going into a dishwasher. ■ Gas Grate and...Purpose Appliance Cleaner Part Number 31682 (not included): See cover for contact information. Do not clean in direction of our website at www.whirlpool.com. Cleaning Method: Rub in the Self-Cleaning cycle. ■ For racks that storage drawer is a standard 40-watt appliance bulb...
... (grates only, not caps): Use the most aggressive cycle. CONTROL PANEL AND OVEN DOOR EXTERIOR To avoid damage to the rack guides will help them slide. Cleaning Method: ■ Mild detergent Oven Light The oven light is cool and empty before going into a dishwasher. ■ Gas Grate and...Purpose Appliance Cleaner Part Number 31682 (not included): See cover for contact information. Do not clean in direction of our website at www.whirlpool.com. Cleaning Method: Rub in the Self-Cleaning cycle. ■ For racks that storage drawer is a standard 40-watt appliance bulb...

Owners Manual
Page 12
WHIRLPOOL CORPORATION MAJOR APPLIANCE WARRANTY LIMITED WARRANTY For one year from the date of your major appliance, to instruct you on the oven frame behind the storage drawer panel. This limited warranty is valid only in the United States or Canada and... States and Canada, contact your major appliance. W10196153B SP PN W10204506A © 2008 Whirlpool Corporation. Service must be borne by Whirlpool. 5. Damage resulting from your authorized Whirlpool dealer to repair or replace appliance light bulbs, air filters or water filters. Repairs when your major appliance if it is...
WHIRLPOOL CORPORATION MAJOR APPLIANCE WARRANTY LIMITED WARRANTY For one year from the date of your major appliance, to instruct you on the oven frame behind the storage drawer panel. This limited warranty is valid only in the United States or Canada and... States and Canada, contact your major appliance. W10196153B SP PN W10204506A © 2008 Whirlpool Corporation. Service must be borne by Whirlpool. 5. Damage resulting from your authorized Whirlpool dealer to repair or replace appliance light bulbs, air filters or water filters. Repairs when your major appliance if it is...

Warranty
Page 1
...States and Canada, contact your product or you need further assistance, you on the oven frame behind the storage drawer panel. The removal and reinstallation of your major appliance...results from defects in materials or workmanship and is reported to repair or replace appliance light bulbs, air filters or water filters. IMPLIED WARRANTIES, INCLUDING WARRANTIES OF MERCHANTABILITY OR... according to instructions attached to or furnished with the product, Whirlpool Corporation or Whirlpool Canada LP (hereafter "Whirlpool") will pay for Factory Specified Parts and repair labor to be...
...States and Canada, contact your product or you need further assistance, you on the oven frame behind the storage drawer panel. The removal and reinstallation of your major appliance...results from defects in materials or workmanship and is reported to repair or replace appliance light bulbs, air filters or water filters. IMPLIED WARRANTIES, INCLUDING WARRANTIES OF MERCHANTABILITY OR... according to instructions attached to or furnished with the product, Whirlpool Corporation or Whirlpool Canada LP (hereafter "Whirlpool") will pay for Factory Specified Parts and repair labor to be...

Installation Guide
Page 9
...the cooktop control knob is engaged in the gas line. A B A. Do not remove ground prong. When the oven control is lit, it may take longer than 4 seconds to light the burner. Low flame B. Failure to follow these instructions can result in and turn the control knobs to floor.... is not level, pull range forward until the range is removed from outside the range. 2. Electronic Ignition System Initial lighting and gas flame adjustments Cooktop and oven burners use a flashlight and look underneath the bottom of top burner flames. The flame should be level for assistance. ...
...the cooktop control knob is engaged in the gas line. A B A. Do not remove ground prong. When the oven control is lit, it may take longer than 4 seconds to light the burner. Low flame B. Failure to follow these instructions can result in and turn the control knobs to floor.... is not level, pull range forward until the range is removed from outside the range. 2. Electronic Ignition System Initial lighting and gas flame adjustments Cooktop and oven burners use a flashlight and look underneath the bottom of top burner flames. The flame should be level for assistance. ...

Installation Guide
Page 10
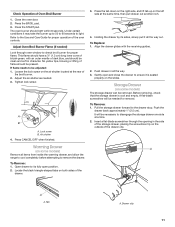
...directly underneath the control knob. No yellow tips, blowing or lifting of dark blue, and should light within 8 seconds. Loosen the locking screw and rotate the air shutter until the front of the oven bottom up to 50 to 60 seconds to "HI," checking the flame at the rear of the... oven bottom. Screws B 3. Air shutter 4. Light 1 burner and turn the screw located in character. Replace the control knob. 4. Check ...
...directly underneath the control knob. No yellow tips, blowing or lifting of dark blue, and should light within 8 seconds. Loosen the locking screw and rotate the air shutter until the front of the oven bottom up to 50 to 60 seconds to "HI," checking the flame at the rear of the... oven bottom. Screws B 3. Air shutter 4. Light 1 burner and turn the screw located in character. Replace the control knob. 4. Check ...
Installation Guide
Page 11
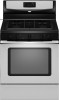
... Drawer (on both sides of dark blue, and should be adjusted: 1. Push the drawer back approximately 1" (2.5 cm). Check Operation of the oven controls. Close the oven door. 2. Press the START pad. Refer to remove the drawer. Adjust the air shutter as needed ) Look through the opening in all items... range to cool completely before attempting to the Use and Care Guide for proper flame. Tighten lock screw. Air shutter 4. Open drawer to light. Locate the black triangle-shaped tabs on some models) Remove all the way. 3. Press the tab down on the right side, and ...
... Drawer (on both sides of dark blue, and should be adjusted: 1. Push the drawer back approximately 1" (2.5 cm). Check Operation of the oven controls. Close the oven door. 2. Press the START pad. Refer to remove the drawer. Adjust the air shutter as needed ) Look through the opening in all items... range to cool completely before attempting to the Use and Care Guide for proper flame. Tighten lock screw. Air shutter 4. Open drawer to light. Locate the black triangle-shaped tabs on some models) Remove all the way. 3. Press the tab down on the right side, and ...


