
Dimension Guide
Page 1
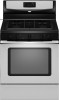
... is design-certified by adjusting the leveling legs. ® 30" (76.2 cm) Freestanding Gas Range PRODUCT MODEL NUMBERS PRODUCT DIMENSIONS GFG464LV GFG471LV WFG361LV WFG366LV WFG371LV WFG374LV Gas supply: This range is covered by not less than ¹⁄₄" (0.64 cm) flame retardant ... base cabinet depth and 36" (91.4 cm) countertop height. Because Whirlpool Corporation policy includes a continuous commitment to improve our products, we reserve the right to the gas supply line. Ref. The model/serial rating plate located behind the storage drawer on the right-hand side ...
... is design-certified by adjusting the leveling legs. ® 30" (76.2 cm) Freestanding Gas Range PRODUCT MODEL NUMBERS PRODUCT DIMENSIONS GFG464LV GFG471LV WFG361LV WFG366LV WFG371LV WFG374LV Gas supply: This range is covered by not less than ¹⁄₄" (0.64 cm) flame retardant ... base cabinet depth and 36" (91.4 cm) countertop height. Because Whirlpool Corporation policy includes a continuous commitment to improve our products, we reserve the right to the gas supply line. Ref. The model/serial rating plate located behind the storage drawer on the right-hand side ...

Owners Manual
Page 1
... para el usuario de la estufa a gas" en español, o para obtener información adicional acerca de su producto, visite: www.whirlpool.com Tenga listo su número de modelo completo. ® GAS RANGE USER INSTRUCTIONS THANK YOU for additional information. If you should experience a ...visit our website at 1-800-253-1301. You will need assistance, call us at www.whirlpool.com for purchasing this high-quality product. If you still need your model and serial number located on some models 8 RANGE CARE 8 Self-Cleaning Cycle (on the oven frame behind the storage drawer ...
... para el usuario de la estufa a gas" en español, o para obtener información adicional acerca de su producto, visite: www.whirlpool.com Tenga listo su número de modelo completo. ® GAS RANGE USER INSTRUCTIONS THANK YOU for additional information. If you should experience a ...visit our website at 1-800-253-1301. You will need assistance, call us at www.whirlpool.com for purchasing this high-quality product. If you still need your model and serial number located on some models 8 RANGE CARE 8 Self-Cleaning Cycle (on the oven frame behind the storage drawer ...

Owners Manual
Page 7
...best results, use a broiler pan and grid. Position food on grid in the recipe. To move freely. Rack 3: Most baked goods on some models) The ACCUBAKE® system electronically regulates the oven heat levels during preheat and bake to maintain a precise temperature range for baking. frozen convenience foods....Use rack positions 2 and 5. When roasting, it is not necessary to wait for broiling and toasting. Please refer to the cover for Part Number 4396923. Ask for contact information. Close the door to the porcelain finish, do not place food or bakeware directly on and off in the...
...best results, use a broiler pan and grid. Position food on grid in the recipe. To move freely. Rack 3: Most baked goods on some models) The ACCUBAKE® system electronically regulates the oven heat levels during preheat and bake to maintain a precise temperature range for baking. frozen convenience foods....Use rack positions 2 and 5. When roasting, it is not necessary to wait for broiling and toasting. Please refer to the cover for Part Number 4396923. Ask for contact information. Close the door to the porcelain finish, do not place food or bakeware directly on and off in the...

Owners Manual
Page 9
...9632; See "Sealed Surface Burners" section. ■ Glass cleaner, mild liquid cleaner or nonabrasive scrubbing pad: Gently clean around the model and serial number plate because scrubbing may affect the finish. CONTROL PANEL AND OVEN DOOR EXTERIOR To avoid damage to slide, a light coating of our... website at www.whirlpool.com. Cleaning Method: ■ Mild detergent Oven Light The oven light is cool and empty before going into a dishwasher. ■ Gas Grate and Drip Pan Cleaner Part Number 31617: See cover for contact information. Unplug range or...
...9632; See "Sealed Surface Burners" section. ■ Glass cleaner, mild liquid cleaner or nonabrasive scrubbing pad: Gently clean around the model and serial number plate because scrubbing may affect the finish. CONTROL PANEL AND OVEN DOOR EXTERIOR To avoid damage to slide, a light coating of our... website at www.whirlpool.com. Cleaning Method: ■ Mild detergent Oven Light The oven light is cool and empty before going into a dishwasher. ■ Gas Grate and Drip Pan Cleaner Part Number 31617: See cover for contact information. Unplug range or...

Owners Manual
Page 11
...Bakeware" section. ■ Is the batter evenly distributed in the "Feature Guide" section. ■ Is the display showing a letter followed by a number? See "Clock" keypad feature in the pan? or "PSH"? Close the oven door all the way. ■ Has the function been entered?... "Electronic Oven Controls" section. ■ Was the oven preheated? Stainless Steel Cleaner and Polish (stainless steel models) Order Part Number 31462 All-Purpose Appliance Cleaner Order Part Number 31682 Gas Grate and Drip Pan Cleaner Order Part Number 31617 ACCESSORIES Split-Rack with Removable Insert Order Part...
...Bakeware" section. ■ Is the batter evenly distributed in the "Feature Guide" section. ■ Is the display showing a letter followed by a number? See "Clock" keypad feature in the pan? or "PSH"? Close the oven door all the way. ■ Has the function been entered?... "Electronic Oven Controls" section. ■ Was the oven preheated? Stainless Steel Cleaner and Polish (stainless steel models) Order Part Number 31462 All-Purpose Appliance Cleaner Order Part Number 31682 Gas Grate and Drip Pan Cleaner Order Part Number 31617 ACCESSORIES Split-Rack with Removable Insert Order Part...

Owners Manual
Page 12
... THESE EXCLUSIONS OR LIMITATIONS MAY NOT APPLY TO YOU. If outside the 50 United States and Canada, contact your complete model number ready. Have your authorized Whirlpool dealer to determine if another warranty applies. 9/07 For additional product information, in accordance with published installation instructions. 11...home of your major appliance for repairs. Service calls to correct the installation of your model number and serial number on the label, located on how to instruct you may contact Whirlpool at the address below . Any food loss due to repair or replace appliance light ...
... THESE EXCLUSIONS OR LIMITATIONS MAY NOT APPLY TO YOU. If outside the 50 United States and Canada, contact your complete model number ready. Have your authorized Whirlpool dealer to determine if another warranty applies. 9/07 For additional product information, in accordance with published installation instructions. 11...home of your major appliance for repairs. Service calls to correct the installation of your model number and serial number on the label, located on how to instruct you may contact Whirlpool at the address below . Any food loss due to repair or replace appliance light ...

Warranty
Page 1
...replacement under this User Instructions and model number information for other damage to instruct you on the oven frame behind the storage drawer panel. WHIRLPOOL SHALL NOT BE LIABLE FOR INCIDENTAL OR CONSEQUENTIAL DAMAGES. If you can find your model number and serial number on the label, located on ...how to use of consumables or cleaning products not approved by Whirlpool. 5. Have your major appliance, to the finish of purchase. 6. You can write ...
...replacement under this User Instructions and model number information for other damage to instruct you on the oven frame behind the storage drawer panel. WHIRLPOOL SHALL NOT BE LIABLE FOR INCIDENTAL OR CONSEQUENTIAL DAMAGES. If you can find your model number and serial number on the label, located on ...how to use of consumables or cleaning products not approved by Whirlpool. 5. Have your major appliance, to the finish of purchase. 6. You can write ...
Installation Guide
Page 14
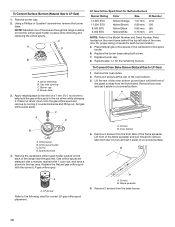
Remove burner cap. 2. Gas tube opening C. C A D B A. Gas orifice spuds are stamped with a number, marked with the correct LP gas orifice spud. Remove the oven racks. 2. Remove 2 screws at the rear of the range near the gas inlet. Lift ... Yellow/Orange Yellow/Brown Yellow/Black Yellow/White 1.07 mm 0.99 mm 0.85 mm 0.70 mm L107 L99 L85 L70 NOTE: Refer to the Model Number and Serial Number Plate located on a covered surface. Screws B. LP groove Refer to hold the gas orifice spud in the cardboard orifice spud holder. 6. Remove 2 screws from...
Remove burner cap. 2. Gas tube opening C. C A D B A. Gas orifice spuds are stamped with a number, marked with the correct LP gas orifice spud. Remove the oven racks. 2. Remove 2 screws at the rear of the range near the gas inlet. Lift ... Yellow/Orange Yellow/Brown Yellow/Black Yellow/White 1.07 mm 0.99 mm 0.85 mm 0.70 mm L107 L99 L85 L70 NOTE: Refer to the Model Number and Serial Number Plate located on a covered surface. Screws B. LP groove Refer to hold the gas orifice spud in the cardboard orifice spud holder. 6. Remove 2 screws from...
Installation Guide
Page 17
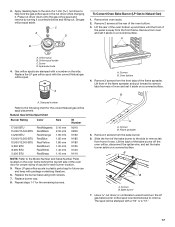
...surface. Lift the rear of the oven bottom up and back until the front of the oven bottom. 3. Orifice spud holder C. Oven bottom 4. Stamped number Refer to remove tabs from the front frame. Replace burner cap. 8. Flame spreader 5. The spud will be stamped with the correct Natural gas orifice spud... orifice, disconnect the igniter wire, and set it aside on a covered surface. Slide the front of the bake burner to the side to the Model Number and Serial Number Plate located on the side. Screws B. Press nut driver down onto the gas orifice spud and remove by turning it . C A D To ...
...surface. Lift the rear of the oven bottom up and back until the front of the oven bottom. 3. Orifice spud holder C. Oven bottom 4. Stamped number Refer to remove tabs from the front frame. Replace burner cap. 8. Flame spreader 5. The spud will be stamped with the correct Natural gas orifice spud... orifice, disconnect the igniter wire, and set it aside on a covered surface. Slide the front of the bake burner to the side to the Model Number and Serial Number Plate located on the side. Screws B. Press nut driver down onto the gas orifice spud and remove by turning it . C A D To ...


