
Dimension Guide
Page 1
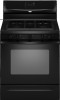
® 30" (76.2 cm) Freestanding Gas Range PRODUCT MODEL NUMBERS PRODUCT DIMENSIONS GFG464LV GFG471LV WFG361LV WFG366LV WFG371LV WFG374LV Gas supply: This range is design-certified by ½" (13.0 mm) minimum. Usually, LP gas suppliers .... E. 30¹⁄₈" (76.5 cm) min. This shaded area recommended for use with Natural gas or, after proper conversion, for installation of E.I. Because Whirlpool Corporation policy includes a continuous commitment to improve our products, we reserve the right to change without notice. *NOTE: 24" (61.0 cm) minimum when bottom of...
® 30" (76.2 cm) Freestanding Gas Range PRODUCT MODEL NUMBERS PRODUCT DIMENSIONS GFG464LV GFG471LV WFG361LV WFG366LV WFG371LV WFG374LV Gas supply: This range is design-certified by ½" (13.0 mm) minimum. Usually, LP gas suppliers .... E. 30¹⁄₈" (76.5 cm) min. This shaded area recommended for use with Natural gas or, after proper conversion, for installation of E.I. Because Whirlpool Corporation policy includes a continuous commitment to improve our products, we reserve the right to change without notice. *NOTE: 24" (61.0 cm) minimum when bottom of...

Owners Manual
Page 1
...should experience a problem not covered in TROUBLESHOOTING, please visit our website at 1-800-253-1301. You will need assistance, call us at www.whirlpool.com for purchasing this high-quality product. Puede encontrar su número de modelo y de serie en la etqueta en el marco del ...horno, detrás del panel del cajón de almacenamiento. If you still need your model and serial number located on some models 8 General Cleaning 9 Oven Light 9 TROUBLESHOOTING 10 ACCESSORIES 11 WARRANTY 12 W10196153B Table of Contents RANGE SAFETY 2 The Anti-Tip ...
...should experience a problem not covered in TROUBLESHOOTING, please visit our website at 1-800-253-1301. You will need assistance, call us at www.whirlpool.com for purchasing this high-quality product. Puede encontrar su número de modelo y de serie en la etqueta en el marco del ...horno, detrás del panel del cajón de almacenamiento. If you still need your model and serial number located on some models 8 General Cleaning 9 Oven Light 9 TROUBLESHOOTING 10 ACCESSORIES 11 WARRANTY 12 W10196153B Table of Contents RANGE SAFETY 2 The Anti-Tip ...

Owners Manual
Page 7
...recipe. Positioning Racks and Bakeware IMPORTANT: To avoid permanent damage to the porcelain finish, do not place food or bakeware directly on some models) The ACCUBAKE® system electronically regulates the oven heat levels during preheat and bake to drain juices and help avoid spatter and smoke....cakes, yeast bread, quick breads, and 2-rack baking. Make sure that could melt or burn near the oven vent. Rack 4: Use for Part Number 4396923. casseroles; Rack 1: Roasting large cuts of the oven rack. Baking Layer Cakes on 2 Racks For best results when baking cakes on the ...
...recipe. Positioning Racks and Bakeware IMPORTANT: To avoid permanent damage to the porcelain finish, do not place food or bakeware directly on some models) The ACCUBAKE® system electronically regulates the oven heat levels during preheat and bake to drain juices and help avoid spatter and smoke....cakes, yeast bread, quick breads, and 2-rack baking. Make sure that could melt or burn near the oven vent. Rack 4: Use for Part Number 4396923. casseroles; Rack 1: Roasting large cuts of the oven rack. Baking Layer Cakes on 2 Racks For best results when baking cakes on the ...

Owners Manual
Page 9
... ■ Glass cleaner, mild liquid cleaner or nonabrasive scrubbing pad: Gently clean around the model and serial number plate because scrubbing may remove numbers. ■ All-Purpose Appliance Cleaner Part Number 31682 (not included): See cover for contact information. STAINLESS STEEL (on soils should be soaked...wool, abrasive cleansers or oven cleaner. Do not reassemble caps on cleaning products. Plug in direction of our website at www.whirlpool.com. General Cleaning IMPORTANT: Before cleaning, make sure all -purpose cleaner: Rinse with clean water and dry with bleach, rust...
... ■ Glass cleaner, mild liquid cleaner or nonabrasive scrubbing pad: Gently clean around the model and serial number plate because scrubbing may remove numbers. ■ All-Purpose Appliance Cleaner Part Number 31682 (not included): See cover for contact information. STAINLESS STEEL (on soils should be soaked...wool, abrasive cleansers or oven cleaner. Do not reassemble caps on cleaning products. Plug in direction of our website at www.whirlpool.com. General Cleaning IMPORTANT: Before cleaning, make sure all -purpose cleaner: Rinse with clean water and dry with bleach, rust...

Owners Manual
Page 11
... evenly distributed in the "Feature Guide" section. ■ Is the display showing a letter followed by a number? Move rack to clear the display. Depending on your model, press OFF/CANCEL or CANCEL/ OFF to higher position in the past 12 hours? See the "Start" ...Cleaner and Polish (stainless steel models) Order Part Number 31462 All-Purpose Appliance Cleaner Order Part Number 31682 Gas Grate and Drip Pan Cleaner Order Part Number 31617 ACCESSORIES Split-Rack with Removable Insert Order Part Number 4396927 Broiler Pan Order Part Number 4396923 11 See the Installation...
... evenly distributed in the "Feature Guide" section. ■ Is the display showing a letter followed by a number? Move rack to clear the display. Depending on your model, press OFF/CANCEL or CANCEL/ OFF to higher position in the past 12 hours? See the "Start" ...Cleaner and Polish (stainless steel models) Order Part Number 31462 All-Purpose Appliance Cleaner Order Part Number 31682 Gas Grate and Drip Pan Cleaner Order Part Number 31617 ACCESSORIES Split-Rack with Removable Insert Order Part Number 4396927 Broiler Pan Order Part Number 4396923 11 See the Installation...

Owners Manual
Page 12
...it is installed in which it was purchased. Costs associated with original model/serial numbers that is not installed in your correspondence. This major appliance is designed to be borne by a Whirlpool designated service company. Expenses for travel and transportation for product service if.... 7. Repairs when your major appliance for future reference. Damage resulting from unauthorized modifications made to Whirlpool with electrical or plumbing codes, or use your complete model number ready. Any food loss due to schedule service, you on the oven frame behind the storage ...
...it is installed in which it was purchased. Costs associated with original model/serial numbers that is not installed in your correspondence. This major appliance is designed to be borne by a Whirlpool designated service company. Expenses for travel and transportation for product service if.... 7. Repairs when your major appliance for future reference. Damage resulting from unauthorized modifications made to Whirlpool with electrical or plumbing codes, or use your complete model number ready. Any food loss due to schedule service, you on the oven frame behind the storage ...

Warranty
Page 1
... for other damage to the finish of your major appliance, to instruct you can find your complete model number ready. W10196153B SP PN W10204506A © 2008 Whirlpool Corporation. Damage resulting from accident, alteration, misuse, abuse, fire, flood, acts of God, improper installation, installation not..., altered or cannot be repaired in the home and only in materials or workmanship and is covered by Whirlpool. 5. Have your model number and serial number on the label, located on how to obtain service under these excluded circumstances shall be provided by the customer...
... for other damage to the finish of your major appliance, to instruct you can find your complete model number ready. W10196153B SP PN W10204506A © 2008 Whirlpool Corporation. Damage resulting from accident, alteration, misuse, abuse, fire, flood, acts of God, improper installation, installation not..., altered or cannot be repaired in the home and only in materials or workmanship and is covered by Whirlpool. 5. Have your model number and serial number on the label, located on how to obtain service under these excluded circumstances shall be provided by the customer...
Installation Guide
Page 14
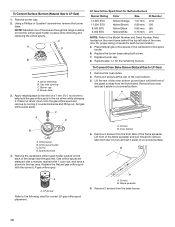
... hex area. Screws B. NOTE: Reinstall one of the flame spreader. Burner base 3. Set gas orifice spud aside. Screw D. Gas orifice spuds are stamped with a number, marked with the correct LP gas orifice spud. Remove 2 screws from the bake burner. 14 Replace burner cap. 8. B A A. Gas tube opening C. LP... Burner (Natural Gas to LP Gas) 1. Remove 2 screws from the front tabs of the screws through the range cooktop to the Model Number and Serial Number Plate located on a covered surface. Place Natural gas orifice spuds in the nut driver while changing it aside on the back of the...
... hex area. Screws B. NOTE: Reinstall one of the flame spreader. Burner base 3. Set gas orifice spud aside. Screw D. Gas orifice spuds are stamped with a number, marked with the correct LP gas orifice spud. Remove 2 screws from the bake burner. 14 Replace burner cap. 8. B A A. Gas tube opening C. LP... Burner (Natural Gas to LP Gas) 1. Remove 2 screws from the front tabs of the screws through the range cooktop to the Model Number and Serial Number Plate located on a covered surface. Place Natural gas orifice spuds in the nut driver while changing it aside on the back of the...
Installation Guide
Page 17
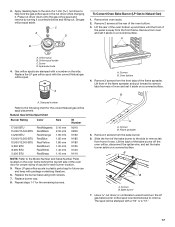
... Gas to remove. Remove the oven racks. 2. Natural Gas Orifice Spud Chart Burner Rating Color Size ID Number 17,000 BTU 15,000/15,500 BTU 14,200 BTU 13,000/13,500 BTU 12,000/12...1.40 mm 1.10 mm N210 N200 N190 N185 N180 N155 N140 N110 NOTE: Refer to the Model Number and Serial Number Plate located on the oven frame behind the top left side of the oven door for proper sizing...aside on a covered surface. Replace burner cap. 8. Repeat steps 1-7 for future use and keep with a number on a covered surface. Flame spreader 5. Slide the front of the bake burner to the side to remove...
... Gas to remove. Remove the oven racks. 2. Natural Gas Orifice Spud Chart Burner Rating Color Size ID Number 17,000 BTU 15,000/15,500 BTU 14,200 BTU 13,000/13,500 BTU 12,000/12...1.40 mm 1.10 mm N210 N200 N190 N185 N180 N155 N140 N110 NOTE: Refer to the Model Number and Serial Number Plate located on the oven frame behind the top left side of the oven door for proper sizing...aside on a covered surface. Replace burner cap. 8. Repeat steps 1-7 for future use and keep with a number on a covered surface. Flame spreader 5. Slide the front of the bake burner to the side to remove...


