
Installation Guide
Page 8
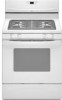
...Use pipe-joint compound. Black iron pipe I . Nipple I HG F. Union J. 90° elbow Typical flexible connection 1. Attach one adapter to the gas pressure regulator and the other adapter to LP, have a qualified person make sure gas pressure does not exceed ... adapters. Burner caps should be different, according to the range. If burner caps are not properly positioned, surface burners will not light. Gas pressure regulator B. B C A D F E J A. Manual gas shutoff valve G. ½" or ¾" gas pipe H. Closed valve B. E A. Adapter (must have...
...Use pipe-joint compound. Black iron pipe I . Nipple I HG F. Union J. 90° elbow Typical flexible connection 1. Attach one adapter to the gas pressure regulator and the other adapter to LP, have a qualified person make sure gas pressure does not exceed ... adapters. Burner caps should be different, according to the range. If burner caps are not properly positioned, surface burners will not light. Gas pressure regulator B. B C A D F E J A. Manual gas shutoff valve G. ½" or ¾" gas pipe H. Closed valve B. E A. Adapter (must have...
Installation Guide
Page 11
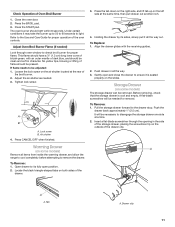
.... Warming Drawer (on some models) Remove all items from inside the warming drawer, and allow the range to cool completely before attempting to the Use and Care Guide for removal. To Replace: 1. Align ...drawer forward to light. Tab A. Open drawer to ensure it all the way. 3. Locate the black triangle-shaped tabs on the right side, and lift tab up to 50 to 60 seconds to ... drawer, placing the screwdriver tip on the air shutter located at the same time, then pull drawer out another inch. 4. Drawer clip 11 A B A. Press the tab down on both sides of the broil burner. 2. ...
.... Warming Drawer (on some models) Remove all items from inside the warming drawer, and allow the range to cool completely before attempting to the Use and Care Guide for removal. To Replace: 1. Align ...drawer forward to light. Tab A. Open drawer to ensure it all the way. 3. Locate the black triangle-shaped tabs on the right side, and lift tab up to 50 to 60 seconds to ... drawer, placing the screwdriver tip on the air shutter located at the same time, then pull drawer out another inch. 4. Drawer clip 11 A B A. Press the tab down on both sides of the broil burner. 2. ...
Installation Guide
Page 14
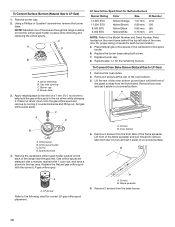
.... Oven bottom 4. B A A. C A D B A. Remove 2 screws from the front frame. Remove 2 screws from rear of the range near the gas inlet. Orifice spud holder C. Replace the Natural gas orifice spud with 1 color dot, and have a groove in the cardboard orifice spud holder. 6. Flame spreader 5. Burner base 3. LP... Gas Orifice Spud Chart for Surface Burners Burner Rating Color Size ID Number 14,000 BTU 11,000 BTU 8,000 BTU 5,000 BTU Yellow/Orange Yellow/Brown Yellow/Black Yellow/White 1.07 mm 0.99 mm 0.85 mm ...
.... Oven bottom 4. B A A. C A D B A. Remove 2 screws from the front frame. Remove 2 screws from rear of the range near the gas inlet. Orifice spud holder C. Replace the Natural gas orifice spud with 1 color dot, and have a groove in the cardboard orifice spud holder. 6. Flame spreader 5. Burner base 3. LP... Gas Orifice Spud Chart for Surface Burners Burner Rating Color Size ID Number 14,000 BTU 11,000 BTU 8,000 BTU 5,000 BTU Yellow/Orange Yellow/Brown Yellow/Black Yellow/White 1.07 mm 0.99 mm 0.85 mm ...
Installation Guide
Page 17
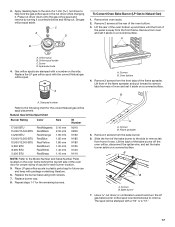
...Replace burner cap. 8. Flame spreader 5. Lift the back of the flame spreader. Press nut driver down onto the gas orifice spud and remove by turning it . Remove the oven racks. 2. Remove 2 screws at the rear of... spuds for each burner location. 5. Orifice spud B. Spark electrode 4. B A. Natural Gas Orifice Spud Chart Burner Rating Color Size ID Number 17,000 BTU 15,000/15,500 BTU 14,200 BTU ...13,500 BTU 12,000/12,500 BTU 9,500 BTU 8,000 BTU 5,000 BTU Red/Magenta Red/Black Red/Orange Red/Blue Red/Yellow Red/Brown Red/White Red/Brass 2.10 mm 2.00 mm 1.90...
...Replace burner cap. 8. Flame spreader 5. Lift the back of the flame spreader. Press nut driver down onto the gas orifice spud and remove by turning it . Remove the oven racks. 2. Remove 2 screws at the rear of... spuds for each burner location. 5. Orifice spud B. Spark electrode 4. B A. Natural Gas Orifice Spud Chart Burner Rating Color Size ID Number 17,000 BTU 15,000/15,500 BTU 14,200 BTU ...13,500 BTU 12,000/12,500 BTU 9,500 BTU 8,000 BTU 5,000 BTU Red/Magenta Red/Black Red/Orange Red/Blue Red/Yellow Red/Brown Red/White Red/Brass 2.10 mm 2.00 mm 1.90...


