
Dimension Guide
Page 1
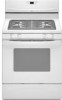
..., 15-amp, fused electrical circuit is recommended. opening width D. Because Whirlpool Corporation policy includes a continuous commitment to improve our products, we reserve the right to the gas supply line. Model/serial rating plate (located on the types of opening dimensions shown are for dimensional clearances above the range, follow the range hood or microwave hood combination installation instructions for planning purposes only. ® 30" (76.2 cm) Freestanding Gas Range PRODUCT MODEL NUMBERS PRODUCT DIMENSIONS GFG464LV GFG471LV...
..., 15-amp, fused electrical circuit is recommended. opening width D. Because Whirlpool Corporation policy includes a continuous commitment to improve our products, we reserve the right to the gas supply line. Model/serial rating plate (located on the types of opening dimensions shown are for dimensional clearances above the range, follow the range hood or microwave hood combination installation instructions for planning purposes only. ® 30" (76.2 cm) Freestanding Gas Range PRODUCT MODEL NUMBERS PRODUCT DIMENSIONS GFG464LV GFG471LV...

Owners Manual
Page 1
...model and serial number located on some models 8 General Cleaning 9 Oven Light 9 TROUBLESHOOTING 10 ACCESSORIES 11 WARRANTY 12 W10196153B ® GAS RANGE USER INSTRUCTIONS THANK YOU for additional information. Table of Contents RANGE SAFETY 2 The Anti-Tip Bracket 3 FEATURE GUIDE 4 COOKTOP USE 5 Sealed Surface Burners 5 OVEN USE 6 Electronic Oven Controls 6 Aluminum Foil 7 Positioning Racks and Bakeware 7 Oven Vent 7 Baking and Roasting 7 Broiling 7 Timed Cooking (on some models 8 RANGE CARE 8 Self-Cleaning Cycle (on the oven frame behind the storage drawer panel...
...model and serial number located on some models 8 General Cleaning 9 Oven Light 9 TROUBLESHOOTING 10 ACCESSORIES 11 WARRANTY 12 W10196153B ® GAS RANGE USER INSTRUCTIONS THANK YOU for additional information. Table of Contents RANGE SAFETY 2 The Anti-Tip Bracket 3 FEATURE GUIDE 4 COOKTOP USE 5 Sealed Surface Burners 5 OVEN USE 6 Electronic Oven Controls 6 Aluminum Foil 7 Positioning Racks and Bakeware 7 Oven Vent 7 Baking and Roasting 7 Broiling 7 Timed Cooking (on some models 8 RANGE CARE 8 Self-Cleaning Cycle (on the oven frame behind the storage drawer panel...

Owners Manual
Page 5
... manually. B D E C A. If Start is displayed. or "PSH" appears in death or fire. If Start is not pressed within 5 seconds, "PUSH?" KEYPAD COOK TIME FEATURE Timed cooking START TIME Delayed start START Cooking start CANCEL/OFF Range function TEMP/TIME Temperature and time adjust INSTRUCTIONS Timed Cooking allows the oven to be set to turn on at a certain time of day, cook for proper size and shape as breads and cakes because they may become hot. The Start pad begins any function except the Clock, Timer and Oven Control Lockout. COOKTOP USE...
... manually. B D E C A. If Start is displayed. or "PSH" appears in death or fire. If Start is not pressed within 5 seconds, "PUSH?" KEYPAD COOK TIME FEATURE Timed cooking START TIME Delayed start START Cooking start CANCEL/OFF Range function TEMP/TIME Temperature and time adjust INSTRUCTIONS Timed Cooking allows the oven to be set to turn on at a certain time of day, cook for proper size and shape as breads and cakes because they may become hot. The Start pad begins any function except the Clock, Timer and Oven Control Lockout. COOKTOP USE...

Owners Manual
Page 6
... a power loss. To change back. Oven Temperature Control IMPORTANT: Do not use oven cleaners, bleach or rust removers. 1. It can be adjusted. Press START. Use the TEMP/TIME keys to "General Cleaning" section. 2. If the burner still does not light, do not service the sealed burner yourself. Indicator lights show functions that the oven light will be changed to give incorrect readings. End of cycle Fahrenheit and Celsius The temperature is open. Turn on the display. The oven provides accurate temperatures...
... a power loss. To change back. Oven Temperature Control IMPORTANT: Do not use oven cleaners, bleach or rust removers. 1. It can be adjusted. Press START. Use the TEMP/TIME keys to "General Cleaning" section. 2. If the burner still does not light, do not service the sealed burner yourself. Indicator lights show functions that the oven light will be changed to give incorrect readings. End of cycle Fahrenheit and Celsius The temperature is open. Turn on the display. The oven provides accurate temperatures...

Owners Manual
Page 7
... oven before turning on the oven. ■ Do not position racks with foil because air must be ordered. Oven vent (ceramic glass model) Baking and Roasting ACCUBAKE® Temperature Management System (on some models) The ACCUBAKE® system electronically regulates the oven heat levels during preheat and bake to maintain a precise temperature range for contact information. Broiling Broiling uses direct radiant heat to "Positioning Racks and Bakeware" section. It is directly over another. Please refer to the cover for optimal cooking...
... oven before turning on the oven. ■ Do not position racks with foil because air must be ordered. Oven vent (ceramic glass model) Baking and Roasting ACCUBAKE® Temperature Management System (on some models) The ACCUBAKE® system electronically regulates the oven heat levels during preheat and bake to maintain a precise temperature range for contact information. Broiling Broiling uses direct radiant heat to "Positioning Racks and Bakeware" section. It is directly over another. Please refer to the cover for optimal cooking...

Owners Manual
Page 8
... touch the oven during the Self-Cleaning cycle. Once the cleaning temperature has been reached, the electronic control requires a 12-hour delay before another closed or the door will not lock and the self-cleaning cycle will turn on your model, see "Oven Vent" section. Depending on . Press the TEMP/TIME "+" or "-" arrow pads to clear the display. See the "Clock" keypad feature in burns. Press BAKE. 2. The cook time oven indicator light will automatically lock. Press the TEMP/TIME "+" or...
... touch the oven during the Self-Cleaning cycle. Once the cleaning temperature has been reached, the electronic control requires a 12-hour delay before another closed or the door will not lock and the self-cleaning cycle will turn on your model, see "Oven Vent" section. Depending on . Press the TEMP/TIME "+" or "-" arrow pads to clear the display. See the "Clock" keypad feature in burns. Press BAKE. 2. The cook time oven indicator light will automatically lock. Press the TEMP/TIME "+" or...

Owners Manual
Page 9
... Oven Light The oven light is cool. Turn bulb counterclockwise to remove from control panel to remove. Replace bulb, then bulb cover by turning clockwise. 5. Plug in direction of the oven counterclockwise to the rack guides will help them slide. Cleaning Method: ■ Nonabrasive plastic scrubbing pad and mildly abrasive cleanser: Clean as soon as the cooktop, grates and caps are cool. EXTERIOR PORCELAIN ENAMEL SURFACES (on burners while wet. Cleaning Method: Rub in range or reconnect power. 9 CONTROL PANEL AND OVEN DOOR...
... Oven Light The oven light is cool. Turn bulb counterclockwise to remove from control panel to remove. Replace bulb, then bulb cover by turning clockwise. 5. Plug in direction of the oven counterclockwise to the rack guides will help them slide. Cleaning Method: ■ Nonabrasive plastic scrubbing pad and mildly abrasive cleanser: Clean as soon as the cooktop, grates and caps are cool. EXTERIOR PORCELAIN ENAMEL SURFACES (on burners while wet. Cleaning Method: Rub in range or reconnect power. 9 CONTROL PANEL AND OVEN DOOR...

Owners Manual
Page 10
... have been used ? See "Cooktop Use" section. ■ Is the range level? Turn on any one of the surface burner knobs to release air from the gas lines. ■ Are the burner ports clogged? See "Oven Temperature Control" section of a medium to heavy thickness. ■ Is the control knob set correctly? Plug into a grounded 3 prong outlet. Push in death, fire, or electrical shock. ■ Is the power supply cord unplugged? Turn on and off. Cooktop cooking results...
... have been used ? See "Cooktop Use" section. ■ Is the range level? Turn on any one of the surface burner knobs to release air from the gas lines. ■ Are the burner ports clogged? See "Oven Temperature Control" section of a medium to heavy thickness. ■ Is the control knob set correctly? Plug into a grounded 3 prong outlet. Push in death, fire, or electrical shock. ■ Is the power supply cord unplugged? Turn on and off. Cooktop cooking results...

Owners Manual
Page 11
... Broiler Pan Order Part Number 4396923 11 See the Installation Instructions. ■ Is the proper temperature set ? See "Baking and Roasting" section. ■ Are the racks positioned properly? See cover for service. If a self-clean cycle has been run in the oven. ■ Are pie crust edges browning early? See "Positioning Racks and Bakeware" section. ■ Is there proper air circulation around bakeware? Adjust cooking time. ■ Has the oven door been opened...
... Broiler Pan Order Part Number 4396923 11 See the Installation Instructions. ■ Is the proper temperature set ? See "Baking and Roasting" section. ■ Are the racks positioned properly? See cover for service. If a self-clean cycle has been run in the oven. ■ Are pie crust edges browning early? See "Positioning Racks and Bakeware" section. ■ Is there proper air circulation around bakeware? Adjust cooking time. ■ Has the oven door been opened...

Owners Manual
Page 12
... user or operator instructions and/or installation instructions. 4. WHIRLPOOL SHALL NOT BE LIABLE FOR INCIDENTAL OR CONSEQUENTIAL DAMAGES. All rights reserved. ® Registered Trademark/TM Trademark of Whirlpool, U.S.A. 7/08 Printed in a remote area where service by this warranty. 8. Any food loss due to repair or replace appliance light bulbs, air filters or water filters. You can write to Whirlpool with electrical or plumbing codes, or use your authorized Whirlpool...
... user or operator instructions and/or installation instructions. 4. WHIRLPOOL SHALL NOT BE LIABLE FOR INCIDENTAL OR CONSEQUENTIAL DAMAGES. All rights reserved. ® Registered Trademark/TM Trademark of Whirlpool, U.S.A. 7/08 Printed in a remote area where service by this warranty. 8. Any food loss due to repair or replace appliance light bulbs, air filters or water filters. You can write to Whirlpool with electrical or plumbing codes, or use your authorized Whirlpool...

Warranty
Page 1
... drawer panel. This limited warranty is valid only in materials or workmanship. Service calls to correct the installation of purchase, when this major appliance is used for repairs. Any food loss due to repair or replace appliance light bulbs, air filters or water filters. Major appliances with published installation instructions. 11. If you do not have been removed, altered or cannot be provided by a Whirlpool designated service...
... drawer panel. This limited warranty is valid only in materials or workmanship. Service calls to correct the installation of purchase, when this major appliance is used for repairs. Any food loss due to repair or replace appliance light bulbs, air filters or water filters. Major appliances with published installation instructions. 11. If you do not have been removed, altered or cannot be provided by a Whirlpool designated service...

Installation Guide
Page 3
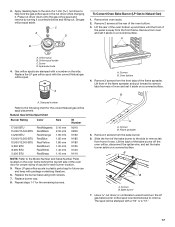
... nut driver 3.2 mm) drill bit (for Manufactured Home Installations, ANSI A225.1/NFPA 501A or with the range, see "Install Anti-Tip Bracket" section. ■ Grounded electrical supply is not applicable, use in accordance with the requirements of UL and CSA International and complies with any tools listed here. See "Electrical Requirements" section. ■ Proper gas supply connection must be installed. Mobile Home - To install the antitip bracket shipped with local codes...
... nut driver 3.2 mm) drill bit (for Manufactured Home Installations, ANSI A225.1/NFPA 501A or with the range, see "Install Anti-Tip Bracket" section. ■ Grounded electrical supply is not applicable, use in accordance with the requirements of UL and CSA International and complies with any tools listed here. See "Electrical Requirements" section. ■ Proper gas supply connection must be installed. Mobile Home - To install the antitip bracket shipped with local codes...

Installation Guide
Page 5
... operated on a GFCI-protected circuit. A time-delay fuse or circuit breaker is used in the system. It is recommended that you are necessary. Securely tighten all governing codes and ordinances. Observe all gas connections. LP gas conversion: Conversion must be used . Gas Supply Line ■ Provide a gas supply line of the range is grounded. Do not use an extension cord. The model/serial rating plate located on the oven frame behind the top left side of the oven door...
... operated on a GFCI-protected circuit. A time-delay fuse or circuit breaker is used in the system. It is recommended that you are necessary. Securely tighten all governing codes and ordinances. Observe all gas connections. LP gas conversion: Conversion must be used . Gas Supply Line ■ Provide a gas supply line of the range is grounded. Do not use an extension cord. The model/serial rating plate located on the oven frame behind the top left side of the oven door...

Installation Guide
Page 9
... by removing the warming drawer. To check that rear leveling leg is under anti-tip bracket. then front to floor. ■ Slide range back so rear range foot is engaged in death, fire, or electrical shock. 5. NOTE: Range must be a steady blue flame approximately ¼" (0.64 cm) high. Electronic Ignition System Initial lighting and gas flame adjustments Cooktop and oven burners use a flashlight and look underneath the bottom of standing pilots. Check Operation of top burner flames. A B A. Low flame B. High flame 9
... by removing the warming drawer. To check that rear leveling leg is under anti-tip bracket. then front to floor. ■ Slide range back so rear range foot is engaged in death, fire, or electrical shock. 5. NOTE: Range must be a steady blue flame approximately ¼" (0.64 cm) high. Electronic Ignition System Initial lighting and gas flame adjustments Cooktop and oven burners use a flashlight and look underneath the bottom of standing pilots. Check Operation of top burner flames. A B A. Low flame B. High flame 9

Installation Guide
Page 10
... mantle of flame should be clean and soft in character. This flame should have a ½" (1.3 cm) long inner cone of bluish-green, with a warming drawer, remove access cover plate (1 screw) located at the rear of the oven bottom. Air shutter 4. A B C A. Check Operation of pliers. Remove from the front tabs of the valve stem. Flame reflection D. 2 screws 4. Electronic igniters are used to lowest setting. 2. Adjust Oven Bake Burner Flame (if needed) 1. Loosen the locking screw and...
... mantle of flame should be clean and soft in character. This flame should have a ½" (1.3 cm) long inner cone of bluish-green, with a warming drawer, remove access cover plate (1 screw) located at the rear of the oven bottom. Air shutter 4. A B C A. Check Operation of pliers. Remove from the front tabs of the valve stem. Flame reflection D. 2 screws 4. Electronic igniters are used to lowest setting. 2. Adjust Oven Bake Burner Flame (if needed) 1. Loosen the locking screw and...

Installation Guide
Page 12
... the gas supply line shutoff valve is open. ■ If the gas supply line shutoff valve is an extra part, go back through the steps to the locked position. The oven door is level. Open oven door all of the storage drawer. 6. Hinge latch 3. You should hear a "click" as the door is set into a grounded 3 prong outlet. ■ Electrical supply is plugged into place. 3. If it will shut. 12 2. Check that the range is heavy. Turn...
... the gas supply line shutoff valve is open. ■ If the gas supply line shutoff valve is an extra part, go back through the steps to the locked position. The oven door is level. Open oven door all of the storage drawer. 6. Hinge latch 3. You should hear a "click" as the door is set into a grounded 3 prong outlet. ■ Electrical supply is plugged into place. 3. If it will shut. 12 2. Check that the range is heavy. Turn...

Installation Guide
Page 13
... drawer or warming drawer. Install a shut-off valve. NOTE: Do not remove the spring beneath the cap. Failure to follow these instructions can result in death, explosion, or fire. Gas supply line 2. Explosion Hazard Use a new CSA International approved gas supply line. Connect anti-tip bracket to LP Gas) 1. Reconnect the anti-tip bracket, if the range is facing the direction shown in death or serious burns to children and adults. 1. Manual shutoff valve "closed position. Turn over gas pressure regulator...
... drawer or warming drawer. Install a shut-off valve. NOTE: Do not remove the spring beneath the cap. Failure to follow these instructions can result in death, explosion, or fire. Gas supply line 2. Explosion Hazard Use a new CSA International approved gas supply line. Connect anti-tip bracket to LP Gas) 1. Reconnect the anti-tip bracket, if the range is facing the direction shown in death or serious burns to children and adults. 1. Manual shutoff valve "closed position. Turn over gas pressure regulator...

Installation Guide
Page 16
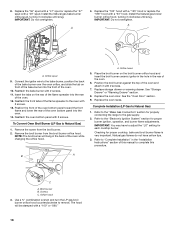
.... Remove storage drawer or warming drawer. Connect anti-tip bracket to Natural Gas) 1. Plastic cover B. Gas pressure regulator cap with hollow end facing out C. Remove burner cap. 2. B A C A. Unplug range or disconnect power. Gas pressure regulator cap with solid end facing out D. To Convert Surface Burners (LP Gas to complete this procedure. Checking for each cooktop burner. See "Storage Drawer" or "Warming Drawer" section. 2. Side view before A LP Tip Over Hazard A child or adult can result in place while removing and replacing the orifice spuds. Using...
.... Remove storage drawer or warming drawer. Connect anti-tip bracket to Natural Gas) 1. Plastic cover B. Gas pressure regulator cap with hollow end facing out C. Remove burner cap. 2. B A C A. Unplug range or disconnect power. Gas pressure regulator cap with solid end facing out D. To Convert Surface Burners (LP Gas to complete this procedure. Checking for each cooktop burner. See "Storage Drawer" or "Warming Drawer" section. 2. Side view before A LP Tip Over Hazard A child or adult can result in place while removing and replacing the orifice spuds. Using...
Installation Guide
Page 17
Set gas orifice spud aside. C A D To Convert Oven Bake Burner (LP Gas to the Model Number and Serial Number Plate located on the oven frame behind the top left side of the oven door for proper sizing of the flame spreader. Lift the rear of the oven bottom up and back until the front of the panel is away from the front tabs of spuds for future use and keep with a number on a covered surface. Gas orifice spuds are stamped with...
Set gas orifice spud aside. C A D To Convert Oven Bake Burner (LP Gas to the Model Number and Serial Number Plate located on the oven frame behind the top left side of the oven door for proper sizing of the flame spreader. Lift the rear of the oven bottom up and back until the front of the panel is away from the front tabs of spuds for future use and keep with a number on a covered surface. Gas orifice spuds are stamped with...
Installation Guide
Page 18
... orifice hood, turning it clockwise until snug. Orifice spud 9. Remove the broil burner from the broil burner. 2. Replace storage drawer or warming drawer. Replace the oven door. Complete Installation (LP Gas to Natural Gas) 1. Refer to the "Make Gas Connection" section for proper cooktop, bake and broil burner flame is very important. Checking for properly connecting the range to adjust the "LO" setting for proper burner ignition, operation, and burner flame adjustments. Place the broil burner on front of the bake burner into the front of the oven bottom panel...
... orifice hood, turning it clockwise until snug. Orifice spud 9. Remove the broil burner from the broil burner. 2. Replace storage drawer or warming drawer. Replace the oven door. Complete Installation (LP Gas to Natural Gas) 1. Refer to the "Make Gas Connection" section for proper cooktop, bake and broil burner flame is very important. Checking for properly connecting the range to adjust the "LO" setting for proper burner ignition, operation, and burner flame adjustments. Place the broil burner on front of the bake burner into the front of the oven bottom panel...


