Installation Guide
Page 1
... 3 Tools and Parts 3 Location Requirements 4 Electrical Requirements 5 Gas Supply Requirements 6 INSTALLATION INSTRUCTIONS 7 Unpack Range 7 Install Anti-Tip Bracket 7 Make Gas Connection 8 Verify Anti-Tip Bracket Is Installed and Engaged 9 Level Range 10 Electronic Ignition System 10 Complete Installation 12 GAS CONVERSIONS 12 LP Gas Conversion 12 Complete Conversion 14 Natural Gas Conversion 14 Complete...
... 3 Tools and Parts 3 Location Requirements 4 Electrical Requirements 5 Gas Supply Requirements 6 INSTALLATION INSTRUCTIONS 7 Unpack Range 7 Install Anti-Tip Bracket 7 Make Gas Connection 8 Verify Anti-Tip Bracket Is Installed and Engaged 9 Level Range 10 Electronic Ignition System 10 Complete Installation 12 GAS CONVERSIONS 12 LP Gas Conversion 12 Complete Conversion 14 Natural Gas Conversion 14 Complete...
Installation Guide
Page 2
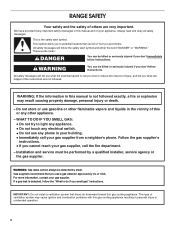
... followed exactly, a fire or explosion may cause ignition and combustion problems with this gas cooking appliance resulting in this gas cooking appliance. Installation and service must be detected by UL or CSA. These words mean: DANGER You can be killed or seriously injured if you smell .... - Do not store or use a gas detector approved by smell. If a gas leak is the safety alert symbol. IMPORTANT: Do not install a ventilation system that you cannot reach your gas supplier. We have provided many important safety messages in your building. • Immediately call the ...
... followed exactly, a fire or explosion may cause ignition and combustion problems with this gas cooking appliance resulting in this gas cooking appliance. Installation and service must be detected by UL or CSA. These words mean: DANGER You can be killed or seriously injured if you smell .... - Do not store or use a gas detector approved by smell. If a gas leak is the safety alert symbol. IMPORTANT: Do not install a ventilation system that you cannot reach your gas supplier. We have provided many important safety messages in your building. • Immediately call the ...
Installation Guide
Page 3
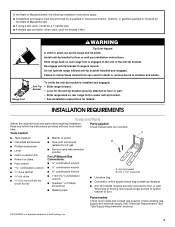
...anti-tip bracket if range is a registered trademark of the anti-tip bracket. In the State of Massachusetts, the following installation instructions apply: ■ Installations and repairs must be performed by a qualified or licensed contractor, plumber, or gasfitter qualified or licensed by the State .... ■ A flexible gas connector, when used, must be securely mounted to floor or wall. • Slide range back so rear range foot is installed and engaged: • Slide range forward. • Look for details. Anti-tip bracket B. #12 x 1⁵⁄₈" screws (2) ■ ...
...anti-tip bracket if range is a registered trademark of the anti-tip bracket. In the State of Massachusetts, the following installation instructions apply: ■ Installations and repairs must be performed by a qualified or licensed contractor, plumber, or gasfitter qualified or licensed by the State .... ■ A flexible gas connector, when used, must be securely mounted to floor or wall. • Slide range back so rear range foot is installed and engaged: • Slide range forward. • Look for details. Anti-tip bracket B. #12 x 1⁵⁄₈" screws (2) ■ ...
Installation Guide
Page 4
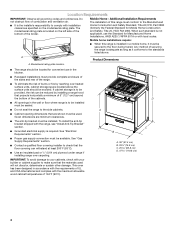
...all governing codes and ordinances. Do not obstruct flow of the broiler. The model/serial rating plate is required. Mobile Home - Mobile home installations require: ■ When this range must be sealed. ■ Do not seal the range to the floor during transit. See "Gas ...If cabinet storage is adequate as long as it must be available. This oven has been designed in the kitchen. ■ Recessed installations must be installed. Model/serial rating plate location ■ The range should be secured to the side cabinets. ■ Cabinet opening dimensions that the...
...all governing codes and ordinances. Do not obstruct flow of the broiler. The model/serial rating plate is required. Mobile Home - Mobile home installations require: ■ When this range must be sealed. ■ Do not seal the range to the floor during transit. See "Gas ...If cabinet storage is adequate as long as it must be available. This oven has been designed in the kitchen. ■ Recessed installations must be installed. Model/serial rating plate location ■ The range should be secured to the side cabinets. ■ Cabinet opening dimensions that the...
Installation Guide
Page 5
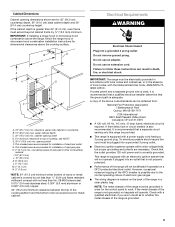
... keypads will not be plugged into a grounded 3 prong outlet. NOTE: The metal chassis of cooktop, see NOTE*. IMPORTANT: If installing a range hood or microwave hood combination above the range, follow these instructions can be electrically grounded in accordance with local codes and ordinances...normal operating nature of electronic gas ranges. ■ The wiring diagram is required. countertop space to follow the range hood or microwave hood combination installation instructions for 25" (64.0 cm) countertop depth, 24" (61.0 cm) base cabinet depth and 36" (91.4 cm) countertop height...
... keypads will not be plugged into a grounded 3 prong outlet. NOTE: The metal chassis of cooktop, see NOTE*. IMPORTANT: If installing a range hood or microwave hood combination above the range, follow these instructions can be electrically grounded in accordance with local codes and ordinances...normal operating nature of electronic gas ranges. ■ The wiring diagram is required. countertop space to follow the range hood or microwave hood combination installation instructions for 25" (64.0 cm) countertop depth, 24" (61.0 cm) base cabinet depth and 36" (91.4 cm) countertop height...
Installation Guide
Page 6
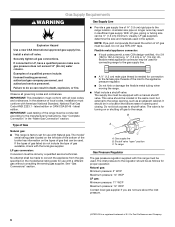
... for connection to the female pipe threads of E.I .D., flexible metal appliance connector may result in a location that allows ease of local codes, installation must be used. Usually, LP gas suppliers determine the size and materials used . Do not use with all local codes and ordinances. LP ... can result in the "Make Gas Connection" section. Gas Supply Requirements WARNING Explosion Hazard Use a new CSA International approved gas supply line. Install a shut-off gas to the regulator should be used in the same room but external to do not include the type of a qualified ...
... for connection to the female pipe threads of E.I .D., flexible metal appliance connector may result in a location that allows ease of local codes, installation must be used. Usually, LP gas suppliers determine the size and materials used . Do not use with all local codes and ordinances. LP ... can result in the "Make Gas Connection" section. Gas Supply Requirements WARNING Explosion Hazard Use a new CSA International approved gas supply line. Install a shut-off gas to the regulator should be used in the same room but external to do not include the type of a qualified ...

Installation Guide
Page 7
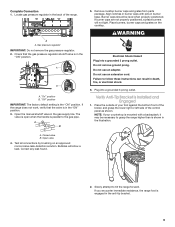
... oven door handle to a maximum of 1" (2.5 cm). Using 2 or more people, stand range back up to lift or move and install range. Install Anti-Tip Bracket WARNING Tip Over Hazard A child or adult can use the wall mounting method. Keep cardboard bottom and foam support under range... for Canada). Remove shipping materials, tape and film from the carton. Adjust the leveling legs to floor or wall per installation instructions. If you are installing the range in front of range. Pull cardboard bottom firmly to loosen the leveling legs. Re-engage anti-tip bracket if...
... oven door handle to a maximum of 1" (2.5 cm). Using 2 or more people, stand range back up to lift or move and install range. Install Anti-Tip Bracket WARNING Tip Over Hazard A child or adult can use the wall mounting method. Keep cardboard bottom and foam support under range... for Canada). Remove shipping materials, tape and film from the carton. Adjust the leveling legs to floor or wall per installation instructions. If you are installing the range in front of range. Pull cardboard bottom firmly to loosen the leveling legs. Re-engage anti-tip bracket if...
Installation Guide
Page 8
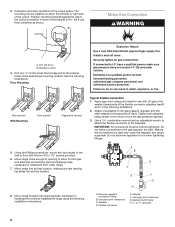
... Adapter F. B Centerline Make Gas Connection WARNING A A. 9⁵⁄₈" (24.6 cm) B. IMPORTANT: All connections must be installed on either the left side or right side of the bracket is 9⁵⁄₈" (24.6 cm) from under range. 7.... 6. Determine and mark centerline of a qualified person include: licensed heating personnel, authorized gas company personnel, and authorized service personnel. See the following installation instructions. Use pipe-joint compound. A B D C E F G H A. 3. The mounting can result in the following illustration). 2. Floor...
... Adapter F. B Centerline Make Gas Connection WARNING A A. 9⁵⁄₈" (24.6 cm) B. IMPORTANT: All connections must be installed on either the left side or right side of the bracket is 9⁵⁄₈" (24.6 cm) from under range. 7.... 6. Determine and mark centerline of a qualified person include: licensed heating personnel, authorized gas company personnel, and authorized service personnel. See the following installation instructions. Use pipe-joint compound. A B D C E F G H A. 3. The mounting can result in the following illustration). 2. Floor...
Installation Guide
Page 9
... be level when properly positioned. WARNING Electrical Shock Hazard Plug into a grounded 3 prong outlet. Failure to tilt the range forward. Verify Anti-Tip Bracket Is Installed and Engaged 1. Place the outside of your countertop is shown in death, fire, or electrical shock. 6. Closed valve B. Test all connections by brushing on the...
... be level when properly positioned. WARNING Electrical Shock Hazard Plug into a grounded 3 prong outlet. Failure to tilt the range forward. Verify Anti-Tip Bracket Is Installed and Engaged 1. Place the outside of your countertop is shown in death, fire, or electrical shock. 6. Closed valve B. Test all connections by brushing on the...

Installation Guide
Page 10
... 4 seconds. The outer cone is an obstruction between the range and the mounting wall. A gnite High B 3. Outer cone B. The flame size should be installed correctly. The range foot is removed from the mounting wall, the rear range foot may not engage the bracket. If you need assistance or service... control knob to the floor. Verify that the anti-tip bracket is more than ½" (1.3 cm) off the floor without anti-tip bracket installed and engaged. Slide the range forward, and verify that the bracket is inserted into the slot of Cooktop Burners 1. Slide range back so the ...
... 4 seconds. The outer cone is an obstruction between the range and the mounting wall. A gnite High B 3. Outer cone B. The flame size should be installed correctly. The range foot is removed from the mounting wall, the rear range foot may not engage the bracket. If you need assistance or service... control knob to the floor. Verify that the anti-tip bracket is more than ½" (1.3 cm) off the floor without anti-tip bracket installed and engaged. Slide the range forward, and verify that the bracket is inserted into the slot of Cooktop Burners 1. Slide range back so the ...
Installation Guide
Page 12
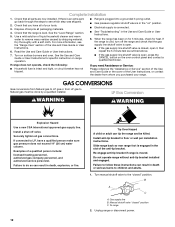
...must be killed. To range 2. Dispose of your range. See the "Level Range" section. 5. For more information, see which step was skipped. 2. Install anti-tip bracket to see the "Range Care" section of the anti-tip bracket. Failure to the "closed " position C. B A C A. Unplug range...line shutoff valve is open, press the CANCEL button on " position. ■ Electrical supply is level. Dry thoroughly with a soft cloth. Install a shut-off the range and check that all of /recycle all gas connections. Check that the range is connected. ■ See "Troubleshooting...
...must be killed. To range 2. Dispose of your range. See the "Level Range" section. 5. For more information, see which step was skipped. 2. Install anti-tip bracket to see the "Range Care" section of the anti-tip bracket. Failure to the "closed " position C. B A C A. Unplug range...line shutoff valve is open, press the CANCEL button on " position. ■ Electrical supply is level. Dry thoroughly with a soft cloth. Install a shut-off the range and check that all of /recycle all gas connections. Check that the range is connected. ■ See "Troubleshooting...
Installation Guide
Page 13
Remove the cap from the gas pressure regulator using a 7 mm combination wrench. Burner 2. Install LP gas orifice spuds using a flat-blade screwdriver. Sealing washer C. Holder 13 Burner cap B. Reinstall the cap. 180º A. A. One LP gas spud is stamped "...
Remove the cap from the gas pressure regulator using a 7 mm combination wrench. Burner 2. Install LP gas orifice spuds using a flat-blade screwdriver. Sealing washer C. Holder 13 Burner cap B. Reinstall the cap. 180º A. A. One LP gas spud is stamped "...
Installation Guide
Page 14
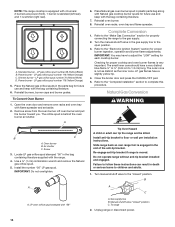
...future use and keep with the bag containing literature. 7. B A C A. Standard burner - Simmer burner - Power burner - Screw 3. Install the number "56" LP gas spud. Place Natural gas oven burner spud in the bag containing literature supplied with flame spreader and set aside... overtighten. Reinstall oven burner. 8. Refer to the open position. 3. The outer cone is moved. Do not operate range without anti-tip bracket installed and engaged. Manual shutoff valve "closed " position. Gas supply line B. A C B D A. Lift oven burner and pull the burner toward...
...future use and keep with the bag containing literature. 7. B A C A. Standard burner - Simmer burner - Power burner - Screw 3. Install the number "56" LP gas spud. Place Natural gas oven burner spud in the bag containing literature supplied with flame spreader and set aside... overtighten. Reinstall oven burner. 8. Refer to the open position. 3. The outer cone is moved. Do not operate range without anti-tip bracket installed and engaged. Manual shutoff valve "closed " position. Gas supply line B. A C B D A. Lift oven burner and pull the burner toward...
Installation Guide
Page 15
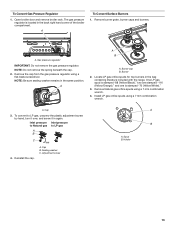
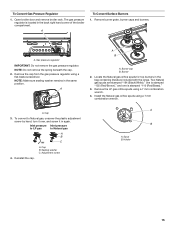
.... Sealing washer C. Reinstall the cap. Spud B. To Convert Gas Pressure Regulator 1. Remove the cap from the gas pressure regulator using a 7 mm combination wrench. Burner cap B. Install the Natural gas orifice spuds using a flat-blade screwdriver. Cap 3. Inlet pressure Inlet pressure to LP gas to Natural gas, unscrew the plastic adjustment screw...
.... Sealing washer C. Reinstall the cap. Spud B. To Convert Gas Pressure Regulator 1. Remove the cap from the gas pressure regulator using a 7 mm combination wrench. Burner cap B. Install the Natural gas orifice spuds using a flat-blade screwdriver. Cap 3. Inlet pressure Inlet pressure to LP gas to Natural gas, unscrew the plastic adjustment screw...

Installation Guide
Page 16
... gas supply. 2. Simmer burner - Remove screw from the oven burner. Air shutter C. Reinstall oven burner. 8. Close the broiler door and press the CANCEL/OFF pad. 5. Install the number "47" Natural gas spud. Natural gas orifice spud number 155 (Red/Brown) B. Natural gas orifice spud number 194 (Black/White) C. Natural gas oven... door and remove oven racks and oven tray with "47" IMPORTANT: Do not overtighten. 6. The outer cone is simmer (right rear). 3. Refer to the "Complete Installation" section to 1.3 cm) long. Screw A.
... gas supply. 2. Simmer burner - Remove screw from the oven burner. Air shutter C. Reinstall oven burner. 8. Close the broiler door and press the CANCEL/OFF pad. 5. Install the number "47" Natural gas spud. Natural gas orifice spud number 155 (Red/Brown) B. Natural gas orifice spud number 194 (Black/White) C. Natural gas oven... door and remove oven racks and oven tray with "47" IMPORTANT: Do not overtighten. 6. The outer cone is simmer (right rear). 3. Refer to the "Complete Installation" section to 1.3 cm) long. Screw A.
Dimension Guide
Page 1
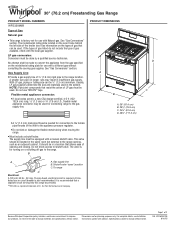
...materials used for planning purposes only. It is a registered trademark of opening , such as an adjacent cabinet. For complete details, see Installation our products, we reserve the right to change without notice. The model/serial rating plate located on the oven frame behind the left.... See "Gas Conversions" section. This valve should be in the same room but external to the gas supply line. D C Because Whirlpool Corporation policy includes a continuous commitment to improve Dimensions are for connecting range to the range opening and closing. Do not block access to the...
...materials used for planning purposes only. It is a registered trademark of opening , such as an adjacent cabinet. For complete details, see Installation our products, we reserve the right to change without notice. The model/serial rating plate located on the oven frame behind the left.... See "Gas Conversions" section. This valve should be in the same room but external to the gas supply line. D C Because Whirlpool Corporation policy includes a continuous commitment to improve Dimensions are for connecting range to the range opening and closing. Do not block access to the...
Dimension Guide
Page 2
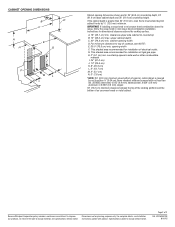
...covered with product. A. 18" (45.7 cm) min. This shaded area recommended for installation of 2 Ref. Because Whirlpool Corporation policy includes a continuous commitment to improve Dimensions are for installation of cooktop, see Installation our products, we reserve the right to change without notice. Page 2 of electrical outlet...) countertop height. For complete details, see NOTE*. countertop space to countertop B. 13" (33.0 cm) max. G. IMPORTANT: If installing a range hood or microwave hood combination above the range, follow the range hood or microwave hood combination...
...covered with product. A. 18" (45.7 cm) min. This shaded area recommended for installation of 2 Ref. Because Whirlpool Corporation policy includes a continuous commitment to improve Dimensions are for installation of cooktop, see Installation our products, we reserve the right to change without notice. Page 2 of electrical outlet...) countertop height. For complete details, see NOTE*. countertop space to countertop B. 13" (33.0 cm) max. G. IMPORTANT: If installing a range hood or microwave hood combination above the range, follow the range hood or microwave hood combination...


