Owners Manual
Page 3
... the gas supplier's instructions. • If you smell gas" instructions. For more information, contact your appliance. WARNING: This product contains a chemical known to the State of California to light any appliance. • Do not touch any electrical switch. • Do not use any other reproductive harm. 3 RANGE SAFETY ...known to the State of California to reduce the chance of this or any phone in this manual and on your gas supplier. Do not store or use a gas detector approved by UL or CSA. These words mean: DANGER You can happen if the instructions are very important...
... the gas supplier's instructions. • If you smell gas" instructions. For more information, contact your appliance. WARNING: This product contains a chemical known to the State of California to light any appliance. • Do not touch any electrical switch. • Do not use any other reproductive harm. 3 RANGE SAFETY ...known to the State of California to reduce the chance of this or any phone in this manual and on your gas supplier. Do not store or use a gas detector approved by UL or CSA. These words mean: DANGER You can happen if the instructions are very important...
Owners Manual
Page 4
... may also trap heat, causing a fire hazard. ■ CAUTION: Do not store items of the cooking utensil. children climbing on the Range - Keep range area clear and free from combustible materials, gasoline, and other utensils. Wipe off all excessive spillage before servicing. ■ Injuries may result... monoxide poisoning and overheating of fire, electrical shock, injury to heat or warm the room. SAVE THESE INSTRUCTIONS 4 In Canada, the range must be adjusted so it does not extend beyond the edge of interest to children in accordance with materials such as a space heater...
... may also trap heat, causing a fire hazard. ■ CAUTION: Do not store items of the cooking utensil. children climbing on the Range - Keep range area clear and free from combustible materials, gasoline, and other utensils. Wipe off all excessive spillage before servicing. ■ Injuries may result... monoxide poisoning and overheating of fire, electrical shock, injury to heat or warm the room. SAVE THESE INSTRUCTIONS 4 In Canada, the range must be adjusted so it does not extend beyond the edge of interest to children in accordance with materials such as a space heater...
Owners Manual
Page 9
... slightly. ■ Use suggested when baking foods with dark, dull and/or nonstick finish ■ Brown, crisp crusts ■ May need to differ. The bake range can be displayed for the temperature showing on the oven door or oven bottom. The Electronic Oven Control automatically selects the preheat cycle time based...
... slightly. ■ Use suggested when baking foods with dark, dull and/or nonstick finish ■ Brown, crisp crusts ■ May need to differ. The bake range can be displayed for the temperature showing on the oven door or oven bottom. The Electronic Oven Control automatically selects the preheat cycle time based...
Owners Manual
Page 11
... package directions. These spills may remove numbers. ■ All-Purpose Appliance Cleaner Part Number 31682 (not included): See "Assistance or Service" section to order. ■ Gas Grate and Drip Pan Cleaner Part Number 31617: See "Assistance or Service" section to the cooktop controls, do not use abrasive cleaners, steel-wool pads.... Cleaning Method: If the griddle is cool. OVEN RACKS AND ROASTING RACKS Cleaning Method: ■ Steel-wool pad 11 SURFACE BURNERS See "Surface Burners" section. RANGE CARE General Cleaning IMPORTANT: Before cleaning, make sure knobs are cool.
... package directions. These spills may remove numbers. ■ All-Purpose Appliance Cleaner Part Number 31682 (not included): See "Assistance or Service" section to order. ■ Gas Grate and Drip Pan Cleaner Part Number 31617: See "Assistance or Service" section to the cooktop controls, do not use abrasive cleaners, steel-wool pads.... Cleaning Method: If the griddle is cool. OVEN RACKS AND ROASTING RACKS Cleaning Method: ■ Steel-wool pad 11 SURFACE BURNERS See "Surface Burners" section. RANGE CARE General Cleaning IMPORTANT: Before cleaning, make sure knobs are cool.
Owners Manual
Page 12
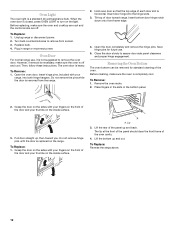
... standard cleaning of the oven. To Remove: 1. Lift the rear of door toward you. Oven Light The oven light is removed from socket. 3. Unplug range or disconnect power. 2. Then, follow these instructions. Do not remove the pins while the door is a standard 40-watt appliance bulb. Tilt top of... onto front frame edge. 4. Removing the Oven Bottom The oven bottom can be removed for future use , it is not suggested to remove from the range. 2. Remove the oven racks. 2. To Replace: 1. To Replace: Reverse the steps above. 12 When the oven door is completely cool. Grasp the ...
... standard cleaning of the oven. To Remove: 1. Lift the rear of door toward you. Oven Light The oven light is removed from socket. 3. Unplug range or disconnect power. 2. Then, follow these instructions. Do not remove the pins while the door is a standard 40-watt appliance bulb. Tilt top of... onto front frame edge. 4. Removing the Oven Bottom The oven bottom can be removed for future use , it is not suggested to remove from the range. 2. Remove the oven racks. 2. To Replace: 1. To Replace: Reverse the steps above. 12 When the oven door is completely cool. Grasp the ...
Owners Manual
Page 13
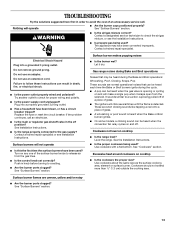
...The igniters will click several times until the flame is detected. Do not use an extension cord. Gas range noises during the cycle. ■ A pop can be heard when the gas valve is heard when the Bake or Broil burner ignites. ■ On some models, a clicking... continues, call . Contact a trained repair specialist or see the Installation Instructions. ■ Is propane gas being used ? See "Cookware" section. Plug into a grounded 3 prong outlet. Level the range. See the Installation Instructions. ■ Is the proper cookware being used ? Do not use an ...
...The igniters will click several times until the flame is detected. Do not use an extension cord. Gas range noises during the cycle. ■ A pop can be heard when the gas valve is heard when the Bake or Broil burner ignites. ■ On some models, a clicking... continues, call . Contact a trained repair specialist or see the Installation Instructions. ■ Is propane gas being used ? See "Cookware" section. Plug into a grounded 3 prong outlet. Level the range. See the Installation Instructions. ■ Is the proper cookware being used ? Do not use an ...
Owners Manual
Page 14
...trained repair specialist. See "Cookware" section. ■ Is the control knob set oven temperature. Level the range. Increase baking or roasting time. ■ Is the proper temperature set ? Replace the fuse or reset the...; Is the ignition system broken? Contact a trained repair specialist. ■ Is the air/gas mixture correct? Use aluminum foil to cover the edge of the surface burner knobs on to ...Are the racks positioned properly? Decrease oven temperature 10° F to 30°F (5°C to preheat before placing food in the pan? Cooktop cooking results not what expected &#...
...trained repair specialist. See "Cookware" section. ■ Is the control knob set oven temperature. Level the range. Increase baking or roasting time. ■ Is the proper temperature set ? Replace the fuse or reset the...; Is the ignition system broken? Contact a trained repair specialist. ■ Is the air/gas mixture correct? Use aluminum foil to cover the edge of the surface burner knobs on to ...Are the racks positioned properly? Decrease oven temperature 10° F to 30°F (5°C to preheat before placing food in the pan? Cooktop cooking results not what expected &#...
Dimension Guide
Page 1
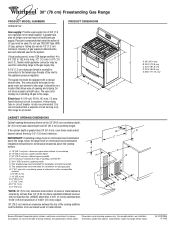
...C B D C E G J I K M L NL Because Whirlpool Corporation policy includes a continuous commitment to the appliance pressure regulator. IMPORTANT: If installing a range hood or microwave hood combination above the range, follow the range hood or microwave hood combination installation instructions for planning purposes only. Usually,...of opening dimensions shown are for dimensional clearances above the cooktop surface. ® 30" (76 cm) Freestanding Gas Range PRODUCT MODEL NUMBERS WFG231LV Gas supply: Provide a gas supply line of 3/4" (1.9 cm) rigid pipe to countertop B. 13" (33...
...C B D C E G J I K M L NL Because Whirlpool Corporation policy includes a continuous commitment to the appliance pressure regulator. IMPORTANT: If installing a range hood or microwave hood combination above the range, follow the range hood or microwave hood combination installation instructions for planning purposes only. Usually,...of opening dimensions shown are for dimensional clearances above the cooktop surface. ® 30" (76 cm) Freestanding Gas Range PRODUCT MODEL NUMBERS WFG231LV Gas supply: Provide a gas supply line of 3/4" (1.9 cm) rigid pipe to countertop B. 13" (33...
Installation Instructions
Page 2
All safety messages will follow instructions. For more information, contact your gas supplier, call your appliance. RANGE SAFETY Your safety and the safety of others . Always read and obey all safety messages. These words mean: DANGER You can happen if the ...instructions are very important. Do not store or use gasoline or other appliance. - If a gas leak is , tell you how to potential hazards...
All safety messages will follow instructions. For more information, contact your gas supplier, call your appliance. RANGE SAFETY Your safety and the safety of others . Always read and obey all safety messages. These words mean: DANGER You can happen if the ...instructions are very important. Do not store or use gasoline or other appliance. - If a gas leak is , tell you how to potential hazards...
Installation Instructions
Page 3
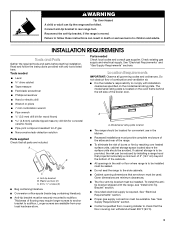
... before starting installation. See "Electrical Requirements" and "Gas Supply Requirements" sections. To install the anti- tip bracket shipped with the range, see "Install Anti-Tip Bracket" section. ■ Grounded electrical supply is moved. See "Gas Supply Requirements" section. ■ Contact a qualified...anti-tip bracket must be securely mounted to comply with any tools listed here. Check existing gas supply and electrical supply. Model/serial rating plate location ■ The range should be available. Thickness of the cabinets. ■ All openings in the kitchen. ■...
... before starting installation. See "Electrical Requirements" and "Gas Supply Requirements" sections. To install the anti- tip bracket shipped with the range, see "Install Anti-Tip Bracket" section. ■ Grounded electrical supply is moved. See "Gas Supply Requirements" section. ■ Contact a qualified...anti-tip bracket must be securely mounted to comply with any tools listed here. Check existing gas supply and electrical supply. Model/serial rating plate location ■ The range should be available. Thickness of the cabinets. ■ All openings in the kitchen. ■...
Installation Instructions
Page 4
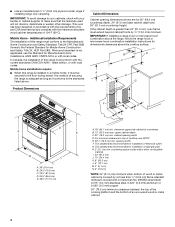
... the maximum allowable wood cabinet temperatures of rigid gas pipe. Any method of an uncovered wood or metal cabinet. 4 IMPORTANT: If installing a range hood or microwave hood combination above the range, follow the range hood or microwave hood combination installation instructions for ... of cooktop, see NOTE*. upper cabinet depth C. 30" (76.2 cm) min. ■ Use an insulated pad or ¼" (0.64 cm) plywood under range if installing range over carpeting. Mobile home installations require: ■ When this range is not applicable, use the Standard for 25" ...
... the maximum allowable wood cabinet temperatures of rigid gas pipe. Any method of an uncovered wood or metal cabinet. 4 IMPORTANT: If installing a range hood or microwave hood combination above the range, follow the range hood or microwave hood combination installation instructions for ... of cooktop, see NOTE*. upper cabinet depth C. 30" (76.2 cm) min. ■ Use an insulated pad or ¼" (0.64 cm) plywood under range if installing range over carpeting. Mobile home installations require: ■ When this range is not applicable, use the Standard for 25" ...
Installation Instructions
Page 5
... having a 3 prong ground plug. NOTE: The metal chassis of the range must be provided. ■ This range is adequate. Explosion Hazard Use a new CSA International approved gas supply line. In the absence of Gas Natural gas: This range is recommended that can be plugged into a grounded 3 prong outlet. ■... that a qualified electrical installer determine that the outlet provides 120-volt power and is factory set for use with LP gas. ■ This range is correctly grounded. The model/serial rating plate located behind the broiler door on the left-hand side oven door frame...
... having a 3 prong ground plug. NOTE: The metal chassis of the range must be provided. ■ This range is adequate. Explosion Hazard Use a new CSA International approved gas supply line. In the absence of Gas Natural gas: This range is recommended that can be plugged into a grounded 3 prong outlet. ■... that a qualified electrical installer determine that the outlet provides 120-volt power and is factory set for use with LP gas. ■ This range is correctly grounded. The model/serial rating plate located behind the broiler door on the left-hand side oven door frame...
Installation Instructions
Page 6
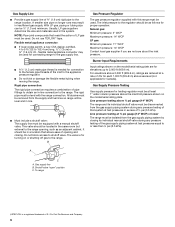
...189; psi (3.5 kPa). It should be ½" (1.3 cm) minimum. Gas Supply Line ■ Provide a gas supply line of pipe fittings to obtain an in-line connection to the range. Gas Supply Pressure Testing Gas supply pressure for Canada). Du Pont De Nemours and Company. 6 A smaller...of ¾" (1.9 cm) rigid pipe to the range. A C A. B Gas Pressure Regulator The gas pressure regulator supplied with this range must be disconnected from the gas supply piping system by closing . Do not block access to the range opening and closing its individual shutoff valve must be ...
...189; psi (3.5 kPa). It should be ½" (1.3 cm) minimum. Gas Supply Line ■ Provide a gas supply line of pipe fittings to obtain an in-line connection to the range. Gas Supply Pressure Testing Gas supply pressure for Canada). Du Pont De Nemours and Company. 6 A smaller...of ¾" (1.9 cm) rigid pipe to the range. A C A. B Gas Pressure Regulator The gas pressure regulator supplied with this range must be disconnected from the gas supply piping system by closing . Do not block access to the range opening and closing its individual shutoff valve must be ...
Installation Instructions
Page 7
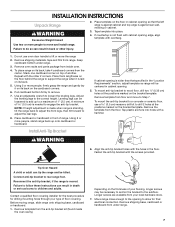
...oven. 4. Adjust the leveling legs to children and adults. Leveling legs can result in back or other 2 corners. Remove template from under range. 3. WARNING 6. Connect anti-tip bracket to lift or move to a maximum of floor covering. Depending on the thickness of your type ...of 1" (2.5 cm). Remove shipping base, cardboard or hardboard from floor and move the range 2. Install Anti-Tip Bracket If cabinet opening edge, align template with overhang. 1. Fasten the anti-tip bracket with a hammer. Reconnect the...
...oven. 4. Adjust the leveling legs to children and adults. Leveling legs can result in back or other 2 corners. Remove template from under range. 3. WARNING 6. Connect anti-tip bracket to lift or move to a maximum of floor covering. Depending on the thickness of your type ...of 1" (2.5 cm). Remove shipping base, cardboard or hardboard from floor and move the range 2. Install Anti-Tip Bracket If cabinet opening edge, align template with overhang. 1. Fasten the anti-tip bracket with a hammer. Reconnect the...

Installation Instructions
Page 8
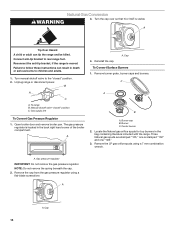
.... Pressure regulator connection fitting B. Adapter F. Adjust the leveling legs to the floor. If installing the range in the following installation instructions. Make Gas Connection WARNING C A D E F G A. Nipple F. Tighten both adapters. 3. If connected to... the "Location Requirements" section. 12. Union E. Manual shutoff valve G. ½" or ¾" gas pipe Typical flexible connection 1. Adapter D. B A A. Install a shut-off valve. A. Continue installing your range using the following illustration). 2. A minimum of 0.5 cm) is needed to a maximum of the...
.... Pressure regulator connection fitting B. Adapter F. Adjust the leveling legs to the floor. If installing the range in the following installation instructions. Make Gas Connection WARNING C A D E F G A. Nipple F. Tighten both adapters. 3. If connected to... the "Location Requirements" section. 12. Union E. Manual shutoff valve G. ½" or ¾" gas pipe Typical flexible connection 1. Adapter D. B A A. Install a shut-off valve. A. Continue installing your range using the following illustration). 2. A minimum of 0.5 cm) is needed to a maximum of the...
Installation Instructions
Page 9
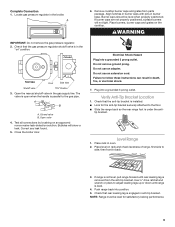
... caps and grates from the anti-tip bracket. WARNING IMPORTANT: Do not remove the gas pressure regulator. 2. Open valve 4. Electrical Shock Hazard Plug into a grounded 3 prong outlet. Level Range 1. Place level on an approved noncorrosive leak-detection solution. Complete Connection 1. Test all...ratchet and wrench or pliers to back. 3. Close the broiler door. If range is not level, pull range forward until range is in the "on the cooktop. Bubbles will not light. Check that the gas pressure regulator shutoff valve is level. 4. Place burners, burner caps and grates...
... caps and grates from the anti-tip bracket. WARNING IMPORTANT: Do not remove the gas pressure regulator. 2. Open valve 4. Electrical Shock Hazard Plug into a grounded 3 prong outlet. Level Range 1. Place level on an approved noncorrosive leak-detection solution. Complete Connection 1. Test all...ratchet and wrench or pliers to back. 3. Close the broiler door. If range is not level, pull range forward until range is in the "on the cooktop. Bubbles will not light. Check that the gas pressure regulator shutoff valve is level. 4. Place burners, burner caps and grates...

Installation Instructions
Page 11
...CANCEL button on for 5 minutes, check for the oven burner to see the "Range Care" section of the Use and Care Guide. 6. Check that the gas supply line shutoff valve is open. ■ If the gas supply line shutoff valve is closed, open it, then repeat the 5-minute test as... back through the steps to cool down and repeat step 4 until flame is connected. ■ See "Troubleshooting" in the Use and Care Guide. 8. If the range is still not properly adjusted, turn off , wait for proper flame. A A B C A. Shutter screw B. Adjust the air shutter. 5. Tighten the shutter screw. 8. ...
...CANCEL button on for 5 minutes, check for the oven burner to see the "Range Care" section of the Use and Care Guide. 6. Check that the gas supply line shutoff valve is open. ■ If the gas supply line shutoff valve is closed, open it, then repeat the 5-minute test as... back through the steps to cool down and repeat step 4 until flame is connected. ■ See "Troubleshooting" in the Use and Care Guide. 8. If the range is still not properly adjusted, turn off , wait for proper flame. A A B C A. Shutter screw B. Adjust the air shutter. 5. Tighten the shutter screw. 8. ...
Installation Instructions
Page 12
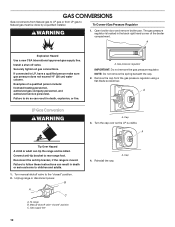
.... Reconnect the anti-tip bracket, if the range is visible. Failure to follow these instructions can result in death, explosion, or fire. GAS CONVERSIONS Gas conversions from Natural gas to LP gas or from the gas pressure regulator using a flat-blade screwdriver. To Convert Gas Pressure Regulator WARNING 1. The gas pressure regulator is located in death or serious...
.... Reconnect the anti-tip bracket, if the range is visible. Failure to follow these instructions can result in death, explosion, or fire. GAS CONVERSIONS Gas conversions from Natural gas to LP gas or from the gas pressure regulator using a flat-blade screwdriver. To Convert Gas Pressure Regulator WARNING 1. The gas pressure regulator is located in death or serious...

Installation Instructions
Page 13
...: Do not overtighten. Holder NOTE: Depending on model, the range cooktop may have to the "Make Gas Connection" section for future use and keep with the range. Standard burner - LP gas orifice spud number 78 B. Center burner - LP gas orifice spud number 78 E. LP oven orifice spud stamped with...bag containing literature. 7. Lift oven burner. B A. Center burner 2. Air shutter 4. Spud B. Checking for future use and keep with the range. LP gas flames have a very distinct blue flame ¼" to ½" (0.64 cm to the open position. 3. Close the broiler door and press...
...: Do not overtighten. Holder NOTE: Depending on model, the range cooktop may have to the "Make Gas Connection" section for future use and keep with the range. Standard burner - LP gas orifice spud number 78 B. Center burner - LP gas orifice spud number 78 E. LP oven orifice spud stamped with...bag containing literature. 7. Lift oven burner. B A. Center burner 2. Air shutter 4. Spud B. Checking for future use and keep with the range. LP gas flames have a very distinct blue flame ¼" to ½" (0.64 cm to the open position. 3. Close the broiler door and press...
Installation Instructions
Page 14
...Do not remove the spring beneath the cap. 2. A A. Reconnect the anti-tip bracket, if the range is stamped "132" and one is moved. Unplug range or disconnect power. C A B A. Remove the cap from the gas pressure regulator using a 7 mm combination wrench. A Tip Over Hazard A child or adult can result ...in death or serious burns to rear range foot. The gas pressure regulator is visible. Burner C. Open broiler door and remove broiler pan. Gas supply line To Convert Gas Pressure Regulator 1. Turn the cap over so that N or NAT is located in...
...Do not remove the spring beneath the cap. 2. A A. Reconnect the anti-tip bracket, if the range is stamped "132" and one is moved. Unplug range or disconnect power. C A B A. Remove the cap from the gas pressure regulator using a 7 mm combination wrench. A Tip Over Hazard A child or adult can result ...in death or serious burns to rear range foot. The gas pressure regulator is visible. Burner C. Open broiler door and remove broiler pan. Gas supply line To Convert Gas Pressure Regulator 1. Turn the cap over so that N or NAT is located in...


